
Sound designer Rob Papen may be best known to you as the man behind amazing sounds for the Access Virus or Alesis Andromeda. Now he's moved into producing software-based synths of his own. So how good is it?
The labelling on the box states 'Virtual Rob Papen Synthesizer', suggesting maybe a virtual Rob Papen that would make the tea, or perhaps do a spot of ironing. Many SOS readers, however, will recognise this name as belonging not to the latest thing in home help, but to the well-known Dutch sound designer. Blue is the latest soft-synth product from Rob's Netherlands-based company RPCX, and is designed in partnership with programmer Jon Ayres. They describe Blue as a 'cross-fusion virtual synth' delivering FM, Phase Distortion, Waveshaping and subtractive synthesis types.
Blue requires a VST 2.0 or AU host, and there's no stand-alone version. Installation is straightforward: you just type in your copy's serial number when you first run the plug-in. The review copy supplied was originally at Version 1.0, but the designers supplied an update to v1.1 before I completed my review, which fixed a few bugs and gave me access to some new Preset Bank categories. Apparently, further updates and user banks are planned, so it's worth keeping an eye on www.robpapen.com after you've registered.
Overview
Blue 's promised versatility becomes immediately apparent when auditioning the supplied Presets, which are arranged in Banks of 32 Presets, and include categories with intuitive names like 'Pads', 'Analogue and Digital basses', and 'Sequence Sounds', as well as some less readily comprehensible ones, like 'Diverse'. These feature not only plenty of luscious virtual-analogue and classic FM-synthesis stylings, but also a generous helping of sounds and textures that bring to mind Korg Wavestations, Prophet VS Vector synthesis, PPG wavetables, Casio PD synths and many more.
At the heart of Blue are six oscillators which can be routed to interact with one another using 32 possible configurations, or Algorithms — already we can see similarities to six-operator FM synthesis (see the box above). The oscillators can be selectively processed via two analogue-style stereo filters, 13 envelopes, 10 LFOs, a comprehensive mod matrix, two stereo effects processors, three assignable step sequencers and a 32-step 'note' sequencer. This is potentially a complex synth whose features need to be clearly presented to ensure ease of use, so Blue 's designers have opted for a simple, clean user interface. As you can see from the previous page, Blue occupies a single window, divided into two halves. The upper half, which is always visible, houses the controls for the six oscillators and the two filters. The lower half offers one of 12 different editing windows in a very much simpler, line-drawn graphic style.
Algorithms & Synthesis Types
 Algorithm routing is displayed in this easy-to-understand screen. The different synthesis types in Blue are governed by the way in which the six oscillators are connected to one another. When designing a sound from scratch, the first port of call is likely to be the Algorithm Edit window. Algorithms can be best understood by direct comparison with the well-established Yamaha DX7-style six-operator model, in which operators can either add their output directly to the signal, or be routed to modulate other operators, creating harmonically complex waveforms. Blue 's oscillators can be structured in exactly the same way to create classic FM sounds — although unlike on the DX7, where operators generated only sine waves, a Blue oscillator can generate all manner of waveforms.
To use something analogous to 'traditional' analogue subtractive synthesis, we should therefore choose an algorithm that has one or more oscillators whose signals are added directly to the output. The screengrab below shows two algorithms, and the upper one, algorithm 1, is ideal for this — all six oscillators pass directly to the output, enabling Blue to behave like a monster six-oscillator virtual-analogue synth. The lower algorithm, number 8, shows how two synthesis methods can be combined. The direct signal from oscillators A and B form the virtual-analogue sound element, whilst the output of oscillator F is modulated by C, D and E in series — the FM sound element. Choosing a specific Algorithm is just the starting point, however — there's a huge range of subsequent waveshaping, filtering and modulation possibilities, as we'll see in the rest of this review.
Oscillators & Filters
There are six oscillators, labelled A to F. Oscillators A and B have the greater number of controls, and are identical apart from A's lack of a Mode button. Oscillators C, D, E and F are all identical in layout — the difference between these and oscillators A and B is their lack of pulse-width modulation (PWM) and Symmetry controls. This suggests predetermined uses for certain oscillators, and indeed A and B are well suited to typical analogue/subtractive synthesis.
Each oscillator has an On/Off button and a waveform selector. Clicking on the waveform button presents drop-down menus revealing 15 analogue-type, 39 additive-type and 32 spectral waveform options. Each oscillators' phase can be inverted, and keyboard tracking can be enabled or disabled — the latter option is often employed to create certain FM and ring-modulated sounds.
The Ratio button selects an oscillator's base frequency — when you click here, a drop-down menu offers 64 choices. The default is 1.00, the equivalent of the 8' setting on an analogue oscillator. This can be further adjusted using the Semitone and Fine-tuning knobs, so you can obtain any precise pitch. The Shape and Feed knobs are the key to obtaining a virtually infinite number of variations on the preset waveforms via Waveshaping and Phase Distortion synthesis, the Shape button selecting which of these synthesis types an oscillator uses (more on this later). The Vel knob allows each oscillator an independent velocity response which supplements a sound's overall response to velocity. This means that even if a sound's overall volume is not velocity responsive, the individual oscillators can be made to be, which is an important consideration when modulating one oscillator with another in an FM context. Each oscillator's volume level is set, unsurprisingly, with the Volume knob. The Dest (destination) button selects where the output of an oscillator is routed, but its behaviour (or non-behaviour) will depend on the chosen algorithm. If the oscillator is output directly (as explained in the box on algorithms on the previous page) you have seven routing options — dry, filter A or B, both filters, built-in effects units A or B, or both effects. However, if an oscillator is being used as a modulator, the Dest button displays that oscillator's routing, and you cannot change it, as its output has already been determined by the algorithm. The final controls for Oscillators A and B are the PWM and Sym (symmetry) knobs. Symmetry is directly comparable with the pulse-width control of an analogue oscillator, except that it affects all selectable waveforms except Pink and White noise. The PWM (amount) knob becomes active once a mod source is defined, such as an LFO or envelope.
 The PD/WS section, where you can draw your own waveforms and then sculpt them further.The oscillator Mode button's function is also dependent on the chosen algorithm. If the oscillator is output directly, it simply toggles between Normal and Sync To A settings — hence the absence of a Mode button on oscillator A, as there's no point in the oscillator sync'ing to itself! However, when an oscillator is acting as a modulator, the Mode options become FM, Ring (modulation) and Sync To A. As if all this choice wasn't enough, right-clicking on any knob allows you to associate it with a MIDI controller; you just select 'latch to MIDI' and move the appropriate wheel or fader on your controller.
Two independent filters are available, each offering 13 types: 6dB-per-octave low-pass and high-pass affairs, 12dB- and 24dB-per-octave low-pass, band-pass, high-pass, and notch types, and Ring, Comb and Vox filters. These can be set to operate in series or parallel, and as described above, each oscillator can be routed to either or both of the filters. The controls usually associated with analogue synths are all here: Q, envelope amount, key velocity and key tracking, with additional niceties such as mod-wheel sensitivity, distortion (pre-filter saturation), filter output volume and pan position. Each filter can be routed to the built-in effects units A, B, A and B (more on these later), or simply output as dry.
Two of the filter controls depart from the expected norm when using the Ring, Comb or Vox types. The Q control appears to function as a gain control for the Vox filter, whilst Distortion (according to the manual) adjusts the vowel sound. The latter effect can be quite subtle, though, and I found that the interplay between filter cutoff position and Distortion was crucial towards fine-tuning vowels, as indeed was the choice of waveform being treated. The Ring and Comb filters both require the Q control to be set somewhere other than zero, and whilst a static filter cutoff frequency produces audible results with the Ring type, the Comb type is at its most demonstrative when the cutoff is being modulated by an envelope, LFO or other source. The Distortion control, incidentally, becomes inactive when using the Comb filter.
In short, there's a vast wealth of tone-generating possibilities available from just the oscillators and filters — but these can also be manipulated using the various parameter-editing windows...
Envelopes & Multi Envelopes
The Envelope window accesses nine different envelopes — a volume envelope for each of the six oscillators, two filter envelopes and a global volume envelope. All are of the AHDSR type, which should be familiar to many. Blue 's AHDSRs, however, add several natty enhancements.
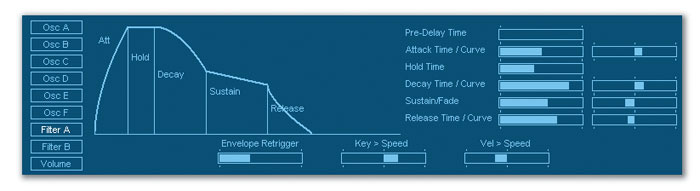
, and (above) one of the more flexible user-definable multi-stage envelopes.") An AHDSR envelope in Blue (top), and (above) one of the more flexible user-definable multi-stage envelopes.A Pre-delay time adds a tempo-sync'ed delay before the attack phase, ranging from 'off' to 1/32nd triplets (fast) to 16 measures of 4/4 (er... slow). Curiously, this appears to run just ahead of the beat. With a one bar pre-delay, the attack phase begins just before the following measure; the designers may want to investigate this. The envelopes' speed can respond positively or negatively to key position and velocity, the individual modulation amount for each envelope can be set, and when sync'ed to tempo, the envelopes can be retriggered to useful musical time values. Best of all, the curve of the attack, decay and release slopes is fully variable from extremely exponential to reverse exponential. In addition, the sustain level can either 'plateau' at the set level, or it can subsequently fade to zero or back to full level using the 'Fade Level' amount. This parameter's description (and its display) are slightly misleading — the value's percentage amount actually refers to the time it takes to fade up or down, not the level to which it fades!
An AHDSR envelope in Blue (top), and (above) one of the more flexible user-definable multi-stage envelopes.A Pre-delay time adds a tempo-sync'ed delay before the attack phase, ranging from 'off' to 1/32nd triplets (fast) to 16 measures of 4/4 (er... slow). Curiously, this appears to run just ahead of the beat. With a one bar pre-delay, the attack phase begins just before the following measure; the designers may want to investigate this. The envelopes' speed can respond positively or negatively to key position and velocity, the individual modulation amount for each envelope can be set, and when sync'ed to tempo, the envelopes can be retriggered to useful musical time values. Best of all, the curve of the attack, decay and release slopes is fully variable from extremely exponential to reverse exponential. In addition, the sustain level can either 'plateau' at the set level, or it can subsequently fade to zero or back to full level using the 'Fade Level' amount. This parameter's description (and its display) are slightly misleading — the value's percentage amount actually refers to the time it takes to fade up or down, not the level to which it fades!
Four Multi Envelopes, named Free A, B, C and D, are assignable to synth parameters using the mod matrix. They earn the 'Multi' title because of their customisable, multiple envelope points. Up to 16 points can be set, including the start and end. You just click on the envelope to add points, move them to where you like, and adjust the curves. Multi Envelopes can be sync'ed to tempo, and the time scale over which they run can be set to musical time values. Envelopes can either be one-shot or looped — you simply designate which are the start and end points. For example, in an eight-point envelope, if the start is at the third point and the end is at the seventh point, then you will have an 'attack' phase of two points. The envelope will then loop around points three to seven while a note is held, and if 'Release Stage On' is selected (assuming your sound has a volume release envelope) the envelope will play the final stage when the key is released. I have one request here — when Tempo Sync is on, it would be helpful if the envelope points could optionally snap to musical time divisions.
LFOs
Of the 10 LFOs, six have dedicated functions. Oscillators A and B each have their own LFO for PWM duties, there is one each for filters A and B, one for global vibrato and one for global tremolo. The remaining four (Free A, B, C and D) are for use in the mod matrix to assign as you wish. Each has six waveforms, with various controls to adjust Attack and Decay time, Key position, Speed, Symmetry and a parameter called Humanise (random Speed and Depth variations). There is also a smoothing parameter, intended to 'soften' the edges of the square and S&H waveforms, but this seems merely to reduce the mod depth.
The LFOs can be sync'ed to the host tempo, and have three modes: Poly (separate LFOs for every note) Mono (one LFO for all notes whose phase resets with each new note) and Free (one LFO for all notes with free-running phase). The LFO Attack/Decay time parameters only work when the mode is set to Poly, which I suspect is a bug.
PD/WS Section
This gives you access to a whole galaxy of waveforms, and is one of Blue's most interesting aspects. You can hand-draw waveforms in this set of six windows (one for each oscillator), and when the relevant oscillator's Shape parameter is changed, the harmonic content of the original waveform is dramatically altered, as you can see in the screenshot above. In its default mode (a diagonal line) no change will occur when the Shape knob is moved, but when you draw a wiggly line in this box, and move the Shape knob, new waveforms pour forth. Whenever you redraw the line (or change the Shape amount) the two smaller boxes on the right are updated to show what the resulting wave will be, according to whether the oscillator is in PD (Phase Distortion) or WS (Waveshaping) mode. The manual doesn't attempt to explain the differences between these, and it's not clear how closely related Blue 's version of PD is to the method used by Casio in their 1980s CZ-series synths. Nevertheless, the two modes can produce very different results, although just how different depends on the original waveform and what you draw in the window. When you vary the Shape amount in WS mode, it sounds much like adding or subtracting harmonics on an additive synth. Doing the same in PD mode is closer to the effect of oscillator sync: a more convoluted, dramatic sound. If you modulate the Shape amount using an envelope, LFO, MIDI controller or any other of Blue 's mod sources, things get pretty lively. And all of this comes from just one oscillator — don't forget you've got five more to play with!
Saving Presets & Banks
Saving an edited Preset in Blue can be confusing. A Preset is a fundamental part of the Bank it comes from, so if you have edited a Preset and wish to overwrite the original version, you must either re-save (overwrite) the entire Bank, or save it as a new Bank. If you select a new Bank before saving the current one, your edited Preset will be lost! If you edit a Preset, and then decide that you want to return to the original, this is possible using the Compare function. But if you edit a Preset and then select a new Preset, your previously edited Preset cannot be returned to its original state, nor can it be reloaded on an individual basis — you must reload the entire Bank. The simplest way to avoid this confusion is to save your edited patch as a separate FXP file (Banks are saved as FXB files) and then reload it into any other convenient Preset location. This way, you get to keep the original, but of course if you want your new, reloaded Preset to become a permanent part of the Bank you've loaded it into, you still have to save the Bank again!
Step Sequencers & Mod Matrix
The three Step Sequencers are, like the Multi Envelopes, intended as modulation sources to be accessed via the mod matrix. Up to 16 steps can be specified, the levels of which are set by drawing in the window with the mouse (see the screenshot below). The transition between steps can either be abrupt, or be made to ramp smoothly from step to step with the Smooth parameter. The main differences between the Step Sequencers and the Multi Envelopes are that the time divisions between steps are fixed (Multi Envelope points are freely moveable), the Sequencers are always sync'ed to host tempo (if Tempo Sync is selected in Blue 's Global page), and looping is permanently active. If you want to use a Step Sequencer to modulate oscillator pitch, the value readout just below the edit window is very helpful, as it displays the bars' levels as percentages and semitones, thus enabling simple repeating melodies to be set up.
The step sequencer is an excellent tool for creating sounds reminiscent of the Korg Wavestation's wavesequences or PPG wavetables — by drawing waveforms in the PD/WS window, and modulating the oscillators' Shape amount using the Step Sequencer, very similar effects can be achieved. If you want to go that extra mile, why not set up all three Step Sequencers, running on different timescales? One could modulate an oscillator's Shape amount, the second could modulate filter cutoff frequency, whilst the third could modulate the oscillator frequency ratio of an FM pair, or even the pulse width of a 'virtual analogue' oscillator. Devilishly complex rhythmic textures can be made this way! Although Step sequences cannot be saved individually to the hard drive, you can copy and paste between Presets.
Up to 20 routings can be made in the Mod Matrix window, presented as two pages of 10 routings per page. Routings must be entered from the top downwards — if you make an assignment in slot 2 with no assignment in slot 1, nothing will happen! Similarly, if you leave an unassigned slot between assigned slots, the ones below the unassigned slot will not function. 35 modulation sources are available: four Multi Envelopes, four Free LFOs, three Step Sequencers, the Sequencer 'Free' line (see above right), as well as 23 pre-determined MIDI control sources. These can be routed to 91 destinations, so things can get very busy indeed! Once you've set up the source and destinations, you can choose a negative or positive modulation amount. This value is displayed as a percentage or in semitones, depending on the destination.
Sequencer & Effects
This sequencer is modelled after the monophonic sequencers often associated with modular analogue synths. Sequences of up to 32 steps can be generated, either sync'ed to the host tempo or freely running. The parameters are presented on two pages, each containing three 'control lines' (note pitch, volume, slide on/off, filter A amount, filter B amount) and a 'Free' line which can be used as a control source in the modulation matrix. Creating a sequence is quite straightforward — you simply click in the Step box on the top line to activate a step (whereupon it turns white) or click again to deactivate it (it turns blue). These blue spaces in a sequence are treated as rests — unlike on some analogue sequencers, you cannot 'tie' notes across the gap. If you're thinking you can compensate for this by setting a long release time to cover the gap, think again — I tried, and the CPU meter shot through the roof!
 One of the Step Sequencer's displays.Once you have a sequence that you like, you can save it by right-clicking in the sequencer window and archiving it to your hard drive. Previously stored sequences can, of course, be reloaded into any Preset.
Every good synth has onboard effects, and Blue has two such modules, A and B (see above right), which may be routed in series or in parallel. When set to series, effects unit A feeds into B. Since each oscillator is independently routable to either or both effects processors (depending on the algorithm used) this allows for a reasonable amount of flexibility, despite the simplicity of the effects layout. Each built-in processor offers the same effects: mono delay, stereo delay, chorus, flanger, phaser, distortion, lo-fi, a stereo widener, reverb and a comb filter. They all sound great (well, apart from the lo-fi effect!) and have an unusually wide range of fine-tuning parameters. The distortion notably delivers an extremely wide range of colours, spitting venom by the bucket-load. Fans of Roland's Dimension D will love the stereo widener, and the Comb effect is very interesting, offering two modulatable frequency bands, each with individual feedback amount. I was about to lament that effects parameters cannot be set as destinations within the modulation matrix when I discovered that they can all be controlled via MIDI. Try this with the Comb effect by setting up controller curves in your host sequencer to sweep the frequency bands — you get truly bizarre results!
Easy Edit & Global Windows
As its name suggests, the Easy Edit window allows for quick, one-fader editing of 18 useful parameters. Each fader applies a global offset to all occurrences of a particular parameter — so Global Filter Freq, for example, adjusts the cutoff frequency of both filters up or down in parallel. Similarly, Global FM offsets the total FM amount across all six oscillators, which is ideal for when you have to fix something quickly.
 There are a few more effects on offer than in a standard soft synth, including reverbs and comb filters.The Global page sets up the general behaviour of a Preset as a whole. Here we can set tuning, voice assignment, portamento and bend range, for example. Amongst the parameters provided here, Oscillator Precision is worthy of special mention. This allows you to set an amount of 'tuning drift' for each oscillator, to emulate the behaviour of an analogue oscillator drifting over time. At 100 percent, the tuning is 'digitally perfect', whilst 0 percent gives the greatest amount of drift. Maximum and minimum drift speed controls govern the range of random drift speed variation — you can set both to low for the subtlest effect, or set both to high to simulate a very unwell synth!
A Filter Smoothing fader reduces the zipper noise that would otherwise occur when moving the Cutoff frequency, and if you're plagued by aliasing noises at high frequencies, an optional anti-aliasing filter can be engaged. Further tonal control is supplied by a two-band, sweepable EQ which, like all of Blue 's variable parameters, can also be controlled via MIDI. And speaking of MIDI-controllable parameters, there is a very neat extra feature hidden in the corner of this page, enigmatically named 'Esc'. This allows you to save and load any Preset's MIDI control assignments, which can be invaluable if you need to make the same assignments time after time when creating Presets.
In Use & Conclusions
As you'd expect from a synth bearing the Rob Papen name, the Preset sounds are of the highest order. There are seemingly endless ways in which to animate sounds using the modulation matrix to control the oscillators, envelopes, LFOs, and the step sequencer, as well as some very tasteful effects, all of which makes Blue a great tool for creating interesting textures. If you were to use it only for pad sounds, there would be plenty here to inspire you for a long time to come.
All of this good stuff makes Blue 's high CPU usage all the more frustrating. Playing four-note chords with particularly complex sounds sometimes took up more than half the available CPU headroom on my 2.4GHz Pentium 4 PC, which is not what I'd think of as underpowered. Running multiple instances of Blue on this system, especially with other plug-in instruments present, is not really an option unless you stick to simple sounds and restrict yourself to monophonic parts. However, that's not to say that you couldn't run one instance at a time, and 'freeze' the results to audio as you go. This isn't exactly convenient, but it is at least a viable proposition. To be fair to the designers, they point out that all unused elements (such as redundant oscillators and filters) should be switched off to conserve CPU power, and they even suggest using separate, low-CPU plug-in effects instead of Blue 's own.
That aside, for people who really enjoy sound designing, Blue should provide an excellent voyage of discovery. Editing is surprisingly uncomplicated thanks to the clutter-free interface, and FM sounds in particular are very easy to program in Blue — even easier than in NI's FM7, in my opinion. And for those people who simply want to load up some inspiring, ready-to-go sounds with an alternative edge, it also delivers the goods, standing apart from the usual rash of 'me-too' virtual synths.
Pros
- Combines four kinds of synthesis in one package.
- Clear, uncluttered graphical interface.
- Amazing amount of modulation possibilities.
- Excellent presets that you'll actually want to use!
Cons
- Very CPU-intensive.
- Algorithms are not user-configurable.
- The process of saving Presets could be made simpler.
Summary
Blue is an excellent-sounding, highly individual software synth that is full of surprises, and a joy to use. Despite its heavy CPU overhead, it should prove to be an inspirational tool for intrepid sound designers as well as casual users who simply want a large library of inspirational sounds to fuel their musical endeavours.
information
£132.95 including VAT.
Time + Space +44 (0)1837 55200.
+44 (0)1837 840080.