Steinberg's DAW software has received perhaps its biggest shake-up to date, with a redesigned mixer and some clever chord functions.
It's been 10 years since Steinberg introduced Cubase SX to the world, and since then the program has changed a great deal. SX2 presented the Time Warp tool and saw the return of much classic Cubase functionality, while SX3 extended warping to audio and introduced the Arranger Track, Device Panels and in-place editing. Cubase 4 dropped the 'SX', adding VST 3 support and Media Bay, Cubase 5 gave us VariAudio and Expression Maps, and Cubase 6 took this even further with Note Expression. So what better way for Steinberg to celebrate a decade of the modern Cubase era than to release a major new version?
This time, the two most significant new features seem to go deeper into the program than any of the aforementioned developments. Firstly, there's a redesigned mixer called, appropriately enough, MixConsole, which represents a radical departure from the virtual mixers both in previous versions of Cubase and, in some ways, other applications. Secondly, a new Chord Track enables musicians to explore harmonic progressions in different ways. And, as ever, there's a host of smaller improvements including workflow-enhancing tools, new plug-ins, and much, much more.
The Seven Ages Of Cubase
Installing Cubase 7 is relatively easy, and, as with previous major releases, it's possible to install Cubase 7 without disrupting an earlier 6.5 installation. One slight change is that the installer now downloads the latest Cubase build from the Web during installation, so you'll need to make sure your computer has an Internet connection (or, alternatively, you can download this core Cubase installer from another computer and run it after the main installer has finished). This is basically a good move, since it means you'll always install the latest version, although it could be frustrating if you ever want to install the program in a situation where you don't have access to an Internet connection.
The first new thing you'll see upon launching Cubase 7 is the Steinberg Hub, a full-screen view incorporating the old Project Assistant with a new 'news and tutorials' section that pulls content from Steinberg's servers. This is all very helpful, except that I wonder why Steinberg felt that the Hub needs to be full-screen. Since it paints a grey gradient over every display attached to your system, opening the Hub (which happens every time you create a new Project) on a multi-display system can become quite a jarring experience. Thankfully, though, the Steinberg Hub can be disabled in General Preferences so that Cubase reverts to the older Project Assistant window.
 For those who work with large track counts, Cubase 7's handy track search function might be worth the price of the upgrade alone. As you type into the search field, the list of tracks displayed is filtered to show only those containing the search string.Once you create or open a Project, you'll notice that Cubase is, at least by default, a little darker and a little greyer, and you'll have to remember that you're not actually wearing blue-tinted glasses. I'm not sure why anyone would want to work in this out-of-the-box colour scheme (especially in the Key Editor, which has become ridiculously dark and obscure), and although you can fiddle around with the colour scheme in the Appearance Preferences, I still couldn't quite get back to the chromatic choices I liked in Cubase 6.5.
The transport icons that have graced the program since version 2 have been replaced by Nuendo's more conventionally styled alternatives, and the Track Control buttons now have a firmer outline with white highlights, making them stand out a little. This is helpful when you have a large number of tracks in a project, as is the new ability to search the Track List. Simply click the magnifying glass icon at the top of the Track List, and a pop-up is displayed that shows all the tracks in your project. As you type into the text field at the top of the pop-up, the list is filtered for tracks containing the search string. You can then jump to your required track either by clicking or using the cursor keys and pressing Return. Brilliant! (The icing on the cake here would be if there was a key command to open this pop-up.)
Another feature that's handy when working in large projects is described in Cubase 7's marketing literature as "MemZap”. This rather ugsome name actually encompasses two new zoom key commands, Zoom MEM and Zoom ZAP. If you're editing in a particular part of the project that you'll keep coming back to, say an audio event that's been chopped up with some intricate editing, you can use the Zoom MEM command to store the state of the Event Display, including track heights, zoom factors and the position. Then, if you're editing in another part of the project, perhaps with different track heights and zoom factors, you can then toggle between the stored and current states by using the Zoom ZAP command. This is actually quite a neat feature, and it can really speed up the editing process once you become accustomed to using it.
Fixing The Mix
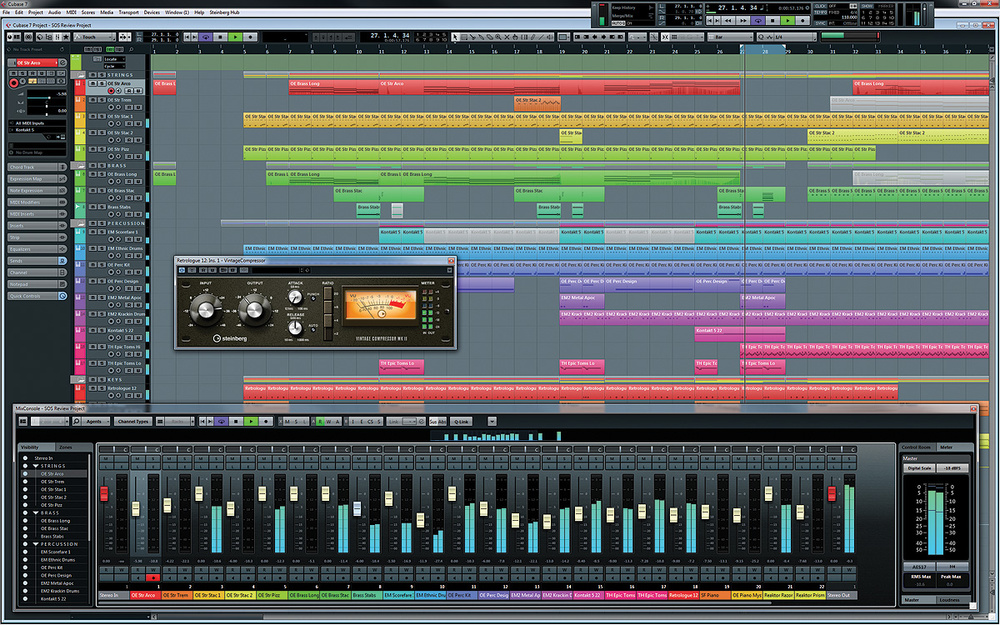
 in full-screen mode on a 30-inch display, playing back one of the Cubase 7 demo songs.") The new MixConsole window in all its glory (or should that be gory?) in full-screen mode on a 30-inch display, playing back one of the Cubase 7 demo songs.
The new MixConsole window in all its glory (or should that be gory?) in full-screen mode on a 30-inch display, playing back one of the Cubase 7 demo songs.
MixConsole replaces the old Mix window with a highly configurable interface that comprises a number of different sections, each of which can be hidden or shown alongside the core fader section, depending on the mixing controls you want to have visible. The fader section itself has been redesigned, and the mute, solo, listen and edit controls are now above the fader, while the automation and record and monitor controls are below. I think this is an improvement, since it makes the fader section look less cluttered. You can now customise the fader-cap colours (based on the channel type) in Preferences, and there are horizontal zoom in and out commands so you can adjust the width of channels with more granularity than the two options available in the old Mixer window.
Disappointingly, though, it still isn't possible to rearrange the order of channels: as before, this has to be done by moving tracks on the Project window. You can click and drag a channel's label, but this turns out to be a way to copy that channel's volume and pan settings to another channel. There's no longer a dedicated button on instrument channels to open that channel's VST Instrument editor, and you now have to Alt/Option-click (or click and hold) the channel's Edit button to do so. This took me a while to figure out, and now that this paradigm has been established, it would be quite useful if the Inspector and Track List's Edit Channel Settings buttons on the Project window used it as well.
Perhaps the most useful section after the faders is the new Channel Racks section, which replaces the Extended view of the old Mixer. The Channel Racks section, as its name suggests, comprises a number of different 'racks', each handling a different category of mixing controls. So there's a rack for inserts, a rack for EQ, a rack for sends, and so on. Most significantly, you can display multiple racks at the same time, which is a really big deal for Cubase users like myself who have been begging Steinberg for a way to see inserts and sends simultaneously since the very first version of Cubase SX!
Each rack consists of a header that you can click to expand or shrink the controls offered by that rack. A filled, light-blue circle indicates whether a rack's controls are active on a given channel, and can be clicked to bypass that rack. One thing you'll notice as you move the mouse around the racks (and, indeed, most aspects of the mixer) is that the control or set of controls over which the mouse is hovering becomes highlighted with an outline. This might seem a little distracting at first, but is actually incredibly useful, given the density of controls.
The insert and send slots have been completely redesigned, and this new look has also been incorporated in the relevant Inspector sections in the Project and the Channel Settings windows (see 'Changing The Channel' box). By default, not all the available slots for every channel will be visible, since Cubase (much like Logic) can now dynamically adjust the number of visible slots as needed. However, if you'd rather see all the slots all the time, a 'fixed' mode is also available.
Clicking on a slot brings up a pop-up just like the one that appears for searching tracks on the Project window, and your plug-in catalogue (for inserts) and routing destinations (for sends) are each represented in one hierarchical tree. This is a welcome enhancement over the previous menu-and-submenu approach, and a search field is also provided, so you can find and select a plug-in just like you would now find and select a track on the Project window, which is kind of neat.
 to the old Extended EQ view in Cubase 6, it's hard to believe that you're in the presence of an improvement.") If you compare the new EQ Rack in the MixConsole window (right) to the old Extended EQ view in Cubase 6, it's hard to believe that you're in the presence of an improvement.What's perhaps not so neat, however, is the display of these slots. For starters, the background behind the slot isn't highlighted for the selected channel (as it is for some other racks), but that's maybe a small thing. Considering the inserts first, the name of the plug-in appears in faint white text over a not-that-dark-blue gradient. This sounds like an aesthetic criticism, but this design choice really doesn't make it easy to see the name of the plug-in assigned to a given insert, especially when there's a profusion of inserts spread over a large display. The situation is even worse for sends, since the destination of a send is written over a background that also indicates the level of the send. And although sends can be set to pre-fade (by right-clicking and selecting Move to Pre-Fader), this is indicated visually by nothing more than a small grey triangle in the bottom left of the slot. It would be far easier to see what was going on if the level of a pre-fader send was simply a different colour.
If you compare the new EQ Rack in the MixConsole window (right) to the old Extended EQ view in Cubase 6, it's hard to believe that you're in the presence of an improvement.What's perhaps not so neat, however, is the display of these slots. For starters, the background behind the slot isn't highlighted for the selected channel (as it is for some other racks), but that's maybe a small thing. Considering the inserts first, the name of the plug-in appears in faint white text over a not-that-dark-blue gradient. This sounds like an aesthetic criticism, but this design choice really doesn't make it easy to see the name of the plug-in assigned to a given insert, especially when there's a profusion of inserts spread over a large display. The situation is even worse for sends, since the destination of a send is written over a background that also indicates the level of the send. And although sends can be set to pre-fade (by right-clicking and selecting Move to Pre-Fader), this is indicated visually by nothing more than a small grey triangle in the bottom left of the slot. It would be far easier to see what was going on if the level of a pre-fader send was simply a different colour.
In the Preferences window, there's a MixConsole Rack Colors Appearance page, but the only place where this change seems to influence the rack colour is in the pop-up where you decide which racks are visible. I assumed this would also change the background colour for the slots in the corresponding rack, but, sadly, it doesn't. In fact, the only way to make the slot display clearer is to adjust the vertical zoom factor for the channel racks, which is something of a compromise: you can either see more slots with less legibility, or you can have greater legibility with fewer slots visible.
One visual cue that is good, however, is that when you click and hold an insert slot, the available destinations to which the insert can be dragged become highlighted in green. As you drag the insert around, the slots light up to show where the insert will end up when you release the mouse. It's a simple thing, but it makes it far easier to see what's going on when attempting this manoeuvre, compared to Cubase 6. Sadly, this visual cue isn't employed in the Inspector Insert section on the Project window, which seems a little inconsistent, since you will see it when moving inserts in the Channel Settings window.
Total Eclipse Of The Strip
 The Picture Browser allows you to assign images to tracks and channels. Messiaen would doubtless have been grateful that Steinberg included un oiseau.
The Channel Racks section also features a channel strip providing dynamics and EQ, as you might expect to find on a high-end hardware mixing console. However, Steinberg have taken the idea of a channel strip to the extreme by including six different processor types: a noise gate, a choice of three compressor modes, the built-in EQ, an envelope shaper, the option of tube or tape saturation and three different limiters. A particularly useful touch is that, as with inserts, it's possible to drag the different processes around to change either the order of the processing (on a per-channel basis), or move a process to a different channel. And, again, the suitable destinations are highlighted in green, making it simple to see both where a process can be dragged, and to where it is actually being dragged.
While I've never been a fan of software mixers having built-in channel strips, since most people are likely to have their favourite dynamics and EQ plug-ins already, I can understand the advantage in having controls for these processors within easy reach, without having to open another window, and the sound of the available processors is pretty decent. However, I can't help feeling that the interface, once again, diminishes what Steinberg were trying to achieve. There's just something odd about the appearance of the knobs, and while it's handy that the background of the Channel Strip Rack highlights to show the selected channel, you can really easily end up with a weirdly grey display cluttered with some colourful knobs. And if you really want to be amused, reduce the horizontal zoom factor to watch the Channel Strips' knobs undergo something resembling an eclipse.
Although the built-in EQ's position in the overall processing chain can be adjusted in the channel strip rack, its controls are accessed via a dedicated EQ rack, which brings another dubious user interface to the party. While it's quite nice to click on the EQ graph and get a pop-up editor to adjust the curve, the four sets of gain, frequency and Q controls in the Rack itself are just ghastly! For one thing, if the controls are too small you can't actually see the value of a control or even what it controls, unless you hover the mouse over it. Maybe Steinberg's developers could just have moved the controls to the pop-up graph window or something, since while their absence is felt there, it would be welcomed on the actual rack.
Some of the functionality of the EQ rack is duplicated by a dedicated EQ Curve section in the MixConsole window itself, which provides the same visual EQ curve representation from the EQ rack. Again, this curve can be edited by simply clicking on it and adjusting the points in the pop-up.
Returning to the Channel Racks, the channel gain and polarity controls have been moved to a Pre rack, which also contains handy high- and low-cut filters, and a Routing rack is where you'll now find the input and output settings for each Channel. If you use Cubase's Control Room feature, Studio sends are now known as Cue sends, and can be accessed from the MixConsole using their own Cue Sends rack. Quick Controls and Device Panels also get their own dedicated racks, and I think this is a really nice idea. While you'll have to be careful about how you design your Device Panels, having Quick Controls for tracks/channels visible across the whole mixer is very helpful indeed.
 Cubase finally offers the ability to decide which controls are linked when grouping channels on the new mixer.To complement the Channel Racks section, there are also a number of other sections that can be displayed in the MixConsole window. There's a Meter Bridge, which offers large VU meters, and is accompanied by the handy Channel Overview section. The Channel Overview is to the MixConsole window what the Overview Line is to the Project window, displaying a level meter for all the Channels in a Project and allowing you to scroll the mixer view left and right. Actually, it would be kind of neat if Steinberg also incorporated this into the Project window (much as you can see in the screenshots of Steinberg's Nuendo Live), allowing you to scroll horizontally using the Overview Line and vertically using the Channel Overview.
The MixConsole window also includes a Notepad section, which mirrors the Notepad available in the Project window's Inspector; and, illustrating another new feature in Cubase 7, there's a Picture section. As with Logic, it's now possible to assign a picture to a channel/track, and these can be viewed in either the MixConsole's Pictures section, or on the track in the Project window if it has sufficient height. To add an image, double-click the picture area on the appropriate channel or track and a browser will appear. Steinberg supply a small selection of factory images with Cubase, which, as you can probably guess, are all grey. However, I did like the tubular bells icon, which imitates the shape used on the cover of Mike Oldfield's album.
Should Steinberg's achromatic factory images not be to your liking, it's possible to import your own user images, with most common image formats supported. And what's quite neat is that there's even a preview mode in the browser window where you can make adjustments to the image in terms of its size, orientation and position, to ensure that it looks just right.
Adjusting The Vertical
Now we've discussed the vertical sections of the new MixConsole window, it's time to consider the horizontal. The Channel Selector section appears on the left side of the window and offers controls for Visibility and Zones. One nice thing about these lists is that they're organised hierarchically with respect to the folder organisation on the Project window; collapsing and expanding folders from this list collapses or expands them on the Project window, though it has no effect on the actual channels in the mixer, which could be annoying.
The Visibility list lets you hide and show individual channels by toggling a circular control next to each track in the Visibility list; since the folder entries get these same controls, you can easily hide and show whole folders of channels with just one click. I couldn't help thinking it would be nice to have the option of this happening automatically when folders are collapsed from the Visibility list (or, if one were to rub the genie's lamp a little more furiously, have the folder represented on the mixer as a VCA fader).
The Zones list adds an interesting feature to the mixer. In this view, each channel (though not folders, in this case) has two circular controls to the left of its name. Whereas the previous mixer window was basically divided into three parts — for inputs, channels and outputs — the new MixConsole offers the flexibility of customisable static zones that appear on either side of the mixer. Toggling the left circle sets your chosen channel to dock in the left zone, and toggling the right circle... well, you get the idea. This means that you can still have the inputs to the left and the outputs to the right, with the other channels scrolling in between; but it also means that you could dock all your group channels to the right of the mixer, or keep a dialogue channel always visible on the left side of the mixer, for example.
Control Room/Meter is the final MixConsole section, and is displayed to the right of the channel strips. It incorporates the Control Room Mixer window, with new metering and loudness analysis for the master output. The Master Meter itself is a large, multi-channel peak meter that indicates the level of the Project's master output bus and, impressively, supports a wide variety of broadcast standards for scale and alignment. A loudness meter is also provided on a secondary tab, and it complies with the European Broadcasting Union's (EBU) R128 loudness recommendation. Discussion of this recommendation is slightly beyond the scope of this article, though extensive documentation is available on the EBU's web site (http://tech.ebu.ch/loudness) for those who are interested.
Not every user is going to appreciate this level of detail for peak and loudness metering, and, in many ways, I'm surprised that Steinberg didn't save this functionality exclusively for Nuendo users. But since metering plug-ins often tend to be quite expensive, having these tools integrated into Cubase is definitely a plus.
Mixing Tools
 Creating events on the new Chord track is easy, thanks to the Chord Editor.
The MixConsole window also features a toolbar, which is where you'll find some of the more advanced functionality. This toolbar offers a duplicate set of transport controls (along with the option to display many of the same sections as the Project window's toolbar), and the main reason for this is that it's possible to use MixConsole in a dedicated, full-screen mode. When you right-click in MixConsole a pop-up menu appears, and addition to offering the familiar Always on Top option that keeps the window visible even when it isn't the active window, you can also choose Full Screen so that MixConsole takes over the whole display. A particularly nice touch is that if you have a multi-display setup, you can choose on which display the MixConsole should appear. This is handy, and I could imagine some people wanting to add an extra display to their system for this reason alone.
If you don't want to work full-screen, you still have the option of opening three independent mixer windows. However, Steinberg have added a nice touch in Cubase 7 and made it possible to link multiple MixConsole windows, which means that you can have one window displaying channels 1-24, for example, and another displaying channels 25-48. While this isn't inherently new, what is new is that when you scroll a linked MixConsole, all linked MixConsoles update, so it's like scrolling one large mixer split into multiple views.
Linking channels has been significantly improved, with a Control Link window where you can specify what controls are linked across the channels in a group. It's possible to change which controls are linked in a given group at any time by selecting that group from a pop-up menu on the Control Link toolbar section and clicking the edit button, although I kind of wished Steinberg had opted to show a group list in the Channel Selection section, much like Pro Tools does. For one thing, there's no easy way to suspend a single group (only a button to suspend all groups), so you either have to unlink that particular group of channels or deselect all the controls for that group in the Control Link window. There's also no way to name the groups, so you have to remember that group '3' is drums, for example. On the plus side, however, there is a neat Quick Link mode that, when enabled, links all parameters across all selected channels.
In terms of functionality, MixConsole is a dramatic improvement over the previous Cubase Mixer window, and Steinberg have addressed many long-term annoyances with some clever solutions. The only thing that really lets MixConsole down is its appearance; and while I admit that this is perhaps an issue of personal taste, I just couldn't escape the fact that, put simply, it's ugly — and ugly in way that actually makes the mixer harder to use, since you often have to look twice or more closely to see what's going on. Some of the controls, like the channel strip-controls and the mute and solo buttons, lend a toy-like appearance to what is actually a very sophisticated mixer, and it's all too easy to end up with a window that's essentially a sea of the blue-ish/grey colour Steinberg seem to like so much. (Maybe the ability for an entire channel strip to inherit a track's colour would help with this?)
Striking A Chord
 The Chord Editor includes an Assistant tab that will attempt to suggest possibilities for the next chord in your progression. The colour-coded list represents the different complexity levels of the suggestions.
One of the great things about Cubase is that Steinberg don't just concentrate on production-oriented features. Features like Expression Maps and Note Expression in recent versions were great additions for musicians who use the program as a compositional tool, and, in Cubase 7, Steinberg continue this tradition with extensive new functionality for working with chords. Cubase 7 isn't the first time Steinberg have offered a Chord track, of course. Some long-time users (from the pre-SX era) may remember a module called Style Tracks, which added a Chord track to Cubase for the purpose of creating backing tracks in a given style. The Chord track in Cubase 7, however, has nothing to do with auto-accompaniment and a great deal to do with harmonic structure and exploration.
At the simplest level, the new Chord track allows you to enter Chord events that map out a harmonic progression. Use the Draw tool to create a Chord event and then double-click it with the Select tool to open the Chord Editor, which allows you to choose from a comprehensive dictionary of chords, along with the option of changing the lowest note over which the chord is spelt. If you want to have C-minor with the added 11th played over an E-natural, that's not a problem. And if you'd rather define the chord by performing it, you can enable a MIDI Input mode so that incoming notes will be recognised as the intended chord. The only thing you can't do is add your own chords, and, even though Steinberg's list is extensive, it might have been nice to be able to do this.
The Chord track itself will play back the chosen chords along with the rest of the Project, and it can trigger any MIDI or Instrument track where the Input Monitor is active (which is the default option), or you can assign the output to a specific MIDI or Instrument track. There's also a Mute button if you'd rather not hear the Chord track, and this works independently of an audition mode that plays Chord events as they are selected or edited.
As well as specifying the type of chord that a given Chord event represents, it's also possible to specify a voicing, such as whether the chord is in root position, first inversion, and so on. By default, the Chord track has an Automatic Voicings mode enabled, and you can choose between three options to affect how chords are voiced: Piano, Basic and Guitar. If you disable Automatic Voicings, you can pick a specific voicing for a selected Chord event in the Event Infoline.
In addition to being able to define a chord from a generic catalogue, the Chord Editor offers a Chord Assistant page, which is where things start to become quite interesting. The Chord Assistant offers a list of chords that Cubase determines might be appropriate based on the previous chord, using one of two modes of suggestion: Cadence and Common Notes. Cadence mode, which is the default, tries to pick something harmonically useful, where Common Notes simply suggests the next chord based on the number of notes it has in common with the previous chord.
Once you've selected a mode for the suggestions, you can filter the list of possible chords by clicking various options in the Complexity Filter pop-up menu. However, this list is rather technical, and a handy Complexity slider is also provided that tweaks the settings of the filter between the least complex (one) and the most (seven).
In addition to simply suggesting the next chord, the Chord Assistant is also capable of suggesting progressions for Chord Events between a start and an end chord, using what's called Gap mode. For example, say you have six chords, where the first chord is C-minor and the last chord is F-major. When you select the four chords in between, the Chord Assistant now shows four chords for each suggestion, and clicking a suggestion will apply that progression to the four selected chords.
This mode could be rather neat, although I did run into a number of issues. Firstly, it didn't seem to be possible to select more than four chords at a time; if I had more than four Chord events selected when I double-clicked (or pressed Enter) to open the Chord Editor, all events other than the first four would become deselected. On more than one occasion, when I double-clicked a selection of Chord events, a progress bar appeared, informing me that it was going to take two and half hours to figure out the chord progression! And sometimes, with a four-chord progression, the first chord suggested would be a duplicate of the preceding Chord event on the track.
In fairness to Steinberg, it did feel as though I might be doing something wrong. But with the manual offering just 71 words of instruction on the use of this mode, there was no advice to guide me in the right direction, if, indeed, there is one.
Another slight criticism concerns the way Chord events are shown on the Chord track. Depending on the horizontal zoom factor of the Event Display and the height of the Chord track, Chord events can start to overlap and become impossible to read. To alleviate this problem, a Remove Display Conflicts button can be enabled, which positions overlapping Chord events between two rows to make them easier to read; but the problem with this mode is that it can become harder to read the progression of the chords. So while the single-row display of Chord events isn't perfect, perhaps if there was an option where the user could manually set the font size used to label a Chord event, this might help legibility in a wider range of workspace configurations.
Chordal Influence
Defining a harmonic progression in the Chord track is only the beginning of what's possible with the new chord functionality in Cubase 7. Starting with a simple example, Instrument and MIDI tracks offer the ability to transform incoming MIDI notes so that they are concordant with the Chord events specified. If, for example, you define a very simple chord progression, such as C-F-Dm-Am, setting Live Transform to Chords in a MIDI or Instrument track's Chord Track Inspector section means that if I play simple C-major root-position chords as the Project plays back, Cubase will automatically transpose these chords so the appropriate root-position chord plays under each Chord Event. And if I were to press record, Cubase would record the transformed version, rather than a stream of C-major chords.
Live Transform also has a second option — Scales — that transforms incoming MIDI notes based on Scale events. In the above example, if I set Live Transform to Scales, because the Scale event that can describe all four chords is C-major, if I were to play the same stream of C-major chords, each chord would remain as C-major. If I were to play D-major chords instead, however, Cubase would change the F-sharp to a G.
As well as transforming live MIDI data, it's also possible transform existing parts using the Follow Chord Track options, also found in the Chord Track Inspector. You'll need a brief flirt with the operation manual in order to truly understand the Follow Chord Track option, but once it's enabled, Cubase will endeavour to keep MIDI on that track in sync with the Chord track. If you change a Chord event, Cubase will automatically update any 'following' MIDI notes to reflect the newly chosen chord.
If Follow Chord Track is set to Voicings, you can further specify how Cubase spells the chords. There's an option to use the Chord Event's own custom voicing (if you've disabled Automatic Voicings on the Chord track), or there is a range of style and theory-based ways to have Cubase adjust chord spelling for you. This is quite handy and eliminates the monotony that might otherwise result from a stream of root-position chords.
The Key Editor also gains a number of editing features that relate to the Chord track, accessed via a new Chord Editing Inspector section, and some these are really quite inventive. For starters, you can select a group of notes and click Add to Chord Track; Cubase will figure out what the chord is and add it as a Chord event at the location of the notes, replacing any existing Chord event if necessary. However, you can't use this command to add multiple Chord events — if you try this, Cubase will detect the most incomprehensible jazz chord known to man and insert it at the position of the first selected note. If you want to create Chord events for an entire sequence in one pass, you can use the Make Chords command instead.
As well as using the Key Editor to create Chord events, you can also perform the reverse operation and re-spell an existing group of notes based on the current Chord event, thanks to the Match with Chord Track command.
Steinberg have also included some commands for chord manipulation that don't require the Chord track at all. When you select multiple notes in the Key Editor, the Chord Type field in the Chord Editing section will recognise the chord and display what it is. The Key Editor actually used to have this feature as a toolbar section, but it disappeared when the toolbars were redesigned a few versions ago, so it's nice to see it back. Once Cubase has determined what chord is represented by the selected note, you can adjust the chord by clicking one of the chord type buttons.
For example, if you've selected a C-major chord, you can click the 'min' chord type button to change it to a C-minor chord. But what's really neat is that because the recognition is based purely on selected pitches, this feature can work over time as well. So if you had an Alberti bass pattern in C-major and you wanted to change this to C-minor, you can do this in exactly the same way you would for a C-major chord. However, because Cubase evaluates a chord based on selected pitches, you can't select all the notes in a piece of music and turn it minor with one click, since all the notes would be evaluated as a single elephantine chord.
The chord type buttons can also be used to add chords into your MIDI Parts. By clicking on the chord type's Insert button, you activate draw mode, such that when you click in the Key Editor's Event Display, a root-position chord will be added. Before you release the mouse button, you have the option to drag vertically to adjust the pitch of the root note, or horizontally to extend the length of the notes in the chord. Once the chord has been added, you can use the inversion or drop notes buttons to adjust the voicing.
Support for Chord events has also been added to the Chorder MIDI insert and Halion Sonic SE plug-ins, making it possible to drag a Chord event from the Chord track onto the required slot in Chorder, or onto one of Halion Sonic's trigger pads.
Overall, though, the Chord track and related functionality are welcome and brilliant additions to Cubase, which musicians of all levels will find useful and intriguing in equal measure. Initially, I thought this would be the kind of feature set better suited for people just getting to grips with music theory, perhaps as a teaching aid; and while it certainly can be used in this way, I also quite enjoyed fiddling around with it as a more serious writing tool, especially when Lady Inspiration was on a tea break. If I were to be a little critical, I might say that some of the functionality isn't immediately intuitive, and the manual is surprisingly sparse, with few examples offered on how to make the most of this new functionality.
Lucky For Some?
While it's always the case that not every new feature of any update is going to appeal to every single user, this situation seems truer than ever with Cubase 7. I'm sure there are going to be many users who never go near the Chord track functionality, for example, and perhaps even more who will never need loudness metering. But, overall, Steinberg have packed an incredible amount of new functionality into the program in an attempt to please as many people as possible in Cubase's diverse user base, and I think this it ultimately a good thing. Whether it's big features, like the new mixer, or smaller improvements such as the search facilities for tracks, channels and plug-ins, there really is something for every Cubase user in this release.
Cubase 7 may also be the cause of a little envy from users of other music creation software, since while Cubase 6 already had what is unquestionably the best piano-roll-style editor for composers, Cubase 7 reaffirms Steinberg's commitment to music-creation features in a way that few competitors seem willing or able to match.
There are still many loose ends that need to be tied up for Cubase 7 to reach its full potential, especially certain MixConsole design choices; but Steinberg have actually been quite good at issuing both x.5 and small maintenance releases over the last few versions, and I would both hope and assume that this will also be the case with Cubase 7. So, ultimately, I don't think there's a good reason for existing Cubase users not to want to upgrade — but there are maybe a few reasons why users of other software might cast a curious eye over Steinberg's latest work.
Changing The Channel
As well as introducing a new mixer in Cubase 7, Steinberg have also given a facelift to the Channel Settings window. Despite using similar visual cues to the MixConsole window, which I can't say appeal to me, the layout of the Channel Settings has been considerably improved by incorporating many of the different panels of the previous design into tabbed pages. For example, whereas to adjust the routing of inserts in the previous Channel Settings window you'd have to right-click and make sure Insert Routing was checked in the Customize menu, you now can simply tab between Plug-ins and Routing in the Inserts section. This might not sound like a big deal, but it dramatically reduces the clutter and complexity. You can still hide and show different parts of the interface, but this has been simplified to just three sections in the Window Layout Setup: Channel Inserts, Faders and Sends.
The new Channel Strip controls share the main section with controls for the built-in EQ, and the EQ display now features dual spectrum analysers to illustrate the frequency of the signal before and after the EQ processing. This is particularly neat, since it's active whether the EQ is in use or not, and bypassing the EQ conveniently freezes the last plot.
As with the MixConsole window, the new Channel Settings window also has a toolbar that provides access to additional functionality. It's now easier than ever to switch to different channels in the window, thanks to the incorporated search feature, as well as to jump to either the input or output of a given channel.
Plug It In, Plug It Out
There are a number of welcome plug-in related improvements in Cubase 7, starting with the fact that you can now easily switch between and compare two states of plug-in parameters, thanks to the new A/B button on a VST plug-in's toolbar. This is quite handy, even though many plug-ins already offer a similar feature internally (such as Waves' offerings). If you use an external controller to manipulate plug-in parameters, the new Remote Control editor should bring a smile to your face.
A number of Cubase's own plug-ins have been spruced up a little for Cubase 7, including Vintage Compressor, which now sports an 1176-inspired user interface. Cubase's MixConvert downmixing plug-in also has a new user interface and offers more controls for making sure a downmix sounds exactly as you want it to. There's a brand new online collaboration plug-in called VST Connect SE, which is kind of Digital Musician meets Source Connect, allowing you to connect with other users of Cubase 7 (or a special stand-alone version) and conduct a virtual session. And, last but not least, Cubase 7 includes a copy of Voxengo's CurveEQ plug-in. It's strange that Steinberg would, apparently arbitrarily, include a third-party plug-in that's been available for nine years, but if you don't have it already, it's a saving of $89.95 on buying a copy separately.
Scale Events
As well as showing Chord events, Cubase 7's Chord track also has a small area along the bottom for Scale events, and as you add Chord events, Cubase will automatically determine to which scale the chords belong. So if you add a progression such as C-F-G-C, for example, Cubase will add a C-major Scale event to the Chord track under the first Chord event; and if the progression changed to C-F-D-C, an additional G-major Scale event would be added under the D chord. You can disable this automatic scale detection by disabling the Chord Track's Automatic Scales feature, making it possible to specify your own scales from the Scale Assistant pop-up. This offers a choice of 29 different scale types, including modes, blues scales, and more. But, for the most part, I'm guessing most people won't really need to worry about Scale events, since their usage seems somewhat secondary to that of Chord events, and they can easily be hidden by toggling the Show Scales button if you don't want to see them.
What About The Score Editor?
Given how much effort Steinberg have put into adding chord-related functionality into almost every aspect of Cubase, it's slightly surprising that more of this functionality didn't make its way into the Score Editor. I would have thought having options for editing and manipulating chord types in the Score Editor would be just as useful as it is in the Key Editor, particularly for those using Cubase in the classroom as a teaching aid. I also encountered what I assume is a small bug, because if I opened the Score Editor by using the key command and a Chord event was also selected, that Chord event would be displayed in the Score Editor's Event Infoline if nothing else was selected in the Score Editor itself, which seemed a little weird.
Still, on the plus side, Steinberg have at least added a new Paper Background toolbar section to the Score Editor in Cubase 7, making it possible to change the background texture that's visible in Page Mode, so it's not all bad.
Varying The Audio (Again)
As mentioned at the beginning of this article, VariAudio was first introduced four years ago in Cubase 5, allowing notes to be detected in monophonic audio and then manipulated using Key Editor-like functionality. Cubase 7 features what Steinberg are calling VariAudio 2.0, which, although still designed for monophonic audio processing, now has a much improved way of working with harmony voices.
In Cubase 6, creating harmonies with VariAudio was a bit of a pain. You'd have to duplicate the track, create a new version of the required audio event, and have multiple Sample Editors open simultaneously, one for each voice. Cubase 7 introduces a new Generate Harmony Voices command, so you can now select the audio event in the Project window, use this command, and specify the number of harmony voices you want to add. Cubase will create an additional audio track for each voice containing a new version of the audio event, and then open a single Sample Editor where all harmony voices are shown simultaneously, colour-coded so you can easily discern them — a big improvement.
As you might be able to guess, the cherry that sits on top of this particular feature is that it can also be used in conjunction with the Chord track, which is why you'll notice that audio tracks also feature a Chord Track Inspector section.
Mind Your ASIO
In order to ensure the most reliable audio performance possible, Cubase 7 introduces a new mode called ASIO-Guard, which can be enabled or disabled in the VST Audio System page in Device Setup. ASIO-Guard is, at root, a way of using free system resources to pre-process audio and instrument tracks ahead of time (where possible), to ensure smoother playback, making the audio engine more resilient to general hardware and operating system issues. According to Steinberg's online Knowledge Base, this means that hyperthreading can now be used to get the most out of your system, and ASIO-Guard is apparently of particular benefit to those running Cubase on Mac OS X.
ASIO-Guard is enabled or disabled globally, but a new column in the Plug-in Information window makes it possible to explicitly tell Cubase not to use ASIO-Guard in conjunction with certain plug-ins, if you find it causes problems. Because ASIO-Guard adds latency to tracks on which it is used (this value is reported in the VST Audio System page), Cubase disables it for tracks where Record or Input Monitoring are enabled. This means that you don't experience any added latency while recording, but it also means that ASIO-Guard will have less impact if your project has a large number of 'live' audio or instrument tracks. (Toggling Input Monitoring on a track during playback results in brief, faded interruption.)
While ASIO-Guard is clearly a good idea, and may help some users to achieve more reliable performance from their systems, I'm not sure how effective it will be in the majority of real-world situations. For one thing, there are so many limitations on the situations in which it can be used. Steinberg state that ASIO-Guard cannot be used for "real-time dependent signals”, VST Instruments with more than one MIDI input, VST Instruments using disk streaming, VST Instruments using specific controllers (such as Native Instruments' Maschine), VST editors and plug-ins used to control external devices, and plug-ins running via VST Bridge (and presumably other, similar, third-party alternatives).
This is obviously quite a long list, and I didn't really notice much difference on my system whether ASIO-Guard was enabled or not, to be honest — but then I have to confess that I'm lucky enough to have a reasonably powerful Windows-based system on my desk. However, at the very least, ASIO-Guard will give you another option to exhaust when troubleshooting drop-outs or other poor performance.
His & Hermode
For the past few hundred years, most Western musical instruments have been based on a tuning system known as equal temperament. By dividing an octave into 12 equal parts, this system was originally designed to make it possible for instruments — and particularly keyboard instruments such as organs — to be able to play harmoniously in any key and, thus, with any other instrument. However, equal temperament has always been a compromise. For example, the E in a C-major chord is not tuned so that it will be heard as a perfect major third; instead, it's tuned in a way that makes it possible to function as the root note in an E-minor chord, or the fifth in an A-minor chord, and so on.
Other tuning systems do exist, but it's rarely practical to use them. For one thing, you usually have to constantly retune your instrument based on the key in which you're playing. However, a few years ago, an alternate tuning system called Hermode Tuning (HMT) was devised by German father-and-son team Werner and Herwig Mohrlok as a modern solution for digital instruments.
HMT attempts to reduce the tonal imperfections found in equal temperament, but without breaking compatibility with instruments tuned to the equal-temperament system. This is possible in part because HMT keeps the required microtonal pitch adjustments as close to zero as possible, but, more importantly, because it's a dynamic system that can retune notes based on the context of all the notes that are being played. So if you're playing a C-major chord and you keep the E and G held while moving the C down to a B, the held notes will be retuned based on the new E-minor tonality.
Hermode Tuning has been implemented in a number of modern instruments, such Access Music's Virus TI, and in music creation software like Logic Pro for a number of years, and it is now also included with Cubase 7. The Project setup window includes a new section where you can activate HMT by setting the type and depth that should be used. There are four different types of Hermode Tuning available, to let you optimise the retuning for different musical styles, and a depth percentage is provided, so you can adjust the amount of influence HMT has when retuning notes.
Rather than having one global setting that activates HMT for all instrument and MIDI tracks, Cubase lets you specify on which tracks it's used via two new options in the MIDI Modifiers Inspector section: HMT Follow and Use for Analysis. Turning on Follow will mean that notes on that track are retuned via HMT, and this will also activate the second option, Use for Analysis, which tells Cubase to feed notes from that track into the HMT algorithm to affect the overall retuning. As the Cubase 7 manual explains, sometimes it's useful to separate these two functions, since while you might want the notes from a piano track to inform the tonality, having HMT retune those same piano notes can sometimes sound a little weird, as, unlike string players, pianists tend not to adjust intonation as they perform.
In order to get the most out of Hermode Tuning, you really need to be using VST 3.5 plug-ins, which is to say VST3 plug-ins that support Note Expression. Due to the dynamic nature of HMT, only instruments with Note Expression support are able to dynamically retune notes without having to re-trigger anything. Otherwise, if you're using VST2 plug-ins, you can only detune a note as it's being triggered, and only then if a VST2 Instrument correctly supports the detune information sent as part of a VST MIDI Event. For more detailed information about HMT, including audio examples, visit www.hermode.de.
Artistic Differences
In addition to releasing Cubase 7, Steinberg have also updated the program's junior sibling, Cubase Artist, with most — but not all — of the new features described in this review. Cubase Artist features the new MixConsole window, but without the Control Room or loudness metering features. Although the Chord track is included, the Chord Assistant feature has been removed. Voxengo's Curve EQ and VST Connect SE are not included, and since Cubase Artist doesn't support surround, there's no need for the new downmixing features. A full list of differences is available from Steinberg's web site.
Pros
- MixConsole adds an array of powerful new mixing functions.
- The Chord track is deeply integrated into many aspects of the program.
- Numerous improvements to enhance one's general Cubase workflow.
Cons
- Not all users will appreciate the aesthetic choices reflected in the new mixer's design.
- Some of the new features would benefit from further and clearer explanation in the manual.
Summary
Despite a few questionable design decisions, Steinberg have once again released a powerful update to their flagship music creation software, adding new functionality for composers and producers alike, while addressing many long-standing issues.
information
Test Spec
- HP Z800 workstation with dual Intel Xeon X5690 processors, 48GB memory and Nvidia Quadro 6000 graphics, running Windows 7 SP1. (Note: with the release of Cubase 7, Steinberg have officially "quality tested” their software for use on HP's Z-series workstations.)


