Want to write music for picture? To deal with tight deadlines, multiple rewrites and ever-changing picture edits, you’ll need to be on top of the technical requirements of the job.
The job of the film and TV composer has changed radically in the last 15 years or so. Advances in technology have sped up the writing and production processes and opened up new creative possibilities. We can all be thankful that the days of complex methods of synchronisation are behind us: full synchronisation of audio to picture can now easily be achieved with just a few clicks in your DAW software. The range and quality of sample libraries has, along with the computers needed to use them, also improved dramatically in recent years, while faster Internet speeds have led to a much more fluid exchange of material between the different post-production departments involved in a project. Where once the composer had to wait for a DVD or tape to be delivered, it’s now standard practice to send and receive movie files online via a file-transfer service; this allows files to be shared in a matter of minutes.
While the onward march of technology is obviously a boon to the film and TV composer, it has also fostered an environment in which there’s significant pressure to produce highly polished demos in a short space of time. (Often, such ‘demos’, in fact, need to be of a quality that could pass as finished cues from the early stages of a project!) Tight deadlines, rewrites of the music and changes to the visual edit during the composition process are more rule than exception. On film projects with a tight budget, there’s usually a lot of material to get through in a limited amount of studio time, and even where significant budgets are available, time pressures are ever-present. When recording with session musicians, strict time limits are often imposed and every second of a session counts. The list of potential for problems seems endless — so it’s as critical now as it ever was, that composers have a very firm grasp of the technical aspects of their job.
I’ve worked both as a sole composer and in collaboration with others on various film and TV projects, and have thus developed a good sense of the different ways we composers tackle the many common issues we face. I’ve also been able to glean plenty of useful tips — including some techniques that fall into the “I wish I’d known that all along!” category. In this article I’m going to share these tips and techniques for the benefit of those starting out in the industry. As I’m a Logic user, some of my descriptions may refer specifically to that software, but the techniques described should be relevant to your DAW of choice.
Receiving The Cut
The movie file of the ‘cut’ (a term referring to different edits of the picture, culminating in the final or ‘locked’ cut) is usually delivered to the composer by the editor or assistant editor, or by the post-production facility where the edit is taking place, typically in either MOV (Quicktime) or MP4 format. Television projects are usually received as a single file per episode, while feature film projects might be broken down into individual ‘reels’ (a term with its origins in physical reels of optical film, but applied to digital files too). For rare cases where the cut is delivered as a DVD movie, you’ll need software (such as HandBrake: http://handbrake.fr) to convert this into a file you can use in your DAW.
The composer needs to specify only a few requirements. I always ask for split-track stereo sound, which I’ll discuss later. , in which the timecode appears on the picture.") On professional projects, movies should come with burned-in timecode (BITC), in which the timecode appears on the picture.BITC (Burned In Time Code) is the visual timecode reference that appears as a counter in the movie file sent to the composer. It should always be included on professional productions, so you rarely need to request it. It’s a definite requirement for the music to remain in sync with the images, so if the movie file you receive doesn’t include it, ask for it! Movie resolution is a double-edged sword: too low, and crucial image details will be lost; too high and it could place an unwelcome strain on your computer. Large files aren’t accepted by all online file-transfer services, and they can also be slow to send and receive. A workable middle ground is about 1GB per hour of movie.
On professional projects, movies should come with burned-in timecode (BITC), in which the timecode appears on the picture.BITC (Burned In Time Code) is the visual timecode reference that appears as a counter in the movie file sent to the composer. It should always be included on professional productions, so you rarely need to request it. It’s a definite requirement for the music to remain in sync with the images, so if the movie file you receive doesn’t include it, ask for it! Movie resolution is a double-edged sword: too low, and crucial image details will be lost; too high and it could place an unwelcome strain on your computer. Large files aren’t accepted by all online file-transfer services, and they can also be slow to send and receive. A workable middle ground is about 1GB per hour of movie.
Doing The Splits
The ability to monitor your music against the rough sound from the picture is hugely important. This is particularly the case in respect to dialogue scenes, when great care is required in shaping the dynamics of the music. A key difficulty for the composer in this context is the widespread use of ‘temp music’: existing tracks taken from a variety of sources, often including existing film soundtracks. The director and/or editor will line these tracks up with the film during the editing process, for a number of reasons: it provides the editor with music to shape the edit to before the composer has had a chance to create the score; it allows the director to screen the project to producers and financers in a more complete-sounding state during the edit process; and it gives the composer a guide as to the musical style and structure that the director has envisioned.
 While some feature films have now been scored on a single laptop, many composers use multiple machines. Vienna Ensemble Pro is a popular way of tapping into the power of the second machine from the one running the main DAW session.The pros and cons of temp music have been hotly debated for years. It can be a severe headache when a director becomes too attached to a piece of temp music — but that’s a creative issue, and I want instead to focus on the technical implications. It is impractical for the composer to compose music to picture if the cut is delivered with temp music mixed in with the rest of the sound. You need to be able to hear the temp music, but you need also to be able to monitor your music against the rest of the sound — without the temp music.
The standard method for the composer to separate the sound and temp-music is to receive the cut as a ‘split-track’ stereo mix. The sound elements, such as dialogue, are hard-panned to one side, and the temp music to the other, providing the composer with individual mono channels of each.
There are several ways to separate these two mono channels, and two key points need to be borne in mind. First is the ability to move quickly between working on different sections of the film, and second is the ability to easily adjust the relative balance of your music, the sound and the temp music.
Some composers approach this by creating an individual movie clip of the scene they’re working on, extracting the split-track mix as a separate audio file into their DAW and lining it up with the visuals. However, I prefer to work without extracting the audio as I find this gives me greater flexibility to move around the length of the movie within the DAW and makes the whole process more efficient. You could write all the cues for a project within one DAW session — but then any slight tempo change would have a massive knock-on effect for everything after that point, which could create a spiralling nightmare of sync problems!
 My solution is to route my DAW and my computer’s system sound (which includes the sound and temp music from the movie file) to different output pairs on my audio interface, then use a small mixer to adjust the level of each element in the monitors. This solution provides many advantages. Any DAW session can be instantly lined up to the movie file in just a few clicks, allowing different musical ideas to be tried against the picture with ease. Another advantage is that the mixer provides fingertip control over the three crucial elements: the music being composed, sound and temp music. I find that the ability to balance the monitoring of these elements and switch between them easily is almost essential to get a sense of the music in context.
Starting With Samples
The days when directors and producers were happy not to hear the music until the day of the recording sessions are long gone — the requirement to deliver convincing demos throughout the composing process is unavoidable. Thus, even for projects where live orchestral sessions are possible, composers need to be able to mock up those projects using samples. While some old-school composers might lament this new landscape, a flick through the pages of Torn Music (Silman-James Press, ISBN 978-1935247050) reveals enough horror stories of composers being fired at the early stages of recording sessions to show that sharing demos in advance has its advantages!
Sample instruments aren’t just used as synthetic recreations of live instruments, however. There is now a huge range of samples available that can be used to create much more unusual textures. All sorts of tuned and untuned, melodic and percussive sounds are available, from bowed glass to farm machinery, plucked pianos to E-bowed guitars, buzzing bees and rattling coins to home-made instruments. All of these can greatly enhance the palette of sounds available to the composer, especially when combined and processed in creative ways to make new and unusual textures.
You will definitely need conventional orchestral sample libraries, though, and well-programmed orchestral samples can sound extremely realistic, if you know how to get the best from them. The first thing to say is that, with orchestral music, better-quality samples really do lead to better results. For those serious about producing high-quality sample-based orchestral tracks, it’s well worth investing in some of the excellent libraries produced by companies such as Spitfire Audio and EastWest.
 The second most important tip I’ll pass on can be encapsulated in a single word: dynamics! It’s worth listening to as many real orchestral recordings as possible to get a better sense of the dynamics of the sound that you’re aiming to emulate. You can’t just play the notes in on a MIDI keyboard and expect it to sound that good! It was a revelation to me when I started using the mod wheel to play in the dynamics for orchestral parts — the difference in the musicality of the instrumental sounds was sudden and marked. Not all sample libraries can be programmed in this way, but most of the better-quality ones can. Those that link the mod-wheel function to dynamics, such as Hollywood Strings or the Spitfire ranges, will give more musical results, but if you are using a sample library where this isn’t possible, a cheat is to insert a Gain plug-in on the channel strip of the sample instrument and link the writing of automation for this to the mod wheel. The mod wheel can then be used to play in the gain automation of the sample instrument. This will lead to similar, though not quite as realistic, results as the dynamics automation, and it’s certainly better than having no dynamics!
Articulations
Modern orchestral sample libraries also provide an extensive range of articulations for each instrument, and making the most of these can bring new life to your tracks. With an instrument such as a solo trumpet, if you play whole melodic lines with just a single legato trumpet sample it’s likely to sound artificial. Working in a range of different legato and staccato articulations will make the phrasing much more realistic. Keyswitching is a feature that can be a big help. Many of the EastWest and Spitfire Audio orchestral samples have this feature, whereby the keys below the bottom range of the instrument are used to select different articulations. This makes it simple to play in parts with different articulations without needing to load up different samples in different channel strips. Some composers have elaborate systems configured in Logic’s Environment to switch between different sample articulations, but for most users going to these lengths is unnecessary.
 A typical folder and subfolder structure for a film or TV scoring project.Another tip is to think like an orchestrator — the music will sound much more like a real ensemble of players if different instruments don’t pop up for a few bars just to disappear for the rest of the track. So think, when setting up your DAW session, about what ensemble of instruments you wish to work with and stick to your choice. It can also be worthwhile grouping instruments into sections in the project/arrange page so that all the strings are together, as are all the brass, winds, percussion and so on. This way it is easier to move parts around between instruments and know where everything is. Doubling is important; for example, a string line might sound good doubled in the flutes, and if the DAW session is well organised it will be easy to copy and paste one instrument’s part to another. (If you wish to improve your knowledge of orchestration, I highly recommend the book The Manual Of Practical Instrumentation by composer Charles-Marie Widor, which I first discovered when reading an interview with legendary film composer Jerry Goldsmith’s orchestrator Arthur Morton.)
Right Click
I’m sure some composers achieve great results ‘working free’, but I strongly recommend working to a click track. With rewrites, changes to the edit, recording live musicians against sample-based parts and so on, working without the tempo grid can create big synchronisation problems that are difficult to work around later. Working to a click also makes notating parts for instrumentalists much more straightforward, as accurate MIDI information can be used to create notated parts within the DAW or in dedicated software such as Sibelius or Finale.
Composing to a click track needn’t make the music metronomic and rigid. In fact, if you experiment with programming tempo and time-signature changes in your music, you’ll find that you can have complete control over how the music fits to picture — much more so than with music recorded on the fly without a click. The flow of music can be made to feel extremely fluid and organic.
Subtle tempo changes can also be used to ‘massage’ the music to hit particular points in the movie with frame accuracy. For example, if the music needs to begin exactly on the moment a door slams in the picture then the tempo and time-signature changes might need to be programmed such that this moment is exactly aligned with the downbeat of a new bar in your DAW session. If the overall position of the music cue relative to the picture needs to move by a few frames to synchronise musically in such cases, this can be accomplished by adjusting the SMPTE start timecode value in the tempo list.
 and selecting Move to Original Recording Position, which will move the cues to the correct timecode location.") An example of an Assembly session in Logic Pro, taken from a 60-minute television drama with 27 music cues. The audio region at the top is the extracted sound from the movie file. If preferred, all the music cues could be imported to one track in Logic, but by importing them to separate tracks the relative levels of the cues can be easily adjusted with the track faders. Lining the cues up to the correct position is simply done by dragging them into Logic, Ctrl-clicking on the region (or multiple regions if importing several cues at once) and selecting Move to Original Recording Position, which will move the cues to the correct timecode location.If you intend live musicians to record on the cue, it’s important to consider how they will interpret the click track: while slight tempo fluctuations can create the feel of natural phrasing in the music, a sudden shift in tempo can be confusing to a performer and cause an uneven performance. This is especially the case with ensembles, rather than a single musician.
An example of an Assembly session in Logic Pro, taken from a 60-minute television drama with 27 music cues. The audio region at the top is the extracted sound from the movie file. If preferred, all the music cues could be imported to one track in Logic, but by importing them to separate tracks the relative levels of the cues can be easily adjusted with the track faders. Lining the cues up to the correct position is simply done by dragging them into Logic, Ctrl-clicking on the region (or multiple regions if importing several cues at once) and selecting Move to Original Recording Position, which will move the cues to the correct timecode location.If you intend live musicians to record on the cue, it’s important to consider how they will interpret the click track: while slight tempo fluctuations can create the feel of natural phrasing in the music, a sudden shift in tempo can be confusing to a performer and cause an uneven performance. This is especially the case with ensembles, rather than a single musician.
Delivering Demos
Often, a lot of the communication about a project takes place by phone or email, and it’s frequently necessary to send demos of the score in progress to the filmmakers. While the project’s still being edited, it can be sufficient to send the music alone as WAV or MP3 files. The editor (or assistant editor) will line the music up to picture (using the timecode information that you printed on these files) for the director or producers to view. Often, though, you’ll need to send a movie-clip demo, with your music lined up to picture. Creating clips like this also gives peace of mind: others will hear your music lined up exactly as you intended it, at a suitable volume relative to the dialogue and other sound. When creating clips of individual cues, rather than the whole movie, include a good run in of the scene before the music comes in and a suitable lead out, to allow the music to be heard in context. It can be useful to insert markers in your DAW at these points, particularly if you anticipate sending future demos of the same section.
In Logic, it is straightforward to export a movie file with the soundtrack exactly as it sounds. The process for this is very similar to creating a standard audio bounce. The start and end locators are used to define the region to be exported, but instead of using the Bounce function, the File / Movie / Export Audio to Movie function lets you save a fresh copy of the movie with the demo music. (It’s important here to untick the box electing to maintain the existing sound attached to the movie file, as that will include the temp music too. Assuming you want to include the dialogue and other sound from the movie file, import the left and right channels of the original soundtrack as separate files, mute the one containing the temp music and adjust the level of the other to suit.)
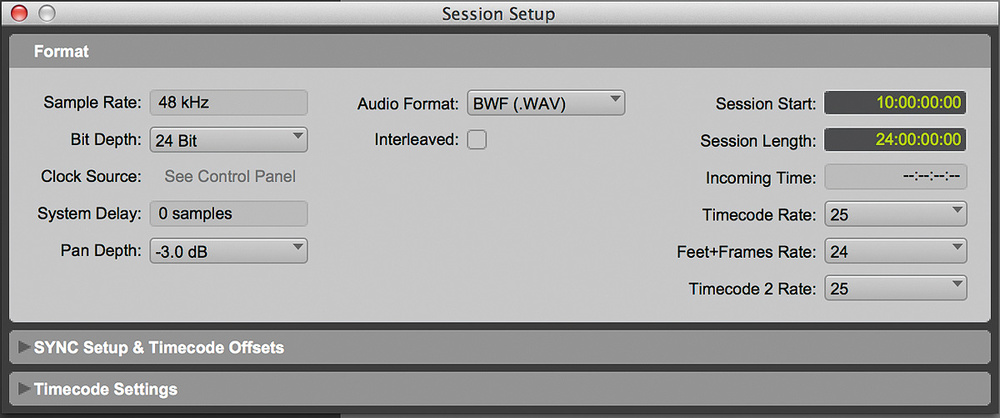
 It’s important to make sure that your DAW’s internal timecode is in sync with the movie file’s BITC. To do this in Logic Pro go to the Movie Settings box in the Position/Movie field, or in Cubase the Project Settings dialogue box, and in Pro Tools the Session Setup window. Most DAWs offer a similar facility, so if in doubt consult the manual.If your DAW doesn’t allow you to work in this way with movie files, you can use Apple’s Quicktime Pro (I’m sure there are other utilities for this, but I find this one particularly easy to use) to create demo clips with the music lined up to picture. First, bounce the audio from the DAW, making a careful note of the exact timecodes of the first and last frame of the bounce. With the music and sound bounced as a single WAV file, open the movie file in Quicktime Pro. Using the In and Out selection markers, select the part of the movie with the exact same start and end timecode values as the bounced audio file (you can use the arrow keys for single-frame accuracy). Copy and paste this selection into a new Quicktime file. You now need to remove the existing soundtrack (containing the temp music) from this movie clip so that it can be replaced with the new soundtrack bounced from the DAW. Go to the Properties window, select Sound Track and press Delete. All that remains is to attach the new soundtrack: open the audio file in Quicktime Pro, select all and copy the selection. Return to the movie clip you created, make sure that the play head is at the very start and select Edit/Add To Movie. Job done. If you used the correct timecode, the dialogue and sound should remain exactly in sync with the picture. Save this file with a different name from the full movie file.
 From Logic and Quicktime Pro the movie file will be saved in the MOV format. It can be worthwhile compressing this to an MP4 file to make sending online quicker (particularly if sending lots of clips). This is easily achieved using free software such as MPEG Streamclip.
It’s A Wrap
As I hope I’ve been able to get across in this article, although working as a composer for film and TV inevitably involves a certain amount of stress and pressure at times, it can also be huge fun and genuinely satisfying to be involved in such a creative and collaborative environment. The technical side of the job might appear daunting to the uninitiated, but if you heed the advice I’ve offered in these pages — invest enough time in understanding the tools at your disposal, in fine-tuning your studio to allow you to work both quickly and unimpeded by technical gremlins, and in learning to tease out and build on the musical ideas and expectations of your clients — you’ll find yourself in the happy position of being able to let your talent and creativity do most of the talking for you.
Jon Opstad’s credits as composer include Channel 4 dramas Black Mirror and Cyberbully, documentary feature film A World Not Ours and, as co-composer, series 16 of BBC crime drama Silent Witness. He has also worked extensively as an additional music composer, programmer and orchestrator for several other established composers, including Martin Phipps, Max Richter, Jocelyn Pook, Sheridan Tongue, Ruth Barrett and others, on projects including feature film X+Y, TV series Critical, Remember Me, Hunted, Whitechapel, Wallander, Wonders of the Universe and more.
Frame & Sample Rates
One of the most basic aspects of working to picture is to set your DAW to the correct frame rate. In Europe, cinematic films usually run at 24fps (frames per second) and TV projects 25fps. I say ‘usually’ because I once worked on a collaboration between the BBC and American company HBO, and my timecode values kept slipping a couple of seconds out of sync between Logic and the movie file’s burned-in timecode. I realised that it was because the movie files for the project were at the less common rate of 23.976fps. If you find that your timecode values slip out of sync, an incorrect frame-rate setting in your DAW is the most likely culprit. (The frame-rate option in Logic is located in File / Project Settings / Synchronisation)
Film and TV post-production sound and music departments run at a sample rate of 48kHz as standard, so it is worth making this your default for all DAW sessions to avoid any confusion or mishaps. I do this by having a Logic template file set to 48kHz.
Tip: Use Templates
Time is a precious resource for the film composer, so it pays to create DAW project templates that make a basic sound palette available for use throughout a project, along with any common routing, send effects and so on. This speeds up the process of creating new cues with the same range of instruments. Similarly, you can re-open old projects, save them under a different name and quickly get down to business.
Mastering Slaves
The sheer size of modern sample libraries places significant demands on computing power, meaning that film and TV composers need a lot of muscle in regard to RAM and processor speeds, as well as some serious hard-drive space. Sample libraries can run into tens or hundreds of gigabytes, but this has been helped by the cost of drives falling and capacity increasing in recent years. The falling cost of faster solid-state drives is also welcome in this respect.
DAW sessions involving multiple orchestral libraries will quickly expose any weaknesses in your computing power, and one option to spread the load is to use more than one computer. This can be configured using software such as Vienna Ensemble Pro, which allows you to host all your sample libraries (using a sampler plug-in such as Kontakt) and soft synths on a slave machine, with full control from the DAW on the master computer. This requires some setting up and adapting to a different workflow, but can pay off dramatically in reducing the processing strain on the master computer. The Open Movie... function in Logic Pro can be found in the File / Movie menu, as can the Export Audio To Movie... function.
All About Timecode
Timecode is fundamental to every sound-for-picture project. The composer works alongside the project’s edit and sound post-production departments, and timecode allows both to know exactly where to place the music. Once the cut is locked (ie. the picture edit is finalised), it’s important for the sound and music departments to work to exactly the same copy of the cut, with the same timecode. This is a given on professional productions, but when working with less experienced filmmakers it’s worth confirming this to avoid problems (the music being lined up in the wrong place, or crossed wires when communicating ideas for specific sections). Timecode is written in the format:
Hours : Minutes : Seconds : Frames
A timecode value of 01:04:06:18 thus refers to a position of one hour, four minutes, six seconds and eighteen frames into the film.
One of the most valuable pieces of advice I can give a budding composer is always to have your DAW session’s internal timecode synchronised with the movie’s BITC (burned-in timecode). Every WAV file you bounce is then embedded with timecode that specifies where the music starts in relation to the picture. This allows the WAV file to be automatically positioned when the sound department need to line up the cues and the edit department import it into their video non-linear editing software, such as Avid or Final Cut Pro.
 in the Tempo List determines the position that a Logic session starts in relation to the movie file.") Programming in changes in tempo and time signature can be very useful when synchronising the music to picture, and when you need the music to hit certain sync points with single-frame accuracy. Entering a timecode value in the SMPTE Position box for Bar 1 (position 1:1:1:1) in the Tempo List determines the position that a Logic session starts in relation to the movie file.There are two places in Logic Pro where timecode must be entered. The first is at File / Project Settings / Movie... and may also be accessed by Ctrl-clicking on the video itself and selecting Movie Project Settings. The timecode box is labelled Movie (Movie Start prior to v10.1). You should enter the timecode position of the very first frame of the movie file. This is easy to find if the movie displays BITC on the first frame: load the movie file, check it’s at the very beginning and enter the timecode you see. Movies are often delivered with a count-in clock displayed for the first 10s or so, but with the BITC not beginning until the first frame after this. In these cases you need to subtract the length of the clock from the first BITC value. For example, if there’s an 11s count-in and the BITC begins at 10:00:00:00 on the next frame, subtract 11s from 10:00:00:00 to give a position of 09:59:49:00 — that’s the timecode of the first frame of the movie, and the value to enter in Logic’s Movie Start box. This might sound fiddly, but it’s worth the effort, and soon becomes second nature. With the correct timecode entered in the Movie Project Settings box, Logic’s timecode (displayed in the Transport bar when the display is set to Time) will sync with the BITC of the picture.
Programming in changes in tempo and time signature can be very useful when synchronising the music to picture, and when you need the music to hit certain sync points with single-frame accuracy. Entering a timecode value in the SMPTE Position box for Bar 1 (position 1:1:1:1) in the Tempo List determines the position that a Logic session starts in relation to the movie file.There are two places in Logic Pro where timecode must be entered. The first is at File / Project Settings / Movie... and may also be accessed by Ctrl-clicking on the video itself and selecting Movie Project Settings. The timecode box is labelled Movie (Movie Start prior to v10.1). You should enter the timecode position of the very first frame of the movie file. This is easy to find if the movie displays BITC on the first frame: load the movie file, check it’s at the very beginning and enter the timecode you see. Movies are often delivered with a count-in clock displayed for the first 10s or so, but with the BITC not beginning until the first frame after this. In these cases you need to subtract the length of the clock from the first BITC value. For example, if there’s an 11s count-in and the BITC begins at 10:00:00:00 on the next frame, subtract 11s from 10:00:00:00 to give a position of 09:59:49:00 — that’s the timecode of the first frame of the movie, and the value to enter in Logic’s Movie Start box. This might sound fiddly, but it’s worth the effort, and soon becomes second nature. With the correct timecode entered in the Movie Project Settings box, Logic’s timecode (displayed in the Transport bar when the display is set to Time) will sync with the BITC of the picture.
The other location where timecode values need to be entered is in Logic’s Tempo List box, under the SMPTE Position heading. By double clicking on this value at the 1:1:1:1 position (bar 1 beat 1 of the Logic session), a timecode value can be entered that determines the start position of the Logic session relative to the movie file. This value will be different for each individual music cue in the project. My personal preference is to begin the Logic session around 20s before the start of the music cue, allowing for several bars of lead-in to the music.
 A complication in timecode arises in the numbering of hours. In much of the equipment used for timecode-referencing over the years there has been an inability to display negative timecodes (any position before 00:00:00:00). The inability to accurately describe earlier positions on the timeline poses several problems, for example if the music begins exactly on the first frame of the picture and a run-in is required. Because of this two different solutions are commonly used. The first is to begin the timecode of the project at 01:00:00:00 or 10:00:00:00, rather than at the problematic 00:00:00:00. Although the 01:00:00:00 format is still commonly used, on projects of over an hour in length the hours column always displays a number one greater than the actual number of hours! I find that distracting, so prefer beginning at 10:00:00:00 and, if you have any influence over the format used in a project, recommend that you request this. This not only makes the second digit of the hours column accurate, but it allows the first to be used to number reels, episodes, or other such divisions (eg. 10:04:06:18 would represent a position of four minutes, six seconds and eighteen frames; while 20:04:06:18 might represent the same position in the second reel of a feature film project).
The Importance Of Being Organised
A one-hour TV project might have 30 or more music cues, and you might work on several different versions of each. I strongly recommend keeping your files and folders organised, or you’ll constantly forget which session is which and where individual audio files are saved, causing you to spend hours searching your hard drives, driving you to madness. Every composer will have his or her own system, but here’s the file structure I’ve adopted:
- Movies: This folder is where I save all a project’s movie files. If work begins before the picture is locked, I’ll create Lock and Pre-Lock subfolders.
- Cue sheets: You’ll usually have a spotting session with the director, in which you’ll discuss the placement of each cue. In most cases it’s the composer’s responsibility to make detailed notes and create the cue sheet. These list every intended cue for a project in a spreadsheet, with timecoded in- and out-points for each cue. (The final cue sheet submitted to the PRS for publishing purposes after the project is completed is usually created by the production company.)
- First sketches: Here, I’ll keep Logic files for my initial, rough musical ideas. Often these aren’t intended for a specific scene yet, or even sync’ed to picture.
- Cues: This is the most important folder, where the Logic sessions for each cue are saved. They’re numbered in chronological order, according to the cue sheet. The industry-standard numbering format runs 1M01, 1M02, 1M03, and so on. The ‘M’ signifies music, and the number that follows is the cue number. The number before the ‘M’ traditionally denoted the reel number on which the music cue appeared. It can be used to denote the episode number in a multi-episode project, but in many cases it will be ‘1’, for single projects not divided into reels.
- Assemblies: This folder caters for an important aspect of my workflow. While each DAW session in the Cues folder contains the music for a single cue, I also create an ‘Assembly’ session for the overall project, which contains bounces of each individual cue, lined up at the correct timecode position to picture, and with the levels balanced against the film’s sound (this will be a rough edit of the sound at this stage, from the editor rather than the sound department). I’ll create a new Assembly session for each cut that’s delivered. Working like this allows me to play back the full project with the work-in-progress music, giving me — and the director — a sense of how things are shaping up. It’s also a convenient means of bouncing the audio of individual scenes with the latest music lined up to picture/sound for making MP4 demos for feedback from the filmmakers.
- Clips: This holds the MP4 demos of the music lined up to picture.
- Scores: I keep any notation material (Sibelius files, for example) here.
- Recording sessions: This folder hosts any material that’s been recorded specifically for the project.
- Mixes: If the project is being mixed by an engineer I create a folder for the final mixes and create duplicate Logic sessions of my final cues for this (in case I need to go back to my previous mixes for any reason).
- Uploads: This contains subfolders of material to send to the director, producer or edit/sound departments, usually MP3s of the music in isolation, and MP4s of the music lined up to picture for review. Once finalised, this will hold the entire score, usually as individual 48kHz 24-bit WAV files of each cue with timecode information. It’s easy to ZIP these folders for delivery via a file transfer service.
Tip: Screens & Screensets
When composing to picture there’s a lot of visual information you need to absorb. Switching constantly between the DAW and the movie file can be frustrating, and the neatest solution is to connect a second monitor so you can view the DAW on one screen and the movie on another. You can connect more screens if you feel the need, and given the prevalence of HDMI connectivity, you can now hook up flatscreen TVs to most computers. Yet you still won’t be able to see everything at once, so also consider creating screensets in your DAW for different tasks, and assigning shortcut keys to them.