
Sweetening the mixing environment and sorting out the bass end is this month's task — but there's much more to do than adding a bit of rockwool!
Our host this month, Ross Prior, described Shipston-on-Stour as being very much like The League of Gentlemen 's Royston Vasey: a remote place where everyone knows everyone else, and with a few shops geared up only for the needs of 'Local' people! Naturally, we were intrigued, so we braved the trip and answered his call for help.
The Studio
Ross has a new PC-based studio in his flat in the town centre. He had initially asked us if we could pay him a visit because he couldn't get an even bass end, despite having a Blue Sky Mediadesk speaker system with a separate sub.
 The obligatory 'before' shots. Notice the acres of reflective space and the placement of the monitors behind the computer screens.
The upstairs studio room, which also serves as Ross' bedroom, is five metres square and a little under two and a half metres high. From an acoustics point of view, this is less than ideal: identical dimensions and exact multiples tend to prevent the room modes from being evenly dispersed. However, this is mitigated to some extent by the room having two windows, a door, a large built-in wardrobe and a bed, all of which serve, at least to some extent, to provide impromptu bass traps.
Ross had also set up a vocal booth in what was probably once a storage cupboard or alcove out in the hallway. This booth had a curtained front rather than a door, and had heavy duvets hanging from wire, which had provided a nice dead acoustic, free from the mid-range 'honk' that so often adds the wrong colour to vocal recordings. He was using an SE2200A vocal mic and said he was very happy with the results he was getting from that.
Problems
When we arrived, we looked at the setup of the studio, where Ross had put his desk to the left of the entrance door. This meant that the speaker layout was very asymmetrical, with one side wall very close and the other a couple of metres or more away. He'd put the satellite speakers on floor stands behind the rather deep desk he was using, and this seemed to invite reflections that would compromise the stereo imaging. His two computer screens were placed on the desk, some way in front of the monitor speakers, which meant that they intercepted and reflected some of the sound. There was also a large rack to the left of the listening position that extended into the path of the left-hand speaker. All of these factors contributed to very poor stereo imaging in Ross' studio.
 Ross had already pressed an old cupboard into service to provide a nice, dead-sounding vocal booth.Originally, Ross had placed the subwoofer in a large MDF open-fronted cabinet about the size of a small fridge, weighed down with two huge bags of sand and three heavy concrete breeze-blocks. I don't know where he got this idea, but he thought it would improve the performance of the sub. My feeling was that the cabinet would act as a resonant chamber and would contribute to the unevenness of the low end. I must have sounded horrified about this arrangement in my reply to his first email, because he immediately took the sub out and tried to find a better location for it on the floor. A friend had helped him with this and they'd ended up with the sub more or less in the centre of the room, which didn't sound as bad as you might expect! However, even though bass itself isn't very directional, it's still best to have the sub nominally in front of you if you can, as any harmonic distortion products from it are most definitely directional!
On the desktop was a Mackie 1604 VLZ Pro mixer, used for mixing subgroups created within Cakewalk's Sonar recording software. The analogue mix was then fed back into two inputs of an Emu 1820M audio interface so that it could be recorded onto Ross' hard drive. The mixer was adorned with a generous layer of dust, as were the two Behringer control surfaces next to it, though Ross couldn't get these to work with Sonar at the same time as his MIDI keyboard. He'd had them working perfectly with Reason but the correct setup for his current software was eluding him. Another problem area was his patchbays (Ross has two Behringer models), as he wasn't sure how to wire these but he knew he'd like to be able to patch his Focusrite Compounder, dbx 266XL and VU Stereo EQ3 into either the Mackie's main mix insert points or into some of its input channels.
Time For Action
After a brief coffee and the first of our encounters with the supply of chocolate Hob Nobs Ross had kindly provided, Hugh and I soon came to the conclusion that Ross would be better off moving the whole setup to the wall opposite the wardrobes, as this wall had no doors or windows to dictate where he could or couldn't put things. We also felt that if the wardrobe doors were left slightly open when mixing, all the clothing and bedding inside would help to damp rear-wall reflections. Ross was happy to try this, even though it might mean removing one or two small pieces of furniture. He also told us he had a few rockwool slabs that he wasn't quite sure what to do with, so we suggested he jam these into old pillow cases and put them on top of the wardrobe, where their proximity to the ceiling/wall corner would enable them to provide useful bass trapping.
Before reorganising the entire room to relocate the studio equipment, I escorted Ross to the local hardware store and cajoled him into buying a fluffy anti-static duster so that we could clean the gear and desk as we moved it. Partly this is because dust makes me sneeze, but it also gets into faders and jack sockets, leading to unreliability. Ross also enquired about the advisability of allowing people to smoke near the equipment. This is always a bad idea, as the smoke leaves sticky deposits on fader tracks (not to mention lungs!), which reduces the life expectancy of the equipment.

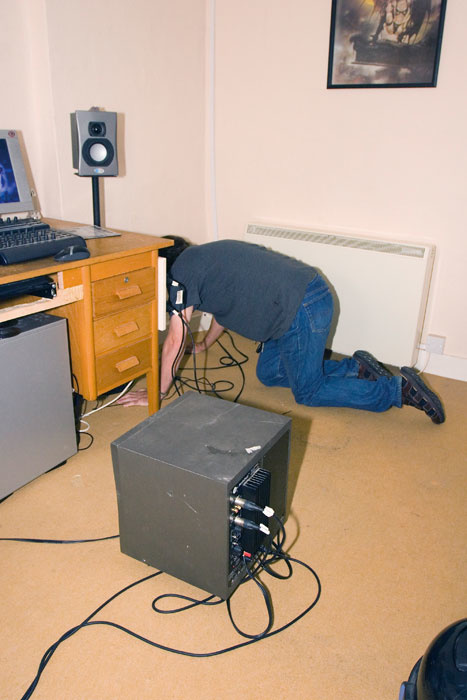
. While this wasn't as bad as you might expect, it still wasn't ideal. Our method for ascertaining the best placement was to place the sub in the engineer's listening position (above) and then crawl around the room listening to it, to find the place where the bass sound was best. The sub was put there and we went back to the listening/mixing position to test the results of the change (below).") Ross had placed his subwoofer towards the middle of the room, in an attempt to achieve a good bass sound (above). While this wasn't as bad as you might expect, it still wasn't ideal. Our method for ascertaining the best placement was to place the sub in the engineer's listening position (above) and then crawl around the room listening to it, to find the place where the bass sound was best. The sub was put there and we went back to the listening/mixing position to test the results of the change (below).We cleared a space for the desk, vacuumed the carpet (as it was unlikely to see daylight again in the foreseeable future!) and then set about moving all the gear, which wasn't too difficult. Ross' PC went under the desk sideways, as there was a cross-member that prevented it going back any further. The mixer tended to be used more for combining and routing signals to the outboard processors than for doing a lot of mixing moves, so the only part that needed to be easily to hand was the master section on the right, as it was used as a monitor control station.
Ross had placed his subwoofer towards the middle of the room, in an attempt to achieve a good bass sound (above). While this wasn't as bad as you might expect, it still wasn't ideal. Our method for ascertaining the best placement was to place the sub in the engineer's listening position (above) and then crawl around the room listening to it, to find the place where the bass sound was best. The sub was put there and we went back to the listening/mixing position to test the results of the change (below).We cleared a space for the desk, vacuumed the carpet (as it was unlikely to see daylight again in the foreseeable future!) and then set about moving all the gear, which wasn't too difficult. Ross' PC went under the desk sideways, as there was a cross-member that prevented it going back any further. The mixer tended to be used more for combining and routing signals to the outboard processors than for doing a lot of mixing moves, so the only part that needed to be easily to hand was the master section on the right, as it was used as a monitor control station.
We reorganised the kit on the desk so that the mixer was on the left and the two control surfaces in the centre, with the mouse mat to the right.
To overcome the problems caused by the speakers being behind acres of reflective surface, we placed them to either side of the desk and brought them forward, making sure they were at head height (with the engineer seated) and angled in towards the mixing chair. This left them slightly wider apart than was ideal, but subsequent tests showed the imaging to be perfectly stable and acceptable. The large rack of outboard processors was propped up on a pair of unused hi-fi speakers, which Ross said he'd replace with a small table, and the MDF coffin was parked temporarily (he promised...) in his flatmate's bedroom, along with other furniture we'd removed. We thought it best to leave him to deal with that particular political issue!
Sub Standard
To find the best place for the sub, we used the trick showed to us by SCV's Steve Fisher, who looks after their Genelec customers. First you move the sub to where the engineer's chair normally goes, then play some material with a bass line that covers a lot of notes. Alternatively you can set up a bass scale using a sequencer and synth. Then you crawl around the front edge of the room listening, until you find a spot where all the different bass notes seem to be at the same subjective level — nothing missing and nothing obviously booming. Once you've found the best spot, you move the sub there and then fine-tune the level (and phase, if available) and that should give good results from the engineer's chair.
This time it was my turn to do the crawling, while Hugh sniggered and took the photos, but I soon found a good spot just to the right of the desk, so that's where we put the sub. Hugh then tweaked the sub level while I listened, and we ended up with a sub level setting of about -6dB, which produced a natural sound with a well-extended and even bass end, but without letting the bass become overpowering. When we checked a fairly wide range of commercial material, we found the results were pretty consistent, so we were confident that the monitoring system was telling a reasonably accurate and reliable story. However, when Ross put up some of his previous mixes, it was clear that his bass levels and balances would need adjusting in the light of the newly positioned and more accurate monitoring system.
The MIDI keyboard was relocated to the right of the desk, where Ross could get to it easily simply by swivelling his chair, and once the moving was complete the whole system felt more comfortable, more spacious and certainly a lot more ergonomic.
We also put up some basic acoustic treatment, to improve the stereo imaging by killing off mid- and high-frequency reflections from the side walls and from behind the speakers. For this, we used simple Auralex foam panels fixed to the walls using picture pins so that we wouldn't upset Ross' landlord. We ended up with three panels on the front wall and one on the right side wall opposite the window, which was curtained. Ross said he'd probably buy some heavier curtains, as they'd help absorb reflections from the window area. We'd also brought a couple of previously used Auralex corner bass traps, so we pinned these up in the front right corner, assuming that the left side would benefit from natural bass trapping from the window.
Patching It Up
Having sorted out the monitoring and the layout, we turned our attention to the patchbay. Ross had two from which to choose, an unbalanced Behringer Ultrapatch Pro PX2000 and a balanced PX1000. His instinct had been to use the balanced PX1000 but he wasn't sure about normalisation or how to connect the mixer and outboard gear to the patchbay. In general, using balanced patchbays — even with unbalanced inserts — can be beneficial, since with careful wiring it helps ground loops to be avoided, but it may require soldering skills and some specialised knowledge to make up custom connecting cables.
However, when we checked the diagrams on the top of the PX1000 it became clear that whether you used the front or the rear of the patchbay, the top and bottom sockets in each vertical pair were normalled together if nothing was connected to the other side. This would have been fine if the patchbay was connected only to insert points, but if Ross also wanted to have outboard gear accessible from the same patchbay, it would have meant that the outputs of the various bits of outboard would be routed directly back to their own inputs via the normalising contacts when nothing was plugged into the front of the patchbay. This arrangement would have risked a 'howlround', with the resulting oscillations possibly causing costly damage to the equipment. The manual for the patchbay suggested avoiding this problem by placing outboard inputs on different vertical pairs to the corresponding outputs, and while that would have been one possible solution, it is rather wasteful of panel space, potentially confusing for the user and certainly not standard professional practice. Given that problem, and the fact that a balanced patchbay isn't usually essential for insert points, we turned our attention to the PX2000 patchbay instead.
 Ross wanted to be able to patch his outboard gear and had both balanced and unbalanced patchbays available. Depending on your gear, balanced is not always the right way to go: in Ross's case, we found that the unbalanced model offered the right solution.The type of mixer found in project studios almost always has unbalanced insert points, which are accessed though the same TRS jacks normally used in balanced cables. However, these are wired such that they carry both the (unbalanced) send and return signals down the two inner cores, using the outer screen as a common signal ground. At the outboard (or patchbay) end, the lead is broken out into two tip-sleeve plugs, one carrying the send signal and the other the return (hence the popular term 'Y-cable'). Normally, the Tip contact is used as the send from the mixer, and the Ring carries the return, although this isn't always the case, so you should check your mixer manual. We confirmed that these were the right way around by leaving the mixer and monitors switched on, then touching the two insert jacks in turn with a finger. The one that causes a small buzz from the monitors is the return back into the desk.
The unbalanced PX2000 patchbay has individual slide switches on the top to set the type of normalisation, if any, that you need for each vertical pair of sockets. Those sockets connecting to outboard gear don't need any normalisation, as they simply act like extension points for the sockets on the back of the equipment itself, so we switched those socket pairs to the 'Open' mode. The socket pairs connected to the mixer insert points are best set to 'half-normalled'.
By convention, input signals are usually plugged into the bottom row on the front of a patchbay, and outputs are obtained from the top row. When set for half-normalled operation, you can plug a jack into a top-row socket to take an output 'listen' or 'sniff' feed from a mixer's insert point without interrupting the mixer channel's signal flow. This is a handy way of splitting a signal on the occasions that you might need to (although the listen feed is not buffered in any way, so if the other end of the patch cable happens to touch earthed metalwork, for example, you'll kill the signal passing through the mixer!) If, however, you plug in both the inputs and outputs of an external device via patch cables, the normalising link is broken and the signal flows from the mixer, through the external device, and back into the mixer, which is exactly what you want.
We used ready made insert Y-cables that Ross had already bought to connect the mixer's main mix insert points and the insert points of four other input channels to the patchbay, and set those connector pairs for the half-normalled mode using the slide switch on the patchbay's top plate. We then hooked up the Focusrite Compounder, dbx 266XL and VU Stereo EQ3 to non-normalled (open) sockets. A permanent marker was used to label the patchbay.
Ross had bought balanced cables for hooking up the outboard gear to the patchbay. Sometimes, though, balanced cables are not the best option, as much depends on the way the inputs and outputs of the outboard gear are designed to work when connected to unbalanced systems (such as insert points). It is important to consult the manuals for your various pieces of outboard equipment to see how they should be connected for unbalanced use: with some you can simply plug in unbalanced jacks, while with others you need to disconnect one of the conductors of a stereo jack or XLR. In most cases, using unbalanced jacks is fine, but there will always be the exception. However, you should not assume that unbalanced cables will be fine: one thing you should be aware of is that many pieces of balanced equipment are designed in such a way that if you use them unbalanced you lose half the signal level, resulting in a 6dB drop, so if you put a number of balanced processors in series using unbalanced connections, the cumulative level drop can be significant.
This proved to be an issue for us, as Ross had hooked up his balanced gear to the unbalanced patchbays using stereo jack cables, and we seemed to be losing significant level when chaining multiple processors together. We prescribed some manual reading to see what type of cable he should be using and, as he wasn't confident about soldering, Ross said he'd order some short unbalanced cables as he'd also need these for patching on the front of the patchbay.
For users new to patchbays, a common cause for one of those 'Why can't I hear anything?' moments is leaving a piece of outboard patched into an insert point while switched off. This is OK if the outboard gear incorporates relay-operated hard-bypass switching, but many bits of outboard simply don't pass signal when switched off.
Mixing
Once we had the patchbay working and we'd tested all the connections, we talked to Ross about the way he was mixing, as he was using some stereo subgroups and some mono groups. We suggested that he make all the submixes in Sonar stereo and then feed these to adjacent channel pairs on the Mackie desk, with the odd-numbered channels panned fully left and the even-numbered channels panned fully right. This would allow him to pan individual tracks within Sonar and have them appear in the right pan position in the final analogue mix.
However, Ross said that he also likes to EQ submixes in the Mackie desk and would often fine-tune levels there too, which makes it hard to get back to an earlier mix if you want to resume work on it later. I suggested he use his small digital camera to photograph the desk's controls at the end of each session, and then store the photo in the song folder, where it could be opened for reference if he ever needed to get back to the same mix. He could also photograph the front of the effects rack and patchbay and store this, for the same reason.
In Control
That left just the Behringer control surfaces to sort out. Whatever we tried initially, we could get either the control surfaces to work (via their USB interfaces) or the MIDI keyboard to work (via the MIDI socket on the Emu interface) but, frustratingly, not both at the same time. The fader unit's manual showed a number of different USB interface modes and we decided we were in the wrong one but couldn't change it using the button presses described in the manual. In the end we resorted to the Behringer helpline, which proved to be most, er... helpful! It turned out that if the control surface is initialised in Mackie Control/Sonar mode, you have to resort to a different system to switch USB modes, involving powering up with the button below the fourth rotary control held down. Then you can use the first rotary control to switch modes, followed by Exit.
 The 'after' shot, with patchbay wired, tighter bass and much better stereo imaging.When we selected the recommended mode (USB3) that enabled both the control surface and its own MIDI interface, we still had no luck getting the MIDI keyboard to work, either via the Behringer's own MIDI interface or the Emu, but by using the 'control surface only, no MIDI' mode (USB1), we were finally able to get the control surface and the Emu's MIDI port working at the same time. Although I can't confirm this (I'm a Mac man and don't usually get involved with PCs!), I suspect there could have been some kind of conflict between the Emu's MIDI spec and the Behringer control surface's MIDI spec. Whatever the cause, once the Behringer's MIDI port was turned off, the Emu MIDI interface worked normally. Ross was pleased with this, as he'd previously used the controllers with Reason and enjoyed the experience but was losing hope of ever getting them to work with Sonar. We ended up with the fader control surface driving Sonar and the rotary one providing real-time control for soft-synth parameters.
Because the Behringer units have no displays to tell you which channel is which, we suggested buying some flexible magnetic plastic from an office supplies store, to make strips that could be 'stuck' on the steel top panel below the faders. This is the same material used for some fridge magnets and for stick-on van signs. Using non-permanent OHP or 'white board' marker pens, these could be marked up for each session and could be made deep enough to label three or four banks of channels. Most of these marker pens are water-soluble these days, but you may prefer to use one that can be cleaned with alcohol, as the ink is less likely to come off on your hands as you work. At the end of a project, the current label strip can also be removed from the control surface and stored for projects that need to be resumed later. This seems such a simple, obvious and inexpensive solution that I'm surprised control surfaces and analogue mixers don't come with them as standard.
To round off the day, Ross played us some of his mixes and, other than the adjustments needed to the bass end, they sounded pretty good. Ross seemed pleased with his newly reorganised system and, though a little bemused by my desire to dust everything, he admitted that it looked a lot nicer. He was particularly pleased that we'd finally got his control surfaces working, and the result was well worth our head-scratching.
We'd been made to feel very welcome in Shipston, but as we set off for home we couldn't help but notice strange people with big teeth, thick spectacles and squinty eyes following every move of our departure...
Ross' Reaction...
 Since I moved into my new flat back in February, I've been getting more and more agitated with the poor acoustics of the room in which my baby studio is set up. As you can imagine, I got a bit excited when Paul and Hugh agreed to come and help me to sort the problem — and sort the problem they certainly did. My biggest concern was with the lower frequencies, so I was surprised that once Paul and Hugh had worked their magic, I was homing in more on the impressive stereo imaging and clearer top end. In fact, I've spent the last three and a half hours just listening to tune after tune, picking instruments out of the mix. The bass sounds immensely better than it did, tight and really punchy on the heavier tracks.
I'm also very grateful to them both for sorting out the routing of the patchbay, and configuring my Behringer controllers and keyboard to work together. This did not look like fun, and it's been hindering me since I stopped using Reason.
Now I'm going to feel a lot more confident mixing and recording here and may be able to start recording people from outside the select few I work with at the moment. So if you are local (Warwickshire) and want some recording done, please send me an email. Guitarists and singers are ideal, as I don't have the room for full bands, otherwise you can visit my web site to hear me and my musical partner in crime, Chris Dunn, a very talented young artist.
In all, Paul and Hugh have done a fantastic job — the studio feels a lot more spacious, it's cleaner and it's more logical. Thank you both so very much for your time and effort. Priceless. The only problem I can see is that I'm now going to have to go back to old mixes and remix them — well, that and the fact that I now have to restock on Hob Nobs...