 Photo: Richard Ecclestone
The Studio SOS visits have shown that many home studio owners are having problems with their monitoring. So this month we explain the principles anyone can use to get their own control room sounding right.
Professional studio design is a very specialised science, with more than a touch of 'black magic' thrown in, but as our Studio SOS visits have demonstrated, it is fairly simple to make a huge improvement to an untreated project-studio room without spending a fortune. However, it's also become apparent how often readers' own attempts at DIY acoustic treatment cause more problems than they solve. So I thought it would make sense this month to have a proper look at the principles behind the acoustic-treatment advice we often give on our Studio SOS visits, so that you can apply them to your own setup.
Room problems can be broken down into two main categories: reflections of mid-range and high frequencies from hard surfaces; and peaks and troughs in the room's low-end response caused by the room's dimensions and the reflectivity of the walls at low frequencies. Both compromise the accuracy of what you believe you are hearing from your monitor speakers, and each has to be dealt with in different ways.
Placing Monitors & Studio Equipment
In an ideal world, what you hear when sitting in your monitoring chair should be mainly the direct sound from the speakers. However, unless you record in an anechoic chamber and cover all your gear in rockwool, there will invariably be some room reflections, and the strongest of these should be either absorbed or diverted before they reach your main listening position. In professional studios there are clever tricks that you can do with wall angles to divert reflections. However, most home studios use rectangular rooms, so that's what I'll concentrate on here.
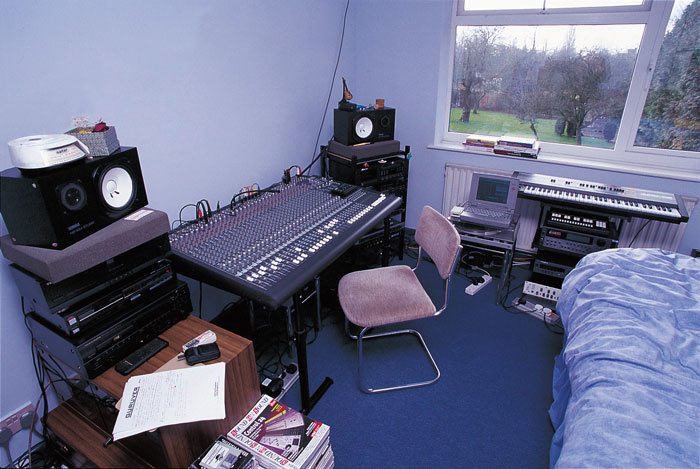
 Here you can see several of the mistakes commonly made in setting up monitors in the home studio. For a start, a number of factors are compromising the stereo imaging: the speakers being on their sides, their asymmetrical placement in the room, and the insufficient angling of the drivers towards the monitoring position. Also, the right-hand speaker is placed directly in a corner of the room, while the left-hand speaker doesn't appear to be mounted on anything particularly solid — both of these factors would have an impact on the bass performance.Photo: Richard EcclestoneReflections from the desk and other nearby equipment can be a big problem, so sorting out the location of the monitors themselves should be the first priority before fixing up any acoustic treatment. First of all, the monitors should usually be used the 'right way up', because lying them on their sides will compromise the stereo image significantly. Ideally, the speakers should also be on stands that put them at head height, and the drivers should be angled so as to point towards your head. Avoid putting the monitors too far into the room's corners, and observe the manufacturer's recommendations on how far from any walls they need to be. For the best stereo imagining, it's also best to place them symmetrically in the room, ideally firing down the long axis in smaller rooms, and set up such that the speakers form two corners of an equilateral triangle, the third corner falling at or just behind the listening position.
It is important that no hardware, such as computer screens or racks, comes between you and your monitors, and that the desk surface is significantly lower than the monitors, so as to avoid strong reflections bouncing off the desk and into your face. If in doubt, put a mirror flat on your desk between you and the speakers, and if you can see the speaker, particularly the tweeter, when you look in the mirror, you have a potential reflection problem which should be addressed by moving the speakers if possible. Where the speakers must stand on a desk or shelf, foam isolation pads help keep the sound clean, and some products also provide a means to angle the speakers up or down if necessary.
The other consideration is that it helps not to have the speakers set up midway along any of the room's dimensions — so neither speaker should be exactly halfway between the side walls, or halfway between the floor and ceiling, for example. If two or more of these dimensions are equal, you could end up with bumps and dips in the low-end response, even if the rest of the room is acoustically acceptable.
The Sources Of Unwanted Reflections
Mid-range and high frequencies reflect from hard surfaces such as plaster or plasterboard walls in a similar way that light reflects from a mirror. The effect is not quite as exact as with a mirror, as some of the sound energy is scattered, and a little is absorbed, but in simple terms you can think of hard walls as approximate acoustic mirrors. If you put a mirror alongside a light bulb, you see the light bulb itself and also its image in the mirror. Both act as real sources of light as far as you, the observer, are concerned.
The same thing happens if you stand a speaker close to a hard wall — a phantom sound source is created by the reflection, so now you hear sound from both the speaker and the wall. If you know which part of the wall is responsible for reflecting the phantom image to your mixing chair, then you can concentrate your acoustic treatment in that area. In fact, you can use a real mirror to find out where that spot is by getting a friend to hold the mirror up flat against the wall at different locations until you're able to see an image of your loudspeaker from the mixing position. It's for this reason that we often refer to these areas as the 'mirror points'.
. Note also the angles and positions of the monitors with comparison to the listening position — arranging the three points in an equilateral triangle will help give a natural stereo image.") This diagram shows how to apply basic acoustic treatment to a typical home-studio room. The absorber panels shown in purple are the most important, but adding in the orange absorbers would improve the situation further. Acoustic foam is a common choice of absorber in this application. If bass trapping is required, then it is usually most effective applied in the room corners (including those corners between any of the walls and the ceiling). Note also the angles and positions of the monitors with comparison to the listening position — arranging the three points in an equilateral triangle will help give a natural stereo image.Photo: Richard EcclestoneIn a normal home studio setup (a rectangular room with a flat ceiling), there will be images on the side walls and ceiling between you and the speakers. Strictly speaking, there will also be one on the floor, but the chances are that this will be obscured by the desk holding your equipment. Clearly, we can also hear sounds from behind us, so the rear wall will also be a source of reflections, plus there will be reflections from the wall directly behind the speakers, and all these need to be considered when applying acoustic treatment.
This diagram shows how to apply basic acoustic treatment to a typical home-studio room. The absorber panels shown in purple are the most important, but adding in the orange absorbers would improve the situation further. Acoustic foam is a common choice of absorber in this application. If bass trapping is required, then it is usually most effective applied in the room corners (including those corners between any of the walls and the ceiling). Note also the angles and positions of the monitors with comparison to the listening position — arranging the three points in an equilateral triangle will help give a natural stereo image.Photo: Richard EcclestoneIn a normal home studio setup (a rectangular room with a flat ceiling), there will be images on the side walls and ceiling between you and the speakers. Strictly speaking, there will also be one on the floor, but the chances are that this will be obscured by the desk holding your equipment. Clearly, we can also hear sounds from behind us, so the rear wall will also be a source of reflections, plus there will be reflections from the wall directly behind the speakers, and all these need to be considered when applying acoustic treatment.
Once you have identified the main reflection points, you can place treatment there to absorb the sound and kill the reflections. Bear in mind, though, that most people tend to move around a bit while recording and mixing, so the absorber panels need to be fairly large if they are to cover all possible reflection points as we move around.
Effective & Ineffective Absorbers
Now you've probably read about Technical Editor Hugh Robjohns and I sticking acoustic foam onto studio walls, but before you rush off and do this it is important to understand the limitations of such materials. While a thick black cloth placed over a mirror will absorb all the visible light of its reflection, a piece of acoustic foam will only be acoustically 'black' at high frequencies, becoming increasingly transparent at lower frequencies. In very general terms, a piece of four-inch-thick foam stuck directly onto the wall is only really effective for frequencies above about 200-300Hz, whereas a piece of two-inch foam is only effective above about 400-600Hz. In other words, if you halve the thickness of the foam, the frequency above which it is effective moves up by an octave.
Once you appreciate this, you can see immediately why attempts to deaden walls with carpet don't work too well — carpet is relatively thin and so only soaks up very high frequencies. This leaves the low and mid-range frequencies unaffected, giving a dull and boxy result. You can probably now also understand why acoustic foam would need to be several feet thick to be effective at bass frequencies, which is why foam is rarely the most practical solution for bass absorption.
Although foam is quite convenient, it's not the only option. You can also use one or more layers of high-density Rockwool insulation slab, as long as you cover it with fabric to keep those nasty irritating fibres out of the air. Rockwool is just as effective as foam, if not more so, but it does require more in the way of DIY skills.
One very useful tip is that spacing foam or Rockwool absorbers away from your wall by a few inches makes them more effective at low frequencies. For example, spacing four-inch-thick foam four inches from the wall is almost as effective as using double the thickness of foam in the first place! It can help in this instance to mount the foam or Rockwool onto a board with large holes or slots cut out of it to let the sound through — radiator fret panel is good for this, but not pegboard. This board can then be hung in the right place. Another quicker solution is to simply glue high-density foam cubes to the back of an acoustic-foam panel to act as spacers. I've found that spray carpet adhesive is as good as anything for fixing foam.
Another way to deal with high-frequency reflections is to break them up so that they become less disruptive. This is called 'diffusion', and requires a very uneven surface with protrusions and wells several inches in depth. Although commercial diffuser designs are available with precisely calculated profiles, putting shelves at the back of your room and part filling them with books, manuals, CDs and bits of unused gear also works quite effectively!
 Photo: Richard Ecclestone
. For best results, fix the panels across the room's corners (shown above).") Normally acoustic foam panels will act primarily on mid-range and high-frequency reflections, but you can improve the low-frequency absorption effects by spacing the panels a few inches from the wall surface — the easiest way to do this is simply to stick small off-cuts of foam to the back of each panel as spacers (top). For best results, fix the panels across the room's corners (shown above).Photo: Richard EcclestoneIn a normal home studio, 2 x 4-foot panels of foam are convenient to manage, and one panel would typically be fixed to each side wall at the mirror points, with a third at the ceiling mirror point if the ceiling were low enough to cause problems. The next step up from this would be to add further panels behind the monitors, as reflections from this area are potentially very confusing, given that they come from almost the same point in space as the speakers themselves. All these foam panels should be centred according to the engineer's head height when he or she is in the monitoring position. Finally, the rear wall needs to be addressed, which is often best done by combining areas of absorption (foam and sofas!) with areas of scattering.
Normally acoustic foam panels will act primarily on mid-range and high-frequency reflections, but you can improve the low-frequency absorption effects by spacing the panels a few inches from the wall surface — the easiest way to do this is simply to stick small off-cuts of foam to the back of each panel as spacers (top). For best results, fix the panels across the room's corners (shown above).Photo: Richard EcclestoneIn a normal home studio, 2 x 4-foot panels of foam are convenient to manage, and one panel would typically be fixed to each side wall at the mirror points, with a third at the ceiling mirror point if the ceiling were low enough to cause problems. The next step up from this would be to add further panels behind the monitors, as reflections from this area are potentially very confusing, given that they come from almost the same point in space as the speakers themselves. All these foam panels should be centred according to the engineer's head height when he or she is in the monitoring position. Finally, the rear wall needs to be addressed, which is often best done by combining areas of absorption (foam and sofas!) with areas of scattering.
Room Modes & Low End
In most project studios, dealing with reflections will already vastly improve the stereo imaging and focus of the sound, but some further bass treatment will probably be desirable to even out the bass response in the room, especially if you have monitors that work down to very low frequencies. Bass problems are associated with room modes, which are resonances relating to the room's dimensions — you get them at any frequency with a half-wavelength (or multiple of half-wavelengths) which matches any of the room dimensions. The smaller the room, the more widely spaced the modal frequencies are, so it becomes more likely that the bass response will be uneven.
Depending on the room dimensions, some bass frequencies will be cancelled due to reflections coming back off the wall out of phase with the source, whereas at other frequencies the reflections will be in phase, leading to a boost in level at that frequency. You can often hear these peaks and dips quite plainly from your listening position when you play a chromatic sequence of equal-level bass notes through your monitors. Hugh and I have found particular problems in small rooms that are approximately cuboid in shape, as these often exhibit a big 'hole' in the bass end in the dead centre of the room. What's worse, though, is that the engineer's chair very often ends up being positioned right on the dead spot in such small rooms!
Although low frequencies can be treated using porous absorbers such as foam or rockwool, the treatment needs to be quite thick and also carefully positioned. Where you have a deep ceiling void, you can utilise this as a bass trap by cutting large holes in the ceiling and then stuffing the void with Rockwool, after which the access holes can be covered with acoustically transparent fabric. The same goes for fireplaces, alcoves, or other unused spaces.
 Photo: Richard EcclestoneBecause of the way bass energy propagates, traps in the corners of the room (both vertical and horizontal) are the most effective. You can't usually make these several feet deep, but you can at least make them several feet long by having them go from floor to ceiling, or all along the length of a wall/ceiling junction. Various companies make big foam wedges that can be glued into corners, but you need quite a lot of them to make a real difference. They are also quite expensive, though you can cheat a little by putting flat foam panels across the corners on wooden frames, then filling the inside of each structure with dense rockwool. Fortunately, there are other ways to absorb bass other than by thick porous absorbers.
The main reason that low-frequency energy bounces off solid walls is that the walls don't move significantly — they neither absorb much of the bass energy nor allow much to pass through. The outcome is that most of the low frequency energy ends up back in the room. Of course sound doesn't really 'pass through' any airtight panel, but sound does cause that panel to vibrate, those vibrations producing sound at the other side of the panel. This gives us another clue as how we might absorb bass energy.
One classic method is to fix a resonant panel over a box containing an acoustically absorbent material. The sound energy forces the panel to resonate and, in the process, some of the sound energy is dissipated by the panel and internal absorber. However, this type of trap works only on or around the resonant frequency of the panel, and it also returns some unwanted energy back into the room because the panel tends to continue resonating for a short time after the incident sound energy has stopped.
Another way to prevent low-frequency sound bouncing is to interrupt it with a heavy but non-rigid surface. Here the principle is the same as when bouncing a ball off concrete and then trying to bounce it off dry sand. Clearly the ball will bounce higher from the concrete than from the sand. (In fact, sand can be quite a useful acoustic material, but its weight makes it impractical in most home studio applications other than for filling hollow speaker stands.) A far better option is to use a material called 'barrier mat' or 'dead sheet', which is essentially a floppy vinyl sheet (not unlike heavy flooring vinyl) loaded with lead or mineral particles to make it heavy. This weighs about 10-20kg per square metre and allows very simple and effective traps to be constructed with minimal depth.
 Photo: Richard EcclestoneThere are many variations on the 'barrier-mat trap' theme, but the general idea is that you hang the material a few inches from a wall and then hang or fix a porous absorber in front of it to absorb the high frequency energy that the surface of the sheet would otherwise reflect back into the room. Using this technique, an effective full-range trap can be created in a box-shaped space less then 12 inches deep. The greater the surface area, the more energy the trap will absorb. Where the back wall of the studio is less than around 10 feet from the monitoring position, this can be a useful way to treat the entire back wall.
A halfway house between the absorber and non-rigid-sheet approaches is used in some of the Real Traps products, where a thick slab of absorber has a thin, non-porous sheet fixed to one face. Simply put, the sound energy tries to make the sheet move, but the damping material to which it is fixed dissipates the energy. These traps work best when spaced away from the wall or, better still, when fixed across corners.
While you need to be careful not to apply too much high-frequency trapping in a room, it is very difficult to go too far with bass trapping, and as a rule the more you can accommodate, the more even your bass response will be. Some people worry that bass trapping will mean less bass in the room, but this is not the case at all. The trapping removes the reflected bass, and reflected bass often cancels out the wanted bass from the speakers. The result is actually a clearer, tighter, and more uniform bass response, free from booms and weak or missing notes. However, in a lot of cases a complete solution is not practical, so in smaller home studios as much bass trapping as possible should be combined with the simple expedient of making sure that the mixing chair is out of the way of any sonic 'Bermuda Triangles'.
Monitoring Miracles
As we've shown, basic acoustic treatment isn't complicated, and any improvements made will be out of all proportion to the cost. Your room is a key part of your recording system, so please don't take it for granted.