Can you record and produce entirely on your iPad? Let's examine the ins and outs...
If you own an iPad, you'll no doubt already have some idea of its audio and music-related capabilities. Apps such as GarageBand, Auria and NanoStudio make it possible to record and produce with only the iPad. There's something of the 'proof of concept' about them still, I think, but you just know you're looking at the future...
Meanwhile, many other innovative synths and audio apps are beginning to establish unique, exciting ways of working, and feel like serious tools rather than toys. They absolutely beg to be incorporated into a Mac-based DAW setup; but what are the best ways to do this? In Apple Notes this month, we'll start by looking at some ins and outs. Some iPad synths, such as Animoog, are so good that they deserve to be integrated into your Mac DAW setup.
Audio
Getting audio in or out of your iPad is pretty straightforward. Easiest of all is to use the headphone out, which is actually a combined stereo output and mono input. If you just need the output, for synths and the like, plug in a lead with a eighth-inch stereo (TRS) jack at one end and, at the other, whatever you need to plug into your mixer or audio interface. That'll frequently be separate left and right quarter-inch mono (TS) jacks. Sound quality seems perfectly good, and surely no worse than an old analogue synth.
To access your iPad's input, look to something like the guitar-oriented iRig or the XLR-equipped mic preamp iRig PRE from IK Multimedia, both £34.95$39.95. They have the necessary 'triple band' TRRS 1/8-inch jack that engages with the input connector.  The battery-powered iRig PRE equips your iPad with a proper 48V mic input, while duplicating the headphone output.
Another option, which can add more flexibility and features, is to use a dedicated audio interface hooked to the iPad's dock connector with a single cable. There are lots out there — check out the Focusrite iTrack Solo and Tascam iU2, for example — and many will give you a stereo input. These plug directly into third-generation (or previous model) iPads via their 30-pin dock connectors. Owners of the fourth-generation iPad or iPad Mini, which have the new Lightning connector, will need Apple's £25$29 Lightning-to-30-pin adaptor. Eventually, of course, we'll see the new standard being supported directly.
There's one more way to go. If you treat your fourth-generation iPad to one of Apple's £25$29 Lightning to USB Camera Adaptors (or, for previous models, the £25$29 Camera Connection Kit), you can plug in almost any USB 1.0-compatible, class-compliant USB audio interface via a standard USB cable. This includes those that are not specifically promoted as iPad-compatible, and if they draw less than 200mA of power, they'll even be bus-powered. At one end of the market, you have the likes of RME's Fireface UCX and Babyface, which are great interfaces by any standard, while at the other you have a humble £20 Behringer UCA202, which does the trick as well.  Don't let the name put you off: Apple's 'camera adaptors' just provide your iPad with a USB interface, and let you hook up external MIDI and audio hardware.
MIDI
When you want to sequence a sound source on your iPad from your Mac's DAW, the simple and apparently obvious solution of connecting them via a USB sync/charging cable doesn't work. For any kind of wired link, you'll need to have MIDI interfaces for both your Mac and iPad (if MIDI isn't already included in your audio interfaces, of course...) and tie them together with good old-fashioned five-pin DIN cables.
The iPad will work with dedicated, dock-connected MIDI interfaces, as well as with class-compliant USB models via the 'camera' adaptors I've already mentioned. Amongst the dedicated models, IK Multimedia's iRig MIDI is one of the more cost-effective, at £59.95$69.95. Via USB, there are distinctly cheaper options: a £3.95 eBay special 'USB to MIDI cable' I bought recently works great, and is, happily, bus-powered.
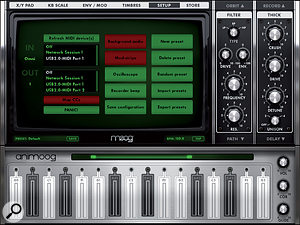
Assuming you've got your Mac and iPad interfaces sorted, you then run a 5-pin DIN MIDI cable from the Mac interface's MIDI Out to the iPad's MIDI In. Next, in the Mac's Audio MIDI Setup application on your Mac, you'll need to add a new device representing the iPad, and draw a virtual connection from the appropriate Mac interface's out port to the iPad's input. Many DAW applications then use this info to derive their MIDI track routing information. With some iPad synths, you might also need to burrow into their configuration menus to make sure the appropriate MIDI input is enabled, which is what's happening in the Animoog screenshot here. It often helps, too, to start them after you've plugged in your iPad MIDI interface, but then you should be good to go.
Next month, we'll look at some network and 'virtual' connection options, and a few apps that can help sweeten your iPad MIDI experience.
