Create custom impulse responses using Space Designer.
Convolution reverb has adorned productions for the past decade or so, recreating the sound of instruments playing within lavish concert acoustics, for special effects in post-production work, and virtual chamber reverbs that just keep on giving! In the not-so-distant days of Logic Studio 8 and 9, Apple provided users with a means of recording their own impulse responses — the Impulse Response Utility. The omission of this Utility in recent, downloadable versions of Logic Pro seems to have left users in the lurch, but there exists a way to create custom impulse responses using a lesser-known parameter within the Space Designer plug-in. This tutorial shows you how.
Time To Sweep
The first task is to generate a logarithmic sine sweep to act as a test signal when recording impulse responses. A swept sine wave allows for the full frequency range of the room to be 'sampled' with greater accuracy and repeatability than shorter signals such as balloon pops, and has a respectable signal-to-noise ratio. This stage is a little tedious to set up, and you may find that you are able to achieve this more quickly in an external audio editor, using a 'synthesize' function or similar. Nevertheless, the following steps describe how it's done in Logic:
- Start a new project with two mono audio tracks and save it with a name such as 'Impulse Response Template'. Name the audio tracks 'Oscillator' and 'Sweep'. This detail will prove useful later on, since any files recorded will acquire these names and will be easily identified (see screen 1)
 1: Naming tracks before you record simplifies file identification later..
 - Navigate to Preferences / Audio and set the buffer size as small as possible to minimise latency.
- In File / Project Settings / Recording, turn off Pre-roll. You'll also need to make sure that the metronome click is disabled for recording (right-/command-click the metronome button on the transport bar).
- Change the ruler to show bar and time information. In Logic Pro 9, use the Marquee Stripe button (clock or note icon) situated at the top right of the Arrange area ruler, select 'Bar and Time' to display time references at the top of the screen. In Logic Pro X, use the 'View' menu above the Arrange area and select Secondary Ruler.
- Enable the Autopunch function on the transport bar and then set the in and out points, using the red bar displayed at the top of the ruler to define a 10-second recording. We'll use this to record the sine sweep and impulse responses with an identical length. These lengths must be identical or the process won't work properly.

Once this groundwork is complete, we can generate and record the sine signal using an oscillator plug-in. Since Logic won't easily allow the output of a plug-in to be recorded to the same track, we're going to route the output of the oscillator to the Sweep track to be recorded.
- On the Oscillator track, insert a Test Oscillator from the Utility category in the plug-ins menu. In the plug-in window, select a 10-second sine sweep and click on the disclosure triangle at the bottom to reveal the Sweep Mode parameter. Select 'Logarithmic'.
- The plug-in requires an automation event to trigger the sweep at the start of the recording. Press A on the computer keyboard to display the automation lanes and then select 'Sweep Trigger' from the list of parameters for the Test Oscillator plug-in. Draw in an 'Off' value at the very start, followed as closely as possible by an 'On' value.
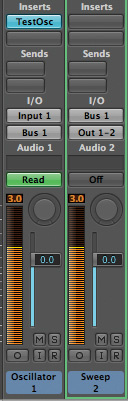
- In the Mixer, route the output of the Oscillator track to the input of the Sweep track using a bus. Screen 2 demonstrates the signal routing.
- Ensure that the Sweep track is in a record-ready state and then check the level of the signal coming through from the Oscillator track. If the signal is clipping or peaking at too low a level, adjust the Oscillator track fader to compensate.
- Record the sweep, making sure no post- or pre-roll recording takes place. After successfully recording the sweep, the Oscillator track should be muted.
Take The Room
It's now time to plug in microphones and record impulse responses. The basic process for rooms and other acoustic spaces is to play back the Sweep track through a loudspeaker in the room whilst re-recording the signal with one or two ambient microphones.
Condenser microphones are favoured here for their sensitivity and high frequency response, with omnidirectional patterns yielding the most ambience. Alternatively, directional microphones will work well placed high up in a room, and for a diffuse chamber reverb effect, turned away from the speaker. You also have the choice of mono and stereo impulse responses; stereo, of course, gives more of a sense of immersion, but mono may be perfectly suitable for special effects or localised reverbs applied to parts you don't want to 'spread out' into the stereo field.
- In Preferences / Audio, ensure that software monitoring is disabled to avoid generating feedback.
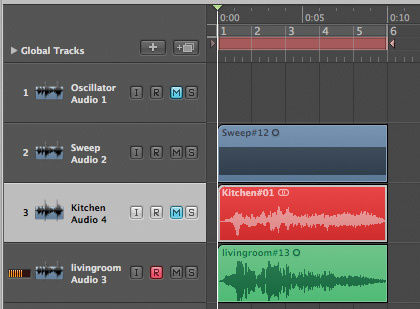
- Connect and position the microphone(s) and create a new audio track for recording the impulse response. Choose between mono and stereo, and then name the track according to the space being captured and the distance between the speaker and the mic(s), for example, 'Kitchen 3m'.
- Select the appropriate input(s) for the new track and make it record ready. Play back the Sweep track at a level loud enough to excite the room. Be sure to protect your hearing, as the sweeps can get quite loud. Increase the gain on the microphone preamp(s) until you achieve a healthy signal that doesn't clip. When happy with the level, proceed to record. Again, the recording must be 10 seconds in length, so keep auto-punch activated. (See screen 3.)
Once the first impulse response has been recorded, mute it and create a new track for the next impulse response (for example, 'Kitchen 4m', 'Garage 5m' and so on). It's well worth recording with microphone(s) placed at different distances and heights in each room to give you more options — you'll be surprised how different they sound.
Venture Into Space
The final stage is to remove (deconvolve) the sine sweep from the impulse response recording, and then trim it to the correct length so we can load it into Space Designer. If this important stage was missed out we'd end up with a bizarre 10-second reverb, complete with eerie sine sweep!
- Create a new audio track in the Logic project and name it 'Deconvolve'. Insert a Space Designer plug-in on the track and select the 'Controls' view at the top of the plug-in window. This reveals some parameters that are hidden behind the graphical user interface.
- From the 'Decode IR' menu select 'Decode IR'. A dialogue window will pop up and ask you to specify the 'coded' impulse response file to be decoded. Navigate to the project folder and select the file pertaining to the final take of the impulse recorded. For example, 'Kitchen3m#01.aif' would be an impulse response file recorded in the kitchen in one take.
- A second dialogue box appears and asks you to specify the test signal to be removed from the recording. Select from the project folder the specific sine sweep recording used when recording the impulse responses (such as 'Sweep#01.aif', or whichever is the final take).
- Finally, you are asked to specify a location and filename for the Space Designer preset that is created. Select the project folder as the destination and name the file appropriately.
- To create a series of impulse responses, repeat the decoding process using the same Sweep file as the test signal.
- Using the Finder, locate the Space Designer preset you have just created. Press enter and manually change the file extension to '.aif' instead of '.SDIR' (the preset is simply an audio file with a modified extension).
- Open the file with an external audio editor of choice (alternatively, you could achieve this in Logic with some careful editing and bouncing). Listen to the impulse response and trim it at the point where the reverb tail has fully died away — this was around 1.2 seconds for my kitchen.
- Add a very short fade out to the end of the file, normalise and re-save/export it in AIF format .
- In the Finder, re-name the final, trimmed impulse response file by changing the AIF extension back to the Space Designer file extension (.SDIR).
You now have an impulse response that can be freely used within Space Designer for mixing projects. Simply load in your new preset using the 'Load IR' function situated towards the left-hand side of Space Designer's graphical user interface.

Although some sweat and tears are required, the process of creating impulse responses becomes easy once a template project has been created — allowing you to capture rooms, spaces and even hardware with ease and efficiency. Custom impulse responses will make more of an impact than you'd perhaps expect, helping your mixes stand out from other Logic productions that invariably rely heavily on Space Designer stock impulses. So, step away from your usual presets, try something different and start sweeping!


