The SOS team help Peter May to brush up his drum sounds and put more life into his mixes.
 Although the toms and snare sounded acceptable on the first visit, on his return Paul optimised the sound with some careful tuning and damping.Peter May's studio occupies a room at the rear end of the ground floor of his house in a space known as 'the void', a room half set into the ground, which certainly helps with the sound isolation. Peter is a school teacher, but was fortunate earlier in his life to get a teacher placement at Abbey Road studios, which gave him the bug for recording and lead him to question his choice of career!
Having worked his way up through TEAC four- and eight-track machines, Peter has been recording since the late '70s, but has now moved over to a computer-based system comprising a Windows machine running Steinberg's Cubase SX. He has also recently invested in a new monitoring system comprising Genelec 1029As with a matching subwoofer. Although at the time of our first visit he still used his Soundcraft Spirit powered mixer for monitoring his computer mixes and for playing back CDs and so on, recording was done through a recently acquired Allen & Heath GS3 analogue console, which feeds his 10-input Terratec audio interface.
The room itself is separated into two areas by a supporting buttress, and all the walls have been covered using thin wood-effect panelling on battens with lightweight rockwool behind. Although this makes the surfaces very reflective, the sheer amount of stuff in the studio provides a lot of dispersion to keep this nicely under control, and the panelling (more by accident than design) seems to act as quite effective bass trapping.
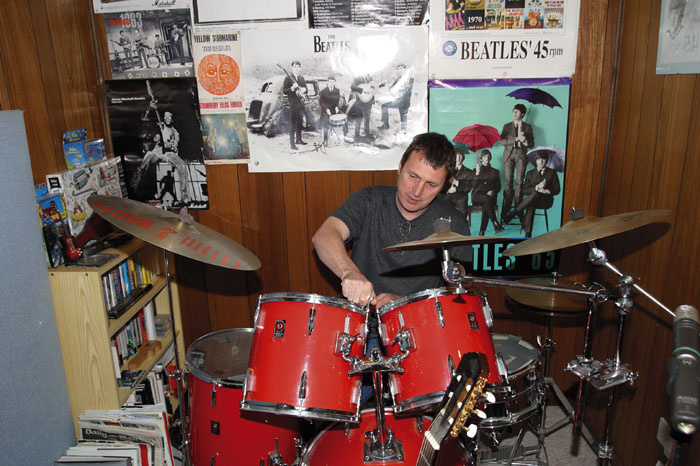
Peter was having trouble getting a good sound from a live drum kit, which he had been recording with just four mics — kick, snare, and two overheads. As he'd recently bought a set of AKG clip-on drum mics, he wanted to explore ways of using these more effectively. He was also having some problems with his mixes sounding lifeless.
First Things First
The first item on our agenda was to check out the monitoring system. This was not set up symmetrically, nor would it have been practical to do so because of the shape of the room, but we heard a problem with the lower mid-range that wasn't attributable to this. A quick check around the back of the 1029As revealed that Peter hadn't set the DIP switches on the back of the speakers for use with a subwoofer, so the necessary low-end roll-off wasn't happening. Hugh adjusted the DIP switches with the aid of a long thin screwdriver and, once they were correctly orientated, the sound improved noticeably. Playing a track with a busy bass line showed a few small subjective discrepancies in bass level between notes, but they were not nearly as severe as we expected in this room, so we decided to leave the subwoofer where it was (beneath the table supporting the console) and press on.
 Peter had been positioning his overhead mics much too close to the kit, so Paul and Hugh moved them higher to get a more cohesive sound. However, the AKG C1000s Peter had selected for the task were rather dull-sounding, so Paul recommended replacing them with a pair of the new generation of inexpensive condenser mics to get a brighter sound.
I offered to tune the Premier drum kit lurking at the other side of the buttress, but Peter rather guiltily confessed that he'd lost the tuning key. Fortunately, the snare and toms were fairly well tuned anyway and I only needed to apply a small pad of tissue (using masking tape in this instance, though gaffer tape is better) to the upper and lower tom heads to tame the ring. The kick drum was a different matter, as the head was too worn to get any depth in the tone, but I retuned it as best as I could (via the hand-operated tuning lugs), replaced the lightweight pillow inside the drum shell with a heavier sleeping bag (a thick blanket would have been better still), and taped a plastic card to the head to try to get more snap from the felt beater. As a rule, wooden or plastic beaters give better definition to the tone for rock and pop music.
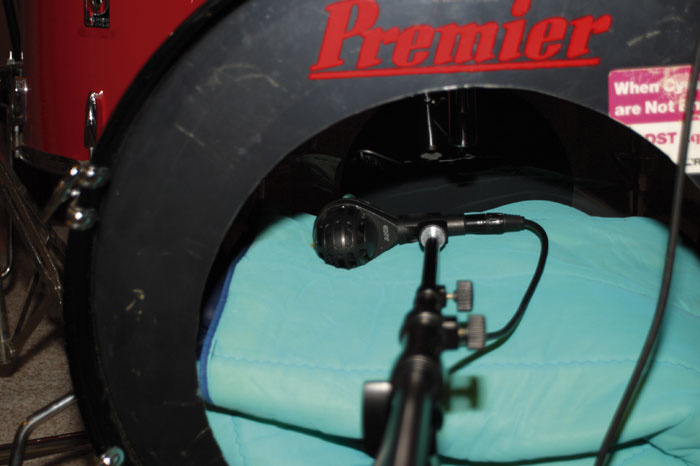
 Peter's original kick mic positioning several inches outside the body of the drum didn't give nearly as much definition to the recorded sound as miking close to the batter head inside the drum.Peter had been setting up the AKG kick mic around a foot in front of the drum, so we repositioned it inside the shell on a boom arm and then experimented with the fine positioning to get the best tone we could. The outcome was a sound with much better definition, but still without any real depth — we weren't getting any depth acoustically either, so a new head has been added to Peter's shopping list.
After raising the AKG C1000 overheads to a more suitable positioning, I played some particularly sloppy drum rhythms so that Hugh could make a test recording on Cubase SX. One of the clip-on mics was used for the snare, but we recommended that Peter experiment using his other clip-on mics on the toms after listening to the test recording. The overall sound wasn't bad, but close-miking the toms gives you more control over balance and also gives a more solid sound that's well-suited to rock and pop work.
After recording, we used the gate in Cubase to clean up the kick drum, and also applied some EQ. A boost at 80Hz accentuated the (sadly underwhelming) thump of the drum, and a little more boost at around 4kHz emphasised the smack of the beater. A further dip at 150-200Hz stopped the sound becoming boxy.
It is worth noting that drums recorded in small or dead rooms won't sound great unless the right reverb is added, and in many cases the reverb plug-ins that come with most sequencers don't really cut it. What you really need is not a washy or splashy effect, but the sense of being in a real room. The newer convolution reverbs do an excellent job of this, but they are very processor hungry. The best settings to use tend to be ambience programs or responses taken in real studio rooms, and the host-powered Cubase SX reverb wasn't really doing the job. Peter said he was in the market for a better 'in-computer' reverb, and as his studio was almost midway between where Hugh and I live, we agreed to a second visit after he'd made any recommended changes and added some new equipment. I told Peter that I liked the reverbs that came with TC's Powercore, and as the Powercore Element card is now so cheap he said he was seriously considering buying one.
Vocal & Guitar Miking
 Paul and Hugh quickly noticed Peter's unusual vocal-miking setup! Given that the NT1 is a side-firing mic, a much clearer sound was immediately obtained by having the singer address the correct side of the mic, as marked with the gold dot.Early on we noticed a Rode NT1 mic set up on a boom stand with a pop shield positioned over the end, rather than at the side — the NT1 is a side-entry mic, so the end of the mic is 90 degrees off axis. When we asked Peter about this, he said that he recorded this way because when he had tried singing into the side of the mic it had produced a dull sound. It transpired that he'd been using the back of the mic rather than the front, which is perhaps understandable when you've been used to dynamic mics all your life, where there is only one obvious business end. In fact, the Rode mics use a gold stud to denote the correct side to yell into, and as soon as this was explained to Peter, he had no further problems. Nevertheless, as the room had so many reflective surfaces, we did suggest hanging a heavy duvet behind the singer when recording vocals, as this would help soak up any excessive mid-range and high-end liveness.
 Although the Line 6 Pod is associated more with guitar sounds, Paul showed Peter how you can set up the unit to create perfectly good bass sounds as well.Peter had also tried using this same mic for recording the acoustic guitar, but with disappointing results. He had felt that perhaps he should be recording in a more dead-sounding area, but I thought the studio room was fine and might even benefit from a sheet of hardboard or MDF on the floor (beneath the guitar) while recording, so as to reflect some sound back up to the mic. We set him up playing his Takamine acoustic guitar and got him to listen to the sound through headphones as I moved the mic around. Peter was surprised at just how much the sound changed with different mic positions and the best sound we achieved was with the mic a couple of feet away looking in the direction of where the body meets the neck. It was generally agreed that the range of sounds available from the NT1 and his guitar provided plenty of scope, and that excellent results could be achieved this way.
For his electric guitar work, Peter had had the good fortune to pick up a Line 6 Pod, in excellent condition with PSU and manual, very cheaply at a local car-boot sale. He'd gone through the presets, but hadn't found much he liked, so I spent a few minutes setting up some '70s rock and blues sounds for him using his old faithful '70s Les Paul Standard.
 The action of Peter's Gibson Les Paul Standard was set too high, so Paul used an old junior hacksaw blade to deepen the nut slots slightly, but suggested that Peter also have the instrument set up professionally as soon as possible.On our second visit, I set up four further sounds to use as generic bass DI settings for his newly acquired Aria bass, and these were based on the Pod's Brit 30 amp setting and on the Marshall-inspired amp setting played through a 4x12 speaker model. The Pod Clean amp model is also capable of some descent bass sounds, as is the Tube DI setting, though I recommended that Peter buy the update chip to convert his Pod to version two software, as that allows you to mix amp models with different speaker models.
While playing his Les Paul, I noticed that its intonation wasn't great, the reason being that the nut slots had never been cut to the appropriate depth. This meant that fretted strings went slightly sharp, and also that the action was higher than necessary. This was compounded by a slightly excessive bend in the neck, which could be redressed by a minor truss-rod adjustment. As this was potentially such a lovely instrument, I suggested Peter treat it to a proper set up at the local guitar shop, as it had evidently never been set up since it was bought, but I did deepen the nut slots for him using a ground-down junior hacksaw blade, which improved the playability immeasurably. Now when he gets it set up properly, the slots will only need a little extra dressing with the correct slotting files. We did manage to find a box spanner to fit the truss rod, but it seemed reluctant to turn and I didn't want to be the one to snap it! Maybe a good soak in WD40 would have loosened the recalcitrant nut?
Studio Ergonomics
 Peter's studio layout was less than ideal for mixing in software — when seated at the computer, the main monitors were set up directly behind him.
The recording system was arranged so that Peter had the mixer and monitors in front of him, where they should be, but his computer was directly behind him. This meant that when he was setting up mixes and effects in the computer his back was to the monitors, which is less than ideal. We felt he would be better off moving the computer to the bench to his right so that at least he could remain facing the monitors as he mixed. This would be possible if the large CRT monitor was replaced by a flat-screen model, and this would also have the advantage of avoiding interference from the monitor scan coils causing hum on his guitar pickups. On our return visit he had moved the monitor screens to the bench on his right as suggested, which made much more sense from an ergonomic point of view and also left him with more free work-surface space.
The Return Visit
Our second visit had to be postponed once, because Peter had managed to contract a particularly unpleasant computer virus, but when we finally arrived Peter had replaced his large VDU monitor screen with a pair of 17-inch flat-screen displays, and had also replaced his empty chocolate Hob Nob packets with full ones! We suggested that the system would work better if the Powered mixer was removed from the setup altogether, as the Allen & Heath mixer had more than enough inputs and facilities to handle recording and monitoring. As Peter currently does virtually all his mixing within Cubase SX anyway, the mixer doesn't actually have to do much in the way of mixing at all.
He'd rewired his system along the lines we suggested, with the direct outs on the first eight channels feeding his soundcard inputs, while the remaining channels were used to monitor the stereo soundcard outputs plus any other sources. Peter had originally been sending the mixer channels to the interface inputs via the buss faders, but, as he invariably records one channel onto one track, the direct outs offered a shorter and theoretically cleaner signal path. Peter had also bought a Powercore Element system since our first visit, but was having some problems installing it. This turned out to be due to a faulty card, and thanks to the efforts of Jim Motley at TC Electronic UK (who diagnosed the problem) and the guys at Digital Village who supplied the card, a replacement was organised without delay.

However, Peter wanted to work on some mixing while we were there, so I suggested that we use his existing Alesis Midiverb, and feed it from a spare output buss in Cubase SX so that it would become part of the effects send/return loop within his sequencing software. The reverb returns could be taken back to a spare stereo pair of inputs on the audio interface and then mixed back into Cubase, but just to prove the principle we brought the reverb return back into two spare channels on the Allen & Heath mixer, as Peter tends to mix to a stereo DAT recorder connected to the mixer anyway. This worked fine, and though not an esoteric reverb by any means, we still felt it sounded a lot better than the built-in Cubase reverb, which after all had to be designed to minimise CPU usage. The channel aux sends in Cubase could be used to control the reverb level in the usual way, and provided that Peter makes a note of the reverb settings and return levels on the analogue desk, everything should be repeatable.
Fixing The Mixes
Since our first visit, Peter had obtained a large acoustic office divider screen which he'd placed between himself and the drum kit area to improve separation and to preserve his hearing. He'd also recorded some new material which was rock/pop in style, and the recording seemed much improved over what we'd heard before, though there were still some areas that we felt needed attention.
 Peter's host-based reverb processing was letting his mix down, so Hugh suggested that he should plumb his Alesis Midiverb into the system, fed from an output of the computer's audio interface and returned to the mix via the Allen & Heath analogue mixer.
For example, the drum overhead mics lacked brightness, as Peter was still using his AKG C1000s for this job and they tend to have a fairly subdued high end. Adding 'air' EQ by applying a wide parametric boost at around 12kHz helped. The ideal solution would have been to assign the C1000s to duties better suited to them and to use a pair of basic, flat-response, small-diaphragm capacitor mics as overheads. Where budget is a concern (and where isn't it?), there are numerous low-cost mics that will work perfectly.
Although Peter still hadn't managed to replace the kick drum head, he had invested in a new tuning key for the rest of the kit! The continued tenure by the aged head meant the kick still needed generous amounts of 80Hz and 3-4kHz boost to add any sense of weight and impact, and even that didn't compensate for the state of the head. One tip here is that, when faced with this kind of sound at a stage where it is too late to re-record the part, you can sometimes add the desired depth by using the sub-octave plug-ins that come with many sequencers, just to add an extra layer of depth to the sound. This is really a salvage measure rather than good recording practice, but it can get you out of a tight corner when all else fails. The snare sound was also quite dull, and needed a lot of high-end EQ. Unfortunately Peter didn't have a harmonic enhancer plug-in, as I've had some success using the one in Emagic's Logic to add life to dull drum sounds — and indeed to lifeless overhead mics.
On one track, Peter had used a synthesized bass sound instead of a bass guitar, and to add energy and depth I tried patching it through Steinberg's tube-emulation plug-in. In isolation it didn't sound exactly like a bass guitar, but once in the mix, it played its part a lot better than previously and actually sounded pretty good. That left the vocals, which sounded absolutely fine now that Peter had sorted out his NT1 mic orientation. However, because this was a rock track the voice needed some fairly strong compression to help it sit in the mix and to give it a high-energy character. We used the Cubase SX dynamics for this, using a 6:1 ratio, automatic time constants, and a threshold setting that gave 10dB gain reduction on peaks. This is more than I'd normally use, but it suited this vocal part extremely well. Peter also played us some tracks featuring acoustic guitar, where he'd tried some of the mic techniques we'd explored on our first visit, and I have to say the results were pretty good and needed little in the way of EQ.
All's Well That Ends Well
Once again, the big picture turned out to be the sum of a lot of little parts. Rearranging the studio layout and simplifying the way the mixer was wired helped a lot, and Peter is planning to add another wiring loom so that he can mix all the separate outputs from his soundcard in the Allen & Heath mixer where necessary. Plus he has added a couple of capacitor mics to his list so that he can get a brighter overhead sound on the drum kit. His future plans include moving his control room into the adjoining garage so that he has better separation and more room for the musicians, but that's still some way off.
Peter's Comments
"You would have thought that I would have seen it all and done it all, having been involved in the world of home recording for 30 years. However, when Paul and Hugh visited I was amazed at how much there was still to learn and think about — they went through the studio with a fine-toothed comb! I think I was expecting, having read previous Studio SOS articles, that I would need to cover the walls with acoustic foam, yet by the end of the session I was pleased that Paul felt the studio didn't need that treatment. I felt really embarrassed about the vocal mic being the wrong way round, but it just goes to show that, even with all that experience, you can still get something wrong! The mixing techniques I was shown were really valuable and with the new Powercore system set up I started remixing old files to bring them back to life.
"Home recording must be potentially one of the most expensive hobbies around — I imagine many readers will have felt dissatisfaction with their gear at some point, and the temptation to upgrade can seem irresistible. Replacing my monitors with flat-screen versions and buying the Powercore have burnt a hole in my pocket, and yet I've still got the drum head to replace and I must seriously think about new mics for the overhead drum positions. Oh, and the Les Paul still needs to be set up... I'm beginning to see that I need a long-term plan for buying gear, with a list of priorities. I wonder if there are any Russian football millionaires out there who would like to sponsor a small home studio? They probably couldn't afford it..."