In a departure from the norm, we take Mix Rescue on location and get back into the swing of mixing on hardware!
 Mike tweaking the controls at the Yamaha digital desk that forms the heart of David's studio.This month's track, 'Looking For Something', was sent to me by SOS reader David Greaves, initially just to get some advice on potential mix tweaks. Although his version of the mix was actually pretty respectable already (albeit with a few overall balance issues), it was managing to sound a bit brittle and empty, despite a fairly prominent bass line. The root of this kind of shortcoming can be really hard to trace without hearing the raw multitrack files, so I asked if he could send them over to me so that I could give him some more useful tips. It wasn't as easy as all that, though, because David's studio was a hardware-only setup, which he had based around a digital console (the Yamaha 02R96) and a Mackie HDR24/96 digital 24-track recorder.
Fortunately, Lady Luck intervened and it turned out that David's home studio was just down the road from me in Cambridge. So I suggested that I just pop over and look at the track as a kind of 'on location' Mix Rescue, in order to pass on some mixing tricks that would be directly relevant to his setup.
Mix Rescue On Location
The song had been put together by local singer-songwriter Matt James, with the help of keyboard player Sam Ball, using a Korg Triton Pro X keyboard workstation and a Yamaha QY700 stand-alone hardware sequencer also in David's studio. Matt had then overdubbed the acoustic guitar and vocal parts with Audio-Technica AT3035 and Neumann TLM103 mics through a TL Audio Ivory 5050 preamp/compressor.
When I paid David a first visit, some of the MIDI parts were still running live through the console from the Korg and Yamaha units, and I could immediately see this causing practical problems with our plan of mixing the track in stages over a number of different visits: given that David would be using the studio for other projects between my mixing sessions, it would be unlikely that I'd be able to recall the mix in progress accurately. Fortunately, upon totting up the number of sounds actually in use in this case, it turned out that there were just enough spare tracks available on the HDR24/96 to accommodate everything, so I suggested that we bounce all the remaining live parts to audio so that we could guarantee that the mix recall would be consistent. Even where recall is not a problem, bouncing your MIDI tracks to audio before mixing can also be a good way of mentally 'switching gear' between the writing and mixing stages of a self-produced project, so I often recommend this to musicians working on their own.
Another thing I asked David to do for me before I started mixing properly was to duplicate the outputs from the multitrack machine across two sets of channels in the Yamaha console. This was so that I would have the option of trying various parallel dynamics tricks without running into processing latency problems. In most software sequencers, something like parallel compression, for example, can be achieved just by setting up a compressor as a send effect. In most digital mixers, however, the extra delay introduced by the return channel's processing will usually cause phasing problems. Setting up duplicate channels, on the other hand, avoids this pitfall by keeping the processing delays on both the processed and unprocessed signals the same. Another advantage of this approach in David's case, of course, was that it left the fixed number of channel auxiliary sends free for sending signals to other effects.
In the end, having parallel processing available really paid off in this particular mix, and I used it in a variety of different ways on different instruments. A lot of SOS readers don't really seem to appreciate the scope of this approach, so given that there were so many examples of it in this mix, I'm going to go into a bit more detail about it.
Parallel Processing In Context: Vocals & Bass
On my next visit to the studio I was able to begin work. Fortunately I had some experience of Yamaha's digital mixer approach via jobs I'd done with the original 02R desk and the AW4416 multitracker, so it was pretty straightforward to get up to speed after a few pointers from the Yamaha's user manual and, of course, from David himself.
To begin with, I headed straight for the vocal, which was clearly meant to be the star of the show. As I'd suspected from listening to David's original mix, although the mic wasn't capturing the brightest of sounds there was already too much sibilance in there, and if you tried any kind of high-frequency EQ boost to make the vocal as a whole more upfront sounding, the 's' sounds became really overbearing. My immediate thought was that I could sort this out by loading a de-esser algorithm into one of the 02R96's four internal effects processors and inserting that onto the vocal channel to sort out the problem. A small hitch quickly appeared in this plan, however: the 02R96 effects didn't include a de-esser.
 A mono 'grot-box' such as this Canford Audio speaker that Mike uses can help you to hear what's happening in the crucial mid-range of a mix.My second wheeze was to use the multi-band compressor algorithm provided instead, to limit the vocal's high band and achieve much the same effect. But not so fast! That also came to nothing once I realised that there were no independent threshold controls for the different compressor bands — an essential for this application. I could perhaps next have used the console's routing facilities to set up the classic 'compressor with an EQ in the side-chain' de-essing method, but I've never had great results with this strategy in practice, and was 99 percent certain that sibilance on this scale would fall foul of lisping side-effects well before I pushed it as hard as I needed.
So I turned to parallel processing, which finally let me work around the problem from a different direction. Rather than trying to get rid of the sibilance so that I could then brighten the whole signal, I used the parallel lead-vocal channel to isolate some high-frequency brightness for the non-sibilant sections, which I then faded up alongside the main vocal channel. The way I set up the parallel channel to do this was by chucking out everything below about 1.5kHz using a high-pass filter, and then limiting the remaining frequencies savagely in order to hammer down the sibilant-induced peaks. Although the output of the parallel channel sounded like a wasp exfoliating itself, once this was mixed in with the main vocal channel it gave me a lot of extra brightness without as much sibilance. There was still a bit too much sibilance for me even then, though, so I also cut a couple of decibels at 9.5kHz on the main vocal channel, compensating for the change in tone by further fading up the parallel channel.
When I later came to automate the mix, the parallel channel ended up serving another useful purpose, too. As the mix got busier, the increase in overall high-frequency density was masking the top end of the vocal and distancing it. Just riding up the parallel channel's fader at those points was very effective in combating this common mix problem. With the sibilance pretty well tamed, the rest of the main channel's vocal processing became fairly straightforward: some high-pass filtering and 3dB of peaking cut at 265Hz to tone down some fairly heavy proximity effect; and soft-knee compression with a 3.5:1 ratio and a maximum of about 8dB gain reduction to lock the vocal more reliably into its mix position.
My next stop was the bass guitar, which had an important melodic role to play, so I reasoned that it would make sense to get that working first, before slotting the other more rhythmic parts in around it. The raw sound wasn't bad, the instrument in question having been DI'd through a Line 6 Pod on its Tube Preamp setting. However, the low-frequency levels were rather inconsistent, even with 4-6dB of overall compression. One approach might have been to automate a low EQ shelf to adjust the bass spectrum where necessary, and although this would probably have given the most transparent-sounding result, in the situation I felt I couldn't trust the monitoring situation in David's studio enough to set up the automation by ear. Ever the pragmatist, I therefore resolved to reduce the dynamic range of the low frequencies in a more automatic way.
Had the Yamaha's multi-band compressor had separate threshold controls I'd have used that for the task, but as it was I turned again to the concept of parallel processing, focusing the bass parallel channel on the LF region with a 10dB high-shelving cut at 180Hz, and then compressing that heavily with an 8:1 ratio, before mixing it in with the main bass track. This inevitably made the sound bass-heavy, so I boosted the main track by 5dB above 1.5kHz with a high-shelving filter to rebalance the combined tone. There still remained an undesirable resonance to the sound at about 200Hz, but it was the work of a moment to dip that out with fairly narrow peaking filters on both bass tracks.
Working Around Monitoring Problems
One cause for concern with this mix job was the monitoring situation in David's room, as the bass levels were very uneven because of the porting and positioning of the speakers, and the irregularities were compounded by the lack of any real bass trapping. This not only prevented any useful judgement of the overall mix tonality, but also made it almost impossible to balance the kick-drum and bass levels against the rest of the track. Because of the way the mixer and racks were set up in the room there actually wasn't a great deal that could be done about this, so I decided to do my best to work around the problem instead.
My primary tool for this was my own personal 'grot box' speaker, which is a little unported active speaker from Canford Audio that fulfils the same kind of function for me as the famous Auratone 5C does for many other mix engineers. Because it delivers single-point mono at a pretty low level, it's able to provide me with a picture of the mix's crucial mid-range balance that is remarkably resistant to many typical room problems. However, its single small driver inevitably doesn't sound very hi-fi, so I supplemented it for more qualitative decisions with a pair of top-of-the-range Sony headphones that I'm very familiar with. Of course, as much as this combination of systems enabled me to make fairly sensible balancing and processing decisions, I could only take an educated guess about the levels at low frequencies, so I had to adopt a cautious approach to this element of the mix, burning in-progress rough mixes to CD at a number of points to evaluate on my own full-range monitoring system.
Filling Out Acoustic Guitar & Pianos
With the vocal and bass up and running, I brought in the main acoustic rhythm guitar next. The raw recording had been done with a spaced pair of mics a foot or two away from the instrument and covering the fretboard and soundhole. The soundhole mic was contributing the kind of resonant 'woof' you'd expect from a mic in this position, so I high-pass filtered at 100Hz and cut another decibel at 280Hz with a peaking filter, to stop too much interference with the bass guitar in the lower mid-range. This might seem a low cutoff frequency for a high-pass filter, but remember that the cutoff point of a filter is typically measured at the -3dB point, so the effects of the EQ extended well up into the problem frequency region.
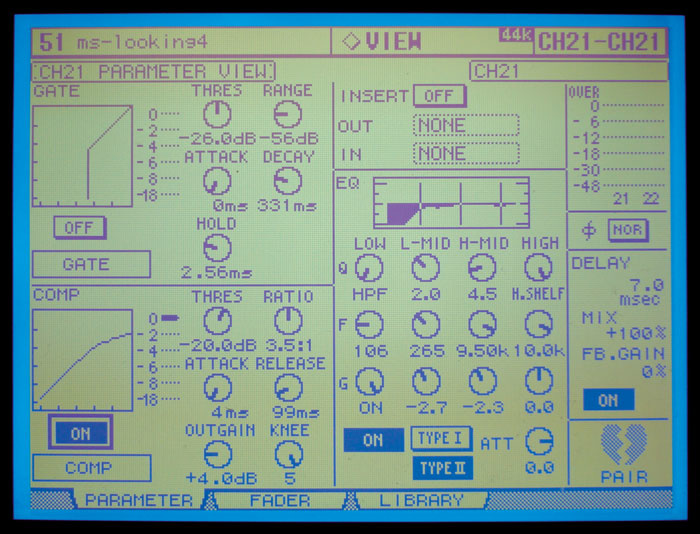
 The settings used by Mike to process Matt's vocals: the screen on the left shows the processing applied to the main vocal channel, while that on the right has the settings used for Mike's parallel processing approach to de-essing.The thing that struck me about all the guitar and piano parts in David's original mix was that they seemed to lack enough sustain and warmth, and it was this characteristic that I concentrated on maximising. My first tactic on the acoustic rhythm guitar was to use a low-ratio (1.3:1) but fairly fast-reacting compression setting to deliver around 2-4dB of gain reduction most of the time. In some ways this is quite similar to some people's mastering compression setting, because it lifts low-level details fairly transparently. The low-level details in this case were the sustain phases of the picked notes, so it made the notes ring on more, and the choice of a quick attack time also helped control the picking transients a little too.
However, there was only so much extra sustain I could get in this way without the compression becoming really unnatural-sounding, so I decided to use parallel compression to take things further. Some people actually refer to parallel compression as 'invisible compression', because of its ability to heavily squeeze the dynamic range with fewer undesirable artifacts. Compressing the guitar's parallel channel to death with an 8:1 ratio again made it sound pretty dreadful on its own, but as usual with this technique, the ridiculously jerky gain-reduction side-effects all but disappeared once the signal was mixed in at a low level alongside the more lightly compressed main channel.
I did need to cut a little more low end from the squashed track to keep the combined sound clear of the bass. This isn't an uncommon requirement, because high frequencies in most natural sounds tend to decay quicker than low frequencies, which means that in pulling up the low-level details in the sound, the heavy parallel compression tends to also emphasise the sound's bass content. If you try parallel compression in the analogue domain (or with a digital model of an analogue processor), you'll also find that many compressors also slightly dull the sound when they're compressing heavily, simply by nature of their design, a factor which can also lead to a bassier overall tone if you parallel process.
In his original mix, David had chosen to leave out the acoustic guitar lead line that opens my version, but this seemed a real shame to me when I was mixing, so I reinstated it. In terms of processing, I followed a very similar approach that I had with the rhythm guitar, but also made the main channel's compression firmer as well, increasing the ratio to 3:1 to make the guitar melody as legato as possible.
 Matt James, whose track was recorded by this month's Mix Rescuee David Greaves.The piano parts also benefited from the parallel compression approach, but with a slightly different aim in mind. Here, the overall sound seemed already more resonant, but the high notes were a long way off competing in this regard with the lower notes — again this is partly in the nature of the instrument, but the particular choice of patch also had to take its share of the blame. Within the context of this mix it was the higher frequencies that needed more sustain for the purposes of audibility, while the low end was already conflicting with the more important bass guitar, so the inherent nature of the sounds was the opposite of what was required.
To start with, I just shelved off 10dB of low end at 90Hz from the main channels of the piano parts (which had repercussions on the frequency response all the way up to 1kHz in practice). This kept the bass line clear, after which I turned to the parallel channels to deliver a bit more 'ring' to the instruments' high registers. I first compressed them moderately with a 3.5:1 ratio, but kept the frequency range restricted to an HF band centred on 10kHz using a combination of low-shelf and low-pass filtering. A little of the parallel tracks in the mix did the job, although I also compressed the main channel for the piano lead line in the choruses a little too, to lend it some of the lead guitar's legato quality.
One less attractive side-effect of the parallel compression, though, was that it brought the piano line's background noise significantly up in level between notes, a problem most noticeable in the second section of the introduction before the drums first play. This wasn't something that I could do much about in this situation, because the noise was a result of David interfacing the multitrack recorder via analogue connections to the desk. The piano had been recorded at a fairly low level, which meant that by the time it arrived at the console it was already quite hissy, and my processing wasn't doing anything to help there! A sensible long-term solution to the problem would be for David to interface the multitrack and the mixer digitally, something that should also improve the overall production sonics into the bargain by reducing the number of A-D and D-A conversion stages all the recordings have to go through.
Rescued This Month
David Greaves teaches at Cambridge University and has a background in pro-audio design. In addition, he runs his own project studio and publishing web site, and frequently collaborates with other local musicians such as Matt James, the writer of this month's Mix Rescue song.
Parallel Gating For Controlled Kick-drum Weight
The final use I made of the parallel channels was in adding a bit more solidity to the kick drum. However, in this case it was parallel gating that was called for. What I wanted was a bit more low-frequency thud to the sound, but when I tried achieving this with simple EQ, I found that the low end of the drum rang on too long and made the drum rather tubby-sounding. By shelving off 8dB of high end at 280Hz on the parallel channel and then gating the result, I could mix it in with the main channel's signal to add additional low end, and then adjust the 'temporal overhang' as required with the gate's threshold and time controls; hold and release times of 17ms and 18ms respectively turned out to work really nicely. Later in the mix I also boosted a peak on this channel at 1.2kHz to add in some extra high-frequency information, which helped the drum retain its audibility better in the face of changes in the arrangement.
The rest of the tracks in the mix presented no real difficulties, although judicious EQ cuts were needed to slot each of them into their places in the backdrop of the mix. I also activated some of the dynamics processors on the snare drum, hi-hat and cymbal parts, to shape the envelope of each sound to taste. With separate gating and compression on all channels, this particular mixer provided ample tools for the job.
Reverb & Delay Effects
Once all the tracks were pretty much in the right place tonally, it was time to start adding in some effects to create the kind of warm reverberant sound that I felt the track needed. I had six effects processors available to me in total: the four internal engines of the console, and two courtesy of a TC Electronic M-One outboard rack unit. However, three of the effects were already accounted for before any reverbs or delays were in use: two providing separate stereo-widening effects for the important lead vocal and bass guitar parts; and one kept in reserve so that I could use it for bus-processing purposes while referencing during the final stages of the mix.
 Increasing the pre-delay on the TC Electronic M-One's reverb patch helped to create enough separation between the original sounds and the long reverb.Given that I was, by necessity, limited to three main send effects, I decided to use them in a very similar way to that described in my article about reverb elsewhere in this very edition of SOS. For that more general-purpose feature I deliberately chose more subtle and general-purpose reverb/delay settings to create my accompanying audio examples, but in the case of this Mix Rescue I wanted to show how the same overriding approach could be used just as effectively for a more obviously reverberant production style.
Out of the four effects I described in the other article, I used all but the slapback delay. (The slapback is the most dry-sounding of the four, so was least appropriate here.) For the shorter of my two reverbs, I dialled up an Early Reflections patch from Yamaha's internal effects engine, and then used the Room Size and Damping controls to avoid any sense of reverb 'tail'. The blending qualities of this effect made it vital in getting this particular mix to work, because of the fact that most of the tracks were either samples or close-miked sound sources, and as such had no real inherent ambient connection.
The drums used a lot of this shorter reverb to put them in the background of the track, despite their dry sampled nature — if you listen to my kick-drum audio examples, for example, you can hear how much I ended up using. However, both of the frequency extremes of the reverb were causing problems with the drum sounds. At the low end, the kick-drum reverb was making the mix sound confused and woolly, while at the high end the hi-hat was sounding overprocessed before it was blending well enough. Fortunately, as with many digital reverb units, the one in the desk had filtering built into it, so I used this to restrict the effect to a 530Hz-5kHz range, which made the effect fit into the mix much more smoothly.
Short reverb can also be very handy where you need to have a close-miked lead vocal turned up loud, but also want it to blend so that it doesn't feel stranded sitting 'on top' of the mix. What I found, though, when I first added the early reflections patch to Matt's lead vocal, was that it was changing the lead vocal's tonality noticeably, and not for the better — a result of phase-cancellation between the earliest of the reflections and the dry sound. To prevent it doing this I increased the algorithm's pre-delay setting, thereby altering the phase relationship between the reverb and the dry sound, until I had a more pleasing timbre. The increase in the pre-delay made the short reverb a little more audible than it had been before on the drums, but it was only a case of reducing a few send levels to sort this out.
My longer reverb came from the TC Electronic rack unit, and although it was by no means a 'long' setting in its own right (at 1.3s decay time), it did provide an obvious reverb tail and a sense of a large space. I dialled in a larger pre-delay of 70ms here, primarily because I wanted to use it for the lead piano and guitar lines, and also the lead vocals, so it was important to keep the rhythmic and consonant elements a little clear of the reverb onset, for the sake of clarity of line and intelligibility. This reverb also turned out to be useful for adding a bit of sustain to the snare, cymbal, and rhythm-guitar parts. The percussion and vocal sibilance were, as is typical, hitting the reverb quite hard to begin with, so I rolled the TC's internal low-pass filter setting down to 4.1kHz to hold this in check, and while I was at it I also turned down the algorithm's 'Lo Color' parameter to avoid any muddiness on the rhythm guitar line. The only parts with no reverb at all were the bass and the two synth pads: the chorus effect on the former was already doing quite a good job of blending it in with the other tracks, while the latter parts, by their very nature, stayed in the background perfectly fine without any effects at all.
The one delay effect I used was, in itself, an utterly unremarkable tempo-sync'ed stereo patch. David and I had to scratch our heads for a few minutes before we could work out how to set up a stereo aux send for this, but we got there in the end! What was a little unusual about it, though, was that I sent from the delay's return channel to both of the reverbs. The short reverb (in tandem with a low-pass filter set at 2.8kHz in the delay algorithm) pushed the delay repeats well into the background of the mix, while the feed from the delay into the longer reverb effectively made the reverb time appear to be longer than it actually was, without my having to use a longer reverb overall (which would have contributed more clutter to the mix).
None of the percussion parts were sent to the delay, because the obvious repeats would have been too distracting, but pretty much everything else was — the exceptions again being the bass and the synthesizer pads. It should already be obvious by now that many of the tracks were feeding all three of the chosen effects at once, but what's crucial to realise is that the proportions of the different effects on each track varied according to the function of each of the tracks. So, for example, on the one hand the kick drum needed only the distancing and ambient connection of the short reverb, and would have quickly caused problems with either the longer reverb or the delay. On the other hand, the lead guitar melody really benefited from the sustain and warmth that the longer reverb and tempo delay could provide, whereas it didn't need as much of the shorter reverb because of its position more at the front of the mix.
In this particular situation, where I was doing so much parallel processing, I also used different effect-send levels from the main and parallel tracks in many cases, to get the best out of the effect in question. So, for example, a slightly warmer delay tone suited the lead piano melody, so I sent to the tempo delay effect much less from the thinner-sounding parallel track than from the fuller-sounding main channel.
Final Adjustments
With all the tracks in place and the effects all on the go, the final stage of the mix, as usual, involved a good deal of level automation, mostly on the lead instrument and vocal lines, in order to even out some slightly uneven playing and to keep them locked in their respective places in the mix. While I was at it, I also automated some of the effect-send levels — for example, riding the long reverb down slightly in the verses and ducking the lead-guitar delay send in the introduction to avoid fret-squeak ricochets. I also (perhaps more noticeably) picked up the ends of some lead vocal lines and threw them into the delay to give more of a connection between adjacent vocal phrases.
I bounced the final mix back into the Mackie recorder at 24-bit resolution, and from there I was able to export it into my own system for a bit of final mix polishing — mostly just a case of a little fairly slow compression, just to even out the levels slightly. While I was doing that, though, a handful of the vocal's noisy consonants were still bugging me — some higher-frequency 'f' and 't' sounds, in particular, had made their way past my de-essing dodge. Fortunately, I was able to fix this problem fairly easily on my computer using Schwa's Spectro, which is a great little plug-in that ships as standard with Cockos's Reaper DAW software. This builds a spectrogram (a kind of colour-coded frequency map of how the frequency content of any audio file changes with time) and then lets you select frequency/time regions and adjust their levels. It was child's play to find the offending bursts of high-frequency noise while listening back to the track and simultaneously watching the spectrogram, whereupon a decibel or three of gain reduction elegantly put paid to the harshness and allowed me to create the final version you can hear on the Sound On Sound web site.
Remix Reactions
 David Greaves.David Greaves: "Although Matt and I have recorded a lot of tracks together, we've never bothered very much about the mixing phase. We've mainly just used a small amount of EQ, reverb, and early reflections. When we listened to the new mix of 'Looking For Something' we were more or less blown away. It is vast improvement over our simple mix: the vocals and percussion are really clear and the sound is never crowded even when there's a lot going on. The individual instruments now clearly stand out so they can be heard individually and the track sounds open and alive. Most impressive is the vocal sound: Matt says it makes him sound like a better singer! The drums too are much improved, sounding quite passable, whereas before they sounded just like the drum machine sounds they were. However, I think we will continue to use live drums wherever appropriate in our work.
"In our mix, the start of the song was particularly messy, so the new arrangement is a great improvement. The same goes for the lead break. Mike has certainly brought out the best bits there. All in all, the Mix Rescue really shows how much difference a good mix can make and that benefits are there to be had if you put some effort in."