Many musicians give great live performances when singing and playing guitar at the same time. So why not do it that way in the studio?
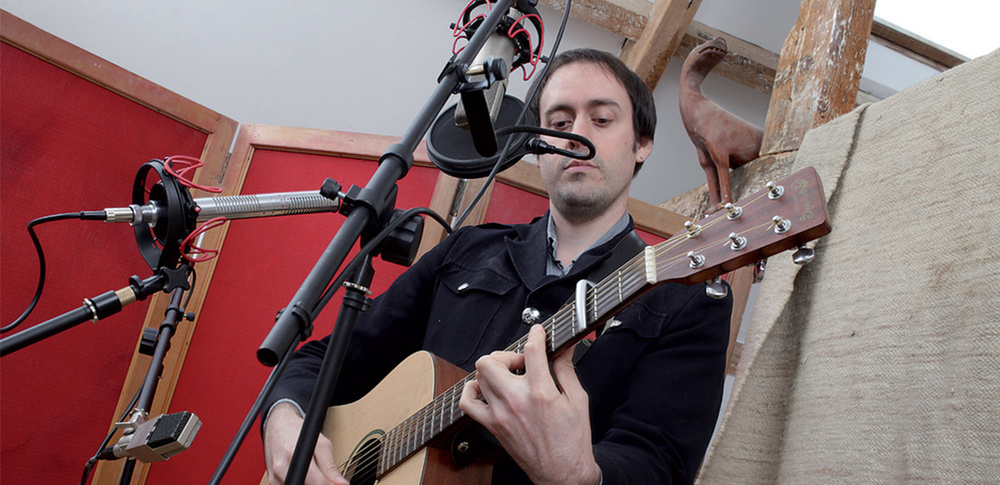
If your interest in recording stretches as far as owning a microphone, the chances are that sooner or later you'll be called upon to point it at someone who sings and plays guitar. From bearded folkies to whiny emo kids, via earnest singer‑songwriters, there's a lot of 'em about, so whether you're recording for fun or profit, it's worth knowing how to get the best results. With that in mind, I decided to explore some of the different mic choices, placements and techniques for recording a singing guitarist. Helping me in my quest was rather good singer‑songwriter Greg McDonald. Greg makes his living playing covers and original material in pubs around London, and I knew that he would have the skill and experience to play and sing the same thing over and over again in the same way, allowing us to compare the techniques as closely as possible. (For copyright reasons, and because we liked it, we ended up using the traditional folk song 'To The Begging I Will Go'.)
The Great Divide
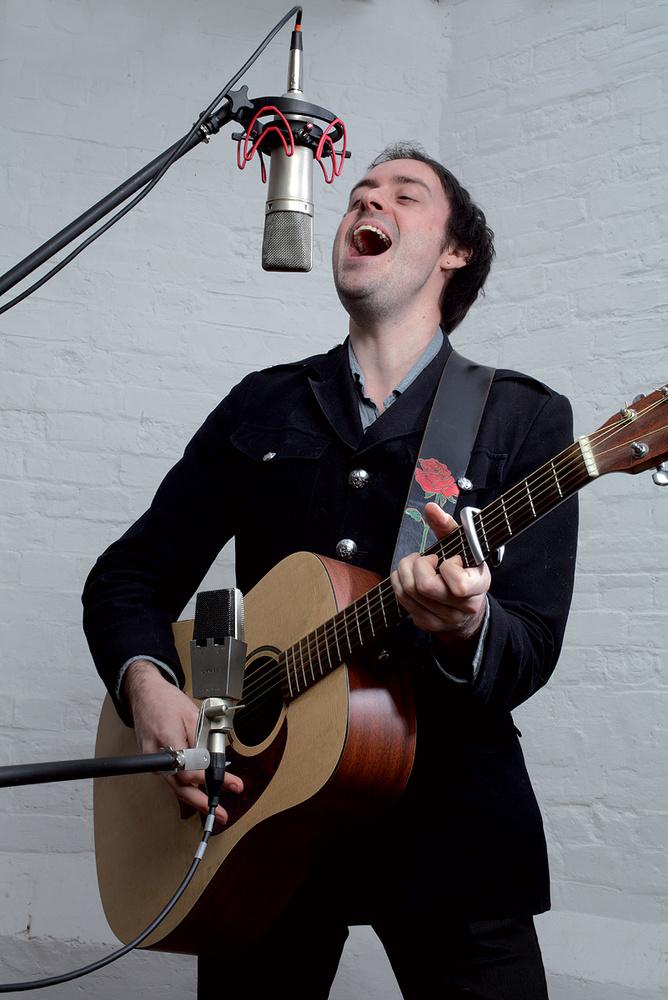 Photo: Richard EcclestoneThe obvious challenge in recording a singing guitarist is that you are, in effect, trying to capture two sources simultaneously and in close proximity. The mic choice and placement that gives you the perfect guitar sound might completely foul up the vocal sound, and vice versa.
In these days where we all have infinite audio tracks and sophisticated editing tools to play with, many people's first impulse is to record the guitar first, then overdub the vocals afterwards. If your overriding aim is sonic hygiene, this approach has a lot to recommend it. You're free to mic both sources exactly as you please, without compromising the guitar sound in order to achieve a satisfactory vocal sound, or vice versa. You can also comp both parts independently to achieve the most polished performance, without having to confront the question of whether you keep a dodgy bit of guitar playing because it also represented the best vocal take.
Yet it's also easy to overlook the fact that sonic hygiene is not, at the end of the day, what makes for a compelling recording. What matters above all is capturing a great performance, and it's valid to ask whether you will really get the best from a performer by requiring him or her to divorce their singing from their playing. Some people will, indeed, sing better when their concentration is not diluted by the need to play guitar too — but not everyone! For every performer who feels liberated by the opportunity to play guitar and sing separately, there will be others who will feel discomfited and undermined in confidence at the thought of just singing.
There are also practical reasons why recording the two components separately might not be feasible. The most pressing of these is likely to be time. If you're working against any sort of deadline, chances are you'll get much more done if you record everything in one go, rather than attempting to build up a track through overdubbing, especially if there are additional musicians involved too.
Finally, it could just be me, but aren't we all sick to death of endless overdubs and comps? I don't know about you, but personally, the longer I remain on this planet, the less patience I have for listening back through 27 vocal takes trying to identify the best example of each phrase. Recording live is just more fun, and in most cases it should be perfectly possible to achieve excellent results.
Comfort And Joy
Before you so much as place a microphone in anger, it's important to make sure that you're doing all you can to make your performer comfortable and help him or her to give of their best. Some will prefer to stand, as Greg did, but others like to sit, so make sure you can find them a suitable and comfortable perch. Some will be happier without headphones, but others may prefer some sort of foldback, or a click track, so be ready to provide this if needs be. (Be aware that click bleed into the vocal mic can be a real problem if you choose the wrong click sound, or if it's too loud.)
It's also very important to deal with any potential sources of unwanted noise, some of which can be quite obscure. For instance, small movements on the performer's behalf can cause the guitar to tap or scrape on buttons or belt buckles. Flapping headphone cables and guitar leads can be similarly irritating, as can ticking watches. And when you're dealing with a relatively quiet source such as this, noise pollution from whirring computer fans, central heating pipes, buzzing fluorescent tubes, traffic outside and so on can be murder, so be sure to vet both your recording setup and recording environment appropriately. (For the example sessions, I used the Rain Recording silent PC reviewed elsewhere in this issue, and a location space in the middle of nowhere, which is mercifully free of the noises of civilisation, but rather susceptible to barrages of loud birdsong!)
One Instrument Or Two?
There are, fundamentally, two approaches to recording a singing guitarist. One is to try to use separate close mics for the vocals and the guitar, to achieve the most pleasing sound possible on both, and to gain, if possible, a useful degree of separation between the two, which will allow independent treatment at the mix: different reverbs, level rides, EQ and so on. The other is to treat voice and guitar as a single sound source (which, after all, is what any listeners in the room will hear) and use relatively distant mic techniques to capture it all in one go.
The second approach has definite purist cred, but as our test recordings showed, opens up a number of pitfalls. As well as making mono recordings with a Neumann large‑diaphragm condenser mic in cardioid and in omni modes, I also tried a number of common stereo miking techniques. With a pair of cardioid small‑diaphragm condensers, I recorded coincident (X/Y), ORTF, NOS, and spaced pairs. I also tried a stereo ribbon mic as a Blumlein (crossed figure‑8) array, and the less well‑known Faulkner array, which uses separate figure‑8 mics, 20cm apart, both pointing forwards. I also put up a second LDC in figure‑8 mode so that an M/S stereo signal could be derived from this and the Neumann. Here you can see a couple of the many stereo miking techniques I tried for this article: M/S with two large‑diaphragm condensers, and NOS with a pair of small‑diaphragm cardioid condensers. None of them was particularly successful!
In each case, the mics were pretty much as close to Greg and his guitar as the acceptance angle of the stereo arrays would allow — about 70cm away — and positioned at a height that captured a reasonable balance between voice and guitar. It's immediately obvious from listening to any of the results that this sort of approach is never going to produce a 'modern' sound, where voice and instrument are dry and up‑front. The location space where we were recording has a pleasant but pretty lively reverb, and even with a thick rug hung directly behind Greg, all the distant mic techniques captured more ambience than I would have liked.
That would perhaps be less of a problem in a deader space, but it was far from the only issue. Placing a coincident or near‑coincident stereo array close enough to capture any worthwhile stereo width makes it surprisingly difficult to get the vocal precisely in the centre of the stereo field, and means that even slight sideways movements on the performer's part are very audible. This is a disconcerting effect, particularly on headphones!
Most of all, though, distant miking means that you are utterly dependent on the performer's own ability to balance the levels of his or her guitar and vocals. Even though Greg is a skilled, professional musician, it's obvious from the audio examples that his vocal is sometimes too quiet against the guitar, and at other times too loud. That's almost certainly a dynamic contrast that works well live, but in a recording it means that some lines get lost and others drown out the guitar.
All in all, I'm not sure I can think of a good reason to favour this approach in any practical recording situation. Were I forced to do it, I think I'd probably position the mics so as to pick up a lot more vocal than guitar, then hope to augment that where necessary with a close mic or pickup signal from the guitar. But if you're going to do that, you might as well abandon any attempt at purism and close‑mic the vocals as well...
Separate Lives
For most of us, I suspect, the foregoing detour through the world of audiophile purism has led only as far as our usual starting point: the wish to capture vocal and guitar independently, make each of them sound as good as possible, and achieve enough separation to process and balance the two separately. So, for the remainder of this article, that's exactly the challenge we'll be confronting.
How much of a challenge this is depends on the performer you're recording, as well as on other factors, such as whether they prefer to sit or stand while playing. Some performers, like Greg, have strong voices and well‑controlled right hands, and thus project a reasonable balance on average, even if we would want to adjust this on specific words and phrases. Then there are those who thrash away at their guitars, but sing weakly because they are used to having stage mics amplify their weedy voices. At the other end of the spectrum, I've recorded singers with lovely and hugely powerful voices who lacked any confidence in their guitar playing, and plinked folornly at their instruments in barely audible fashion.
Performers who've played live a lot will probably be used to the discipline of singing into a microphone, and may well have developed 'mic technique', backing off the mic for louder phrases. In a recording context, exaggerated mic technique isn't always terribly helpful, especially if the performer steps back from the guitar mics at the same time. Others may have got into the habit of swallowing the mic, which is equally unlikely to give the best results. Less experienced performers, by contrast, can find it difficult to keep their heads still while singing, and tentative guitarists will often look down at their fingers in the middle of a phrase. Someone in this position will probably find recording stressful enough already, without the added pressure of suddenly being ordered to keep still, so it may well pay to back off the vocal mic and trade some separation for a more consistent sound.
Although it's often worthwhile offering suggestions as to how the performer might play, you really don't want to be making a difficult situation more difficult for them. So, for instance, if someone is used to singing with his or her lips touching the mic, you could put up a stage mic purely for this purpose, with the main recorded signal coming from a second microphone above and behind it. Most of the time, this sort of lateral thinking is likely to be more productive than an impromptu course in mic technique.
Miking The Guitar
Let's start, then, by thinking about how to capture a good guitar sound that is relatively free from vocal spill. The test recordings I made with Greg confirmed what I had already suspected, which is that if your guitarist is singing as well as playing, most of the vaguely experimental or unorthodox guitar‑miking techniques go out of the window. Realistically, you can forget pointing mics over the shoulder, or along the neck from the headstock, because those positions will give you a ton of vocal spill (we did try it, and it sounded horrible). Your options are pretty much restricted to close‑miking the body of the guitar.
The challenge in this situation is to capture a nice guitar sound while minimising vocal spill onto the guitar mics. Without the added complication of vocals to think about, the most common point to focus on when close‑miking a guitar is the area where the neck joins the body. If that didn't yield the required sound, or we wanted to add a second microphone for a stereo guitar recording, most of us would probably next shift our attention to the area around the bridge, perhaps just behind or below it.
The good news is that these are still probably the best positions to start with when the guitarist is singing too, although there are additional considerations that come into play. The pursuit of separation, for instance, might lead you to move the mics rather closer to the guitar than would be ideal if you were recording that instrument on its own. Depending on what mics you choose, there might also be other things you can do to improve matters in this respect. For example, small‑diaphragm cardioid mics usually have a fairly accurate off‑axis response, so if you angle them downward rather than perpendicular to the guitar, you won't change the sound of the guitar much (unless you have a very reflective floor!), but you will move the vocals further off‑axis and closer to the null of the mic, thus diminishing their level. This is a very common and conventional setup for recording a well‑balanced singing guitarist, with a large‑diaphragm condenser mic for vocals and a pair of cardioid mics on the guitar, angled downwards for better vocal rejection.
 ; if you want to add a second mic, or are in search of a thicker sound, a position somewhere behind the bridge often works well.") If you have only one mic on the guitar, the neck/body joint is often a good starting point (left); if you want to add a second mic, or are in search of a thicker sound, a position somewhere behind the bridge often works well.
If you have only one mic on the guitar, the neck/body joint is often a good starting point (left); if you want to add a second mic, or are in search of a thicker sound, a position somewhere behind the bridge often works well. Alternatively, if you're using a multi‑pattern, large‑diaphragm condenser, you can achieve a useful improvement in the amount of separation by switching from cardioid pattern (where the null is behind the mic) to figure‑8 (where the null is perpendicular to the plane of the mic, and much deeper than in cardioid).
. The other guitar mic shown (upper left) is a stereo ribbon mic; again, the null is pointing towards the singer's mouth.") If you're using a multi‑pattern mic on the guitar, you can often improve vocal rejection by switching it to figure‑8 mode and angling it as shown, so that the singer's mouth is in the null (which now lies along the plane of the mic diaphragm). The other guitar mic shown (upper left) is a stereo ribbon mic; again, the null is pointing towards the singer's mouth. I'm a fan of ribbon mics on most things, including acoustic guitars, and these also have the benefit of a natural figure‑8 pattern and associated rejection.
If you're using a multi‑pattern mic on the guitar, you can often improve vocal rejection by switching it to figure‑8 mode and angling it as shown, so that the singer's mouth is in the null (which now lies along the plane of the mic diaphragm). The other guitar mic shown (upper left) is a stereo ribbon mic; again, the null is pointing towards the singer's mouth. I'm a fan of ribbon mics on most things, including acoustic guitars, and these also have the benefit of a natural figure‑8 pattern and associated rejection.
If you listen to the audio examples, you can compare the amount of spill that is picked up in similar positions near the neck/body joint by, respectively, a Neumann KM84 cardioid small‑diaphragm condenser pointing at 45 degrees downwards, an AKG C414EB large‑diaphragm condenser in cardioid and figure‑8 modes, a cardioid AKG D19 dynamic mic, and an Oktava ML51 ribbon microphone. To my ears, what these examples reveal above all is that when the guitar is played reasonably loud, as Greg was doing, the amount of spill is secondary to the changes in the tone of the guitar sound that different mic choices and mic placements bring about. The difference between the guitar sounds captured by a ribbon mic, a moving‑coil dynamic and a condenser overshadows any difference in the amount of vocal spill.  or even dynamics (right) can radically change the guitar sound.") Changing from condenser mics to ribbons (left) or even dynamics (right) can radically change the guitar sound.
Changing from condenser mics to ribbons (left) or even dynamics (right) can radically change the guitar sound.
Separation does become an issue with any performance that includes quiet fingerstyle playing, and here you may need to lean on all the above tricks to minimise vocal spill. Don't be afraid to move mics on a song‑by‑song basis, if necessary, and where a single song includes both fingerpicking and heavy strumming, it might even be worth putting up multiple mics, to produce the right sound for each section.
In a situation where you know that vocal spill onto the guitar mics will be a problem, it pays to set up the vocal mic and leave it open, then have the performer sing and play while you position the guitar mics. It's important to listen to all of the mics, even when you're just trying to position one, so that you can hear how they interact. That way, you can try to manage, somewhat, the tone of the inevitable comb‑filtering between the vocal mic and the vocal spill on the guitar mics.
Much the same considerations apply when you're miking in stereo. As the audio examples show, when there's nothing else in the mix, having two mics on the guitar which are hard‑panned left and right, while the vocal mic comes straight down the middle, can fill out the sound in a way that's hard to achieve with just one guitar mic. The crucial thing here, as ever, is to check how it all sounds in mono: the more mics you introduce, the greater the potential for it all to collapse into a phasey mess.
Miking The Voice
Choosing a microphone and mic position for the top half of your singing guitarist is, similarly, about balancing the twin priorities of achieving a good vocal sound and rejecting guitar spill. And, once again, 'normal' vocal miking techniques are often perfectly successful in this application, as long as you don't go too far away. If you're using a conventional large‑diaphragm condenser microphone, and you place it as close to the mouth as you're comfortable with — personally I'd want it at least four inches or so away — then as long as your singer has a reasonably strong voice and doesn't move about too much, chances are you'll get a healthy vocal level without too much guitar spill. I usually try to avoid pop shields, as I feel they colour the sound, but if your microphone is right in front of the singer's mouth, you will need something to reduce popping and protect the mic diaphragm from moisture.
If you're using a multi‑pattern condenser mic, again you should be able to achieve greater separation by switching it from cardioid to figure‑8 mode. I recorded a series of audio examples with the same vocal mic in omni, cardioid and figure‑8 modes to illustrate this. You can, indeed, hear the level of the guitar spill falling as the mic is switched, but that's not the only thing that changes. The tone of the guitar spill becomes more coloured as the mic is switched further from omni mode, which is what you'd expect. At this sort of distance, you'd also expect to hear increasing bass tip‑up in cardioid and especially figure‑8 modes, thanks to the proximity effect.
What's perhaps more of a surprise in these examples is that as the mic is switched between polar patterns, Greg's vocal sound changes markedly at the top end. Many multi‑pattern condenser mics have audibly different frequency responses in cardioid, omni and figure‑8 modes, and the human voice is a source where small differences can be pretty obvious. To my ears, at any rate, the vocal sound using a cardioid pattern in these examples is noticeably better than the sound with a figure‑8 pattern, and the reduction in the level of the guitar spill that comes from switching to figure‑8 is easily outweighed by the slightly 'crunchy' top end on the vocal sound. The differences might not be as apparent on every mic, but it's a point worth bearing in mind. Changing the polar pattern on a dual‑diaphragm condenser mic doesn't only change the amount of spill picked up: it can also change the tone of that spill, and often makes a noticeable difference to the on‑axis frequency response too.
Another point that's clear from the audio examples is that in a situation where minimising guitar spill is the most important factor, the most effective weapon is not the figure‑8 polar pattern but a microphone jammed right up against the singer's mouth. You can't do that with a typical studio condenser mic, but you can with a dynamic, so I recorded Greg with a Shure SM7, which has the advantage of a purpose‑designed foam filter to minimise plosives. Some low‑end rumble still made it through, but I think this could be dealt with at the mix, and, as you can hear, the separation achieved with Greg singing perhaps an inch away is excellent. To my ears, though, while the vocal sound from the SM7 is perfectly usable, it doesn't come close to that of the Neumann, and personally I would choose the better vocal sound over increased isolation in this case. (If you want that level of isolation with the clarity of a condenser mic, you could try one of the modern stage condenser designs such as the Neumann KMS105, Sennheiser e965, AKG C5 or Shure Beta 87a.) Switching a condenser mic to figure‑8 can give improve vocal isolation, but if that is your key concern, you're best off using a mic that can be worked very close, like the Shure SM7 dynamic mic shown here.
Any of these approaches would work fine with Greg's well‑balanced singing and guitar playing, but things get more difficult when you have to deal with potential problems. For instance, where sibilance is an issue, I would normally try to tackle it by moving the mic further away and orienting it so that it was pointing down from forehead height to the singer's mouth. This isn't really an option with a singer who's also playing guitar, because it means pointing your vocal mic almost straight at the guitar, so you'll get very little separation. The most successful method I've found so far for dealing with very sibilant singing guitarists is to use a ribbon mic (these are usually 'darker' than condensers anyway, and thus less prone to harsh sibilants) and position it below the mouth, so that the culprit is singing over the top of it, but the null is still pointing at the guitar. It's not perfect, but separation is still good, and sibilance is significantly reduced.
Singers who won't keep their heads still can also be a challenge. Both the level and the tone of the vocal that's picked up by a directional mic will tend to vary wildly as the singer alternately looks down, to check his fingers haven't fallen off, and up at the sky. If you can't stop this from happening — for instance, by giving the singer headphones so that he or she can hear themselves, and a stage mic as a 'target' — you basically have two choices. One is to back off the mic a little or use a less directional pattern, thus sacrificing separation for consistency of vocal sound. The other is to try to use some sort of headworn or lavalier mic, if you have one. In extremis, this might be one of those cases where you're best off making the recording space as dry as possible and using one of the distant‑miking techniques described earlier.
Mixing A Singing Guitarist
When you're just recording solo guitar and vocals, the options available for fixing things at the mix are minimal. If you didn't get it right at the recording stage, chances are it will never be absolutely right, although there are certainly rescue missions you can attempt. For example, if there are audible phase problems between the vocal and guitar mic, and you can visually identify vocal events within the guitar track, 'slipping' the vocal part by a few tens of samples for better alignment can sometimes help. If you use one of the techniques that aims for a high level of separation, you might also find that you can comp the odd dodgy vocal word or phrase in from a different take without it being too obvious.
In general, compressing either the vocal or guitar mics will tend to bring up the level of any spill contained therein, so don't be too heavy‑handed with the threshold control. As this sort of music can often be quite delicate in any case, I much prefer to keep compression to a minimum, and use automation to draw in level changes. Achieving the right balance between guitar and vocal can be surprisingly difficult, so don't be afraid to make fairly radical moves on occasion. Also, don't be too aggressive in muting the vocal mic where the singer isn't singing, because if there is guitar spill on the vocal track, the guitar sound will suddenly change as soon as the vocal fader is raised.
One of the major advantages of gaining some separation between vocal and guitar mics is that you can use two different reverbs, or at least different amounts of reverb, on the two signals. My own preference for vocals is usually something plate‑ish, with plenty of pre‑delay, and perhaps a touch of slapback echo. On guitars, by contrast, a much more natural reverb is often the order of the day — perhaps something involving mainly early reflections, just to add a bit of life and zing to proceedings. Separation will, of course, also allow you to equalise the two signals independently if need be, although, again, you need to be aware that adding a large high‑frequency boost to the vocals will make the guitar spill much more obvious. If you're forced to use the output from a pickup as your main source of guitar sound, you might need to get much more radical with EQ or even multi‑band compression; both piezo and magnetic pickups tend to put out too much mid‑range, which will need to be reined in if you are to achieve a natural sound.
Speaking for myself, I have to say that the lack of freedom at the mix is one of the reasons I enjoy making simple recordings with only a handful of mics. Get it right and the results come together effortlessly. Get it wrong and you've got a brilliant excuse to do it all over again. And come triumph or disaster, at least you won't have to spend days staring at a computer screen wondering which of the 87 tracks labelled 'Audio_3465' is the kick drum.
Audio Examples
To accompany this article, I recorded numerous examples illustrating the audible effects of different mic placements and choices on Greg's stalwart performance of 'To The Begging I Will Go'. To hear these for yourself, surf to: /sos/jul12/articles/rsgmedia.htm.
Picking Up The Guitar
The means have not yet been invented to capture a guitarist's vocals without some spill from the guitar, but the obverse is not necessarily true. Almost every guitarist who ever plays live will own an instrument with some sort of pickup system in it, and for unmolested guitars there are a number of removable options, such as magnetic pickups that sit in the soundhole.
Under‑saddle piezo pickups and magnetic pickups will give you a guitar signal that is completely free from spill. The disadvantage is that they also tend to give you a guitar signal that doesn't sound very much like an acoustic guitar. Conventional under‑saddle pickups, in particular, can have a vicious, plasticky 'quack' to them, and are a pet hate of mine. The sound from a magnetic pickup is less offensive, at least to my ears, but no more realistic.
Recent years have seen a number of technological solutions to the problem of extracting a convincing acoustic guitar sound from a pickup. These include the Taylor Expression system, any number of pickups that combine built‑in condenser mics with magnetic or piezo elements, and digital processors such as D‑Tar's Mama Bear or the Fishman Aura system, which employ intensive multi‑band dynamics processing to try to redress the frequency balance. Some of these sound better than others, and with the right guitar and the right setting, the Aura, for instance, can deliver reasonably convincing results.
The bottom line is that if the guitar has a pickup fitted, you might as well record it (remembering that passive piezo pickups like to see a very high impedance, so will flourish best when presented with an input designed for the purpose, rather than a typical mic or line in), even if this is only a safety blanket in case the worst happens to the miked signals. It could even be worth investing in a cheap removable pickup to bring to sessions, as just occasionally you come across a guitarist who plays so quietly that the vocal spill swamps any attempt to mic the guitar.
At the same time, though, I personally would never rely solely on any pickup system unless it's obvious that there will be masses of spill from other sources in the room, such as if the singing guitarist is playing live with a drummer and bass player. Putting up a mic or two on the guitar, and moving them around to find the best positions, need not take long, and no matter how good the pickup sounds, you'll never regret having the options available at the mix.
Greg's Martin acoustic is by no means a cheap instrument, but even so, as you can hear on the audio examples, the output from its under‑saddle pickup really isn't very pleasant to listen to without some pretty heavy processing.