Reverb is vital for most types of modern music production, so it's no surprise to find that many sequencers provide a variety of reverb plug-ins. But what do all those different parameters do?
Digital reverberation has evolved considerably in the two decades or so that it has been in widespread use, not least because it has fallen in cost from around the price of a modest car to less than you'd expect to pay for a second-hand bicycle — that said, there are still car-priced high-end units if you need them. Increases in available processing power allow algorithms to be devised that produce a much more dense, natural-sounding reverb than was possible using the older technology. The other great advance is, of course, the availability of software reverb plug-ins that draw their processing power from the host computer. Plug-in reverb is obviously convenient if you work mainly in a computer environment, but there are compromises.
How Much Reverb Is Enough?
Because music recorded in small or acoustically absorbent spaces lacks the ambience of a live performance in a larger space, we tend to add reverb to studio recordings artificially, but there's a fine line between adding enough reverb and too much. Too little reverb can leave a part, particularly vocals or drums, sounding detached and 'stuck on' to the rest of the backing track, while too much pushes the part into the distance making it sound less 'in your face'. Excess reverb also fills up the vital spaces that give a mix dynamics, so getting the balance right is very important and, unfortunately, there's no simple formula that you can apply — everything has to be done by ear.
One tip is that what sounds like a lot of reverb when you hear a part in isolation can sound lacking in reverb when you hear the part in the context of the complete mix, so always make your final evaluations when everything is balanced and playing. The denser the song, the less reverb you're likely to need on the instrumental parts, whereas a sparse instrumentation may allow you to use more. If the sound does become muddied when you add what you think is a sensible amount of reverb, consider rolling some of the low end out of the reverb input — this can clean up drum parts considerably. Paul White
Making The Most Of Your CPU Resources
Of all the basic studio effects, reverb tends to take the most processing power, and, while this isn't a problem for today's high-power DSP chips, a host-powered plug-in has to be designed to economise on the CPU power it needs otherwise there will be insufficient CPU power left to run other effects plug-ins and virtual instruments. This means that every reverb plug-in is a compromise between density of sound and power requirements, which is why some sequencers come with a choice of two or more reverbs as part of their suite of plug-ins.
The reason plenty of power is needed is that a real-life reverb comprises an unthinkably large number of sound reflections which sum together at the listener's ears to create the reverberant effect we hear in any acoustically reflective environment. All enclosed spaces will produce reverberation in response to a sound impulse within them, though the more heavily damped the space, the shorter the reverberation time will be. Hard solid walls, such as the stone walls of a cathedral or cavern, tend to be the most reflective, whereas rooms containing soft furnishings and carpets tend to be the least reflective. Most materials also reflect some frequencies more effectively than others, which has the effect of adding natural EQ to the reverb. Again, hard surfaces tend to sound brighter, while fabrics absorb more high frequencies than they do low frequencies. Simulating all these reflections and applying the necessary EQ takes a lot of processor cycles.
Artificial reverb tends to comprise two distinct components: the early reflections and the late decay. These elements are roughly modelled on what happens in real life — early reflections occur a short time after the original sound, where reflections from walls and other objects are heard as a series of very closely spaced, but still distinctly separate, echoes. This stage doesn't last long, as the reflections encounter other surfaces and reflect again, quickly becoming more dense and more complex as time elapses. Within a quarter of a second or less, the early reflections give way to the dense decay that we call the reverb tail, where no individual echoes can be perceived. Because sound scatters as it reflects, the reverb tail in a real room is infinitely complex, but because our ears can't possibly analyse everything that's going on, a good approximation comprising several thousand simulated reflections per second can create a convincing illusion.
Because sound is partially absorbed by the surfaces it encounters and the air it passes through, the reverb tail decays in level until it is no longer audible. The time at which the reverb level has decayed by 60dB is generally taken as the decay time, also known as the RT60 value. A digital reverberation device often uses a multitap delay line to provide the early reflections pattern, where the delay taps are randomly or pseudorandomly spaced and also varied in level. Some reverb algorithms then take these discrete echoes and feed them through a series of recirculating filters to build up a dense decay tail, but the better designs seem to generate the early reflections and late decay tails in separate processes.
The reason reverb units need to be stereo is that, in real life, each of our ears picks up a slightly different pattern of reflected sound, which our ears and brains interpret as a sense of space. To fake this, a reverb processor's early reflections may be placed across the stereo field by means of having a different pan position for each reflection, while the reverb tail may be generated twice from two very slightly different sets of algorithm values. In most cases, only a mono input is required, because, for most sound sources (unless they are physically very wide), it's the reflected sound that produces the impression of space and width. In the plug-in world, inserting a stereo reverb into a mono track usually results in the track output switching to stereo mode so that you get the full benefit of stereo reverb.
Reverb In Steinberg Cubase
 Although Wunderverb3 is included in the Cubase SX reverb line-up, it's mainly there for compatibility with older projects — you'll usually get better results with Reverb A.The first reverb plug-in to appear in Cubase VST was the inappropriately named Wunderverb, since wonderful it isn't — a more suitable name might be Tin Box, due to its extremely artificial and metallic sound. Now up to Wunderverb3, with just three controls for Size, Decay, and Damp, each with an arbitrary range from zero to one, it can't be described as comprehensive either, although in its favour it does use a tiny amount of CPU. While its hall and large-room settings are unlikely to get used except in an emergency, its small-room preset can be quite useful. However, it comes into its own for special effects, managing some versatile and unusual sci-fi springs, robot voices, and other resonant tails, especially if you automate its controls — just the job if you're looking for something a little different. However, I suspect it's still included in the Earlier VST Plugins folder of Cubase SX largely for compatibility reasons with elderly songs imported from Cubase VST.
The Reverb and Reverb32 plug-ins are proprietary to Cubase v5, in that they only appear as options to their host application, but confusingly the identical plug-ins also appear in Cubase SX in different graphic livery as Reverb B and Reverb A respectively. Reverb/Reverb B provides rotary controls for Room Size, Reverb Time, Pre-delay, and Damping, along with a wet/dry Mix control. It manages some rather more realistic halls, but its presets do it little justice, as many of them exhibit metallic coloration. If you use Cubase SX, Reverb B is the better option, since its parameters have real-world values, rather than the arbitrary percentage readings of the older version. It's actually possible to create some good results, still with low processor overhead, as long as you use suitable settings. For rooms, try a Room Size of 20 percent with a Reverb Time of just 0.2 seconds (one percent in Reverb), while, for halls, increase to around 40 percent and between one and two seconds (seven and 15 percent respectively). I wish developers wouldn't insist on providing decay times of 12 seconds and beyond at the far end — it would make most real-world adjustments far easier. Add some Damping to taste, although even at its greatest -15dB setting it's fairly subtle.
Reverb A/Reverb32 looks altogether more impressive, with its descriptive moving graphic displays showing Pre-delay, Room Size, and Reverb Time, although if you look more closely it's not actually all that different. It loses the high-frequency damping in favour of high-cut and low-cut filters with fixed turnover frequencies and a range of zero to -15dB (although confusingly the Reverb A version has its filter parameters incorrectly labelled), and adds an input meter. Its algorithms are obviously different, and it does take slightly more CPU, but it provides smoother reverb tails, particularly with room sizes over 50 percent, and the filters come into their own for special effects like the Ice preset. However, it's a shame that neither of these reverbs offer any separate control over early reflections to create ambience presets. Martin Walker
Reverb Parameters
Ultimately it doesn't matter to the user how a reverb algorithm works as long as it sounds good, but there are some key parameters that it helps to understand. The most important aspect of a reverb is probably its decay time, which we've looked at already, but on most units you can also adjust the time it takes for the reverb to start after the original sound. This is known as pre-delay and is created by a simple digital delay built into the input to the reverb. Setting a pre-delay of between 70ms and 120ms can add to the sense of space and depth and at the same time separate the original sound from the reverb slightly, which helps maintain clarity of vocal diction, for example. Some reverb devices allow separate pre-delay times to be set for the early reflections and reverb decay.
I mentioned earlier that natural reverb changes in tonal content depending on the nature of the materials in the reverberant space. This can be emulated artificially in at least two ways, one of which is simply to add some EQ to the simulated reverb. However, simple EQ doesn't quite do what we want when we need to simulate the way high frequencies are absorbed more rapidly than low frequencies in a typical concert hall. For this we need a new parameter called high-frequency damping that varies the decay time of high frequencies relative to low frequencies. Sometimes this is simply a variable amount, whereas, on more flexible systems, the user may be able to set a crossover frequency above which the decay time is controlled independently of the low-frequency decay time. In most natural spaces, the high frequencies decay faster than the low frequencies, but in empty rooms lined with thin wooden panels, or in spaces with a large area of windows, the high frequencies may reverberate for longer than the low frequencies.
Further user-adjustable functions may include the ability to alter the room size (which usually spaces out the early reflections while at the same time extending the decay time), to change the level balance between the early and late reflections, and to vary the stereo width of the reverb simulation. Reverb density is also a popular user parameter, which usually changes how closely packed the simulated reflections used to build the reverb tail are — low settings can reduce the reverb tail to a series of coarse echoes and may also exaggerate the metallic ringing effect that often accompanies an underpowered reverb algorithm. As a rule, the most dense settings sound most natural. Other than that, most plug-ins work by offering a range of algorithms, each designed to emulate a particular kind of reverberation, such as a Plate, Room, Hall, Gated, Reversed and so on. Once the type of room has been selected, the other adjustable parameters are used to customise the sound of that room. Better plug-ins may also offer ambience treatments which rely predominantly on early reflections to create a sense of space without adding any noticeable reverb tail.
Because reverb units are effects designed to be added to the dry signal, they have a mix control to balance the dry sound with the effect. When used in an insert point, this sets the depth of reverb added to a sound, but if the plug-in is used via the effect send/return loop then the mix control should be set to maximum and the channel send controls used to regulate the amount of reverb added.
Reverb In Cakewalk Sonar
As regular readers will have noticed, many of Sonar's bundled plug-ins come from Cakewalk's Audio FX1 and FX2 plug-in packs, but strangely they didn't include their excellent Audio FX3 Sound Stage reverb that I reviewed in SOS July 1999. Instead there is the straightforward Reverb carried over from their Pro Audio sequencer, plus the FxReverb from the DSPFX range by Power Technology.
The Cakewalk Reverb looks decidedly dull, but, unlike many entry-level reverb plug-ins, doesn't suffer from metallic ringing on its longer tails. It is unusual because the Decay control (with a useful real-world range from 0.2 to 5.0 seconds) is joined by a selection of three buttons controlling the number of early reflections. The Dense Echo option sounds more spacious than Sparse Echo, and is more suited to larger acoustic spaces, while No Echo bypasses the entire early reflection section and sounds most odd with its mono reverb tail. Greater versatility is provided by the optional low-pass and high-pass filters, although with a range from 16Hz to 16kHz it's easy to filter out the entire audio range by accident, especially as none of the controls update until you let go of the mouse button. Strangely there are also separate controls for the Wet and Dry signal levels, along with a Link button to revert to more normal mix operation.
The FxReverb can have its parameters automated, and features a wealth of controls including Room Size, Decay Time (0.25 to 20 seconds), High-frequency Roll-off, High-frequency Decay (damping), and Pre-delay. Density is a useful addition that alters the number of reflections and, although you'll normally want the higher and therefore smoother settings, lower settings produce grainy clusters of reflections that can add impact to drum loops, especially in conjunction with a large room size and short decay time. The final pair of controls, Motion Rate and Depth, are more unusual, although you can find them on Lexicon hardware algorithms, and they add modulation to the reflections. This can prevent metallic colorations developing on long reverb tails, and gives a sort of 'soft focus' swirling effect, although this was extremely subtle to my ears.
Given its still modest processor requirements, FxReverb is surprisingly smooth, although it's a shame that there are again no early reflection controls for ambience settings. And with the large number of parameters, thankfully there are a huge number of presets with sensible names to get you into the right ball park, although, like many reverb plug-ins, some of the designer's ideas of a small room decay time are considerably longer than mine, and should be one second or less. Martin Walker
Reverb In Emagic Logic
The plug-ins which use the least CPU overhead in Emagic's Logic are Averb and the 3.0 Rev, the latter carried over from Logic v3 to ensure compatibility with older songs. Averb has combined density and reverb time parameters, but also has a Reflectivity control that creates the effect of a room with more reflective surfaces and adds what I can only describe as a cathedral-like 'roar' of reverb to the reverb tail. Pre-delay is provided for all Logic's reverb plug-ins.
 provides the smoothest reverb tail in Emagic Logic, but the most creative possibilities come courtesy of Enverb (below).") The Platinumverb plug-in (top) provides the smoothest reverb tail in Emagic Logic, but the most creative possibilities come courtesy of Enverb (below).Though very basic, Averb sounds fine on non-percussive instrument sounds, but is a little unrefined for use on main vocal parts. 3.0 Rev sounds a little better to my ears, but only if the Quality parameter is set to its maximum — at settings below this the reverb has insufficient density and sounds more like a set of coarse echoes. A high-frequency damping parameter helps smooth out over-bright reverbs, but again this plug-in is not recommended for critical musical parts.
The Platinumverb plug-in (top) provides the smoothest reverb tail in Emagic Logic, but the most creative possibilities come courtesy of Enverb (below).Though very basic, Averb sounds fine on non-percussive instrument sounds, but is a little unrefined for use on main vocal parts. 3.0 Rev sounds a little better to my ears, but only if the Quality parameter is set to its maximum — at settings below this the reverb has insufficient density and sounds more like a set of coarse echoes. A high-frequency damping parameter helps smooth out over-bright reverbs, but again this plug-in is not recommended for critical musical parts.
Silververb is one step further up the quality ladder, but is rather oddly designed in that the decay time must normally be adjusted by juggling the Room Size and Reflectivity controls. Clicking on the extra parameters button reveals a combined slider for decay time and density control, as well as modulation controls that can be used to impart a gentle chorus character to the reverb sound. If the Density/Time control is reduced from its default maximum setting, the reverb sound becomes very coarse. High-cut and low-cut filters with variable turnover points are available for customising the reverb frequency response, but there is no true high-frequency damping. Silververb sounds smoother and more natural than the two economy models, but is still a far cry from what we expect from a good studio reverb, and it has a tendency to sound metallic.
Goldverb offers a denser sound, a selection of room shape algorithms and separate control over the early reflections and the reverb tail. The Room Size fader increases the spacing of the early reflections, but, as the room gets bigger, it soon becomes apparent that there aren't nearly as many reflections as you'd get from a decent hardware reverb. Also the High Cut control doesn't seem to offer true high-frequency damping. Even so, careful setting of the controls within the 'sweet' range of the plug-in's capabilities can produce good results on most sound sources. The stereo width of the two reverb components can be controlled to a degree, and at short decay settings you can coax a very passable ambience simulation out of it. The hidden extra control panel offers only Diffusion, which regulates how quickly the reverb density builds up after the initial event. Normally this would be set to maximum for the best results.
Top of the tree comes Platinumverb, which builds on the concept of Goldverb and adds a variable-frequency crossover, and Low Ratio and Level controls for tailoring the low-end EQ decay time relative to the HF decay. In the hidden section, diffusion and early reflection scaling are available — The ER Scaling control allows the early reflections to be spaced more tightly if required, which might help when creating ambience effects or simulating smaller spaces. The algorithms are also more powerful than those of Goldverb, as the reverb pattern is more dense and less ringy. By comparison with a good hardware reverb, Platinumverb still lacks a little finesse, but it can give good results on all sound sources if you take care, and it still isn't too greedy in terms of CPU resources.
Finally, there's Enverb, which isn't so much a reverb plug-in as a special effect based on reverb. Essentially, it allows the attack, decay sustain and release envelope of a reverb sound to be modified (by ADSR controls) allowing the user to set up abrupt gated bursts, slow-attack reverse simulations, and anything in between. There's no reverb time control, as that's set by the envelope parameters, though the high and low EQ can be adjusted, along with the density and stereo spread. Enverb is fairly demanding of processing power, but is able to create some great effects.
Vocal Reverb Tips
Vocal reverbs are frequently based around Plate algorithms, and if you want that classic 'steamy' reverb sound then you'll need to keep a lot of the reverb's high end intact, but keep an ear open for sibilance, as bright reverbs can emphasise existing sibilance dramatically. You can patch a de-esser into the reverb feed, but in most cases you don't need to go that far. Adding up to 80ms or so of pre-delay can separate the reverb from the vocal line slightly, which in turn increases the sense of space and improves clarity. Adjusting the early and late reflections balance (where possible) is often worthwhile for fine-tuning, as favouring the early reflections retains the sense of space but cuts down on the clutter.
Dedicated ambience settings or regular reverb settings high in early reflections (with the later reverb tail turned down) may be useful when you want a vocal line to sit right at the front of a mix but still sound like part of the mix. As a rule, plate algorithms have little in the way of early reflections, whereas hall or room algorithms have quite pronounced early reflections, so the latter may be the best choice when setting up ambience effects if you don't have a dedicated ambience algorithm.
Finally, when using plug-in reverbs, listen carefully to the reverb tail to ensure that it is adequately smooth and dense, as this is one area that suffers when algorithms are created to conserve processing power. As a rule, it's better to use one or two good-sounding, power-hungry reverbs via one of your virtual mixer's effects loops than to use several lesser reverbs in insert points. Paul White
Reverb In MOTU Digital Performer
 Digital Performer's eVerb.Touted as DP's 'serious' reverb, eVerb has a range of early reflection effects on offer — five 'spatter' shapes, selectable from the pop-up menu at the top left of the window, and user-configurable size, level and pre-delay. Numerical values for these can be revealed by clicking eVerb's Expand button, but you can change all aspects of early reflection just by dragging handles along the sides of the Reverb Shape display. Characteristics of the main reverb tail are handled in the lower third of the plug-in window. There are separate decay times for low and high frequencies, with an adjustable crossover point between them. There's also a separate high shelf filter, with variable cutoff and attenuation. However, by engaging the Hi-Q Link button, high-frequency filtering is tied to high-end reverb time in a bid to provide more natural-sounding tails. Finally there's variable diffusion, and the Colour parameter changes reverb tail characteristics by bleeding early reflection signals into it. If you stick to MOTU's presets you might be disappointed with eVerb — it has a tendency to sound ringy and 'hard', especially with longer decay times. But experimentation is everything, and with a bit of tweaking you can often get much better results. In particular, eVerb often sounds better with its high end tamed, and the settings of Colour and Diffusion can often be crucial. Also, remember that you can turn the level of the main tail right down and use the early reflections alone — weird and wonderful results are possible.
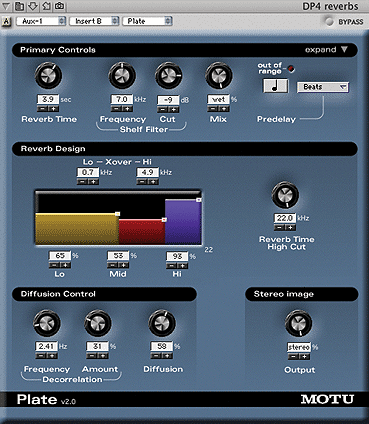 Finally, there's DP's reverb 'secret weapon', Plate. This plug-in can do some seriously smooth tails, and offers an array of parameters which make it very versatile. As you'd expect, Plate doesn't do early reflections, but it does have pre-delay, and what's more this can be tied to beats, bars and note values as well as absolute time values. This, in itself, makes Plate a tweaker's dream. But there's more, including reverb times up to a minute(!), a shelf filter, and a Reverb Design display, accessible via the Expand button. This controls relative reverb time across three adjustable frequency ranges, allowing a wide range of unusual reverb effects to be created. As well as a conventional diffusion control there's also Decorrelation, which is, in effect, an LFO that modulates the individual delays that make up the reverb tail. Used sparingly this can add extra thickness and warmth, but more extreme settings introduce pitch fluctuations and strange Doppler-like effects. For more advice on using reverbs efficiently in DP, check out Performer Notes in the SOS October and November 2001. Robin Bigwood
Reverb In Digidesign Pro Tools
Until the release of Pro Tools v6, no one reverb was included as standard with Digidesign's MIDI + Audio recording software. However, Digidesign have always had a policy of bundling additional plug-ins with each system sold, and their basic D-Verb reverb plug-in has been widely distributed in this way. The RTAS version, for instance, is standard issue with the Digi 001 and M Box interfaces in the UK, and Pro Tools v6 finally includes D-Verb as part of the Digirack set of plug-ins.
Digi themselves also produce the highly regarded Reverb One for TDM and HD systems, while their Digi 002 interface comes with an impressive bundle of native plug-ins in the UK, including Waves' Renaissance Reverb. If you are lucky enough to have a 002 system, or a high-end TDM reverb such as Reverb One or Universal Audio's Realverb Pro, you'd usually turn to that before thinking of D-Verb, but Digi's basic plug-in is not without its uses.
 D-Verb is shipped with the majority of Pro Tools systems, and can give surprisingly usable results.
Like all the Digirack plug-ins, D-Verb comes in TDM, native (RTAS) and off-line (Audiosuite) versions; and, as usual, the real-time plug-ins are available in mono, mono-to-stereo, multi-channel and multi-mono versions. Unlike the dynamics and EQ plug-ins, it imposes a significant DSP or CPU load: the TDM version uses an entire DSP Farm DSP chip, or half of a Mix card DSP chip, while a stereo RTAS D-Verb uses about 30 percent of the CPU power of my 300MHz G3 Power Mac. This means that, in most circumstances, it makes sense to use the TDM version if you can.
The good news is that the DSP or CPU load of any given reverb design is almost always reflected in its sound quality and, although D-Verb doesn't approach some of the high-end plug-ins available for TDM and HD systems, it's quite usable — to my ears, it definitely has the edge over the native plug-ins bundled with sequencers such as Cubase. The relatively limited number of parameters also means that it's quicker to set up than some heavyweight designs.
The most basic D-Verb parameter is the reverb algorithm. There are seven to choose from, of which four are designed to mimic real spaces and one an old-style reverb plate. The final two are intended to produce 'transparent' ambience and 'nonlinear' reverb effects. Each algorithm offers a choice of small, medium and large variants; choosing a different size changes the range of decay times available, but also effects other changes 'under the bonnet'. You also get Pre-delay and Diffusion controls, which do exactly what you'd expect, while the Decay control is also conventional except in one respect. In the room and plate algorithms, its range runs from a minimum of 100-400ms (depending on the algorithm and room size chosen) to a maximum 'Inf' setting. This, as the name suggests, means that the reverb generated takes infinitely long to decay. If you're into New Age music, this could be the reverb for you...
There are also two controls shaping the spectral content of the reverb. One slider sets the corner frequency of a 6dB/octave low-pass filter affecting the entire wet signal, while the other specifies a frequency above which the reverberated sound decays more quickly. The only other control is an input level slider, helping to prevent clipping.
Sound-wise, D-Verb avoids most of the flaws that plague low-end reverb plug-ins, such as obvious metallic coloration, or early reflections so few in number you can count them as they happen. The reverb tails are smooth, the controls all behave as you'd expect, and the range of sounds is wide enough to cater for most applications. The small rooms are nothing special and the plate algorithm is not as convincing as it might be, but the ambience setting is useful for adding the kind of reverb you don't notice until it's taken away, and the nonlinear effect adds a punchy, almost gated reverb effect to drums and percussion.