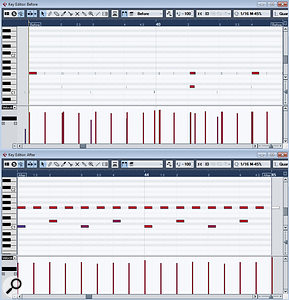
 The low-velocity MIDI notes generated in this MIDI guitar performance (top) were removed using the Input Transformer. In the 'after' example (above), these changes have been made permanent simply to illustrate which notes the Input Transformer has filtered out.
Not everyone who uses Cubase is a competent keyboard player. Guitar, drum and wind MIDI controllers offer alternative means of getting MIDI information into a project — but all represent something of a compromise. For example, pickup‑based MIDI guitar systems, such as the Roland GK3, rely on a conversion process to translate string vibrations into MIDI pitch and velocity data. Brilliant though they can be, the conversion process sometimes gets confused by all the fret squeaks, damped notes and other incidental noises in a guitar performance. When using such controllers, therefore, you'll probably need to do a little more MIDI editing to clean up the performance than you would with a well‑played keyboard part. Thankfully, Cubase offers a collection of tools that make this 'tidy up' process less of a chore.
On The Way In
One way to reduce the requirement for post‑performance editing is to clean up the MIDI data as it is being recorded. The Input Transformer (which can be switched on via the Inspector Panel) can help here. This provides a subset of the MIDI-editing functions available in the Logical Editor. However, before looking at the Input Transformer itself, make sure you insert an instance of the MIDI Monitor plug‑in, which displays the MIDI data for a track in real‑time, and thus allows you to see 'live' what the Input Transformer settings are doing to the MIDI data input as well as events occurring on playback.
The Input Transformer window has two panels, the upper of which is used to specify what MIDI events are to be 'caught' by the Input Transformer. Events that don't meet these conditions are allowed to pass. Those that are caught can be either filtered (removed) or transformed (altered in some way). This choice is set in the Function box, which is found bottom‑centre of the Input Transformer window. If 'Transform' is selected, then the lower panel is used to specify how the events that meet the condition in the upper panel are to be changed. Up to four such configurations can be set, one in each of the Input Transformer's four modules.
 Here, the Input Transformer is being used to adjust the velocity of just the snare (note D1) from a MIDI drum controller performance. Let's look at some useful applications of the Input Transformer. First, if your MIDI controller generates a supply of unwanted extra notes, you can attempt to filter these out. For example, MIDI guitar devices often produce low‑velocity notes as a result of fingering noise and other playing artifacts. These can be automatically removed as you play, by setting one of the four Input Transformer modules to filter out all notes below a certain velocity value. To achieve the results reflected in the screenshots above, all notes with a velocity equal to or less than 25 were filtered out — you can, obviously, adjust the velocity threshold to your own needs and from performance to performance.
A second application is to filter out unwanted pitch-bend data if, for example, you're playing a virtual piano that shouldn't respond to pitch-bend. Doing so with the Input Transformer is often easier than diving into the menu system of your hardware controller to switch pitch-bend data off.
As a final Input Transformer 'quick fix' example, I find that my snare-drum trigger (purchased separately from the rest of my electronic drum kit) consistently generates rather low velocity values. To avoid having to hit the drum harder, or delve into the drum-brain's settings, the response can be adjusted by increasing the velocity of all the snare-drum notes by a fixed amount. The Input Transformer setup I used to achieve this is shown in the screenshot above.
After The Fact
 The original drum performance (before) and the processed performance (after). This example is shown for illustration; in reality, you might not wish to clean things up quite so clinically.
There are some things that the Input Transformer cannot do, such as ignoring the very short notes which are sometimes generated by MIDI guitar systems, reducing long notes to a fixed, shorter length (my own drum controller sometimes generates such long notes), or removing 'doubles' where two notes are generated by the controller when only one note was intended. What these conditions have in common is that none of them can be recognised until after a Note Off is received.
Thankfully, the Transformer MIDI plug‑in — which looks very similar to the Input Transformer — acts after a recording has been made and can offer you more control over the result. As it operates in real time during MIDI playback, there's no risk of making unwanted permanent changes to your MIDI performance. The Transformer plug‑in includes presets for ignoring notes below a specific velocity, and for filtering out controller data such as aftertouch (this preset can easily be edited to target pitch-bend). If you don't wish to permanently eliminate such data while recording, in case some of it proves useful later on, the Transformer is a better choice than the Input Transformer for filtering.
One further useful Transformer preset is 'delete short notes'. This defaults to a setting in pulses per quarter note, but you can change the time-base to seconds, samples or frames if you prefer, and then adjust the maximum length of note that you wish to filter out. As mentioned earlier, this can often help clean up short notes that have been falsely generated by a guitar or drum MIDI controller.
Permanent Commitment
Some simple clean‑up tasks require permanent changes to the MIDI data (though you can use the Undo command if things go wrong!), and these can all be achieved via the MIDI menu, using a combination of the Quantize Setup, Functions and Logical Presets options.
Let's consider an example. My MIDI drum controller has a habit of generating multiple short notes when I intended to hit a drum only once, as well as the occasional spurious long note. The first issue is more significant, as on playback it produces several sample triggers close together in time. The second simply looks a little odd in the standard Note Editor.
To get from the raw MIDI data to a suitably cleaned version there are a number of steps, but as this is going to be a destructive process it's probably best if you first make a copy of the original performance. Applying the settings shown in the Quantize Setup screenshot (below) pulls all the separate notes to the same start position. You'll need to set the grid size to suit the basic divisions of the pattern (in this instance it was eighth notes, for the hi-hat part), and the 30 percent Magnetic Area catches the most likely 'double notes'. Incidentally, once you've configured the Quantize Setup dialogue, the first step described above could also be achieved by turning on the auto-quantise option while recording.
Setting the Iterative Strength to 100 percent forces all of these notes to exactly the same start position. This is essential for the next step, where the MIDI/Functions/Delete Doubles option deletes any notes with the same pitch and start position — but it only works if the notes have exactly the same start position. Having got rid of the double notes, the varying note lengths can be dealt with. Although this is mostly cosmetic, when it comes to triggering drum samples it makes things look a lot neater, and I find that this in turn makes things much easier to edit.
Returning to the Quantize Setup dialogue, set the grid to something smaller than the smallest division in the performance. For example, for our eighth‑note pattern, a grid of 1/16 or 1/32 could be used. If you execute the MIDI/Functions/Fixed Length command, all notes will be set to the length of the chosen grid division. This process is easiest to follow in the Key Editor. It won't make any difference in the Drum Editor where note lengths are not displayed.
There is an obvious down side to doing all of this quantising, though: although you may retain the dynamics of the playing, it can easily make the performance feel rather mechanical. A quick return visit to the Quantize Setup dialogue to add a bit of swing or some random quantise (to create some subtle 'human error') can breathe a little life back into the performance, as can some groove quantising.


