Getting the macrodynamics of a song right while also nailing down the important rhythm can be a real challenge. We explore some techniques for tackling this and more on Moosmusic's 'Big Dummy Shake'.
 Rescued this month: Moosmusic are a songwriting team made up of Kristen Bishop and Duncan Eeles. Their mission is to write catchy songs full of memorable melodies and uplifting choruses, with a view to securing a publishing deal and showcasing their songs through a range of performing artists.
Duncan Eeles and Kristen Bishop wrote, performed and produced this month's Mix Rescue song, 'Big Dummy Shake', as a collaborative effort, and while they were pretty happy with what they'd achieved in terms of the song and its arrangement, when Duncan tried to come up with a convincing final mix he encountered a number of difficulties. Foremost amongst these was that he couldn't get the different sections of the song to sit together, so that the verses in particular were sounding bigger than the choruses, but he also struggled to make the bass and vocal sounds hold their places in the mix.
 To start with, Mike just used Stillwell Audio's Event Horizon soft‑clipper and Tin Brooke Tales' Tube Limit to control the bass levels and add density to the mid‑range. However, once the guitars had been added to the mix, further processing with Waves Renaissance Bass and Stillwell Audio's Vibe EQ was required to avoid the bass submerging in the mix.A quick scout through his multitrack files revealed the root of the main problem to be the drum and percussion parts, because of the inherent nature of some of the drum sounds that had been used, and also because the verse section used a completely different drum kit and percussion line‑up to the chorus and middle sections. Not only did this tend to make the two sections sound like two different songs, but each was also somehow managing to make the other seem like a let‑down — the verse kick drum felt piddly next to the one in the chorus, while the chorus snare didn't seem to have any body at all next to the verse's. So for this month's column I'm primarily going to concentrate on how I went about tackling this central challenge in my remix.
Laying The Foundations
Just before I get stuck into that, though, let's take a quick look at what I did with the bass, which was another of Duncan's concerns. In fact, I started my mix from the bass sound, partly because I felt that it would be crucial to filling out the low end of the track, but also partly because it was almost the only track that played throughout the song, thus providing something of a reference point (which proved useful in building up the different drum sounds, in particular).
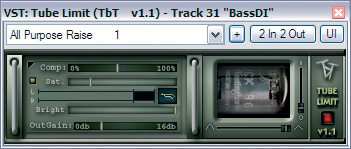
I tried a few different compressors and saturators to make the levels more consistent and bulk up the density of the sound in the mid‑frequencies, settling in the end on a mix of 5dB of soft‑clipping in Stillwell Audio's Event Horizon and some tube saturation and peak limiting from Tin Brooke Tales' Tube Limit. This did the trick on its own while I was building up the drum, percussion, and vocal parts, but as I started introducing more of the guitars I eventually needed to respond with further tweaks to the bass.
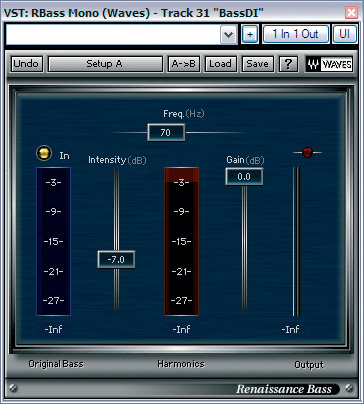
At this later stage some more bass warmth turned out to be useful, for which I turned to Waves' Renaissance Bass, one of my favourite bass enhancers. This plug-in generates harmonics from the sub‑bass elements of your bass line to make the low end appear fatter and more powerful. In addition, a couple of strong peaking boosts from Stillwell Audio's Vibe EQ (4dB at 1.2kHz and 8dB at 3.2 kHz) provided additional bite to compete with the guitars in the mid‑range.
Double The Kicks
I'd started my mix from the bass sound, as this seemed slightly more important sonically than the drums, and I knew that I'd only be able to judge the low end of the drum sound once the bass was already cooking. Only when I'd got to the point of being pretty happy with the sound of the bass did I begin my assault on the drum problem, starting with the chorus‑section kick drum. The chorus used electronic drum‑machine sounds and the kick had a strong sub‑bass element to it which was causing a variety of problems. In the frequency domain it was not only making the verse kick sound anaemic by comparison, but it was also competing with the bass guitar for headroom at the very low end. However, there was also a problem in the time domain, because the sub‑bass frequencies seemed to be lagging the beat compared to the drum's transient.
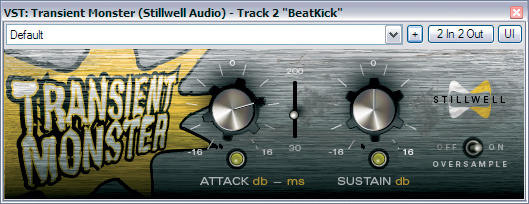
 For these reasons, I deliberately took out a fair bit of the kick's low end with a 40Hz high‑pass filter and 4dB of low shelving cut from 145Hz, using Reaper's built‑in ReaEQ plug‑in. This made the kick drum less dramatic on its own, but worked better with the bass guitar, and made it much easier for the lighter‑sounding verse kick to compete. With the low end of the mix more on target, I set about toughening up the kick's attack, first by adding a 3dB peak at 750Hz (emphasising a part of its frequency spectrum which could clearly cut through the bass's mid-range) and then using 8dB of attack from Stillwell Audio's Transient Monster plug‑in.
The verse drums were an emulated acoustic kit courtesy of FXpansion's BFD, and the virtual multi‑mic line‑up included both close (inside the drum) and more distant (outside the drum) positioning. Of these, the inside mic was giving the kind of tight sound that I reckoned would pair up best with the electronic kick, but the outside mic was nonetheless useful mixed in at a lower level to blend the bass drum into the kit as a whole. The outside mic just needed some relative phase adjustment using Betabug's Phase Bug phase‑rotator plug‑in, and a gentle 2dB peak at 2kHz using ReaEQ to get it to combine well with the inside mic.
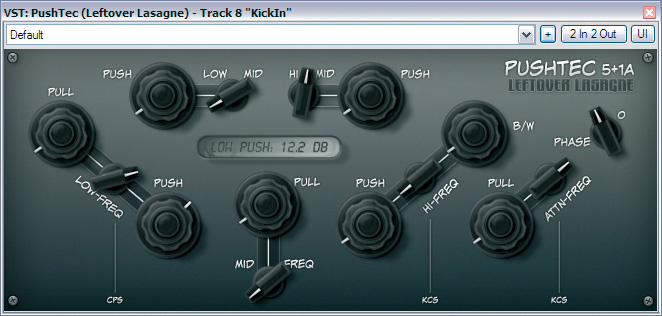
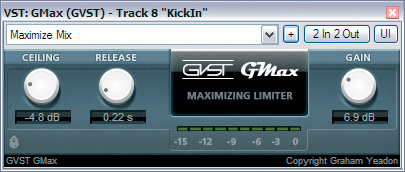
The classic Pultec EQP1A has a reputation for the warmth of its bass boosts, so I pulled up Leftover Lasagne's 5+1A emulation to help with beefing up the low end of the inside mic. After about 12dB of 60Hz shelving boost I began to get something that sounded more comparable with the electronic kick drum of the chorus, but once again I found that the very lowest frequencies were becoming overpowering when layered with those from the bass guitar — but it was nothing that a very gentle 20Hz ReaEQ high‑pass filter couldn't fix. An instance of GVST's GMax limiter was then drafted into service to even out the levels of the different hits, triggering up to 8dB of gain reduction at times, in the pursuit of consistency.
 Here you can see the processing that was used to bring the verse and chorus kick‑drum sounds closer together: whereas the chorus kick‑drum received ReaEQ low cuts and Transient Monster attack enhancements, the verse kick‑drum had 12dB of low boost from Leftover Lasagne's 5+1A and a healthy dose of limiting from GVST's GMax.Judging the release‑time setting in this case was a fairly fine balance, because I needed a fast enough setting so that the gain could reset even when hits were only separated by an eighth note; but at the same time I didn't want to go so fast that the gain reduction reset significantly during the drum hit itself, effectively shifting the balance between the sound's transient and sustain portions. The final setting worked out at around 220ms, and although the limiting did reduce the 'clickiness' of the drum's transient a fraction, I felt that this processing side‑effect actually made the sound work better in context.
Having another listen between the sections, it occurred to me that the exceptionally dry kick sound of the verse was still making the transition between the sections a tad jarring. One way to deal with this would have been via reverb of some type, but I didn't fancy faffing around trying to match the BFD room sound with a plug‑in, so opted instead to copy and paste the outside kick mic and the under-snare mic from the verse sections, and then fade them in just enough to make the sample feel more like it belonged in the track. As usual when layering kick drums, I made sure that the layered kick hits always maintained the same time‑alignment, and then checked whether that phase relationship could be tweaked for a better mix sound. Inverting the polarity of both added tracks gave the best bass response, so I went with that.
Snare Processing
The chorus's electronic snare was, for me, one of the most problematic sounds, and the area of my mix that probably constituted the clearest departure from Duncan's original sound. The raw sample just seemed to lack any real body, somehow managing to be both gutless and flabby at the same time, if that's not too much of a contradiction in terms! The improved clarity of the processed kick sounds wasn't making the snare's shortcomings any more acceptable either.
In the first instance, I quickly threw up ReaEQ to see if something could be salvaged by rebalancing the available frequency content. Out went a whole load of hissy noise components above around 5.5kHz, the remainder being treated to a 7dB boost at 525Hz, and a compensating 4dB peaking cut at 125Hz to keep the lows fairly clear. Encouraged that this had worked better than expected, I pursued things further and went in search of a bit more sustain via another instance of Transient Monster.
However, adjusting that plug‑in's Sustain control on this particular sound (to around +8dB) actually increased the level of the snare's transient too, even though the Attack control was zero'ed. This isn't something you'd probably expect if, like me, your first introduction to transient‑shaping processors was SPL's Transient Designer, but Transient Monster actually has quite different response‑time characteristics (which often give it a slightly subtler character). As it turned out, I rather liked the extra 'smack' that this unexpected processing side‑effect introduced, so I embraced my inner Joe Meek and went with what I was hearing, rather than thinking too hard about the specific settings. What I did do, however, was to hard‑clip this transient a touch using GVST's GClip, changing its timbre slightly while also controlling its peak level.
 The BFD snare sound in the verses was coming not only from top and bottom close‑mic channels, but also from the stereo overheads and room mics. The sound in the overheads was alright, and the undersnare contributed a usefully noisy sustain (with nice sympathetic vibrations on kick hits) once I'd notched out a nasty resonance at 619Hz. However, the close‑mic track was a disaster: a papery little attack, no decent sustain, and untamed clusters of lingering resonances. Even cursory experimentation demonstrated that trying to find a solution to this through processing was going to be a mug's game, so I made the decision to replace it using a sample triggered from an instance of Reaper's ReaGate plug‑in on the original close‑mic track.
I rifled through some of my favourite samples to find a suitable replacement sound: something short and fairly dead‑sounding was the aim, just to add that upfront burst of noise that was missing in all the other mics. A super‑tight Ludwig 402 from Sample Lab's Drum Fundamentals proved short and dead enough, but still needed some stern work with EQ and Aphex‑style psychoacoustic enhancement to bring out the brightness and 'snap'. My ReaEQ setup comprised a high‑pass filter at 112Hz, a low peaking cut at 412Hz, and a high shelving boost at 3.7kHz, while the enhancement was working from 2kHz upwards at fairly serious settings of 60 percent Drive and 50 percent Mix.
 Once the snare sample was up and running, I compressed the overhead mics fairly savagely with another Stillwell Rocket to drag the room up into the mix, which began to really pull the drum sound together — with the exception of the dry snare sample, which, predictably, sounded a bit 'stuck on'. Again, reverb would have been one solution here, but I chose a different route in order simultaneously to address another concern; namely that I wanted to boost the upper frequencies of the snare sound in the room mics, but couldn't do so without over-emphasising the cymbals. My alternative was to use a gate on the room mics triggered via its side‑chain from the sampled snare. By releasing a short, carefully controlled burst of brightened room‑mic signal on each snare hit, I was able to use brightened room mics to blend the snare sample more into the kit, but without washing out the whole mix with cymbals.
Filling Out The Percussion
 The very short, abrupt, raw clap sound couldn't make much of an impression behind the snare hits, so Mike first gave it a thicker sound with Reaper's ReaEQ and TBT's Tube Limit tube saturation before lengthening the envelope using delay/reverb effects from Reaper's ReaVerb and Christian Knufinke's SIR2.
Finally, the two main drum sounds began to co‑exist more comfortably, such that subsequently mixing in the sampled and emulated acoustic hi‑hats proved to be a doddle, with just a 5dB high‑shelving cut required on the sample to keep the tone from shifting too much between verse and chorus. This rhythmic skeleton could now be fleshed out with Duncan's various additional percussion parts, but the snag here was that the raw parts weren't all that fleshy! In other words, the timbres used were a bit Victoria Beckham: thin, overly spiky, and pretty one‑dimensional.
For the shaker and tambourine tracks I dug up some more samples to pack things out. There's no shortage of live percussion loops in most general‑purpose and construction‑kit libraries, and even if you can't find stereo loops, they can usually be layered and panned to create a nice stereo effect. My choices here were two pairs of stereo loops from Equipped Music's fabulous Smokers Relight sample collection, each pair split across the stereo field. I actually imported and tempo‑matched a couple of dozen of the Smokers Relight loops for auditioning purposes, trying them in different combinations while the track was playing until I found a combination that seemed to work — and this meant that I didn't need to do any EQ at all to make these fit in the mix.
The dynamics processing for most of the percussion involved stiff limiting from George Yohng's W1, simply to soften any excessive spikes from the raw tracks, the reasoning being that, while I wanted the percussion to fill out the texture at the appropriate points, there was a potential danger of extraneous transients interfering with the main groove of the kick and snare hits. The added shakers also benefited from some side‑chain‑triggered gating (using a reduced gating range) in order to match the stresses in the sampled parts with the hits in Duncan's original — although the added parts had the right sound, they were too busy, which had the perceived effect of slowing the tempo.
 The claps were tricky to deal with, because they were very abrupt and slender‑sounding, and it was only because they were always slightly after the beat that they weren't just being masked by the snare hits in the original mix. The timing issue bothered me, because it made the snare sound like it was dragging, so at the outset I used a simple time‑shifter plug‑in on the claps track to find a better match with the snare timing, and then resolved to try to make the claps more audible by thickening their timbre and lengthening their sustain.
The thickening came by way of some 370Hz EQ boost from Reaper's ReaEQ coupled with a small dose of tube saturation from Tin Brooke Tales' Tube Limit plug‑in. Distortion can frequently be counted on to help you out of a jam with thin‑sounding percussion, and you'll get most control if you set up the distortion as a send effect (as I effectively did here) so that you can independently adjust the amount and character of the distortion.
 For additional sustain I ran the EQ'd and saturated signal through a series of very short delay/reverb patches, the first two from Reaper's built‑in algorithmic reverberation plug‑in, ReaVerb: a series of four delay taps roughly spaced at 10ms intervals, each of these generating roughly 20ms of large‑room reverb tail. The final reverb came out of SIR2 and was another Lexicon PCM70 impulse response, this time the Gated Chamber patch, which I shut down after 80ms or so using the plug‑in's envelope controls. The combination of the more distinct delay taps from ReaVerb and the denser, wider sound from SIR2 complemented each other neatly, allowing the clap sounds to fill up a bit more space in the mix, and act as a nice reinforcement for the upper frequencies of the snare.
Processing each of the percussion parts to fulfill its function within the overall balance had already left me in a situation where they didn't sit too badly with the rest of the kit, but I decided that I would also experiment with some more short reverb to see if I could bind them in a touch better, increase the stereo spread, and add some high‑frequency density. After a certain amount of digging, I came across a bright 'tiled room' impulse response — again from the Lexicon PCM70 — and this seemed to do a pretty good job once I'd shortened the reverb envelope to around 0.3s.
Maintaining The Punch

As I've already mentioned above, once the drums and percussion were working with the bass, the rest of the mix really didn't present that daunting a prospect. However, having worked hard to make the rhythm track punchy, I felt that I should take a few precautions to try to retain as much of that drive in the final mix as possible. The production as a whole was pretty tightly played, which made things easier in this regard — although I did tighten some of the vocal timing so that I could ride it up as far as I wanted in the mix without it undermining the drum groove.
That said, there was one point, in particular, where I felt some audio editing would help, and that was in the chorus, where the main syncopated bass and guitar riff wasn't damped as well as it could have been at the end of each iteration of the riff rhythm (the third beat of each bar). Simply cutting holes in the audio regions instantly gave the section a more urgent vibe, letting the lyric "serious”, in particular, cut through much better than before. A little limited‑range gating on the same guitar riff, triggered via side‑chain from the kick and snare hits, also improved the flow of the groove overall, forcing the dynamics of the riff to match the drum pattern a bit more closely.
The final piece in the puzzle was the way I did the master bus processing, inspired by my recent investigations into the unusual compression methodologies of Michael Brauer, one of the world's top mix engineers. I'd been particularly impressed by the way he'd moulded the bass and drums for James Morrison's debut album, Undiscovered, and I was ready to gamble that Kristen's song would benefit from a similar kind of approach.
One of the important tenets of Brauer's technique is that, rather than using just a single master bus compressor, you should have several working in parallel, their outputs being combined to feed the master mix bus. The point of this is twofold: firstly, it means that groups of instruments can be matched up with whichever specific model of bus compressor suits them best; and secondly, it allows the engineer to control whether high levels in one instrument part will affect, by virtue of a bus compressor's gain reduction, the levels of other instruments in the mix.
 One way in which the rhythm sound was made punchier during the choruses was by using audio editing to damp the guitar and bass notes during gaps in the riffs. Here you can see a section from the second chorus, showing how the edits looked by the end of the final remix.It takes a while to get used to the concept, so rather than getting too bogged down in the theory, I'll just demonstrate how the idea was useful in this particular mix. (If you're interested in investigating this further, check out our interview with Brauer back in SOS November 2008 for more detailed information.) My aim was to try to keep the bass and drums solid and present throughout, which meant that I didn't want a single master bus compressor pushing the bass/drums backwards in the mix as the levels of other instruments rose during the fuller sections of the arrangement. By feeding the drums and bass to their own separate bus, where I could compress them separately, I could keep the rhythm sound more constant.
The compression that I used was a fairly mild setting based on the '3:1' Empirical Labs Distressor emulation in URS's Console Strip Pro plug‑in. I opted for the Distressor as a first port of call because of Brauer's professed regular use of this for his bass/drums bus — but upon listening to how it responded in this mix, I felt that it was still a bit too aggressive. By turning the ratio down to 2:1 to reduce the severity of the gain reduction, increasing the attack time up to about 30ms to let the bass transients through, and decreasing the release time to allow the compression to reset fairly quickly, I was able to improve matters to the point where 2‑3dB of metered gain‑reduction was consistently delivering that 'gluing' effect that bus compression can be so handy for.
Paradox & Compromise
 Here you can see the Michael Brauer‑inspired parallel‑compression scheme that Mike used for Kristen's lead vocals. The vocal part was first multed to three different tracks, from each of which it was sent to a different combination of the compressors/saturators you can see to the right of the vocal tracks.
There are a lot of music styles that live or die by their rhythm section, so if that particular sonic backbone is important to you, I hope I've pointed out a few useful processing tricks for you to try this month. In addition, although 'Big Dummy Shake' is quite an unusual song in some respects, it embodies a very common mixing paradox — namely that while you need contrast between the different sections to make an impact, you usually also need commonality between them if the entire production is going to hold together. Many of my techniques this month were aimed at creating a working compromise in this regard, and as such are worth a go if you find yourself fighting to resolve these conflicting impulses in your own mixes.
One Vocal, Five Compressors
I mention some of Michael Brauer's mixing tricks in the main article (see next page), and another of his techniques worked really well on the lead vocal. This involves multing the vocal to five compressors in parallel and then combining their outputs to achieve the most favourable tone. What this relies on is the fact that most compressors don't just adjust gain, they also introduce a variety of different tonal side‑effects — so the important thing is to make sure that you don't just use multiple instances of the same processor.
I chose a selection of my favourite budget VST plug‑ins here, which should provide some starting‑point suggestions for any PC musicians who fancy trying out the concept on their own systems: Buzzroom's Grancomp, Stillwell Audio's The Rocket, Jeroen Breebaart's PC2 Psychoacoustic Compressor, Tin Brooke Tales' TLS3127 Leveling Amplifier, and Bootsy's Density.
From the descriptions on Brauer's web site, it appears that he drives the compressors all at the same level and then mixes their outputs, but in my case I decided to set up sends in my Reaper‑based mix system to feed each compressor at a different level. This allowed me to mult the vocals to different tracks and then set up different compressor send levels for each, thereby giving me the flexibility to adjust the tone of the vocals for the different sections of the song. (In addition to the compressors, I set up MDA's little Combo plug‑in as another parallel channel, so that I could add a tinge of megaphone‑style distortion, as used on the original mix.)
Creating the vocal sound in this way was then just a case of trying out different compressor send-levels until I liked what I was hearing on a purely subjective level. I have to admit to some initial scepticism about this multiple‑compressor idea, but in practice I was impressed, not only due to improvements to the singer's tone, but also by how it held the vocal surprisingly firmly in its position in the mix, such that I needed fewer vocal fader rides than I'd typically expect. It might seem a bit fiddly to set up, but I certainly felt that the results justified the effort I put in.
Remix Reactions
Duncan & Kristen: "When we first heard Mike's remix, the difference shocked us. The main impact that hit us was the dynamics Mike has introduced into the song. Each section flows effortlessly into the next and the chorus now sounds huge! We love the way you get totally sucked into the bridge. We also love the bass sound Mike reached, and the drums now sound as they did in our heads! The whole process has been a massive eye-opener for us and will serve as a template for the songs we do in the future. Cheers Mike, you are a star!”
Mix Rescue On-line
If you want to hear before and after audio files from this Mix Rescue, including the full mix, go to the SOS web site at /sos/mar09/articles/mixrescueaudio.htm, where you can play MP3s or download higher quality WAV files to audition in your DAW.