 Of all the new devices introduced in Reason 6, The Echo is one of the most exciting and versatile.
As we all know, delays are the linchpin of all manner of effects, from subtle vocal treatments to creative experimentation. But until now, Reason users haven't had a terribly broad range of options to call on. There are, of course, several good delay algorithms lurking in the RV7000 reverb (which I covered in detail back in the February 2010 Reason Technique column), but otherwise we've been stuck with the rather limited half-rack DDL1, or having to do some nifty patchwork to run audio through Thor's Delay section.
In Reason 6, though, it's a whole different story, thanks to the great new device, The Echo. Users with even the most passing familiarity with hardware delays of yore will recognise the design cues from Roland's revered Space Echo units. But, as is typical in the Propellerhead world, this thing goes way beyond the capabilities of hardware — it's an astonishingly versatile device. To get an idea of what's achievable, and to check out the most crucial features, let's look at setting up some typical delay-based effects.
What Is Normal?
There's no question about it: sometimes you just need a very straightforward delay/echo effect for a guitar or vocal line, say. The Echo is perfect for this. After you've applied it to an instrument or audio track device, these are the main parameters to watch for.
First off, you'll need to work in Normal mode, selected at far left. Then adjust the nearby Time knob to set the length of time between 'echoes': from one millisecond to one second or, with the Sync button engaged, tempo-synced note values between 1/128 note and a half note. Next, go to the far right and adjust the Dry/Wet balance knob to set the relative volume of the input signal and the following echoes. Now, increasing the level of the Feedback knob determines how many echoes you hear. Around the 2 o'clock position, you'll get echoes that never die away but go on into infinity. Wind it on more and your echoes will get louder, and progressively more distorted. Keep your monitoring level control handy...
The beauty of The Echo, though, is how easy it is to make a basic echo effect into something much more interesting. For example, to make the echoes become increasingly lo-fi, like an old tape echo unit, just turn on the Filter section. The Freq knob sets the centre frequency of a band-pass filter, so for that typical warm tape echo sound keep the value quite low, and turn up the Reso(nance) knob to intensify the effect. To add in a bit more dirt, turn up the Drive level and experiment with the four different drive 'Colors'. Still want more of a tape vibe? Turning up the Wobble knob, in the Modulation section, adds some random wow and flutter pitch variations. And finally, to soften the 'edges' of the echoes, enable Diffusion and turn up the Amount knob. That adds a reverb-like sheen around the echoes, and the Spread knob makes the 'smearing' quality more pronounced.
Ambidexterity
Even more variety is possible if you utilise The Echo's stereo features. Setting up a ping-pong delay — where echoes swap sides across the stereo field — is as easy as pressing the Ping-Pong button! Then the associated Pan knob chooses how 'wide' the effect sounds, and on which side of the stereo field, left or right, it starts. Set to its minimum or maximum position (marked 'L' and 'R'), it's at its most pronounced. But be careful: if the knob is in the centre position, essentially you've turned the effect off.
More stereo effects are possible, though, and they're quite unusual. Check out the 'Offset R' knob in the Delay section. If you raise it, The Echo effectively turns into two separate delay lines: one for the left channel and one for the right. It makes most sense of all in Ping-Pong mode — the 'Offset R' knob makes the ping-pong timing 'swung' or uneven. Then there's the other 'Offset R' knob, in the Feedback section. At any setting except dead centre, this unbalances feedback between left and right. Put simply, it makes echoes pan to one side of the stereo image as they die away. Weird, but quite nice! One thing to note, though, is that it's more or less redundant when Ping-Pong is enabled.
Trigger Happy
Now we're getting to the heart of The Echo's unusual but interesting and useful capabilities.
An ever-popular effect treatment is to add delay to individual words in a vocal phrase, or pick out just one or two notes in a guitar or synth line. It's a technique that's sometimes called 'selective delays', and I described the normal way you have to set this up, by automating mixer send levels, in the March 2010 Reason column.
The Echo, however, blows that out of the water, and makes adding selective delays stupidly easy. Here's what you do:
1. Set up The Echo in Normal mode, so you can quickly zone in on the sonic effect you want, balancing input level and echoes with the Dry/Wet knob.
2. Switch to Triggered mode. Initially, it'll sound like you've bypassed The Echo.
3. Now, any time you want to add a brief delay/echo effect, just click the Trig button. It's a momentary button that only stays on for as long as you hold it, so frequently you will want to hold it for a short time, to completely cover a word in a vocal phrase, for example.
4. To record those Trig button presses into your song as automation data, right‑click on The Echo and choose 'Create Track For The Echo'. Make sure the new track is selected in the sequencer track list. Then hit Record, and Trig away... The data for the button-pushes appears in the track lane ready for subsequent editing.
Essentially, Triggered mode puts a gate on The Echo's input, and by pressing the Trig button you momentarily open that gate. It's a really nice solution to a common need.
Rock & Roll
If Triggered mode is useful, Roll mode can get seriously trippy!
Roll mode works best when the Wet/Dry mix control is set to 100 percent wet, or at least close to it. Initially, it'll sound like The Echo is bypassed, but to actually trigger the effect you have to grab the Roll slider and move it to the right. That's when the wet/dry mix really changes. Moving the slider also shuts off any further input, and cranks the feedback right up. What the hell does this mean in practice?
Essentially, Roll mode is a freeze or repeat function — it's 'roll' in the sense of a drum roll. While the slider is moved to the right, a little slice of your input signal gets 'stuck' in The Echo, and is endlessly repeated, subject to the filtering and other sound options we've already mentioned. If you've chosen a really high feedback setting, the repeats will actually increase in volume. You can use this as another flavour of the 'selective delay' effect I already described, but try it on drum or instrument loops, or even an entire mix (by creating The Echo in the Insert FX sections of the Master Section), to drop quirky bits of ear candy into a phrase or finished song.
Next month, we'll look at some more elaborate possibilities, including glitch treatments, and setting up hardware control to really 'play' The Echo.
Insert Or Send?
All the techniques I've described this month assume you're using The Echo in an insert-type configuration, processing the output of a single instrument or audio track. But, of course, if you prefer you can use it patched into the mixer, in a send/return configuration. If it's used like that, you really need to keep the dry/wet mix control set to 100 percent wet, at which point it's the channel's send level that effectively determines the balance of dry signal and echoes.
The other thing to note is that Roll mode pretty much relies on an insert configuration, with its dry/wet mix set to 100 percent wet (or close to it). A send/return setup for that doesn't make much sense.
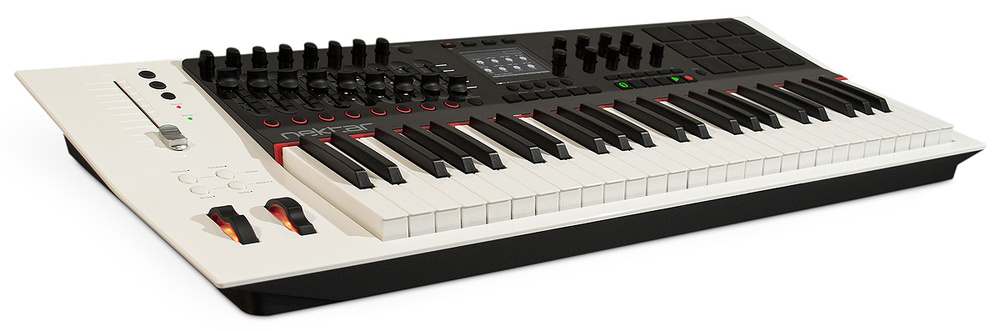
Nektar Panorama P4
While plenty of generic MIDI controller keyboards include templates for Subtractor, Malström and other devices, Reason users have so far not been offered a dedicated hardware controller, by Propellerheads or anyone else.
All that's about to change, though. Nektar are a new California-based company that have just released a 49-note, 12 drum-pad controller keyboard called the Panorama P4. It'll function as a generic MIDI controller, but its real purpose in life is as a hardware front end for Reason 6. Central to the whole thing (literally and figuratively) is a 3.5-inch, high‑resolution, colour display surrounded by faders, encoders and buttons, and a 'completely transparent' integration with Reason that promises to do away with a lot of mouse work, at least for mixing and device control. A single 100mm motorised fader should be an asset for writing automation data of various kinds.
The P4 looks classy and, at an anticipated street price (in the US, at least) of $500, could be really tempting for dedicated Reasonists. More details at www.nektartech.com.


