One of our engineers aims for a big sound from the smallest of acoustic drum kits, as he sets about creating a drum sample library...

This month's recording session was all about tracking drums, which is probably one of the most written-about topics in audio production, and one we've covered in different ways many times in the pages of SOS. In my experience, though, each session throws up its own challenges, and usually plenty of opportunities to experiment with different mic selections and placements too — so, in my book, if you don't learn something new every time you track a drum kit, you're not doing it right.
For this particular project, there was a little twist, in that I wasn't tracking drums to fit a full musical composition. Instead, they'd be used in two ways. First, in addition to being a session musician, the drummer in question, Levi Szendro, is also a drum maker. One of his main aims was for me to catch the sound of his kit and playing for use on his web site. Second, my own main aim was to capture all the nuances of his kit in order to create a sample library — the post-production side of which will, if all goes to plan, form the basis of another SOS workshop in the not-too-distant future.
 In this shot, you can see the fully miked drum kit, including the overhead pair of AKG C451B mics which, positioned equidistant from the snare drum, formed the basis of the overall kit sound, as well as picking up most of the cymbals sound. Note the jumper hanging off one mic stand — an impromptu counter-balance to stop the boom sagging when extended to reach through the spaghetti mess of stands and cables!Making drums sound rich and full on their own, with no other musical accompaniment, is a very different prospect from tailoring them to fit alongside other instruments. In fact, in some respects it's easier, as there are going to be no clashes with other instruments in terms of masking of frequencies. On the other hand, there's nowhere to hide; if you get the sound wrong, the mistakes and embarrassments are there for everyone to hear! The sample-library side of the equation complicates matters, in that you have no idea what song anyone wants to use the library for, but you do know that it will need tweaking to fit various songs — and that means that you need to build in a certain amount of flexibility. Of course, unless you capture the sound of several alternative drums for each part of the kit, you're going to be limited to some extent in what the library can do, but you can still experiment with the panning and levels of close-miked signals versus those from the room and overhead mics, and you can, if you wish, change the sound considerably by rigging more than one pair of overheads. Some further flexibility can be added in the post-production phase but, as I said earlier, that's a subject for another day. For now, I'll focus on some of the successes and difficulties of the recording session itself.
Choosing A Recording Space
 The initial plan for snare close-miking was to place an AKG C414 B-ULS on the bottom and a Beyerdynamic M201 on the top, with one polarity-inverted. It's a combination that often works, but it didn't seem to acquit itself so well on this piccolo, and in the end Matt was able to get a fuller, more natural sound using a pair of C414 B-ULS in the same configuration.
After lining up a decent drummer and drum kit, by far the most important factor in capturing a good drum sound is finding a nice — or at the very least sufficiently controllable — space in which to set up the kit. It is possible to use quite a small, relatively dead-sounding room to track drums, and then add in ambience later on, using, say, a natural-sounding convolution reverb. Indeed, that's an approach we often advocate in our Studio SOS column, in cases where drummer-recordists are working within the constraints of a small domestic environment. However, both Levi and I were keen to experiment with room mics, to see what sort of sounds we could capture from his unique kit — and given that I'd be close-miking most kit pieces, too, a small room would not provide sufficient space to erect the necessary forest of mic stands.
Another thing about tracking drums, in my experience, is that you really need to be able to hear clearly what you're recording — and that means having reliable monitoring. While it's relatively easy to find good or interesting rooms for recording, the monitoring side of things is tougher, and it's no coincidence that my experiences of tracking drums on location when there's no separate area to set up as a control room have so far failed to meet with my complete satisfaction. Headphones serve well enough for most things, but even when using them in a separate room (never mind trying to monitor in the same room as the kit!), I've yet to find a pair I'm happy to use to hear what's going on with a kick drum — however good the cans are, they still leave me guessing a bit in this respect, and the kick sound is so important in so many styles. For many engineers, it's the solid foundation around which a kit sound can be built.
It's perfectly possible to set up an impromptu control room on location — just as Hugh Robjohns did for the Selwyn Jazz session that appeared in this column a few months ago — but I don't own a particularly portable monitoring setup, so I decided to hunt around for a proper studio. A quick begging phone call to Westminster University in London secured me the use for one day of a studio used by their MA Audio Production students. I thought this would be ideal for several reasons. First, having used the studio several times before, I was familiar with both the good and less good aspects of the sound of the live room, as well as the workings of the lovely old Amek Angela console and the sound of the monitors in the control room, which would save me precious time on the day. Second, it was located somewhere that would be accessible for both Levi and myself. Third, in the event of technical gremlins, I'd be able to call on the house engineers to lend a helping hand (always a nice safety net, but even more so when you're also taking pictures and notes for an SOS article — there's only so much one pair of hands can do at a time). Last, and far from least, the live room in question is relatively tall and large, and controllable enough that I was confident of being able to capture a good sound, complete with room ambience, while also having plenty of space to set up extra mics and stands for experimentation.
I appreciate that not everyone reading this will be able to get access to a full studio like this, so I'll stress that, lovely as the Amek Angela console is, we only really used it as a rack of preamps and for routing to the DAW and back to the monitors. I also deliberately shied away from applying console EQ or other processing during tracking, so any lessons you pick up from this column should be applicable to other situations. There's a whole other article waiting to be written on the relative merits of location recording, tracking at home, or using a dedicated studio facility, but this isn't the place!
Preparation
 The kick sound came largely from the vintage AKG D12, placed inside the 16-inch kick near the batter head, with a CAD Equitek E200 in cardioid mode outside the drum for a little extra definition.
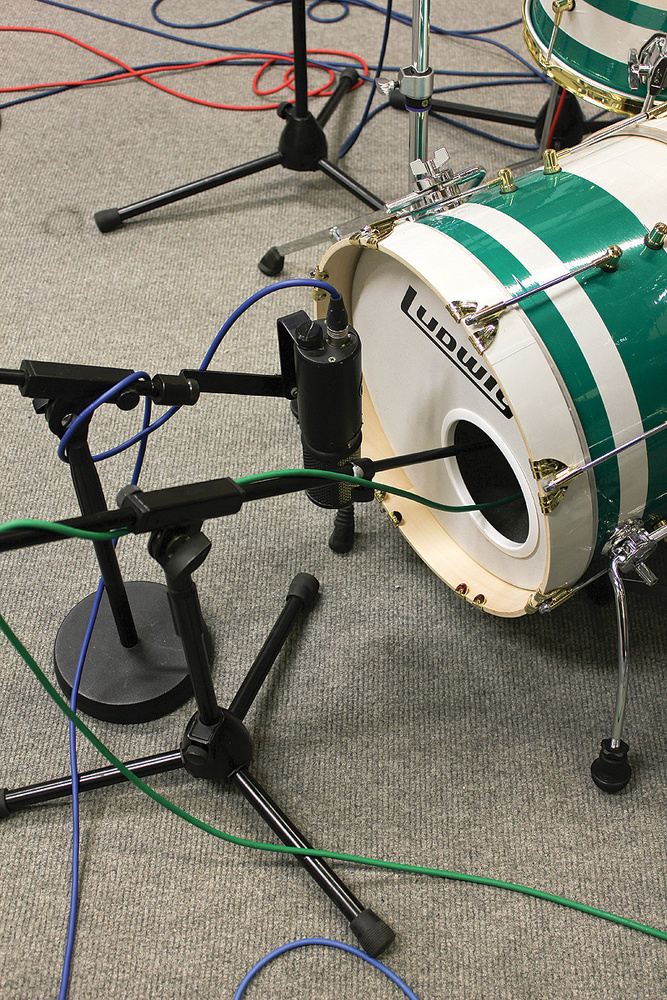
A few weeks before the session, Levi sent me one of his new Recording Master piccolo snare drums, which he proposed to use on the day, so that I'd have a better idea about how it should sound. We then chewed things over on the phone, to decide what other kit pieces we might use, and what mics, stands, cables and other gear we'd want to bring along. While Levi was keen to bring along an alternative snare option, a louder, beefier-sounding model, we decided to keep everything else simple and reasonably portable. We restricted ourselves to a single floor tom (which we thought we'd be able to tune up to use as a rack tom if we felt we needed another tom in the sample library), and Levi also suggested opting for his tiny 16-inch kick drum, a heavily modified vintage tom that looks rather like a posh toy drum, but sounds the real deal! In the end, we were glad we kept things simple, as there was quite a long way to lug all the kit, mics and other bits from the car park, and it took a few trips to get all the gear inside as it was.
For a one-day session like this, I usually prefer to use my own mics where possible; I know their strengths and weaknesses, and can be confident that they're in good, working condition. I felt that a few extras would be useful here, though. The studio had Neumann KM184s, Shure SM57s and Electrovoice RE20s aplenty, so I'd be able to borrow those, but what I didn't initially have was a good plan for a room mic. Fortunately, I'd been chatting with Terry Finn of Affinity Audio, AEA's UK distributor, about the recording session, and he was keen to loan me an AEA R88 stereo ribbon mic specifically to try out as a room mic. More fortunately still, he was due to be passing by the studio on the day of the session, so he'd drop it off and give us a hand rigging things up.
It saves a hell of a lot of time preparing a rough plan of which mic(s) will be deployed on which instrument, even if you change your mind on the day, simply because you can get things set up much more quickly, and can create a recording template in your DAW. Our initial list looked something like the 'Initial Mic Choices' table.
We'd decided to rely on the overhead mics for the cymbal sound, and would bring along a few alternative mics to play with, including a lovely looking vintage American DR332 dual-element ribbon-plus-dynamic mic from Levi's collection.
Setting Up
 Unusually, Matt opted to use two separate mics on the hi-hat, as they offered different 'flavours'. One, a Neumann KM184i sounded a litle brighter, and the other, the M201 that had been retired from snare duties, was a little less brash-sounding.
When we arrived on the day, I was dismayed to discover that I'd left my external hard drive at home — and on that was sitting a Pro Tools session I'd already set up. I'd also somehow managed to pack the wrong Audio Technica mic — a large-diaphragm AT4030, which is a nice enough mic, but I presumed it would not be best suited to hat duties. Not the perfect start to the day!
After unloading the car, lugging all the gear into the studio and grabbing a much-needed caffeine injection, I left Levi to set up and tune his kit, the position of which was largely decided by the need for visual communication through the control-room window, rather than for any sonic reasons. Meanwhile, I configured the Pro Tools 10 session on the studio Mac, just in time for Terry to arrive with the AEA mic. He kindly set it up for us, too, while Levi and I quickly assembled the rest of the mic stands we'd need, connected cables and hooked up the mics we'd allocated.
I rigged the overheads up as left and right mics pointing directly down from above the kit, slightly spaced and about three-and-a-half feet above the kit. This technique, I thought, should give a nice clear cymbals sound, and quite a natural balance, with most of the sound coming to the mic broadly on-axis. The idea was to use these as the basis of the kit sound, and to be able to augment that image with the various close-mic signals, before mixing in the room mic signals to taste. I used my tape measure to set each overhead mic the same distance from the snare, so as to ensure a good, solid image of the snare in the overheads, free from the nasty phase-cancellation issues which plague so many newbie drum recordings.
For the kick, I used a short mic stand to place the D12 inside the kick through a small port on the drum's resonant head. (There's no way this would have fitted through the hole with a taller mic stand coming in at an angle). The CAD Equitek E200 condenser mic was placed outside, about a foot away from the resonant head, pointing straight at the drum in cardioid mode, just off to one side of the port. The idea was that the D12 would provide the warmth and low end, whereas I'd be able to filter the E200 sound, to capture more of the click, which could be mixed in to taste.
Levi then had the opportunity to warm up and get the kit sounding exactly as he liked it, while I checked the level of the signals, tweaked the position of some of the close mics, and set up a headphone mix for him. He didn't really need a monitor mix as such, as we weren't tracking anything to a click, but we did need the cans as part of the talkback facility.
Appraisal & Change
 After experimentation, Matt settled on using an Electrovoice RE20 dynamic mic to capture the sound of the tom.
On closer scrutiny of the sound, both in the room and coming over the speakers from the various mics, it was no surprise to find that some tweaks would be necessary. First, Levi identified a buzzing sound in the room. This turned out to be largely due to an unused drum kit which had been stored and partially obscured by some heavy-duty acoustic screens. In particular, the snare was still engaged on the snare drum, so we disengaged that, rearranged the other drums so that the ring wasn't problematic, and then pulled the heavy screens completely in front of those drums for good measure. Thankfully, this made things sound much better.
When it came to the miked sound, there was an audible problem with the sound coming from the MD421 on the tom — or, rather, an inaudible problem, because there was no sound! Having tested that mic the previous night and found it to be working fine, I was initially rather puzzled. The only way to tackle this sort of thing is to go methodically through the signal chain to discover the culprit, so I tried plugging the cable into a different wall socket (and thus console channel). No joy. Next, I tried swapping the cable for another from a different drum that I knew to be working. No joy again, which meant that there must be a problem with the mic. The next step, then, was to give up on the 421 and try out a different mic. We settled on one of the studio's Electrovoice RE20s. Plugged into the same wall socket as the MD421 originally was, there was again no signal but switching the cable to another one, in a different socket, finally gave us a sound. It was a nice sound, too; the RE20 is probably my favourite all-rounder dynamic mic, and I strongly suspect I'll be using it in this application again. Just to add to the confusion, I tested the MD421 again when I got home and all was fine — so I'm afraid that all you can learn from this particular experience is that you need to take spare mics and cables to a session, and have a bit of patience!
The Snare & Hi-hat Conundrum
 With most mics in place, as Levi started to warm up, Matt placed another C451B as a spot mic on the ride cymbal, just so that any bell work on that cymbal could be brought out a little more cleanly.
For Levi, the snare was definitely supposed to be the star of the show, and while we were getting a passable sound from the M201/C414 B-ULS combination (one mirroring the other, with the polarity inverted on one so that the two signals reinforced rather than cancelled each other out), it just didn't seem to be doing the snare justice. Solo'ing each mic revealed that the C414 was capturing rather a nice under-snare sound, but the M201 — which I usually love in this application — just wasn't cutting the mustard.
One of the things about this snare that I like is that it combines that snap and bite of a piccolo with a little more body than most, and it was this latter quality that just wasn't coming through over the monitors, no matter how I balanced the overheads and the two close mics. I tried an SM57 in place of the M201, and then another RE20, but neither seemed to do much better. I've solved such issues in the past using a C414 B-ULS pointing at the snare from the side of the kit a couple of feet away, but that only really works if you can afford to work with spill, and given the sample-library project, that wasn't really an option here. I still thought the C414 might give the right sort of sound, though, and certainly a more EQ-able sound, so I borrowed another C414 B-ULS from the studio. This left me with the same model of mic for both top and bottom snare duties. Finally, we had a happy result, with sufficient flexibility offered by balancing the two faders, and everything sounding good alongside the overheads and the room mic. It would have been so easy just to make do, but I don't see the point of multi-miking if you're going to do that. This sort of setting up can take the patience of a saint from a drummer, though!
The change of snare mic also led me to the final choice of hi-hat mic. Or, rather, hi-hat mics — because while I often don't use a hi-hat mic (there's usually more than enough of it in the overheads and room mics), I ended up using two in this case. Having failed to bring the right mic, I first tried out the AT4030 that I'd brought, just in case it surprised me by doing a good job. It didn't: although it's a nice mic for its intended purposes, the sound in this application was brittle and unappealing. I begged a Neumann KM184i from the studio, a classic choice for hi-hat, which I placed above the hat, and slightly in from the cymbal's edge, just to avoid the slightly lispy sound you can get from the escaping air. This worked, but I still felt a little unsure, feeling that the sound might be a bit bright, especially when combined with that captured by the C451 overheads. The M201 I'd initially placed on the snare was still set up on a stand, so I decided to move this on to the hat and compare it with the KM184, reasoning that if the KM184 sounded bright, then this dynamic mic should 'sand off the edges' of the hat sound a bit by comparison. Indeed, it softened the hat attack sound nicely, and complemented the overhead sound well. Still unable to decide which sound I preferred, I simply made sure that the two would combine without phasing issues and routed each to its own track in Pro Tools. I'd be able to make my mind up later which to use, and I might even offer both alternatives in the sample library.
Happily, the room mic just worked. It's the first time I've tried stereo ribbons in this configuration, which is effectively an X/Y pair pointing towards the kit, and another X/Y pair picking up from the rear. All I had to do to get a sound that worked was to set it set back a few metres from the kit (just further than halfway between the kit and the rear wall), and about a foot higher than head height, with the 'centre' of the front X/Y pair pointing towards the kit.
Having tracked a few bars of Levi's warm-up with the mics set up and the signals balanced to taste, I invited him into the control room and played back the result, demonstrating the differences we could create by mixing in more or less room sound, and balancing the close and overhead mics. All the hard work had evidently paid off, as he seemed very happy with the sound.
The Never-ending Story!
 Matt's view over the Amek Angela console and through the glass to the live room. Note the configuration of Pro Tools, with the takes and waveforms on one screen and the mixer on another, which is a useful setup for this sort of tracking session.
Levi and I then ran through how we would capture the seemingly never-ending series of individual drum hits we'd need in order to create a sample library. We ranked the instruments in order of importance — snare, hi-hat, kick, tom and cymbals — according to the number of different articulations we'd need to capture. It made sense to put the hard work up front, while Levi was relatively fresh.
We agreed that for the snare, which is probably the most expressive instrument in a rock drum kit, we'd need straight hits on the centre of the snare, to be captured at seven different velocity levels, and with both right- and left-hand hits captured separately. We'd also want open and muted side-stick sounds, rolls, double, triple and multiple ghost notes… and then we'd want more clean hits and rolls but with the snare disengaged. With 10 hits recorded for each articulation and velocity later, just so that the sample library would not suffer from recognisable repetition if re-triggering the same articulation and velocity, that amounted to… well, I'm sure you get the picture. It was an awful lot of hits! For the hi-hat, there were a number of different articulations, too (chick, tip and side hits, semi-open, fully open, open and closed hits, open and closed but struck on the bell…) but the other kit pieces would be much more straightforward, with only a couple of different types of hits for each.
We'd spent several hours getting the sound right without yet recording anything we'd keep, but it was a worthwhile investment, because we were able to zip through all of the recording while focusing on getting the drumming right and not worrying about the engineering side of things. It did take a while, but that was only because of the quantity of hits — capturing individual hits is a relatively easy recording job as long as you keep your ears open and stay focused. From an engineering point of view, what is important in this sort of session is clear labelling of tracks and projects in your DAW, and taking copious notes with pen and paper, so you can decipher exactly what you've recorded, and can check off each hit as it's played and recorded. It's so easy to lose count after a while, and although some minor things ("delete the first hit on that take,” and so on) seem obvious at the time, your notes will be invaluable a week later when you next have a chance to work on the files! In the end, I created different Pro Tools sessions, using the first as a template, for each kit piece, just to keep things simple later on.
In addition, it's hugely important to maintain your focus and listen to each hit. I was fortunate in having a very skilled drummer who was able to strike 10 hits in a row at almost exactly the same velocity, and to do the same thing for several different velocities. Unfortunately, I've yet to discover any software that could simply rip through a number of hits and order and batch rename them in velocity order — if someone could invent that, it would save sample-library manufacturers days on every project! If your drummer has less skill on the drums, you might need to pay a little more attention to getting the velocity right on each hit — or restrict yourself to fewer layers. Your other main job here is to make sure the drummer leaves enough time for each hit to die down before striking the next one. You'll be surprised just how long a snare, kick or tom sound can go on for, never mind a cymbal hit!
The Loops
 Completing the mic line-up was the AEA R88 stereo ribbon mic, placed some distance from the kit, and picking up a signal in a crossed figure-of-eight configuration. The idea was to add some flexibility to the sample library and to provide some natural ambience and 'glue'.
When I was sure that I had everything I'd need, we were able to move on and track the various loops for Levi, including a number of more 'out there' styles, just to see whether the kit sound we were capturing might work for those. I just hit record and let Levi do his thing. I've put the multitracks for one of the loops up on the SOS web site, so that you can hear what the drum kit sounded like, and have the opportunity to download them to play with in your own DAW.
A week or so after the session, I started to do a little editing and mixing work on the loops, just to tighten things up a little bit. The editing only really involved a bit of time-alignment of the tom sound, as the close RE20 was clearly audible before you could hear the tom hit in the overheads. So much so, in fact, that it sounded like a flam! So I zoomed in on the waveform and nudged the close-mic track along until it was in time with the overheads (moving the overheads would have caused many more problems of alignment with the other close mics).
The rest was pretty standard stuff — a little compression here and there on the individual kit pieces, a tiny bit of EQ to help balance things better, a hint of reverb, and all this going into compression and tape emulation on the stereo bus. The only ways in which the processing really departed from the norm were that I used SoundToys Decapitator to bring out a little more of the bite and tone of both the snare and the kick, and slapped a limiter at the end of the stereo bus chain. This was simply to ensure that when it was played on Levi's web site it would be at a sensible level compared with other online media and wouldn't force anyone to turn up their volume. Not everyone agrees with that approach, but it's fine in my book, as long as you don't suck the life out of the sound as you do it!
On Reflection
There are a few lessons I think you can take from this session. First, check that you pack everything on your list! Having forgotten my hard drive and taken the wrong mic, I was fortunate: I had my MacBook Pro with me to take notes for this article, and I was able to fire that up as a Firewire target drive and copy the session from the studio system onto that; and I had alternative mics to try out at the studio. If I'd been working on location, I wouldn't have had that luxury. Second, even decent mics won't always give you the best result, and if you have the opportunity to swap mics about and hear the differences between them, it's a very good idea to do so: you might just hit on something better than you're used to. Finally, and probably most importantly, time spent on preparation, both on the day of the session and in advance, and on searching for the right sound, will always pay dividends. I probably spent in the region of three hours in prep for every one of actual recording. That might seem like a lot of administration and faffing about, but there's no way I'd have got the same results in the same amount of time otherwise — and to leave more to chance can become very expensive in studio space and people's time!
Initial Mic Choices
| Instrument | Mic | Desk/Pro Tools Channel(s) |
| OH | 2 x AKG C451B | 1+2 |
| Kick In | AKG D12 | 3 |
| Kick Out | CAD Equitek E200 on cardioid | 4 |
| Snare Top | Beyerdynamic M201 or Shure SM57 | 5 |
| Snare Bottom | AKG C414 B-ULS | 6 |
| Hi-hat | Audio Technica AT-4021 | 7 |
| Floor Tom | Sennheiser MD421 | 8 |
| Room 1 | AEA R88 (stereo) | 9+10 |
| Room 2 | Realistic PZM x 2 | 11+12 |
Drum Kit Details
 The Levi Drums Recording Master piccolo snare drum used on this session.
I asked Levi to talk us through the drum kit he chose for the day, and what it he thinks makes for a good recording kit. The actual kit recorded in this session comprised the following pieces:
- Kick: 16-inch bass drum, customised from a 1964 Ludwig parade drum.
- Snare: Levi Drums Recording Master (see below for details).
- Hi-hat: 15-inch Paiste Dixie
- Floor Tom: 1960s 13-inch Ludwig Tom.
- Cymbal 1 (Ride): 1960s Paiste 18-inch Dixie Ride
- Cymbal 2 (Crash) : 18-inch Paiste 505 Black Label medium crash.
The Recording Master Snare
Levi's latest creation, and the first 'standard' product he's planning to manufacture and sell, is a piccolo snare drum, based loosely on an old Ludwig design. It has a 14 x 5 inch, three-ply (beech/poplar) shell which is custom-made in Italy to Levi's own specifications: each of the three layers is much thicker than in most modern shells, but the shell as a whole is no more than 4mm thick. The idea behind this is that the drum will benefit from a little more of the body resonance, fullness and sustain that you'd expect from a good vintage drum, and which many modern piccolos lack — but without losing the characteristic 'bite'. Levi then assembles the full drum by hand in Camden, London, using carefully selected parts and an aesthetically distinctive arrangement of the lugs. It's fitted as standard with a Remo Ambassador coated head.
According to Levi, many drummers look down on poplar, wrongly thinking that it's a cheap and inferior wood, but he points out that Ludwig and other great '60s drum manufacturers used this wood in their shells. He also mentioned that DW drums — one of the more expensive and desirable brands today — have launched a 'Vintage' series, which also uses poplar.
Kick & Tom
As you can see from the list above, the kick and the floor tom are tiny, but they're still capable of producing a deep and powerful sound, and this is due only in part to the choice of mics and recording technique. Again, Levi puts the sound down largely to the wood used and the construction: "they're a mahogany/poplar/mahogany thick three-ply, as used back in the 1960s by Ludwig, Rogers and some other highly respected manufacturers. If we'd used the same setup but with maple drums, we'd have been working with a much brighter sound, which to me isn't much like a kick drum or floor tom should be!” But the heads can be important too: "Using a Remo Black Dot clear head on the floor tom helps to give an extra slap to the sound, and for the bottom I put on a coated Remo Ambassador head, which reduces the long sustain, without killing it in an unnatural way. To my ears, this makes for a better, warmer sound.”
Cymbals
Levi is particularly fond of vintage Paiste cymbals for recording. "Paiste cymbals are the best recording cymbals so far for me. They have a great, complex sound, but without getting too bright and dominating the kit. They just seem to work on so many styles.”
Who Bangs The Drums?
 The man behind the kit, Levi Szendro, who needed the patience of a saint to track all the sample-library hits!
The drummer in this session is a friend of mine, Levi Szendro. He's a classically trained orchestral percussionist who, several years ago, turned his back on the classical world to pursue his passion for rock drumming. I can't write any drummer jokes here, either, because he has a good ear for music and also writes, composes, gigs and records with several artists. Frustratingly, for mere mortals such as me, Levi also has more than a modest amount of skill on piano.
Like so many of us who start out as musicians, his passion for music goes hand in hand with an ever-increasing interest in the construction of his chosen instrument, and in mics, gear and the recording process. His curiosity has led him to experiment with original designs and customisations for the drums in his own kit — and so much interest has he had from other drummers in those designs that he recently decided to make and sell them. His first product is the 'Recording Master' piccolo snare, which was used in this session. You can find full details of this piece and the rest of the kit used on the day in the 'Drum Kit Details' box
Reader Reaction
Levi Szendro: "I can't find words to express how much I enjoyed the SOS recording session! It's been a great experience, and I'm very pleased with the result. We've given the answer away in this article, but if you'd done a blind listening test and tried to guess what sort of drums we'd used for these recordings, I bet no-one would have guessed that it was a 16-inch kick and a 13-inch floor tom — the sound is so deep and fat! I'll be interested to hear how the kit sounds in the sample library too — particularly given that we went to the trouble of capturing some of the classical side of the snare drum, as well as all the obvious rock/blues/pop articulations. Many thanks to Matt and the SOS team.”
Audio Examples
It hardly seems worth the bother of writing about recording drums if you can't hear what I'm talking about, so I've placed a few audio examples on the SOS web site, including the multitrack recording for one of Levi's drum loops and the processed loop.