The new Commit Tracks option in Pro Tools 12.3 makes archiving your projects easier than ever.
Last month we explored some uses for the new Commit Tracks feature introduced by Avid into Pro Tools 12.3. This month we will look at how these features can be brought to bear on audio tracks, and how they can be used to create stems, future-proofed archives and other ‘deliverables’.
 and after (below): applying these settings in the Commit Tracks dialogue results in a copy of the original track being created, with the audio consolidated, and with all the insert processing printed — but sends, automation and group memberships are inherited intact.") Before (above) and after (below): applying these settings in the Commit Tracks dialogue results in a copy of the original track being created, with the audio consolidated, and with all the insert processing printed — but sends, automation and group memberships are inherited intact.
Before (above) and after (below): applying these settings in the Commit Tracks dialogue results in a copy of the original track being created, with the audio consolidated, and with all the insert processing printed — but sends, automation and group memberships are inherited intact.

Let’s start with the process of committing a single audio track. Right–click on the track title in either the Mix or Edit window, select the Commit option and the Commit Tracks dialogue window will pop up. In the example shown in the screenshots I am not going to render the volume, mute or pan automation, but I will copy the sends and group assignments so that the committed track will inherit the same auxiliary effects and group memberships as the source track. The options I’ve chosen mean that the committed track will be inserted in the session after the source track, which will be made inactive and hidden. Clicking the OK button will create the committed track; note that the committed audio clip is longer than the original, so as to accommodate the tail of the reverb.
 in one go.") Pro Tools 12’s Bounce feature means I can export all of my stems (the highlighted aux tracks in the Mix window) in one go.
Pro Tools 12’s Bounce feature means I can export all of my stems (the highlighted aux tracks in the Mix window) in one go.
You can also commit ‘up to’ a plug-in inserted on a track. This gives you the option to commit a track with only the first part of a plug-in chain — useful if, for instance, there are some effects you’re uncertain about. To do this, click on the last plug-in you want included in the committed version; again, this can be done in either the Edit or Mix window. Again, set up the Commit Tracks window to suit your needs and click OK. Once Pro Tools has finished processing, you will see that the audio has been consolidated and only the plug-ins you chose to commit have been removed from the insert slots on the committed track.
Flatliners
Committing tracks is an excellent way to provide ‘flattened’ versions of all the tracks in your session for archiving or delivery to a record label. Since the committed tracks contain nothing but audio files, they can be accessed regardless of the availability of particular plug-in processors or instruments. At the same time, committing your tracks means your mix secrets and plug-in settings don’t get passed on!
 Following the instructions described, your archived track will have a series of playlists that successively ‘print’ the output of each plug-in in turn.
To commit an entire session, select all the tracks, hold down Shift+Alt, right–click on any of the selected tracks and select Commit. If you are delivering a Pro Tools session rather than just separate audio files, consider unticking the Render Volume, Mute and Pan automation options so they remain intact in the session you will deliver. However, you probably want to make sure that Hide and Make Inactive are selected, while choosing Offline will ensure that the process is as quick as possible — how fast will depend on the speed and power of your computer and the plug-ins you are using.
 Once the commit process has finished, you can select all the newly committed tracks, go into the File menu and choose Export Selected Tacks as New Session. Make sure you choose Audio Files in the Items To Copy section of the Save Session Copy window, so that the new session will include copies of the processed audio. Click OK and Pro Tools will create a new session containing only the committed tracks, with no plug-ins, which is probably the most shareable and future-proof archive format possible at the moment.
Bouncing Stems
In post-production it has long been the norm that audio engineers will be asked to supply stem files as well as full mixes, and the same is increasingly true in music work. The traditional way to do this is to route all the different stems to separate aux tracks, then bus the outputs of these auxes to new audio tracks. However, the new Bounce feature makes it possible to create stem files straight from the aux stem tracks without all that complex additional routing and track creation.
 In a typical TV documentary post-production session, for example, I’d have aux tracks for each of the stems — dialogue, sound effects, music and voiceover — plus the full mix and an M&E stem (music and effects, for dubbing into other languages). To export all these simultaneously, I can now simply select all the aux track stem tracks, hold down Shift+Alt, right-click on any one of the selected tracks and choose the Bounce option.
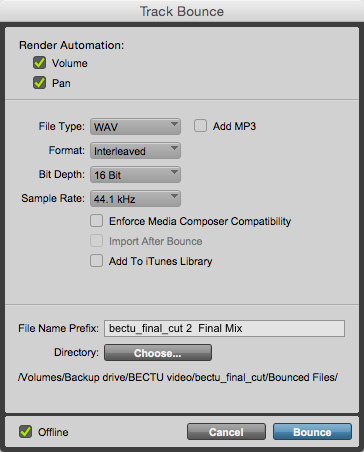
This, not unsurprisingly, brings up a dialogue box similar to the Bounce to Disk dialogue window. From here you can select what file format, sample rate and bit depth you need for the exported files, and you can choose to create MP3s as well as uncompressed files if you need to. You can set the location for the files to be placed or simply use the default Bounced Files folder inside the session folder. There is also a neat option to set the prefix that is added to the name of all the files about to be created, to help maintain consistent file naming protocols. Remember to choose Offline and click the OK button to start the Bounce process. Once complete you will find all the appropriate files in the destination folder ready to be delivered.
The Ultimate Archive
The Commit Track feature makes possible a very comprehensive archiving process that enables you to archive every plug-in in your session while still keeping all your options open. I am going to demonstrate it on a single track, but as we’ll see, you can easily repeat it for multiple tracks.
The first step is to place what is, in effect, a dummy plug-in in the first insert slot. What I mean by this is a plug-in that isn’t doing anything. This way, when you Commit up to this plug-in, what you end up with is a consolidated track with no processing rendered into the audio. In this example shown, I have a Trim plug-in in the first slot. In the Commit Tracks to Insert dialogue window, I make sure that the top Commit option is set to Track, don’t render automation, set the Source Tracks to Do Nothing and click OK. What I end up with is the original track, plus a new track with the audio consolidated and all the same plug-ins. On the source track (in the third screen above, ‘Sally Vox’), I then create a new playlist and name it with suffix ‘original’. Now holding down the Ctrl key, to constrain sideways movement, drag up the audio from the newly created committed track onto the ‘original’ playlist and rename the audio file with the same suffix as the playlist, so in this case, the file is called ‘Sally Vox.original’.
Next, delete the now-empty committed track, bypass the first plug-in on the source track, right-click the second plug-in and select Commit Up To This Insert again. From this point on there is no need to tick Consolidate Clips. Commit the track to include this plug-in and create another playlist on the source track using that plug-in name as a suffix. As before, drag the committed track’s audio up onto the new playlist, delete the empty committed track and bypass the plug-in you just committed ‘up to’.
Now move through the rest of the plug–ins on the source track in turn, repeating the process until you have a playlist with a consolidated file for each stage of the plug–in chain, along with the original playlist containing all your edits. You can repeat this process for each track in your session; you could also do all the first plug-in slots on all tracks in one pass if you wanted to.
What you end up with is a session where every track has multiple playlists, one for each step in the plug-in chain, but with all the plug-ins and their settings still in place. This gives you the maximum possible flexibility for the future, because regardless of which plug-ins continue to be available, you’ll be able to open your session and have it sound exactly as it originally did. This technique is ideal for internal archiving, so that you have access to the session at all levels depending on what you need.


