Since Pro Tools 6 there's been some additions to the set of built-in plug-ins. This month we look at how to get the most out of the D-Verb reverb.
Both TDM and LE flavours of Pro Tools 6 include the D-Verb real-time reverb effect as part of the basic install. D-Verb has its detractors, and certainly it's not on a par with the more expensive reverbs available, such as Reverb-One. Used carefully, though, it can hold its own against many of its peers and become a useful addition to your line-up. Even if you have a higher-quality reverb, D-Verb is likely to be more processor-efficient. You might, for example, use it on pads and guitars, saving your flashy reverb for vocals and drums.
Basic Operation
 Figure 1: Vocal Booth patch settings.While D-Verb has only a basic set of controls (see the accompanying screen shots) and looks pretty simple to operate, the way some of the parameters interact is a little confusing. For example, there are three size buttons, but also a decay control, plus High-Frequency damp and Low-Pass Filter sliders. Then there are the 'Algorithm' buttons: are these distinct reverb types? All will be revealed!
To begin with, the algorithms are different reverbs, and the same parameter settings will yield different results depending on the selected algorithm. As is evident from their names, the algorithms are meant to give you a starting point for simulating types of environment or classic reverb styles. Below the Algorithm buttons are Size buttons, which have two effects on the plug-in. Firstly, they further alter the characteristics of the sound of the reverb, and secondly they interact with the Decay parameter slider by shifting the range of reverb times available.
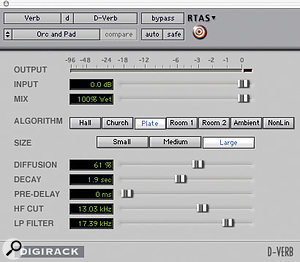 Figure 2: Orchestral & Pad patch settings.Moving on, the Diffusion control sets how quickly the sound shifts from the initial small echo-y responses ('Early Reflections') to the more steady 'cloud of sound' we know as reverberation. With D-Verb (like many other reverbs), better results are achieved with high diffusion settings, unless you're creating a special effect that benefits from the graininess you get at the lower end of this setting. Even if you want to simulate a small space, it's sometimes better to combine a high diffusion setting with a short decay time.
 Figure 3: Drum patch settings.The Pre-Delay slider is used to add a delay before the effect kicks in, and is useful for simulating large spaces, or creating slapback or rhythmic effects (see the 'Boing Delay', and 'Guitars' presets in the next section). The last two sliders are the HF Cut and LP Filter controls, which produce subtly different results. The latter is just a simple low-pass filter that rolls off the high end of the plug-in's output. It only acts on the 'Wet' portion of the sound. The HP Cut control governs the proportion of high frequencies in the reverb over time. Frequencies above the slider's cut-off point will decay more quickly than those below, mimicking real life (where high frequencies are damped by the air).
Some Examples & Tips
I've created some suggested starting points you could try out. Copy the parameter positions in the screenshots and then use the small sub-menu in the top left of the plug-in window to save the patch. These setting are designed to be used in a 'send-return' fashion, rather than inserted directly into a track. If you're not sure about this, the Pro Tools Reference Guide details what to do; if you do decide to insert the plug-in directly onto an audio track, you'll need to change the Mix setting to control the amount of reverb applied.
- Vocal Booth
This adds a subtle amount of space. I've used the Room 1 algorithm, which (to my ears) sounds better than Room 2. I've ignored my own advice, though, and used a fairly low Diffusion setting to get an echoey result! (See Figure 1, previous page.)
- Orchestral & Pad
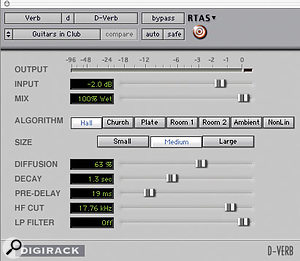 Figure 4: Guitars patch settings.This should give decent results on most strings and pad-type sounds. I've gone for a large size setting with a shortish decay as the larger algorithm is smoother. This setting has a 'shimmery' quality which should be used subtly as it can sound pretty artificial at points where the music stops suddenly and you're left with just the reverb tail. (See Figure 2, previous page.)
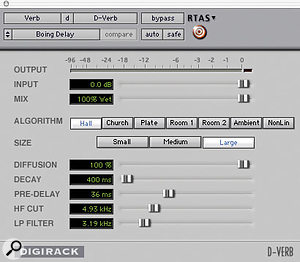 Figure 5: Boing Delay settings
- Drums
Drums really tend to show up the sound of reverbs, because their transience means that you're hearing the reverb on its own a lot of the time. D-Verb can sound a bit 'swooshy' on drums, so rather than fighting to make a realistic sound, use the Plate setting combined with a pretty short decay setting and high diffusion. I've used the HF Cut and LP Filter setting to remove some of the less desirable and harsher artifacts in the high end. (See Figure 3, previous page.)
- Guitars
This patch tries to create a classic 'slap-back in an empty club' type effect — or something! The Hall setting is bright and smooth, and the pre-delay gives the slap-back. I've left the HF Cut and LP Filter pretty much open, to retain a 'jangliness' that works well with guitars. (See Figure 4.)
- Boing Delay
 Figure 6: Electro Drums patch settingsYou can get some weird and interesting sounds by combining the large algorithms and room sizes with very short decay times. Combine these with a pre-delay time that syncs musically with your song and you get this rhythmic effect. An EQ/filter after the reverb can be used to further shape the sound and remove clutter. Tip: with the Hall and Church algorithms and a smaller room, very short decays seem to go a bit wrong, in that you end up with all the reverb in the right channel only. (See Figure 5.)
- Electro Drums
By heavily damping the high frequencies you can create an interesting, rather claustrophobic-sounding space. This patch also really fattens up electronic drums. (See Figure 6).
Quick Tips
- It was annoying me the other day that there's no dedicated command-by-command guide to Pro Tools' menus in the Reference Guide. Then I discovered that there's a separate 'Menus Guide' that's not part of the printed documentation. In case you didn't notice it either, it's with the other PDF files in the 'Documentation' folder that gets installed in your Pro Tools application folder.
- At home, I'm mainly running Pro Tools with MBox, and I find that occasionally when I fire up and hit play all I get is a quiet static clicking and no audio. Usually, quitting and unplugging the MBox from the USB port for a few seconds sorts this out. However, occasionally it requires a restart.
- I've discovered something wonderful about my Apple iBook, which is a way of enabling dual-monitor spanning support, enabling constant viewing of the Mix and Edit windows. This is only possible with later iBooks (800MHz+) with the 32Mb graphics chip, and shouldn't be attempted on earlier models, or you could seriously screw up your firmware. Apple disabled monitor spanning on iBooks for commercial reasons, but you can download a small AppleScript utility that will turn it back on from www.macupdate.com/info.php/id/12444. It's in German, but if you just hit 'Ja' at each prompt it will check if your laptop is compatible and make the changes automatically.


