
If you want to artificially extend your instrument samples, or make entire backing tracks from one rhythmic snippet, you'll need to know about looping and time-stretching. And then there's keygrouping... This month, we explain these fundamental sampling processes, and more.
As promised, I'm going to look at sample looping this month. However, one problem associated with tackling this topic is that looping means different things to different people. As explained in the second part of this series, it originally meant finding a way to artificially extend a sample's length by playing a portion of it over and over again, back in the early days of sampling, when the hideously expensive nature of sampling RAM made taking full-length samples of instruments impossible. However, from the mid-'80s on, looping came to mean something rather different. By looping a short recording of percussion or drums so that it could be repeated to play over and over again, samplists learned how to easily create backing tracks, thus giving rise to the term 'drum loops' — short, pre-trimmed, repeatable sections of rhythm that could be used to build rhythm tracks fast. By the early '90s, vocals were being looped in the same way, and then people began sampling whole sections of existing tracks and building new compositions around them, particularly in the worlds of rap and R&B production. I'll say more about this later on this month, but first, let's look at instrument sample looping.
Going Round In Circles
Conceptually, this type of looping is very simple — you just find a reasonably constant portion of the sound in your sampler, put loop points around it, and then when you play it back, the sound will play back in an infinitely sustainable form, forever repeating the constant-sounding section between the loop points until you take your finger off the trigger key. Like most things, of course, it's a lot harder in practice!
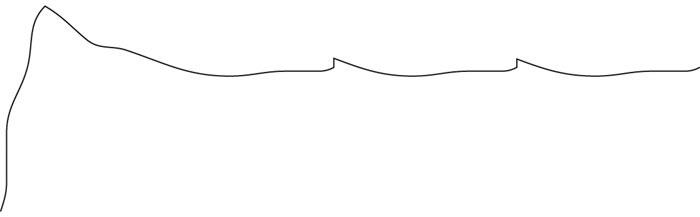
 results in a looping waveform that clicks or glitches (above).") Here's a very simple repeating waveform. It should be easy to loop, but picking bad loop start and end points (top) results in a looping waveform that clicks or glitches (above).
Here's a very simple repeating waveform. It should be easy to loop, but picking bad loop start and end points (top) results in a looping waveform that clicks or glitches (above)., loops without glitching (above).") The same waveform looped properly, with its loop points placed on zero crossings (top), loops without glitching (above).Apart from the simplest electronically generated waveforms, most instrument sounds vary considerably in amplitude and harmonic/timbral content over the course of a note. On a quick listen, therefore, while many sounds might appear to have a reasonably constant-sounding sustain portion (ensemble strings, for example), if you analyse the sounds closely, you will usually find some complex sonic 'movement' going on during that sustain. You can see this for yourself very simply by looking at the amplitude changes in pretty much any sound in a software waveform editor (or on-screen on your hardware sampler) — finding sections that remain even close to constant in amplitude over any period of time is very hard. As I mentioned last month while explaining the process of trimming samples, if you edit a sound such that there is a very great, instantaneous change in a sample's amplitude from before the edit point to after it, you'll hear a glitch or click in the edited sound, and this is equally true when looping sounds. And even if you can get the amplitudes to match at your loop points, there will often be harmonic changes happening over the course of a section that disrupt your attempts to make inaudible loops.
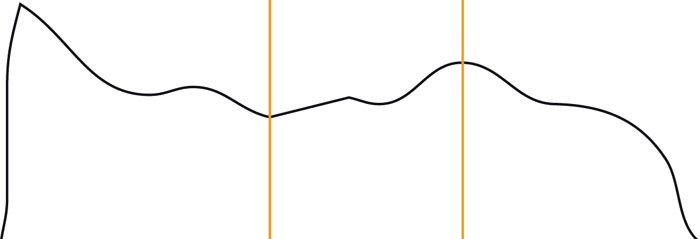
The same waveform looped properly, with its loop points placed on zero crossings (top), loops without glitching (above).Apart from the simplest electronically generated waveforms, most instrument sounds vary considerably in amplitude and harmonic/timbral content over the course of a note. On a quick listen, therefore, while many sounds might appear to have a reasonably constant-sounding sustain portion (ensemble strings, for example), if you analyse the sounds closely, you will usually find some complex sonic 'movement' going on during that sustain. You can see this for yourself very simply by looking at the amplitude changes in pretty much any sound in a software waveform editor (or on-screen on your hardware sampler) — finding sections that remain even close to constant in amplitude over any period of time is very hard. As I mentioned last month while explaining the process of trimming samples, if you edit a sound such that there is a very great, instantaneous change in a sample's amplitude from before the edit point to after it, you'll hear a glitch or click in the edited sound, and this is equally true when looping sounds. And even if you can get the amplitudes to match at your loop points, there will often be harmonic changes happening over the course of a section that disrupt your attempts to make inaudible loops.
Before you give up on the whole process as unworkable, take heart. While these difficulties do make sample looping something of a trial-and-error process, it's also true that the more you try to do it, the more you get used to what to look and listen for. With experience, you can often nail a decent loop almost immediately with fairly coarse loop settings, which can then be further refined with careful nudging of the loop start and/or end points. And successful looping isn't all down to experience, either — there are a few cunning techniques that can help...
Short Loops
 Economical sound design using very short loops. The top diagram shows the naturally decaying envelope of a sound. In the middle diagram, a very short loop has been set up to create the sustain portion of the sound, which works, but sounds very unnatural. However, the natural envelope of the sound could then be restored using the sampler's onboard amplitude-enveloping facilities, as in the lower diagram, thereby creating something close to the original sound, while taking up far less sample RAM. In the early days of sampling, when conserving sample memory and storage space was essential, it was common to store just the attack portion of a sample, and then set a very short loop of just a few milliseconds to convey the rest of the sound. These days, in modern samplers with generous memory complements, loops like this really are a thing of the past, but hardware manufacturers still use the technique in their synths and workstations.
A typical example might be a bass guitar sample — the 'pluck' and initial decay would be heard, and then this would settle down into a static loop. This creates a totally unnatural sound, of course, but the original instrument's envelope and tonal movement can mostly be restored artificially using the sampler's envelope and filter functions (see diagram, right). It might sound horribly primitive and crude, but a sound like this can work surprisingly well when programmed by someone with skill, especially when the sound is used in a full arrangement. You might never know that it uses 92 Kilobytes of memory, not 92MB!
Tricks Of The Trade
Firstly, and as with trimming, explained last month, it's usually a good idea to set loop points on zero-crossing points, because there won't then be any amplitude changes at the edit points (see the diagrams on the first page of this article). This, at least, takes care of amplitude-related loop clicks. Many software wave editors and the editing facilities in some hardware samplers include a 'zero crossings only' function (although it's often known under another name). With this enabled, when you try to move your loop points, they will 'snap' to zero-crossing points only. And if your editor doesn't have such a function, you can still try to find zero crossings in the waveform by eye.
Crossfading (sometimes known as crossfade looping) is another handy looping trick, although sometimes it creates its own problems. Once again, the concept is simple — instead of 'hard cutting' from the end of the loop section to the start at a fixed loop/edit point, you create a crossfade section instead, where the end part of the loop fades out, while the start portion of the loop fades in at the same time. In some cases, this can 'smooth over' a difficult loop point very nicely (the diagram at the top of this page should make this clearer). Some samplers also offer other possibilities such as forwards/backwards looping. In theory, this is an ideal solution to looping awkward, evolving sound sources such as (say) ensemble strings or voices. When you play the sample it plays back normally, then plays the loop section, then plays the loop section backwards to its loop start point, then forwards again through the loop section, then backwards again... and so on (the diagram on the right should explain this more clearly). However, in practice, I have to say that I've never really found this option to be much help in looping sounds. In theory, you'd think it a perfect solution, but I rarely found it so. Some people seem to like it, though, so maybe it'll work for you — if you have access to such a function, it's certainly worth experimenting with.

 The top diagram shows a sample with bad loop points, which, when looped, results in the glitching, clicky waveform in the middle. However, applying a loop crossfade could 'smooth out' these clicks, as in the lower diagram.While all of these techniques can take care of differences in waveform amplitude across loop points, as mentioned earlier, the tiniest tonal or harmonic changes over the course of the sound can create audible problems when looping, even if the loop you make is free of clicks. If the pitch of (say) a string or guitar sound varies even slightly across your loop point, you'll hear a disconcerting pitch change as the sound loops, and even if you put in a crossfade, you'll hear a flanging or chorus-type sound as the two sections at different pitches overlap.
Much worse is the problem of audible repetition. If a portion of a sound is cycling round and round as it is being sustained, our ears can pick up on this (even subconsciously) very quickly, and the effect can be as irritating and obvious as a clicky loop, and/or interfere with the rhythm of any piece of music you try to use the looped sound in!
For this reason, it is best to make loop sections as long as you can, to minimise the impression that the sample consists of an intro portion and then the same few milliseconds of sound repeated ad inifinitum (even though that's exactly what people used to do in the days when sample RAM was expensive — see the box on the previous page). These days, I usually take samples of around five seconds, and typically make loops of around four seconds — this way, the cycling is less repetitive and less obvious to the ear.
In addition to using these techniques, you may find that your sampler or editing software has some functions that can make looping much easier. I've already mentioned zero-crossing finding functions, but there are others. Many devices or audio-editing software packages allow you to listen to your loop section cycling as you adjust the loop's start and end points, so you can hear how the loop will sound and can tweak it until it improves. Some hardware samplers will also display the waveform 'join' at the loop point, making it easier to match the two points up visually, and others have a 'Loop Lock' function which allows you to slide the entire loop around the sample in search of a better position. Some (most notably, those hardware samplers made by Ensoniq) allowed you to modulate loop position in real time.
In the world of software, there are even dedicated programs designed to help create smooth-sounding loops, such as Antares' Infinity for Mac OS 9 and Beatcreator's Zero X Seamless Looper for Windows. If you're wondering why I didn't just mention these earlier and spare you all of the stuff about manual crossfading and zero crossings, there are good reasons. In much the same way as having a copy of Auto-Tune doesn't make you a vocalist, having a looping editor doesn't make you an experienced sound designer! Even if you make use of such applications, a basic knowledge of how to manually set loops is beneficial, so that you can set some rough loop points in advance according to your judgement and then let the applications' clever looping and crossfading algorithms work from your starting points. Simply setting arbitrary loop points and throwing the loop at the software is unlikely to yield good results. What's more, these software tools aren't always equally effective at dealing with all types of sounds (some are less good at dealing with sounds containing a lot of harmonic movement, for example), and so it can help to have some idea of what to do when the software doesn't quite give you the result you were hoping for. When I'm looping sounds, I'll sometimes set rough loop points using my experience, put the sound through a software looping tool, and then tweak the loop points again manually afterwards. It's good to have some idea of manual looping techniques, so that you're not simply stuck with what your looping software gives you.
Looped Loops & Stretched Time
Once you have an understanding of good instrument looping and basic sample-trimming techniques (as described last month), then creating rhythmic loops — the other kind of looping mentioned at the start of this month's article — is a piece of cake. Here's a simple example, based around looping a small four-bar section of drumming to create a continuous rhythmic backing track. First, don't sample four bars — sample five! Then, in your sample editor, set the sample start to the first beat of bar one (taking care to put it on a zero-crossing point, as described last month, to avoid clicks). Now set the sample end to the first beat of the start of bar five (again, taking care to set it on a zero-crossing point).
 Looping forwards and backwards. The upper trace shows a sample with loop points set, and the lower trace shows the results of playing the sample back with a forwards/backwards loop.You now have a loop that, if repeated, will give you a rhythmic backing as long as you want it to be. If you know the tempo of the drumming you've looped, you can load the loop into a sequencer, put the sequencer at the same tempo as the loop, put triggers in to fire off the loop every four bars (thus ensuring the loop stays locked to the rest of the arrangement) and add other sync'ed material on top at the same tempo. If you don't know the tempo of the audio you've looped, your sequencer may have a 'tap tempo' function that will work it out for you if you tap along to the beat of the loop.
This is the basis for loop-based composition, but of course, your loop doesn't have to be of drums — anything with a rhythmic element will do, as Fatboy Slim (to name just one fan of this technique) has been fond of proving to people with looped vocals, looped piano, and so on.
Now, that's fine if you are working with one sampled loop at a certain tempo — everything you add on top is simply recorded at the same tempo — but what happens if you want to alter the tempo of the piece as it grows, or you want to add another sampled loop at a different tempo? As soon as you alter the tempo of your backing track, the loop will no longer play back in time with it. You could slow down or speed up the playback of the loop, of course, but unless it's a totally unpitched loop you're working to, such as drums or percussion, the pitch of the loop would normally change too, which could mean that it will no longer fit musically with the rest of your backing (and even with unpitched drum and percussion sounds, if you change the speed by very much, the sounds soon become noticably slowed down or sped up). This was a problem for samplists in the '80s, until the problem was partially solved by the invention of time-stretching...
Time-stretching is a process which allows you to lengthen or shorten a sound without changing its pitch. Conceptually, it's not difficult — to make a sound longer, duplicate samples are inserted throughout the sound, and to make it shorter, samples are removed. Once again, in practice, it's not so easy, which is why its invention provided only a partial solution!
 The effects of time-stretching. This is a sample before stretching.
 After time-stretching by 200 percent. Samples have been duplicated and inserted, with crossfades to smooth things out.
.") Time-compression in action — here the sample is half its original length. To achieve this, samples are carefully removed (with crossfading once again to smooth the transitions).To insert or remove samples, small crossfades have to be applied where the data is modified so that the transition is smooth, and certain decisions have to made (in software) with regard to where the samples are inserted/removed. If those decisions are wrong, inappropriate data might be inserted, the best example being when stretching a drum phrase — if the percussive transient of one of the drums is duplicated/inserted, you will get a flam sound (in other words, it could sound as though the drum has been struck twice). Similarly, if the percussive transient is removed, the sound will be corrupted, with a loss of attack.
Time-compression in action — here the sample is half its original length. To achieve this, samples are carefully removed (with crossfading once again to smooth the transitions).To insert or remove samples, small crossfades have to be applied where the data is modified so that the transition is smooth, and certain decisions have to made (in software) with regard to where the samples are inserted/removed. If those decisions are wrong, inappropriate data might be inserted, the best example being when stretching a drum phrase — if the percussive transient of one of the drums is duplicated/inserted, you will get a flam sound (in other words, it could sound as though the drum has been struck twice). Similarly, if the percussive transient is removed, the sound will be corrupted, with a loss of attack.
Complex sounds which consist of many frequencies and harmonics also tend to time-stretch badly, as what works well for one set of frequencies usually doesn't for another. Consequently, if you try to stretch a sample of a complete mix, you might find that the low frequencies stretch smoothly, while the mid and high frequencies exhibit problems with flam-like sounds in percussive transients and other unnatural-sounding artefacts. Conversely, sometimes the high frequencies will sound acceptable while the bass end sounds 'wobbly', especially on sustained bass notes. This has been typically overcome in the past with a well-known scientific technique known as 'compromise'; sampler manufacturers frequently offered several different time-stretch 'presets' optimised for certain types of sound sources (percussive samples, sustained sounds, and so on).
It's also possible to partially overcome these problems by splitting the sound into different frequency ranges and processing them separately, but that in itself can cause phase and other problems when the processed sections are recombined. A similar dodge was used to time-stretch stereo signals, by splitting the signal into Left and Right components, and processing them separately, but again, the phase problems this caused were often severe. Later attempts at stereo time-stretching analysed a mono sum of the the two channels and applied an overall stretch process to the left and right sides separately, which at least meant that both sides were processed similarly, but this was hardly foolproof either, as it suffered from the same problems besetting the first attempts to stretch any complete mix or harmonically complex sound. Of course, time-stretching recordings of individual instruments (or isolated recordings from a multitrack), particularly if they were harmonically simple ones, didn't suffer many of these problems, but that wasn't what many people wanted to do.
Throwing Out The Baby?
 In the top diagram, you can see a sample looping smoothly thanks to crossfade looping. For creative sound design purposes, you could discard the attack portion completely, and keep just the looping section, as in the middle diagram. You can then add back an envelope using your sampler's sound-shaping facilities, as shown in the lower diagram. This could create an ethereal sustaining pad sound with a slow fade-in, quite unlike the original sampled sound.As explained last month, when you have created a successful loop, it's a good economy measure to discard all sample data after the loop's end — you're not ever going to hear it, and the data is just wasting memory and storage space.
But in some cases, you might actually want to try removing the stuff before the loop start as well!
This might fly in the face of conventional thinking, where the attack of a sound is the most important element that helps us identify instruments, but if you're not bothered about realism, and you're just trying to design an interesting sound, you can create some great washy pads by lopping off the attack section of the sound, and creating a new, artificial attack with your sampler's built-in envelope generators (see the diagram right for more on how this is done).
The Stretching Solution
The solution arrived in 1994 from then-new Swedish software house Propellerhead, in the form of their Recycle software. Most sampler owners these days use this software, or at least files in its REX format, without being aware of how it works. It's one of those ideas that's so brilliantly simple that it can't fail to be a success — and Recycle was most certainly that.
Basically, the software takes a sample (typically a drum phrase with percussive transients) and slices it up into separate beats/hits, making each hit a separate sample. Once the 'hits' comprising the loop are separate, it is possible to vary the distance between each of them, and hence change the tempo without changing pitch — if you want the loop to play back more slowly, you space the beats out more widely, and if you want it to play faster, you squeeze them more closely together. That would have been clever enough for most people, but Propellerhead added a further cunning twist — they also very cleverly generate a standard MIDI song file of the pattern/phrase that's been sliced. This MIDI song file can then be imported into a sequencer and its tempo can be varied there to match the tempo of the song being created. As regular users of REX files know, this makes it possible to take almost any sampled pattern and use it at any tempo in your music. Furthermore, you can rearrange the beats in your sequencer to create your own patterns and variations, and, of course, they can be quantised. Not surprisingly, the concept underlying Recycle is now available in almost every sampler, software or hardware, even if it works in slightly different ways, and machines or programs that don't have the ability built in usually have a REX-file input option at least. The idea is inspired, simple and effective and allows another variation on the concept of 'looping'.
Of Keys & Maps
![]() Mapping single samples of G notes in every octave across a full MIDI keyboard, as you might do it in a modern software sampler or hardware sampler's editing package. First, the G-note samples are dragged and dropped on every 'G'.
Mapping single samples of G notes in every octave across a full MIDI keyboard, as you might do it in a modern software sampler or hardware sampler's editing package. First, the G-note samples are dragged and dropped on every 'G'.![]() The range of the G1 sample is extended down to C1 (usually by simply dragging 'handles' at the edge of the G1 Keygroup icon).
The range of the G1 sample is extended down to C1 (usually by simply dragging 'handles' at the edge of the G1 Keygroup icon).![]() Extending the G1 sample up to B1 in the same way.
Extending the G1 sample up to B1 in the same way.![]() Extending the G2 sample down to C2.
Extending the G2 sample down to C2.![]() Extending the G2 sample up to B2.
Extending the G2 sample up to B2.![]() The keyboard after all the samples' key spans have been adjusted.Once you've taken some samples, edited, looped and tweaked them to your satisfaction, you need to assign them to MIDI notes so that they can be played back from a controller or a sequencer. Again, this should be simple to understand — if you've taken a sample of an organ playing a 'C#', you'll want to map that to the MIDI note corresponding to 'C#' in the correct octave. However, it gets more complicated when you've taken samples of a less-than-complete set of notes to save memory (as explained in this series two months ago). You'll then want some of the samples, on receipt of the appropriate MIDI notes, to be played back untransposed, while others are shifted a few semitones to provide the complete range of notes across an entire keyboard. There's also the issue of what to do with drum sounds (or the loops you've carefully edited to provide backings, as described on the previous page). Typically, you'll want each MIDI note to trigger a different drum sound or loop, so that you have a spread of drums or loops available to you across the span of a MIDI keyboard, rather than (somewhat less usefully) a single drum sound or loop that pitches up and down over the range of the keyboard.
The keyboard after all the samples' key spans have been adjusted.Once you've taken some samples, edited, looped and tweaked them to your satisfaction, you need to assign them to MIDI notes so that they can be played back from a controller or a sequencer. Again, this should be simple to understand — if you've taken a sample of an organ playing a 'C#', you'll want to map that to the MIDI note corresponding to 'C#' in the correct octave. However, it gets more complicated when you've taken samples of a less-than-complete set of notes to save memory (as explained in this series two months ago). You'll then want some of the samples, on receipt of the appropriate MIDI notes, to be played back untransposed, while others are shifted a few semitones to provide the complete range of notes across an entire keyboard. There's also the issue of what to do with drum sounds (or the loops you've carefully edited to provide backings, as described on the previous page). Typically, you'll want each MIDI note to trigger a different drum sound or loop, so that you have a spread of drums or loops available to you across the span of a MIDI keyboard, rather than (somewhat less usefully) a single drum sound or loop that pitches up and down over the range of the keyboard.
So that a sampler knows what to do when it receives a given trigger note, it can hold in its memory a 'map' of instructions telling it which samples to trigger on receipt of which notes, whether to transpose them before outputting them, and so on. As with many sampling features I've discussed in this series, these instructions are set up differently from sampler to sampler, and they're also called different things on different samplers (some call them 'zones', others 'groups', for example). I've always preferred Akai's nomenclature, Keygroups, because it seemed logical to me — a Keygroup refers, after all, to a group of keys — so that's the term I'll be using here.
Setting up Keygroups on hardware samplers, with their tiny displays, used to be a horribly fiddly process, but in these days of software samplers and software editors for hardware, it's much less of a problem, as you nearly always have access to a graphical overview of the sample mapping. Moreover, whereas in the old days you had to select the samples you wanted to assign to Keygroups from a cumbersome, scrolling list of all your samples, these days you can drag and drop samples directly on to a graphical representation of the keyboard, and define the spans over which you want the samples to be stretched by simply dragging handles on the various Keygroup graphics (see the diagram above for a representation of how this could be done).
Next Month
In next month's instalment, I'll conclude looking at Keygroups and mapping (as well as explaining drum mapping), and start looking at some of the great things you can do using the built-in synth engine hidden away inside modern samplers.