Logic's built-in EXS24 sampler is a powerful tool for playing realistic instruments, but dig a little deeper and you'll also find unlimited potential for sound design.
 The EXS24 soft sampler can manipulate a single source sample to provide every element of an electronica track, from kick drums to pads.Whether you are a sound designer working with visual media or a music producer looking for signature timbres, chances are you'll resort to some creative audio generation during your quests for sonic inspiration. This is not only necessary when projects require originality, but is also advisable if one is to stand out from the preset-using crowd. But can we really be completely free from the tempting presets included with most of our favourite virtual instruments? The answer is yes, and in this workshop, we'll see how every element of a typical track can be built from a single source sample, using the tools built into EXS24.
From Sample To Cycle
Of course, the sound-design process can just as easily start with a pure wave generated by a synth oscillator, but for this experiment, we'll use a short vocal sample: one with a couple of words and a handful of different vowels and consonants. Bear in mind that the original content of the source will be rendered almost irrelevant once the sonic manipulation is in full swing, so any interesting sample, short or long, will do.
 The Instrument Editor can be accessed from the Edit button next to EXS24's Sampler Instrument selection menu. Once inside the Instrument Editor, you can create a new Zone from the local Zone menu and load up a sample by clicking in the blank field beside Audio File. Clicking on the small 'E' buttons at the bottom of the Zone pane — the 'E' button next to Loop will only become available if Loop is first enabled — will launch the sample in Logic's Sample Editor, allowing for finer graphical editing. This is also where you can edit the sample loop points in order to create a single-cycle selection. Make sure you preview the resulting tone in the Sample Editor by enabling loop playback, so you can continue to experiment with loop lengths until the desired continuous tone is achieved.We can start by loading our sample in an EXS24 Sampler Instrument via the Instrument Editor. Once it's loaded up and the instrument saved, we can begin our sonic journey. What follows will be based fundamentally on a subtractive synthesis approach, in our case depending on a digital sample for the source rather than an analogue waveform. But just as an analogue synth depends on the shape of a cycled waveform to provide the basic character of a starting tone, so can we determine a similar cycle within EXS24, departing from the perceived characteristics of a vocal tone and arriving at something more abstract.
To achieve this we have to resort to some sample-level sound selection. From the EXS24 Instrument Editor, launch the sample in Logic's Sample Editor (click on the 'E' to the right of the Start Frame field) then zoom in and select a single cycle of the waveform. In essence, this is the equivalent of a synth's oscillator wave shape and, in most cases, the more random it looks, the more interesting it will sound. The selection can be looped by enabling the Zone's Loop button, creating a continuous tone. Chances are that the timbre of the continuous tone will have little or no relation to the vocal tone we started with and, in fact, the shorter the selection, the less it will resemble the source. Bear in mind that the length of the cycle will have a direct effect on pitch too, so you can use the EXS24's transpose, tune and fine controls to match the tuning of a correctly pitched instrument (for example, an instance of ES1 playing a basic waveform).
At this stage it's possible to load up another instance of the same vocal sample in a second Zone of the instrument, repeating the Sample Editor selection for a new cycle. Layering Zones will emulate the effect of operating a multi-oscillator synth, where any slight detuning between oscillators (or, in our case, Zones) will produce richer timbres. The process can be repeated several times in consecutive Zones or completely new sampler instruments, resulting in a rich palette of varying tones, just as one would have on a multi-oscillator synth. The difference here is that the tones derived from Sample Editor cycle selections will generally prove to be more exotic-sounding than classic oscillator wave shapes, such as sine, square or saw.
Bear in mind that we can also experiment with longer cycles that perhaps do carry with them some of the characteristics of the source material they derived from.
EXS24: More Than Just A Sampler
EXS24 is a fully fledged virtual sampler that allows you to not only load and play extensive libraries of sounds, but to also edit them and use them as starting points for further sonic manipulation. All the controllers and modifiers you would expect to find on an advanced synthesizer are included here and they're all available from the Editor view of the plug-in window, with the added benefit of a very flexible modulation matrix allowing for all sorts of control signal source routing to various parameters. A flexible Filter section with six switchable modes of operation (high-pass, band-pass and four types of low-pass) provides all the tone-shaping options desired, while the amplifier section is 'hard-wired' to velocity (although constant values are also possible via limitation of the range control). Three LFOs and two Envelopes can be freely assigned to any generator or modifier parameter — as well as to each other — using the available modulation matrix, while the Via field allows for assignment of a further modulation source (typically a MIDI controller number, although control signal sources are an option too). The routing possibilities are endless, as are the ways in which a static source sample can be modulated dynamically.
Break It Down, Build It Up
The type of approach most suitable to start building the arrangement will be dictated by the sound design needs of the different instrument types we choose to create. These will normally be inspired by the specific project at hand, but let's consider for a moment a case of creating a short electronica piece consisting of bass drum, snare, hi-hat, bass and pad.

 and slowly evolving pad (right) sounds.") Different amplifier envelope settings can be used to produce a wide variety of sound shapes from the same initial tone. The two amp-envelope snapshots above correspond to the percussive bass drum (left) and slowly evolving pad (right) sounds.When it comes to non-percussive tones, such as the bass or pad sounds, sticking to single-cycle oscillations will provide the sought-after continuous tone. Once you've established this, the Filter section is what will determine the frequency characteristics of the different timbres. After the intended tone has been pitched down substantially for the bass sound, lowering the cutoff on a low-pass filter setting will get rid of any unnecessary high frequency content, while a 24dB/octave filter set to 'fat' will provide a powerful filter slope, simultaneously compensating for loss of low-frequency content on extreme resonance settings. The drive control can be utilised for further analogue-style overdrive effects. An 18dB per octave low-pass filter, without the 'fat' setting enabled and at different pitch settings, will help differentiate the pad sound, but it's the amplifier envelope that will define the suitable loudness trajectories for either sound, so go for short attack, sustain and release settings with a medium decay for the bass, while allowing generous values on all four stages for a slowly evolving pad. For added pad richness, layer further zones with slightly detuned tones to emulate multi-oscillator synth characteristics.
Different amplifier envelope settings can be used to produce a wide variety of sound shapes from the same initial tone. The two amp-envelope snapshots above correspond to the percussive bass drum (left) and slowly evolving pad (right) sounds.When it comes to non-percussive tones, such as the bass or pad sounds, sticking to single-cycle oscillations will provide the sought-after continuous tone. Once you've established this, the Filter section is what will determine the frequency characteristics of the different timbres. After the intended tone has been pitched down substantially for the bass sound, lowering the cutoff on a low-pass filter setting will get rid of any unnecessary high frequency content, while a 24dB/octave filter set to 'fat' will provide a powerful filter slope, simultaneously compensating for loss of low-frequency content on extreme resonance settings. The drive control can be utilised for further analogue-style overdrive effects. An 18dB per octave low-pass filter, without the 'fat' setting enabled and at different pitch settings, will help differentiate the pad sound, but it's the amplifier envelope that will define the suitable loudness trajectories for either sound, so go for short attack, sustain and release settings with a medium decay for the bass, while allowing generous values on all four stages for a slowly evolving pad. For added pad richness, layer further zones with slightly detuned tones to emulate multi-oscillator synth characteristics.
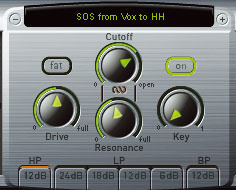
 and bass drum (bottom) sounds. The former depends on a high-pass filter to minimise the low-frequency content, while the later settings reverse the process, focusing only on lower frequencies. The 'fat' button is also enabled in the case of the bass drum to compensate for loss of low frequencies if high resonance settings are reached.") Note the difference in filter settings for the hi-hat (top) and bass drum (bottom) sounds. The former depends on a high-pass filter to minimise the low-frequency content, while the later settings reverse the process, focusing only on lower frequencies. The 'fat' button is also enabled in the case of the bass drum to compensate for loss of low frequencies if high resonance settings are reached.For the bass-drum sound, a good starting point would be to tune the oscillation as low as necessary to first acquire the right pitch content. It's easy to use the transpose and tune controls to achieve that, but playing the sampler instrument lower on the keyboard can provide further flexibility. The filter settings here can resemble those of the bass sound so, to differentiate the two, you can program shorter attack, sustain and release settings to retain a percussive characteristic. The decay time is what will provide the main body of the intended bass-drum sound, so altering it will give you the opportunity to shape the sound to suit your mix.
Note the difference in filter settings for the hi-hat (top) and bass drum (bottom) sounds. The former depends on a high-pass filter to minimise the low-frequency content, while the later settings reverse the process, focusing only on lower frequencies. The 'fat' button is also enabled in the case of the bass drum to compensate for loss of low frequencies if high resonance settings are reached.For the bass-drum sound, a good starting point would be to tune the oscillation as low as necessary to first acquire the right pitch content. It's easy to use the transpose and tune controls to achieve that, but playing the sampler instrument lower on the keyboard can provide further flexibility. The filter settings here can resemble those of the bass sound so, to differentiate the two, you can program shorter attack, sustain and release settings to retain a percussive characteristic. The decay time is what will provide the main body of the intended bass-drum sound, so altering it will give you the opportunity to shape the sound to suit your mix.
For the creation of the snare and hi-hat, it's best to scan our source for material that's closer to the intended end result (this is why we specified a source sample with a variety of sounds at the beginning of the article). A breath in our vocal sample will provide just the right noise source for percussive sounds of this nature, while we can once again depend on the amplifier envelope and filter to shape the response of the short sample. Higher cutoff and resonance settings than the ones used for the bass drum are advisable for the snare, with yet another type of low-pass filter selected. For the hi-hat, try the high-pass filter mode with a high cutoff setting and a fair amount of resonance.
Painting In Time
Creating the different instrument types out of minimal samples is a great way to discover the powerful sound design capabilities of Logic's instruments, reaching far beyond simple preset and sample playback. But the added benefit lies in the integration of the instruments' controls with Logic's automation engine and Hyper Edit functionality. Any parameter and control on the Editor view of an instrument plug-in can be automated, and most MIDI controllers can be set as sources for parameter modulation and depth control, so the dynamic possibilities are virtually endless. Using these functions allows for the transition from static tones to flexible and evolving sounds, through the integration of dynamic parameter modulation.
, the amount of filter cutoff modulation can be determined by Controller 1 in real time, resulting in MIDI data as visible in the Hyper Edit window on the left-hand side of the image above. The filter cutoff can, of course, be specified by automation data, as demonstrated in the Arrange window to the right-hand side of the above image.") Top: With the relevant assignments routed (as left), the amount of filter cutoff modulation can be determined by Controller 1 in real time, resulting in MIDI data as visible in the Hyper Edit window on the left-hand side of the image above. The filter cutoff can, of course, be specified by automation data, as demonstrated in the Arrange window to the right-hand side of the above image.
Top: With the relevant assignments routed (as left), the amount of filter cutoff modulation can be determined by Controller 1 in real time, resulting in MIDI data as visible in the Hyper Edit window on the left-hand side of the image above. The filter cutoff can, of course, be specified by automation data, as demonstrated in the Arrange window to the right-hand side of the above image. splits the arrow in half, so you can determine the extent of alteration that occurs when the controller is moved.") Left: Notice how not entering a selection for the Via field in the furthest EXS24 modulation matrix path maintains a single arrow for a constant value of modulation. Selecting a Via field (in this case Ctrl 1) splits the arrow in half, so you can determine the extent of alteration that occurs when the controller is moved. Let's continue with the previous pad example to demonstrate this dynamic functionality. Assuming we'd like the pad to be constantly moving in the stereo field but also progressively sweeping in high-frequency content at key arrangement moments, we'll have to use the modulation matrix to set up two different scenarios of dynamic interpolation. In the first modulation matrix path of EXS24 we'll set the source to LFO1 and the destination to Pan, while limiting the range control to a constant value by not selecting a 'via' parameter. This will have the effect of constant panning of the pad instrument at a rate dictated by the LFO1 Rate parameter. It can even be set to tempo-sync'ed values to adhere to the song's already established rhythms. In the second EXS24 modulation path, we'll route LFO2 to Filter Cutoff via the modulation wheel, with the range control this time spreading from 0 to 100 percent. The result will not only be Filter Cutoff modulation according to the second LFO's rate, but also the ability to determine the amount of modulation depth via the wheel on a controller keyboard. This can be performed in real time or drawn in in the Hyper Edit window for further precision.
Left: Notice how not entering a selection for the Via field in the furthest EXS24 modulation matrix path maintains a single arrow for a constant value of modulation. Selecting a Via field (in this case Ctrl 1) splits the arrow in half, so you can determine the extent of alteration that occurs when the controller is moved. Let's continue with the previous pad example to demonstrate this dynamic functionality. Assuming we'd like the pad to be constantly moving in the stereo field but also progressively sweeping in high-frequency content at key arrangement moments, we'll have to use the modulation matrix to set up two different scenarios of dynamic interpolation. In the first modulation matrix path of EXS24 we'll set the source to LFO1 and the destination to Pan, while limiting the range control to a constant value by not selecting a 'via' parameter. This will have the effect of constant panning of the pad instrument at a rate dictated by the LFO1 Rate parameter. It can even be set to tempo-sync'ed values to adhere to the song's already established rhythms. In the second EXS24 modulation path, we'll route LFO2 to Filter Cutoff via the modulation wheel, with the range control this time spreading from 0 to 100 percent. The result will not only be Filter Cutoff modulation according to the second LFO's rate, but also the ability to determine the amount of modulation depth via the wheel on a controller keyboard. This can be performed in real time or drawn in in the Hyper Edit window for further precision.
Alternatively, the routing approach can be replaced by Logic automation, either by click-dragging the mouse over the Cutoff control using one of the automation writing modes, or by drawing in automation curves in the Arrange window itself. Being able to 'perform' the filter sweep using a keyboard controller, however, is a much more expressive experience than using the mouse for data entry. Whatever the approach though, utilising the modulation matrix to create flexible modulation routings opens up the sound design possibilities of Logic instruments to a new level of arrangement integration.
Beyond Samples
The consistent architecture across Logic instruments also means that the ethos of limiting source material to expand on original sound generation can be applied to many different sources over numerous types of instruments. Just imagine the application of such methods on Ultrabeat samples and phase oscillations or Sculpture's physical modelling functionality. Add to this the option of dynamic control of any parameter via automation, real-time controller performance or Hyper Editing, and suddenly Logic transforms into the ultimate modular polysynth with more routing options, control and programmability than you would ever acquire from a hardware device.
Logic 8: The Shape Of Things To Come?
So after the long wait, and with very little fanfare, Logic 8 and the associated elements that go to make up Logic Studio have been released (you've probably already read the full review on page 108). It's a mixed bag; some features are better than before, some are worse, and I can see why many people have been underwhelmed with the release. Perhaps the biggest surprise was the major reduction in price; Apple seem to be aggressively promoting Logic as the sequencer for the Mac. And it seems to be working: several colleagues who use Pro Tools and Cubase have bought the package just to see what all the fuss is all about.
The loss of the XS Key, possibly one of the most secure systems ever, is also interesting, but it may not be as crazy as it seems. You need one Mac to run one copy of Logic Studio, so the more copies out there the more computers Apple will sell, and they are first and foremost a hardware company. The addition of SoundTrack Pro is also interesting, as the program has some features that Logic users have been requesting for ages. You don't need to be Nostradamus to predict that these will probably be folded into Logic at some point, but why Apple chose to bundle the program now isn't clear. It'll probably just make people annoyed that the features aren't yet in Logic!
For me, one of the most important changes is the locking of the Transport bar, as you will have ascertained if you've read the SOS review. Logic always has been (almost confusingly) customisable and no two setups I've ever seen have been the same. But while many of the features on the new Arrange page can be removed, the Transport bar remains resolutely glued to the bottom of the screen. While this could be really annoying for those who work with large numbers of tracks — horizontal screen space is very important in music production — it may also indicate a paradigm shift in Apple's thinking about the future direction of Logic. We'll probably see how the wind lies in one of the minor updates, but if Apple keep the sticky Transport and introduce more and more fixed ways of doing things it may indicate that future versions Logic are going to be aimed more and more at new users who are moving from GarageBand or other DAWs rather than the old soaks who've been there since the Atari days. Stephen Bennett


