From guitar amps to gates, Pro Tools’ bundled plug-ins are more versatile than you might think.
The plug-ins that come free with Pro Tools are sometimes overlooked, but as we saw last month, some of them are very useful. This month, we’ll look at a few more of these freebies and what they can do for you.
Sansamp PSA1
The Sansamp plug-in is an emulation of a hardware tube amp emulator created back in 1989 by guitar player and electronics genius B. Andrew Barta. The various Sansamp hardware models have been used on countless albums over the years, and the plug-in is likewise both versatile and useful. What’s more, its controls are relatively self-explanatory.
You can drive the entire circuit harder by turning up the Preamp control, but remember to bring down the output too, or everything will get very loud! Buzz adds low-end harmonics for a nice warm sound, and as you push it further, these start to distort, giving the control its name. Punch is a mid-band control: pull this down and you can get a nice ‘scooped’ Stratocaster tone, or push it up for an in-your-face sound which will distort if you overdo it. Crunch brings out harmonic content in the top end and can enable you to enhance or reduce the audibility of pick attack on the strings.
The Drive control enables you to overdrive the power amp stage, and gives a different flavour of distortion compared with overdriving the preamp stage. Lo and High are simple but effective EQ controls and, finally, the Output control allows you to compensate for the increased gain that the earlier stages add.


 This was one of the first guitar amp emulators to appear in software, and perhaps isn’t as convincing a recreation of a real tube amp as its more modern counterparts. Don’t neglect it on that account, however: once you’ve had a play with the controls and checked out some of the presets, you’ll soon see how versatile it is. Many people find that it is just as useful on other sources as on guitars, so do try it on vocals, drums, electric bass, keyboards, and anything else that needs a bit of grit or warmth.
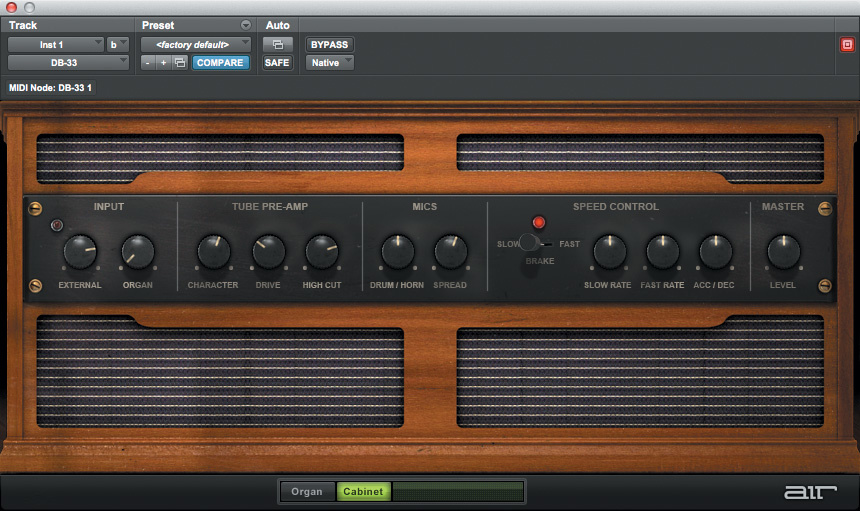
DB33 Cabinet
Some people are not aware it is possible to use the DB33 instrument plug-in as an insert, so that its rotary-speaker emulation can be applied to other sources. You could try it on guitars for smooth tremolo and chorus effects or, as in this example, on an electric piano.
Insert the plug-in and switch to the Cabinet page. Make sure the organ input is turned down and the external input is turned up, and check it out on your track. Try adjusting the tube preamp stage, and see how the sound changes when you move the mic position between the drum and horn, and how Spread opens out the effect. There isn’t a mix control on the DB33 plug-in, so if you just insert it on a track, its output will be 100 percent wet. If you want to blend the dry and processed signals, put the DB33 plug-in on an instrument track and send to it from your instrument(s) of choice. That way you can use the track faders to be able to mix the clean and the DB33-processed audio.
You could, of course, do this using an aux track — but if you use an instrument track, you can employ your keyboard’s mod wheel (and record it as MIDI data) to control the speed of the virtual Leslie cabinet. (On an aux track, this can still be done using plug-in automation, but it’s not quite as immediate.)
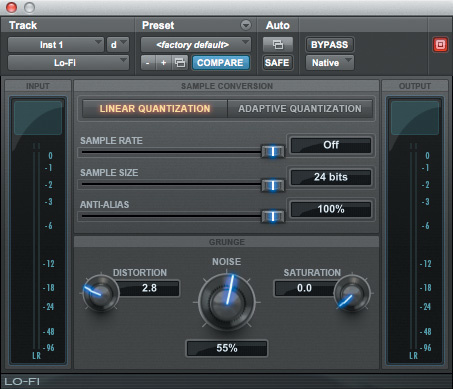
Lo-Fi
In the words of one Abbey Road engineer, the Lo-Fi plug-in is for more than just distortion. You can use Lo-Fi on drums, vocals, bass, guitars and almost anything else. It adds an interesting tone and character that helps sounds cut through a mix without the need for extreme EQ.
As with the DB33 plug-in, consider creating two paths so you can use the faders to control the balance between dry and processed versions. Adding some noise and distortion to a snare drum or hi-hat and mixing it back in with the dry signal sounds as though you have used some EQ to push the top end, but you haven’t. On a kick drum track, try using the Saturation control to add low-end harmonics. You may need to insert a Trim plug-in before the Lo-Fi so that you don’t clip it.
Xpand2
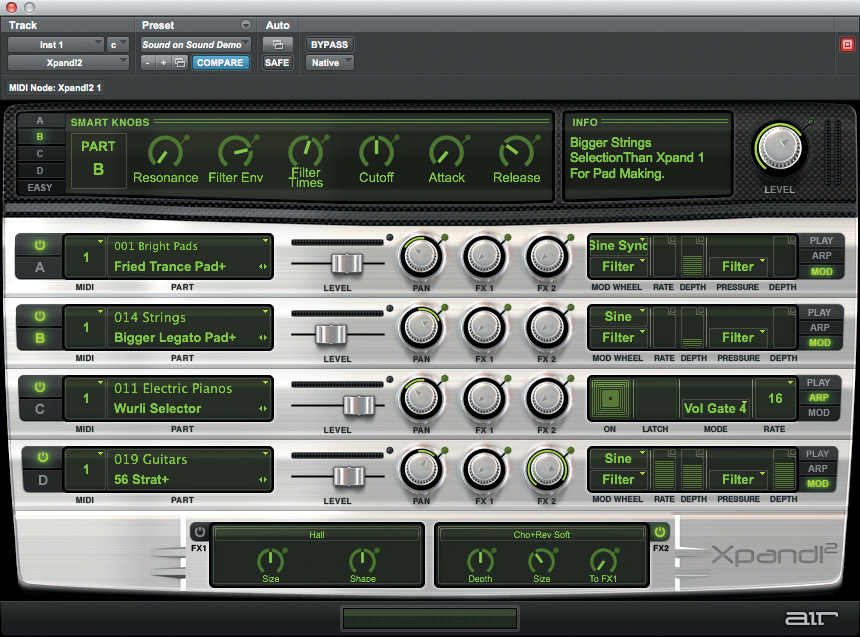
This handy multitmbral virtual instrument comes bundled with Pro Tools. Each instance has four slots, and by using these to stack different sounds you can get a great-sounding patch worthy of a very expensive synth. I am going to show you one example to whet your appetite:
- Open up an instance of Xpand2 and load ‘Fried Trance Pad+’ from the ‘001 Bright Pads’ bank into Part A (note that the presets aren’t in alphabetical order). Turn down the mod rate and filter depth, and bring down the filter cutoff to make the sound more mellow. Set the Mod Wheel Filter to Sine Sync and Filter so that the mod wheel will control the filter.
- Load ‘Bigger Legato Pad+’ from ‘014 Strings’ into Part B. Again, bring down the depth and trim down the cutoff a little bit.
- Load ‘Wurli Selector’ from ‘011 Electric Pianos’ into Part C and the ‘56 Strat+’ from ‘019 Guitars’ into Part D.
- Now turn on the arpeggiator for Parts A, B and C and set it to Vol Gate 4 on all three slots.
To take things further, think about panning the two pads hard left and right, and the other parts left and right a little. See what happens when you use the mod wheel. Also consider mapping the Part volume controls to MIDI controllers by right-clicking on the controller in the plug-in, selecting Learn MIDI CC and then waggling the appropriate controller. This way you can modify the mix with the MIDI controllers. To make it a little easier I have included an Xpand2 patch to get you going, but do experiment from that patch and see how by layering and linking controllers you can get a very powerful patch going with lots of performance adjustability in it.
Eleven Free
The free baby brother of the Eleven plug-in, Eleven Free, is often overlooked, but it is still useful when you’re on the lookout for guitar sounds. Eleven Free gives you two custom guitar amplifiers and two cabinet models, selected from the full version of Eleven, one clean and the other dirty. Even so, there’s a surprising amount of variety possible. A nice trick to liven up a DI’d acoustic rhythm guitar track is to track two takes, pan one left and one right, and insert Eleven Free onto one side. Start with the DC Vintage Crunch amp and 4x12 Green 25W speakers, and see how that changes the sound.
Channel Strip
The last plug-in we are going to look at is Avid’s Channel Strip, which derives from the Euphonix System 5 digital console. It is a very flexible and powerful channel-strip plug-in that comes free with every Pro Tools system, and if you are lucky enough to own an HDX rig, it is available in AAX DSP format.
Channel Strip includes an EQ, gate and compressor, yet only occupies one plug-in slot. At the top you can determine the order the different modules come in; the high-and low-pass filters are treated separately from the rest of the EQ section, which is very useful. There is a Volume control with which you can manage the levels going into the dynamics section. This is more useful than you might expect, because all the inserts on the Pro Tools mixer are pre-fade except on Master Fader channels. If you want to manage the levels of a vocal track going into a compressor rather than coming out of it — which can be very useful — you can automate this Volume parameter in the Avid Channel Strip plug-in.
The EQ section is very screen-friendly, with each section of the EQ colour-coded and then the filters shown separately. Avid have worked hard to get a lot into a small amount of screen real estate. The dynamics section can be set up to carry out de-essing or any other kind of frequency-sensitive dynamic processing. With external keying, it can be set up as a ducker, or could be used in the Tone Generator trick I showed you last month.
I hope these two articles have whetted your appetite for trying out those forgotten plug-ins that came free with Pro Tools. It’s well worth taking some time and having a play with these bundled plug-ins: they are surprisingly powerful and you can do a lot with them if you take the time to learn how to use them, and it won’t cost you a penny!
Preset Download
To download the Xpand2 preset described in the main text, head to www.sosm.ag/xpandpreset.htm.


