Even 'grime' mixes need clarity! This month we get our hands dirty cleaning up the mud in Alex Giddens' track.
 This month's Mix Rescue track, Alex Giddens' 'Get Blown', was written in Propellerhead's Reason, before being exported to Apple Logic Pro 8 for mixdown.
Although we're offered plenty of muddy tracks for Mix Rescue, we don't actually encounter many proper grime artists, so I was intrigued at the prospect of remixing a representative of this more underground genre: Alex Gidden's 'Get Blown'. When Alex sent me his original mix, he had a number of concerns, most crucially that the bottom end of the spectrum was loose‑sounding and undefined, while the kick drum was fighting to be heard against the bass line's sub‑bass frequencies. If the bass and kick don't work in a style like this, you're fighting a losing battle! In addition, though, many other elements of the mix seemed a bit thin and narrow‑sounding, and the vocals weren't sounding as committed as they might, or holding their place very well in the mix — again, not good where the lyrics are so important in maintaining the listener's interest.
In order to make this Mix Rescue as useful as possible for Alex, I was keen to take a crack at it using his own mix system, in this case Apple Logic 8 without any third‑party plug‑ins, and it turned out that his college (Cambridge Regional College) were happy for me to stake out one of their classroom computers for the purpose. As usual, there was more to this remix than I'll be able to look at in detail, so I'll focus mainly on the issues that Alex was worried about.
Bass & Kick Conundrums
 These two spectrum analyser displays show how soft‑clipping processing was able to increase the density of higher harmonics generated by a sub‑bass synth patch.
Part of the confusion at the low end of the mix was due to the presence of two different bass layers fighting for the same low‑frequency regions. One was the main 'character' synth line, with detuned oscillators and a noticeable tremolo‑style modulation effect, and the other was a dedicated sub‑bass synth part (pretty much just a sine wave wandering around in roughly the 50Hz region). Both parts had issues to be dealt with. For a start, the sub‑bass synth part was very uneven, but that wasn't too tricky to sort out with a fast, 8:1-ratio setting from Logic's Compressor plug‑in. By setting the Threshold control low enough so that even the quietest notes were just tickling the gain‑reduction meter, I was able to even up the line effectively in very little time. Attack and release times were kept short enough to obtain firm control (7ms and 25ms respectively), but not so fast as to introduce distortion: a compressor with very fast time constants can start tracking individual waveform peaks of bass sounds if you're not careful, reshaping and therefore distorting it.
 In order to control the wayward low‑frequencies of the main bass part independently of the higher frequencies that gave it its character, Mike duplicated the track and used these two EQ settings to separate out the different elements of the sound for separate compression.It was clear from listening to the main bass line why Alex had felt the need for a separate sub‑bass synth part (from here on, 'sub synth'): the level of low frequencies was very inconsistent, and didn't solidly support the bass‑line melody. However, with the sub‑bass part mixed in, it was clear that the low‑end level lumps were making it tricky to achieve evenness in that zone, so I popped a high‑pass filter on the main bass track to get rid of them. The down side of this approach, though, was that the low‑end unevenness actually extended upwards beyond the sub‑bass region, so cutting away the uneven bits also robbed it of much of its subjective warmth.
 Getting the kick drum to compete with the bass demanded an unusual blend of processing: Enveloper to add front‑end smack, SubBass to get the subwoofer moving, and a bit of Distortion mixed in for extra attitude and sustain.My first thought was to overdrive the sub synth, generating more low mid‑range harmonics from the low sine wave and thereby compensating for the loss of warmth, so I switched on the Soft Clip mode in the Compressor's Extended Parameters for this purpose, driving the output Gain control to +19dB to increase the distortion products to an appropriate level. This helped to some extent, but there was no getting away from the fact that the low‑end character of the main bass line was essential to the track, so I reduced the high‑pass filtering and took a different tack.
My next strategy was to try splitting away the low‑frequency region of the main bass line so that I could compress it independently. I duplicated the bass track in Logic and used the high‑pass and low‑pass filters on the two tracks to create a kind of crossover between them at around 200Hz. I could then adopt the same kind of compression strategy for the bass line's LF bracket as I had for the sub‑synth part, in order to smooth out the level irregularities. Another fairly similar compression setting on the upper frequency region brought out more of the detail there, and I could finally achieve a decent balance of all the elements of the bass part.
Spicing Things Up
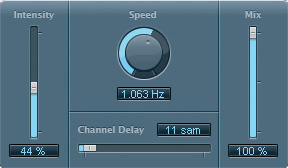
 Modulation effects were used to widen the bass and vocal images in the mix: the Microphaser and Spreader plug‑ins.
I had to admit, though, that I still didn't feel particularly inspired by the result, which led me to try a couple of sneaky send effects to spice things up. The first was a simple Overdrive plug‑in, fed via a 180Hz high‑pass filter from the upper bass‑line track. I adjusted it to fill out the mid-range, by adding 20dB of drive and then setting the Tone control to 980Hz. Once this was balanced against the main track, I added another Overdrive send, but this time it was fussier, brighter and fed into Garageband's Microphaser plug‑in, to give some stereo spread and a hint of extra growl!
Next to this monster, the kick drum now felt rather tame. Sharpening the slightly flabby attack transient with 40 percent Attack Gain from Logic's Enveloper plug‑in (a processor that came in handy for most of the other beat parts) helped a certain amount, and while I was there I also experimented with the release gain, and found that an 84 percent setting created a nice subliminal background‑noise swell that worked nicely. Some Overdrive also paid off, emphasising the region above 200Hz, and somehow giving the sound a sense of roominess too. This is something that the producer Tchad Blake talked about in interview back in SOS December 1997: "I've only used reverb on maybe two records in the last 10 years. Instead I prefer to use distortion and compression to create ambience.” In addition, I felt that the kick drum really wanted to compete at the low end, so I applied Logic's SubBass plug‑in to generate some low harmonics that the original sample lacked.
 A double dose of compression was required to manage the vocal dynamics: first a slower Opto‑mode setting to manage the average levels, then a faster FET‑mode setting to even out faster peaks.Having serious sub‑bass power coming from your bass line and your kick drum can be a recipe for disaster, because whenever the two instruments combine, they create a pulse of sub‑bass that eats into your mix headroom and can cause problems during mastering. In this situation, I'd often set up some kind of side‑chain‑triggered ducking system between the two, to automatically reduce the level of the sub‑bass track on each kick hit. In this particular case, though, I took a less orthodox approach that seemed more in keeping with the genre: I simply left the low‑end pulses intact and allowed them to saturate into a soft clipper on the master bus. This worked really nicely, adding a bit of crunch to each kick‑drum hit — but although you may hear this in commercial tracks from time to time, it's certainly not a trick I'd recommend using as a matter of course!
Tonal Distortions
 Here is the Channel EQ setting that was applied to the vocal compressors' side‑chain detector circuits to adjust their high‑frequency sensitivity, thereby preventing over‑emphasis of sibilants.
Many of the other parts had the same kind of anaemia that the main bass synth had exhibited, and again benefited from some selective distortion processing. For example, the little SID‑like synth arpeggio (reminiscent of the brittle electro sounds of the Commodore 64's SID synth chip) that runs throughout the track had a great deal more body once it had been put through Guitar Amp Pro. There was no real method to the setting: I just surfed a few presets and played with the amp EQ controls until something subjectively appealing emerged. I finally settled on the UK 30W Combo model through an emulated 2x12 amp, picked up through a simulated Shure SM57, and bracketed the result with high‑pass and low‑pass filters to isolate the frequency band that seemed most usable in the mix.
 Intensive fader automation was used to maximise the intelligibility of the vocal verses. The upper screen shows the whole of one verse, while the lower one is zoomed in so that you can see individual vocal syllables.I've always found the C414B ULS to be a rather soft‑sounding mic for lead vocals, so I've never really been a fan of it in this role. The rapping sounded much as I expected it would through this mic, and a little distortion helped out here too, making the sound more up-front by lending the C414 timbre some much‑needed bite. The plug‑in that seemed to work best here was Logic's Distortion, with just 6dB of Drive and the Tone control set to around 1kHz.
Another type of distortion processing I used a lot was Logic's Exciter, because many of the samples Alex had used felt slightly dull, tonally, and I don't find Logic's built‑in Channel EQ very good at remedying that kind of tonal problem, even when cranking the high‑end boost. In this capacity, the Exciter ended up on the hollow‑sounding synth riff, as well as the whining synth-lead during the choruses. However, the Exciter is also good at bringing important tracks to the front of a mix, and I applied it to the snare‑drum and lead‑vocal tracks for this purpose.
Stereo Widening

Most of Alex's raw tracks were mono, and there was only so much stereo interest that could be achieved through simple panning, so I used a number of other effects. Short reverb is frequently useful in this situation, and I turned to Space Designer to add it to the lead vocal line, the snare and the hollow‑sounding synth riff. The vocal's effect was a 0.2s chamber impulse, with 15ms of predelay, while for the snare I used another 0.2s impulse called 'Snare Stretch', high‑pass filtered at around 1kHz. As for the synth riff, I'd already split it over two tracks in a similar way as I had with the bass (to separate the HF 'whizzing' details from the main mid‑range melody line), and the upper frequency band benefited from an even shorter reverb, based on a gated‑reverb impulse response. As with the snare treatment, I high‑pass filtered the effect at 1kHz again, to enhance just the high frequencies, and stuck in a Direction Mixer plug‑in for good measure, increasing the Spread parameter to 1.6 to artificially widen the image.
 Longer reverbs played their part too, with a 1s 'Big Club' impulse providing a sense of space for the upper percussion and 'SID' synth, and a 2.2s 'R&B Plate' adding a bit of 'tail' to some of the synth parts and pulling them deeper into the mix. Overall, my use of reverb on this track might seem a bit odd if you're used to applying a couple of global send reverbs across all your tracks, but it's important to realise that in many of the more modern electronics‑led genres reverb is much more a creative tool than a means to achieve some kind of sense of a common spatial environment. As such, each reverb I used was specifically chosen to enhance particular aspects of individual sounds, using EQ and other processing in the reverb returns.
To open out the mix character for the choruses, I decided to mult the main 'SID' arpeggios for those sections to a separate track, and then created a new stereo delay feature just for the choruses. This involved sending to Logic's Tape Delay to generate a single quarter‑note echo, which I could then pan to the opposite side of the stereo field to the dry sound, and I also sent this to the plate reverb.
 In many cases, stereo widening is created with modulation effects, and I'd already used Microphaser on the bass part for this reason. In addition, I sent the lead vocal parts to Logic's Spreader plug‑in to widen those a little, especially as there were no double‑tracks here to otherwise thicken the vocal sound.
Vocal Processing Refinements

Although I multed one of the synth parts, for the purposes of better differentiating the choruses from the verses, 'Get Blown' was otherwise very much in the classic hip‑hop mould, in that the arrangement wasn't really designed to have any long‑term dynamics. While this means that the listener then inevitably focuses more on the MC (who is, after all, the star of the show), it also means that the lead rap takes on more importance in carrying the track than in more chart‑targeted styles. In recognition of this importance, I probably spent as much time dealing with the vocal parts as I did mixing the whole of the rest of the track.
Working from the raw recording, my first task was to high‑pass filter it to remove the low‑frequency level spikes, created by plosive pops on the mic. (These can cause real problems with dynamics processors further down the plug‑in chain, making the gain‑reduction lurch unnaturally.) Following that, I addressed the slightly soft tonality with the Distortion and Exciter plug‑ins, as I've already mentioned, before turning my attention to dynamic‑range issues. What was tricky was that I wanted the vocal to be as clear as possible for the sake of the lyrics, but didn't want to have it so high in the mix that it made the bass and drum parts sound small. The key to managing this delicate balance was keeping the dynamic range of the performance very closely controlled, and I did this by combining a pair of compressors with fader automation.
 The first of the two Logic Compressor plug‑ins was set to its smoother Opto setting, and I kept the attack time fairly slow (47ms) so that it would even out primarily medium‑term level changes. A 3:1 ratio, an automatic release time, and a soft-knee setting all helped the compressor to operate fairly transparently. The second Compressor plug‑in I set to its Urei 1176‑inspired FET model, and then used an 8:1 ratio with shorter attack and release times (5ms and 20ms respectively) to clamp down on moment‑to‑moment level spikes. If the first Compressor plug‑in hadn't already been riding the average signal level, it would have been difficult for such a fast setting of the second Compressor just to target the peaks: any phrases that were slightly louder overall would have been over-compressed, and slightly quieter phrases would have lost some detail.
 The result was some serious dynamic‑range reduction, and while this sounded fine within the bounds of the style, the sibilance was being unduly emphasised by the compressor action. High‑frequency sibilant noise bursts aren't detected particularly well by most compressors, so the gain reduction for 's' sounds isn't as vigorous as for other parts of the vocal. One way to deal with this problem would have been to use Logic's dedicated De‑esser plug‑in, but I've never been particularly thrilled with its results, so I decided instead to take a different tack, EQ'ing the compressor side‑chains to increase the gain reduction of sibilant frequencies. The Compressor plug‑ins themselves have built‑in side‑chain EQ, but this isn't very flexible, so I chose to set up a separate, EQ'ed version of the vocal track to feed the side‑chains, allowing me to work with the more flexible Channel EQ plug‑in. Aiming a peaking filter at the 7.8kHz region on the side‑chain track and boosting by about 14dB brought the sibilance nicely back into balance, but because this EQ wasn't working on the main vocal channel itself, there was no overall tonal change to speak of. The final piece in the puzzle was extensive fader automation (see the Advanced Vocal Automation box).
Polishing Grime

While styles like grime trade on their lo‑fi credentials, there's a good deal of scope for enhancing sounds and balance by careful mix work, without betraying this central ethos. It's perhaps unsurprising that a range of distortion effects can work wonders for this kind of job, but modulation and reverb effects of different types can also contribute usefully to the sound — as long as you're a bit selective about which effect you apply to which track. Irrespective of the style, however, rapped vocals are usually the central attraction in any arrangement they inhabit, so be sure to spend sufficient time and energy recording, comping, processing and automating them if you really want your track to connect to the listener. Indeed, on a commercial level you have to ask yourself how likely it is that anyone's going to buy your track if they can't hear what the MC's on about!
Rescued This Month
 Alex GiddensThis month's track is by Alex Giddens, who's studying Music Technology at Cambridge Regional College. In his own time he does A&R for Cambridge‑based label Morph Recordings, as well as producing his own primarily grime and dubstep music, first programming the parts in Propellerhead's Reason 3, and then bouncing elements down as audio for mixing in Apple Logic 8. The MC on this track, Sonny Mac Gillespie, recorded into Logic using one of the college's AKG C414B ULS large‑diaphragm condenser mics.
Remix Reactions
 Alex Giddens: "This new version is spot on. The mix now seems to have an extra sparkle when compared with my original mix, which sounds dull by comparison. Everything sounds a lot clearer, especially the vocals, which are also more prominent: I went a bit crazy with the reverb on my mix! The bass sits really nicely and has that low end I was after, and the kick has loads more definition as well. I like the increased width to the lead sounds, and there's now also a lot of movement on the synth arpeggio and the lead on the chorus, which makes the mix sound a lot more interesting. Overall, I'm extremely happy with the remix, as it sounds so much more professional than mine!”
A Hint Of Vinyl: Noise As 'Glue'
In tracks like Alex's, which have quite a sparse arrangement built out of primarily electronic and sampled sounds, it can be difficulty to make all the instruments sound as if they all belong on the same record. In other styles of music, a global reverb or two can provide this kind of 'mix glue', but this almost inevitably distances the sounds in the mix to some extent, and changes their tone, so I was reluctant to use this method here. My alternative method was to add some subtle background noise over the whole production. This can have a surprisingly similar 'gluing' effect without any of the side‑effects of reverb. I've touched on the idea briefly during a few Mix Rescues in the past, but this month's track is a good opportunity to look at the details of doing it in a little more detail.
The choice of background noise is, of course, important. Film/TV sound‑effect libraries are a good place to look if you don't fancy recording your own, as they will usually include a variety of room tone (the background noise of various rooms) and ambience (the same for open spaces) tracks that are used for holding together layered Foley and dialogue tracks, and can do the same job for sample‑heavy music. Another common alternative is to use a recording of tape hiss or vinyl noise, and it was the latter I used for Alex's track (I have a selection of different samples I've built up, from libraries such as Spectrasonics Retro Funk, Tekniks Mix Tape Toolkit and Tekniks Ghetto Grooves).
Whatever sound you choose, it's almost always worth high‑pass filtering it, even if only to remove the inaudible subsonic components that many such signals contain. I usually crank the high‑pass filter still further, to keep the noise well out of the way of the low end of the mix, using mostly frequencies above about 500Hz, and then balance the sound just below the level where it draws attention to itself. This might seem to defeat the purpose, but it can be surprising how much of an impact it has when you mute that track, even when it's at a low level. The other processing tactic that can be useful for vinyl noise, in particular, is limiting, as I find that I often want more of the 'noise' of a given vinyl sample than the 'crackle', and a limiter can punch the peaks down into the signal to give you some control over this balance.
Advanced Vocal Automation
No matter how much you try to level out a vocal track with compression, you're almost always going to need to adjust that track's fader level in response to changes in the backing‑track spectrum. Every snare or hi‑hat beat has the potential to mask vocal intelligibility, for example, and you have to respond to that if you're going to get the best transmission of the lyrics. In this case, though, I was also using automation to improve the performance itself.
While the MC's timing was commendably tight, he'd encountered the usual difficulties in maintaining a consistent level of attack and enunciation. You can remedy this with careful comping from multiple takes, but this performance hadn't been built in that way, and quite a few important syllables had ended up sounding a bit too laid back, which undermined the aggressive intent of the words. Addressing this with automation was a case of pulling up the first little section of any soft‑sounding syllables to make them sound more committed.
I also pulled up quite a few of the lower‑level sections between vowel sounds, to increase the sense of immediacy and closeness, because the more you can hear the grain of the voice, the closer it tends to feel, and you typically hear that kind of character more when the actual volume the rapper is putting out is lower. Another specific thing I brought forward with the automation was 'n' and 'm' sounds, which don't project through the mix as well as other consonants, on account of their reduced high‑frequency content. It might seem like a picky thing to do, but it really helped protect the meaning of the lyrics at a number of points, and was well worth the effort.
No matter what I tried, though, there was a limit to how much I could bring out the words of the chorus vocal, due to the side‑effects of the dramatic pitch‑processing that had been used. I tried a few more unusual tactics in an attempt to increase the intelligibility, but whatever I did seemed to detract from the interest of the actual timbre, so in the end I did what I could with automation and left it at that, reasoning that (judging from Alex's original mix), the character of the special effect was more important than the intelligibility of the lyric from an aesthetic point of view.
Exciting Times
In case you're not familiar with what Logic's Exciter plug‑in does, it basically uses distortion to create high‑frequency harmonics only above a user‑selectable frequency, and then lets you decide how much to mix back in with your unprocessed signal. The difficulty with using such processing is that you can easily overdo it by mixing in too much of the distortion, ending up with a harsh sound. It's also tempting to put an instance of Exciter on everything, because of the way it brings sounds forward in the mix, but if you involve all your tracks in that kind of HF 'arms race' you'll usually end up with a brittle final result, that lacks depth. So although this particular Mix Rescue track used the Exciter plug‑in quite a lot, I was careful to try to keep its contributions under close observation.