Don't be scared to trash something you've already recorded if it helps you to achieve a better end result...
 This month's Mix Rescue submission comes from SOS reader James May
Most people who send mixes in for Mix Rescue question their mix technique, when it's primarily their arrangement and recording decisions which have stymied them. This month's project was a pleasant change, then, given that SOS reader James May contacted me for advice while still recording and arranging his song 'On The Line'. He felt that this tune was one of his strongest, but was dissatisfied with a previous version he'd released and had resolved to rework it to do the music more justice. This gave us the opportunity to head off potential mix problems at source, as well as exploring some fresh arrangement ideas.
 and pick noise (high band) on the acoustic guitar recording.") The outer bands of this instance of Universal Audio's Precision Multiband were used to tone down string-damping thuds (low band) and pick noise (high band) on the acoustic guitar recording.The original version of the song was recorded professionally at Cookie Marenco's OTR Studios in California, so I was confident that most of the existing multitracks would be in pretty good nick — as, indeed, they proved to be once I'd imported them into my Cockos Reaper-based mix system. That said, James had already made some edits to adjust the pacing of the musical links between the song's main sections, and was keen to re-record his vocal and his acoustic guitar performances to improve the expression and groove.
The outer bands of this instance of Universal Audio's Precision Multiband were used to tone down string-damping thuds (low band) and pick noise (high band) on the acoustic guitar recording.The original version of the song was recorded professionally at Cookie Marenco's OTR Studios in California, so I was confident that most of the existing multitracks would be in pretty good nick — as, indeed, they proved to be once I'd imported them into my Cockos Reaper-based mix system. That said, James had already made some edits to adjust the pacing of the musical links between the song's main sections, and was keen to re-record his vocal and his acoustic guitar performances to improve the expression and groove.
Acoustic Guitar: Fixing At Source
As it happened, I was happy to encourage the idea of replacing the original guitar part, as it didn't seem strong enough, sonically, to fulfil its vital function as the harmonic backbone of the track. The single mic seemed to have caught a rather small and 'scrape-y' representation, and the accompanying DI'd part was of little use in combating that. My suggestion, therefore, was that James experiment with an X/Y microphone rig in front of the guitar, as I find this is often better for capturing a good balance of the instrument when close-miking, and also provides some scope to expand the stereo picture without phase-cancellation problems in mono — a particularly useful feature when you want the instrument to sound big and close in the image.
 The drum overhead microphones had been positioned very well, catching the tone and balance of the whole kit beautifully — which made the drums a joy to mix.In the event, James not only provided the X/Y rig, but also a mono DI signal and one other stereo 'pseudo-miked' track generated from the DI using convolution processing (in a manner akin to that of Fishman's well-respected Aura system). Mixing together the two stereo signals (I didn't use the DI) immediately produced a much more appealing raw sound, with a lovely sense of width and depth. The only EQ I added, therefore, was a couple of decibels of Sonimus SonEQ's 100Hz low shelving boost for extra warmth, and that was it. Then I rounded off some pick-noise edges somewhat with a negative-attack setting in SPL's Transient Designer, and finished the job with Universal Audio's Precision Multiband, compressing frequencies above 4kHz with a 3.5:1 ratio and fast time constants. Some limiting with the latter plug-in's low-frequency band also allowed me to reduce thuds caused by James's hand damping the strings as part of the rhythm pattern.
Smashing Drums
 Here you can see the Lightweight Limiter plug-ins from the kick and snare tracks. In the case of the kick drum a longer Attack setting was used to emphasis the drum's punch, whereas a faster-attack setting was employed for the snare to round off some of its initial transient.
The brushed drum-kit was eminently mixable straight away, not least because of beautifully recorded overheads in which all the instruments sounded believable and well-balance — it's much, much easier to get a natural-sounding kit mix if you don't have to rely too heavily on close mics for corrective purposes. The only EQ I applied to the overheads was a small cut at 4.3kHz to soften the tone a little bit and keep the drums in the background. Adding in the kick close-mic supplied a fuller low end (once I'd inverted its polarity), and 3dB of boost at 90Hz emphasised the nice rumble that seemed to give the sound so much character. I then applied Christian Budde's Lightweight Limiter to the kick, using 17ms of attack time to allow some of the drum's transient to sneak through before the limiting responded, thereby hardening the subjective attack a little to propel the song's groove.
By contrast, I used a faster 1.5ms attack for another Lightweight Limiter inserted on the snare channel, because I wanted to slightly round off the transients, in line with the generally restrained overheads sound. Once I'd set the snare's polarity (inverted sounded best again), some EQ moulded it into a shape that supported what was already in the overheads: a broad 5dB peak at 570Hz to give the brush-slap's attack gravitas and a 3dB shelf above 3.4kHz to reduce conflict with the lead vocal. An isolated pitched harmonic at 905Hz also needed notching out to prevent it clashing with the song's harmonies. The toms played very little beyond ghost notes, as a result of which their close mics were mostly spill from the rest of the kit, so I simply used them as additional overhead/room mics, mixing them in without any processing other than polarity inversion.
 Some low-frequency squeeze from Cockos Reaper's bundled ReaXcomp helped to give greater consistency to the bass guitar's low-end contributions.Listening to the drums/guitar blend, it seemed that there was some leeway to fill out the spectrum more towards the frequency extremes, so as a final touch I applied Universal Audio's Pultec EQP1A EQ emulation across the whole drums buss, pushing a little with a shelf at 100Hz and a peak at 12kHz. Some gentle dynamics from Universal Audio's LA2A (no more than 2-3dB during the loudest sections) was also beneficial. Although the LA2A isn't commonly associated with drums, because it doesn't respond that well to peaks, it can still be useful for understated, medium-term volume control on less aggressive drum parts.
A Case For Overdubbing
 James tracked his lead vocals using two microphones at the same time, in order to provide some tonal alternatives at mixdown.
The bass part presented the only other significant mixing problem, because somehow the instrument's tone and frequency balance seemed rather uneven, such that some notes boomed out, while others were anaemic — all in a rather sporadic way. James and I tried a variety of progressively more radical processing remedies, but I never got the impression we were winning the battle to achieve a warm and dependable result. I emailed James to ask whether it might be possible for him to re-track the bass part, but this proved impractical, so we agreed to enlist the services of the online session musicians at Studio Pros to recreate the line with more reliable sonics.
A couple of days later, I was in possession of a shiny new DI bass part, which proved much more mixable. My EQ cut a little low end and low mid-range to allow more room for the drums, as well as pushing the centre of the spectrum by a couple of decibels at 820Hz and 1.5kHz to bring out more of the instrument's string character and project the melodic line more clearly. A touch of drive from a parallel channel of Mokafix's NoAmp distortion assisted here too. The bulk of the automatic level control was provided by two instances of Universal Audio's LA2A. The first applied 3dB of gain reduction to the DI track alone, to match its dynamics a little with the drive channel (most distortion effects reduce dynamic range by their very nature), and the second operating with a similarly light touch on the combined 'DI plus NoAmp' group channel.
 The lead vocal's compression setting can be seen here, along with the 8kHz side-chain EQ boost that Mike applied to discourage the compressor from exaggerating the singer's sibilants.
 Later on, though, I decided that I wanted to keep the warmth of the lower octaves of the bass a little more consistent across the song, so I also fed the bass group through Reaper's ReaXcomp multi-band compressor to pin down the sub-120Hz region a bit more firmly — but I deliberately kept the attack and release times here reasonably moderate, at 15ms and 116ms respectively, in order to retain some of the performance's nice inherent 'bounce'. Of course, the mix thus far had been built around a slightly more wiry bass sound, so it came as no surprise that I subsequently needed to slim down the drum kit's low end with a narrow 3.5dB peaking cut at 77Hz to make a little more room for the new rounder-sounding tone.
Vocal Processing
Once the new vocal comp had been delivered and the edits tweaked (see 'Fine-tuning The Comp' box for details), I slotted that into the mix to check how it fitted with the rhythm section. James had provided two microphone signals (Audio-Technica AT4050 and Microtech Gefell UMT70S), but I'm always cagey about using more than one mic on a singer, because of the danger of phase problems between them as the singer moves, so I chose the one I liked the most rather than mixing them. Some very gentle tonal adjustment came from Universal Audio's Harrison 32C (1-2 dB of cut at 2.9kHz and 8kHz, and similar amounts of boost at 145Hz and 17kHz), while one super-narrow surgical cut from Reaper's ReaEQ at 2771Hz zapped a little resonance in James's voice that was making his tone slightly abrasive.
My compression choice for James's voice was Stillwell Audio's The Rocket, because I like the way it can bring things up front in a mix, but I was careful to set its lowest ratio and steer clear of hitting it too hard, because I didn't want to make the voice sound unduly processed. I also automated the input level to the compressor, so that it operated less strongly earlier on in the song where the vocal dynamics had more room for manoeuvre. Because the degree of compression wasn't enormous, I was able to keep sibilance in check by EQ'ing the vocal compressor's side-chain (8dB boost at 8kHz) rather than resorting to specialist de-essing.
For the single backing vocal, I was content to take a slightly less refined approach, with 190Hz high-pass filtering and a couple of decibels of 4.5kHz boost from ReaEQ, a good dollop of compression from Universal Audio's LA3A, and some corrective de-essing from Tone Boosters' handy little TB_Deesser.
Mandolins & Cellos
 Warming up the mandolin sounds was achieved through a combination of low-end EQ from a Neve 1073 and stiff compression from a Fairchild 670, both running in emulated form on Universal Audio's UAD2 platform.
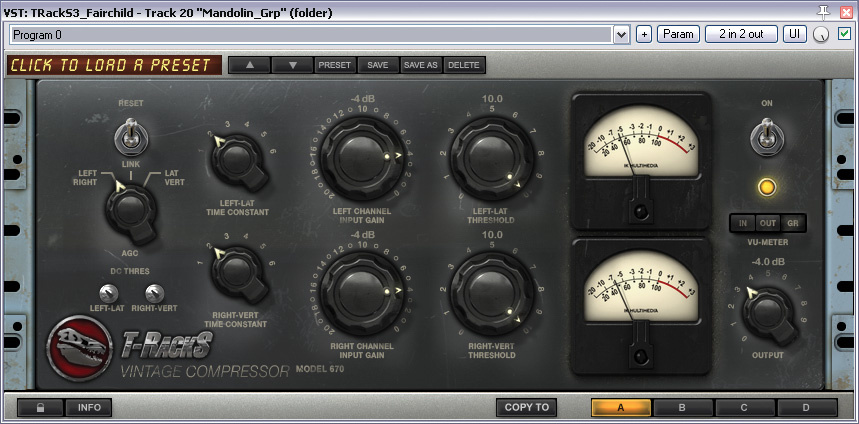
The Mandolin parts didn't warrant any complicated equalisation measures, beyond some low mid-range fullness from Universal Audio's Neve 1073 emulation: a 3dB peaking boost at 360Hz and 5dB of low shelving boost at 220Hz, but tempered by a high-pass filter at 160Hz. I allowed myself slightly more assertiveness when it came to restricting the dynamics of these tracks, in order to keep them from poking too far forward and distracting from the vocals. This involved plumbing the parts into IK Multimedia's Fairchild 670 emulation (part of their T-Racks 3 bundle) and giving them 6dB of gain reduction from its characteristically smooth-sounding, soft-knee limiting, using one of the faster time-constant settings (switch position number two).
The cellos were pretty straightforward too, although they did need slightly stiffer EQ to slot them in alongside everything else going on in the mix. I curtailed the low end with 165Hz high-pass filtering and a 7dB peaking cut at 240Hz from ReaEQ, while a certain nasality to the recorded tone (as well as some edginess in the bow noise) was addressed by a fairly localised 7dB cut at 1.4kHz. Once again, I fed the cellos through a Fairchild 670 emulation to keep them even, using the fastest time-constants (switch position number one) to contain stray peaks and smooth out the note sustains.
Parallel Compression & Automated EQ
 A wideband midrange cut on the acoustic guitar part was automated to clear room in the mix whenever the lead vocal was present.
Parallel compression from Stillwell Audio's The Rocket played an important role in lengthening and fattening some of the individual sounds without stamping out their natural performance dynamics. For the drums, I chose the plug-in's fastest attack time, so that no transients made it into the parallel signal, increasing its concentration of sustain. I chose a 70ms release time, which was just fast enough to stay out of the pumping zone, but well clear of distortion-inducing territory. Setting the Threshold level fairly low gave me plenty of gain reduction with the compressor's 4:1 ratio, although it was triggered rather too strongly by the kick drum's low frequencies (ducking the upper frequencies undesirably) until I high-pass filtered the compressor's side-chain at 146Hz.
The acoustic guitar enjoyed a fairly similar setting, but with a fraction more attack time to avoid distortion of the instrument's periodic waveforms. Again I used a high-pass filter in the compression side-chain (this time at 100Hz) to reduce the degree to which the upper frequencies were being ducked by the low-frequency string-damping 'thuds', but I also inserted a 3dB low shelving cut at 55Hz, pre-compressor, to shift the parallel channel's focus even more in favour of the mid-range and high frequencies. Even though 55Hz is below the fundamental frequency of the acoustic guitar's lowest note, the slope of the shelf I used was so shallow that it was still 1dB down at 200Hz. The parallel processing for the mandolins shared most of the guitar's compressor settings (without the pre-dynamics EQ), but I switched to a higher 8:1 ratio to produce a stronger sustain enhancement in this case.
 Here you can see how much fader automation was used in this month's remix, to maintain a solid balance without recourse to excessive compression.Another more 'niche' processing trick I used was automated EQ. In the case of the main guitar part, once I'd got a guitar tone I liked in isolation, James felt that it was obscuring too many vocal nuances. Riding in a wide 2.5dB peaking cut at 3.3kHz during the singing helped with this. On the cello parts, on the other hand, I used an automated 1.1kHz high shelving cut to adjust their apparent distance from the listener, reducing the cut to allow the solos and a few other interesting fills to move closer to the front of the soundstage. Finally, a couple of automated low-pass filters toned down some rather obtrusive hiss on the guitar, bass, and cello parts, particularly at the end of the song.
My effects use on this mix was fairly minimal: the main send effects were a long smooth plate from Universal Audio's EMT140 to enrich the overall timbre (especially the vocals and guitars), an impulse response of the 'Live Wooden Room' preset in TC Electronic's M3000 outboard unit for some 'air' around the ensemble (especially the vocals and drums), and the standard pitch-shifted delay stereo widener I'm always going on about in this column. The only real refinement was a little bit more reverb length added to the lead vocal, by sending it first to Tweakbench's freeware Maelcum tape-delay modeller. Once those effects were sorted, all that remained were the usual fader rides to nail down the final balance, although in this remix those were a little more numerous than normal. That's is typical with acoustic music, because it allows you to keep levels steady without too many unnatural compression artifacts.
From Sonics To Arrangement
 In order to thin out the opening bass part, longer note decay tails were synthesised by looping shorter note sections with gradually decreasing volumes.
While building a mix sound, I had already carried out some small creative edits to the cello and mandolin tracks, as well as introducing a bit of interplay between the foreground and background parts, but otherwise the overall arrangement of the production was still fairly similar to that of James's original mix. So although he was broadly happy with my balancing and processing decisions by this point (bar a few small revisions, as per usual), he was still interested to hear whether some gutsier edits might help give the song more musical 'ebb and flow'.
During the introduction, for instance, he felt that the bass part wasn't engaging enough to bridge the gap before the vocals arrived. Given that the bass ran uninterrupted throughout the whole track, my view was that thinning it out would create more contrast, so the idea of muting it until later seemed promising. Pulling this off successfully required a little care, though. Firstly, I had to shorten the guitar-only intro to prevent it from sounding over-long in the absence of the erstwhile bass entry. Then I needed to choose a moment for the bass to re-enter that would make sense from a musical perspective.
 To heighten the arrangement contrast of the song's fourth verse, Mike faded out all of the drum mics except the kick.The most obvious location would have been the beginning of one of the subsequent sections, but this felt like a bit of a waste, given that both the interlude following verse one and the beginning of verse two were already being flagged fairly effectively by the mandolin and cello parts respectively. After experimenting with a few alternatives, I eventually opted to bring in the bass for the final line of verse one ("and all he asks of you is please don't hide”), underpinning the fuller guitar chord that signals a momentary relaxation of its main rhythm pattern. However, while this helped to create a nice, gradual build-up in the instrumental forces through the first and second verses, the bass line itself now seemed too busy before the onset of the second verse, so I did a little editing to take out some of the notes, carefully looping individual sustain tails to fill in any gaps.
When it came to bringing some variation to the next 'ripe for reinvention' moment, the drums were definitely in the frame for some cuts. Muting them during the interlude after the first chorus was simple and effective, although, again, their return for verse three benefited from some extra attention: I'd noticed that the middle of the interlude included a nice little snare fill that I was loath to leave on the cutting-room floor, so I slid that into place as a lead-in to the verse instead.
 Muting the acoustic guitar for the fourth verse proved difficult to do in a natural-sounding way, but a workaround was eventually provided by pasting the sustain tail from the song's final chord at the edit point to smooth the transition.The last main section for which James wanted to create more contrast was verse four (following the cello/mandolin solo section), underlining the evocative "in a heartbeat the whole scape can change” lyric. I initially experimented with James's suggestion of silencing the drums completely again here, but while whimsically soloing tracks in various combinations, I realised that the kick-drum mic, with its understated hi-hat spill, had something more intriguing to offer — something almost akin to a 'heart-beat' pulse, in fact. So I faded out all the other drum mics for that section, reintroducing them only where the texture suddenly fills out again for "from your home back on the range”.
To give this little stunt the greatest impact, I then tried my best to strip back everything else. Killing the main acoustic guitar was trickiest, and it was only by grafting the tail of the song's final chord over the mute point that I was able to avoid too abrupt a transition. A similar trick was also useful for the bass, but otherwise thinning out the bass and mandolin parts proved more straightforward — with the help of a bit of trial and error!
Who Dares Wins
Deciding to trash something you've recorded is rarely easy, but this month's remix demonstrates the benefits of making such tough choices. So try not to treat retracking as some kind of 'nuclear option' if it means you can save yourself hours of soul-destroying mix salvage work, and don't be afraid to sacrifice some audio snippets to the editing scalpel for the greater good of the overall arrangement.
Rescued This Month
James May is a California-based guitarist and singer-songwriter writing in a contemporary folk style and drawing influences from artists such as the Beatles, Paul Simon, Ferron, Dee Carstensen and Neil Young. In 2009, he released his first album, A Thousand Shining Pieces, which includes this month's Mix Rescue submission, 'On The Line', in its original form. The performers on the original recording were Jim Norris (drums), Paul Olguin (bass), Kimball Hurd (mandolin), Barry Phillips (cello), and Keith Greeninger (backing vocals), who also shared production duties.
Fine-tuning The Comp
 Here you can see James's original vocal comp for the song's first verse. Notice the 'blackout' between the second and third phrases.
Because James, like me, works in Reaper, he was able to provide me with his session files, so that I could smooth out a few slightly lumpy lead-vocal edits, which I was concerned might show through if we started thinning out the arrangement. While doing these touch-ups, I noticed that a couple of times there was a gap in the audio between the verse lines where the background noise dropped out. In a lot of musical styles, this momentary 'blackout' wouldn't matter at all, but in acoustic music I find it subtly undermines the continuity of the performance, so I patched it up with a bit of noise copied from elsewhere.
The same thing happened between verses, but I was less bothered about this, because a slight hiatus feels more natural there. However, the initial breath had been edited off the start of verse three as well, and that entry therefore also felt a touch abrupt to me until I'd reinstated it. It's important to realise, though, that opinions differ about the importance of this kind of thing (as I discussed in my critique of Adele's 'Someone Like You' in SOS May 2011's The Mix Review), so check out this month's audio examples to judge for yourself how much it matters to you.
Overdubs On Demand
Many thanks to Studio Pros for assisting with this month's Mix Rescue project by re-recording the bass part for us. An overdub like this is pretty cost-effective at $125 (including one round of revisions), so it's worth bearing in mind as an alternative to spending hours trying to mix-fix a troublesome part. For more information on the range of services StudioPros provide, check out their web site.
Remix Reactions
James May: "The first thing that struck me about Mike's remix was the clarity and tonal quality of the acoustic guitar. It's a smooth yet driving sound which I am really pleased with. Next, I was pleasantly surprised with the sound of the drums. I didn't realise the original tracks sounded that good, and hearing them more prominent in the mix is effective. I do get a much stronger impression of a train rolling along the track, which is appropriate for this song. The bass is better defined, more punchy and even. The unevenness of the vocals is gone now, and I don't cringe at certain sections. The cellos and mandolins work together sonically, and complement each other nicely.
"But I'm especially pleased by Mike's treatment of the transitions, which was one of my main requests. In particular, the segue between the first and second verse now has a beautiful tension and release quality as it gives way to the hi-hat backbeats of the second verse. Even juicier for me, though, is the transition between the instrumental section and the last verse — I love the way things get quiet then gradually accelerate in intensity as it moves into the final chorus. In this section, the choice of alternate bass notes, and the decisions about which instruments to leave in and which to leave out, are all part of a recipe that, for me, is very tasty. Thank you, Mike, for a superb job!”
Audio Examples & Project Files
On the SOS web site, you'll find lots of audio files that relate to this month's remix, including both the original and remixed tracks, as well as numerous 'before and after' processing demonstrations with detailed captions — and even the full Cockos Reaper project file of the remix, so you can investigate my settings in more detail. There are also the song's raw multitracks, in case you fancy having a go at mixing them for yourself!