
Over the last 20 years, several hardware manufacturers have tried to harness the power of additive synthesis in an accessible format. Can soft-synth designers Virsyn succeed where they didn't?
One of the most notable features of Virsyn's first product, Tera, was its Spectral Oscillator. Where conventional oscillators used in subtractive synthesis offer a range of frequency-rich wave shapes such as square and sawtooth, leaving it to the user to filter out the frequencies that aren't required, Tera's Spectral Oscillator allowed the user detailed control over its spectral content at source. You could specify the levels of up to 128 harmonic partials individually, with the ability to morph between separate A and B layers and detune up to six Spectral Oscillators to create inharmonic sounds. What really stood out, compared to other implementations of additive synthesis, was the Spectral Oscillator's ease of use. Previous additive synths such as the Kawai K5000 demanded individual adjustment of hundreds of parameters, but Tera made it possible to shape a sound simply by drawing a wiggly line with the mouse. (You can read SOS's Tera review on-line at www.soundonsound.com/sos/feb03/articles/virsyn0203.asp.)
In the case of Tera, the Spectral Oscillator was just one component of a modular soft synth that also boasted conventional and wavetable oscillators, filtering and all the usual bells and whistles. At this year's Frankfurt Musikmesse, however, Virsyn announced that they were developing a new product based exclusively around additive synthesis. All of Cube's four oscillators are additive designs derived from Tera's Spectral Oscillator, but offering a much greater degree of user control. Not only do they allow you to set the level of each partial in the sound individually, but you can also determine these partials' attack and decay times and pan positions. As well as its pitched harmonics, each oscillator also boasts a noise source that can be shaped in the same detailed fashion, plus a filter that's capable of arbitrarily complex frequency responses. Complex multi-stage envelopes are used to create movement between the four oscillators.
The Nitty Gritty
Virsyn Cube is compatible with Windows 98, Me, 2000 and XP, and Mac OS 9 and 10.2. It requires at least 128MB RAM and a relatively modern processor — either a 600MHz Pentium III, Pentium 4 or Athlon, or a 400MHz G4. Like Tera, it will run either as a stand-alone application or as plug-in instrument in a VST2- or Audio Units-compatible host program.
 is the key to controlling Cube's powerful morphing features.") The 2D envelope editor (centre) is the key to controlling Cube's powerful morphing features.Installation is straightforward, requiring only that you enter your serial number in order to unlock the program. Getting started is equally easy: load in one of Cube's presets, either using your sequencer's patch management facility or Cube's own, and start playing. Each instance of Cube is eight-part multitimbral on MIDI channels 1-8, with eight buttons at the top of the interface window used to select the part currently being edited. A slim but welcome printed manual in English and German helps get you started, and is reproduced in PDF form on the CD-ROM.
The 2D envelope editor (centre) is the key to controlling Cube's powerful morphing features.Installation is straightforward, requiring only that you enter your serial number in order to unlock the program. Getting started is equally easy: load in one of Cube's presets, either using your sequencer's patch management facility or Cube's own, and start playing. Each instance of Cube is eight-part multitimbral on MIDI channels 1-8, with eight buttons at the top of the interface window used to select the part currently being edited. A slim but welcome printed manual in English and German helps get you started, and is reproduced in PDF form on the CD-ROM.
The 300 or so presets are supplied in five banks each containing up to 64, with a sixth 'greatest hits' bank being loaded by default. They're a bit of a mixed bag, including as they do some indifferent 'real instrument' patches, lead sounds that would grace any trance anthem, some very usable basses, many nice pads, most of which have a glassy or metallic quality to them, and a good collection of atmospheric, chattering rhythm loops. Then there are a few that really make you sit up and take notice of what this synth is capable of. 'Metal2Aah', for instance, morphs seamlessly from a bell sound to a vocal 'aaaah', in a way that would be impossible on any conventional sample-based synth. 'Washer Bass' is a clean, yet grindingly heavy synth bass, the exact like of which I've never heard from a subtractive synth. 'Wauwa' and 'IAEU-Rhyme' are startling human voice-like percussive sounds.
Some of the presets also present an unusual degree of response to keyboard velocity and mod-wheel position. It's not just a question of louder or quieter, brighter or darker: moving the mod wheel to the other end of the scale, or thumping the keyboard, can completely change the character of the sound. 'Tubells', for example, uses the mod wheel to morph between a struck metal sound and a vocal choir, while on 'Asian Banjo', the key presses generate a staccato attack, with the mod wheel bringing in a sitar-like drone. Not enough of the presets make use of these possibilities, but those that do are impressive.
Going Deeper
On the editing front, Virsyn Cube is one of those synths that offers both instant gratification and endless possibilities for deep-level tinkering. The quickest way to create a new patch is to click on the tiny 'fruit machine' icon at the top right of the screen. Doing so generates semi-random settings for most of Cube's parameters, and delivers useful sounds surprisingly often.
 Each partial or group of partials can be given its own simple AD envelope.High-level editing parameters, meanwhile, include a pitch LFO for each oscillator, along with Spread, Ensemble and Detune controls. The first of these determines how perfectly the harmonic partials should be pitched, with higher values introducing more detuning in the upper harmonics, while the second modulates the partials for a kind of chorus effect and the third sets an offset in semitones between the pitch of the note played and the root pitch for the oscillator. There is also a handful of global synthesis and housekeeping controls, the latter including maximum polyphony, last note priority, portamento time and pitch-bend range. Global synthesis parameters include an overall brightness filter which can be set to track key pitch, mod wheel, velocity or aftertouch, and the option to treat all the partials within a sound as free-running oscillators or have them all reset to the top of their cycle at every Note On, which is more suitable for percussion patches.
It's possible to make fairly substantial changes to the character of a sound by tweaking these top-level controls, but the meat of Cube's editing process takes place in the oval window at the centre of the screen. What looks on the front of the box like some kind of cabalistic symbol is, in fact, Cube's 2D morphing envelope editor. This is the key to the synth's unique evolving sounds: it's also the hardest part of the editing interface to get your head around, although it's very easy to get interesting results by randomly clicking and dragging.
All Enveloping Sound
Much of Cube's power comes from its ability to morph smoothly between up to four oscillator settings simultaneously, and Virsyn are at pains to point out that this morphing is far removed from simple crossfading: every single oscillator parameter is smoothly adjusted in real time. In essence, every Cube sound is based around three linked envelopes. The first is a more-or-less conventional volume envelope, albeit with up to 64 time/level segments. The others are the X and Y morphing envelopes, and it's these that control the timbral development of a Cube sound. The four oscillators are positioned at the corners of a square matrix, and the X and Y morphing envelopes determine the way the sound 'moves' around this matrix.
 Some unusual stereo effects can be created by panning the different partials within a sound. There are, in fact, two envelope displays in Cube. The 2D envelope editor in the centre of the screen shows the way in which a sound's timbre changes, while the more conventional envelope editor below it can be used to display either the volume envelope or one of the X or Y morphing envelopes. Yellow dots mark the breaks between different segments in the envelopes, and are consistent across all three envelopes — so, for instance, if you want to have the end of a decay phase at a particular point in time, you'll also get a breakpoint on the X and Y morphing envelopes, whether or not you choose to have the morphing path change direction at that point.
The 2D editor provides a clear representation of the way your sound's timbre changes, and a very neat and fast way of editing it, but it doesn't convey any information about the timing of each stage — the length of a segment in this view simply indicates a more or less radical change in the sound, not whether that segment takes more or less time to enact. Unless you press a key, all that appears in the 2D window is a series of straight lines joined by yellow blobs, with no indication of direction. All of these are identical, and the only way to tell whether the one at the end of a line represents the beginning or the end is to select it and see where it appears on the conventional envelope editor at the bottom of the screen. Things get confusing even with fairly simple X-Y morphing envelopes, especially if they return to the place where they started, and more complex envelopes can make your brain hurt. Adding to the complication is the ability to assign both vertical and horizontal morphing to controllers such as mod wheel, velocity, key track and aftertouch. If you do this, the controllers then interact with the X and Y morphing envelopes in a way that isn't explained at all well in the manual.
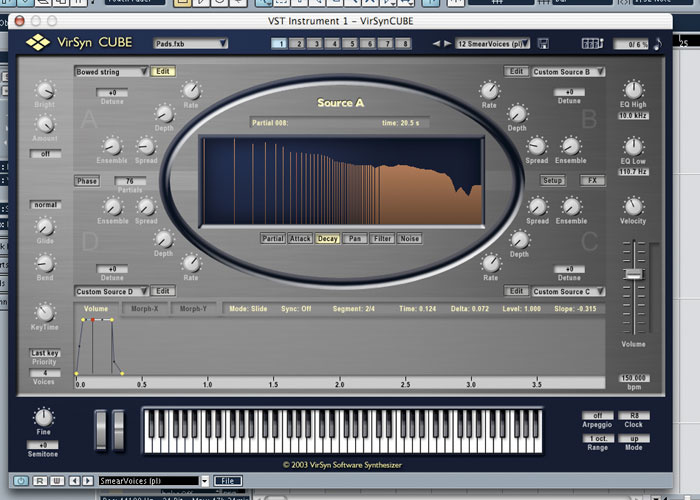
.") Cube's filters can generate complex responses, which can be used to mimic the resonances of real-world sources such as a bowed string (shown).In the initial version 1.0 of Cube there was no indication of the current morph position or direction at all. As I was writing this review, however, an update to version 1.01 was posted on the Virsyn web site, and went some way towards making the 2D envelope editor clearer by adding an animated blob, which moves around to show you the current position of the morph. Nevertheless, I still feel that more could be done: it would be very helpful to have the direction of the envelope indicated permanently by arrows along the lines, and perhaps by a gradual change in their colour. For some reason, the update file seemed to work only on the stand-alone version of Cube, so I never got the animated blob to work in the VST version.
Cube's filters can generate complex responses, which can be used to mimic the resonances of real-world sources such as a bowed string (shown).In the initial version 1.0 of Cube there was no indication of the current morph position or direction at all. As I was writing this review, however, an update to version 1.01 was posted on the Virsyn web site, and went some way towards making the 2D envelope editor clearer by adding an animated blob, which moves around to show you the current position of the morph. Nevertheless, I still feel that more could be done: it would be very helpful to have the direction of the envelope indicated permanently by arrows along the lines, and perhaps by a gradual change in their colour. For some reason, the update file seemed to work only on the stand-alone version of Cube, so I never got the animated blob to work in the VST version.
Fortunately, the conventional envelope editor below the 2D matrix is a model example. It shows the volume, X or Y morphing position clearly plotted against time. A particularly neat touch is the time ruler along the bottom: it's sensibly calibrated in real-world units (ie. seconds), and clicking in it and dragging horizontally slides it left or right, while dragging vertically allows you to zoom in or out. Better still, clicking the Sync button changes the ruler units from seconds to beats, and allows you to synchronise all the segments of your envelopes with the tempo of the host sequencer in a completely natural and intuitive way. Full marks. Cube also features extensive use of context-sensitive menus, and Control-clicking in the envelope editor brings up a selection of useful preset envelopes as starting points for your editing.
Envelopes can include a looped section, a facility which is exploited very effectively in some of the sequence-like presets. Cube tries to be helpful by anticipating where you want your loop points to fall and automatically creating them, but this gets confusing, and I would definitely have preferred to turn looping on and off and set the loop points manually. Another minor irritation is that you can't create new breakpoints by shift-clicking in the 2D editor; you have to do this in the conventional envelope editor. This means that when they appear on the 2D editor, they're often hidden underneath existing breakpoints.
Partial To Some Noise?
Clicking the Edit button adjacent to any of the four additive oscillators causes the 2D envelope display to be replaced with the editing screen for that source. Again, a number of templates are supplied for use as starting points, and are accessed from a drop-down menu next to the Edit button. These presets include human vowel formants, bowed and plucked strings, brass and bell tones, as well as typical 'analogue' oscillator tones such as sawtooth and square waves, and different flavours of noise. You can also save and load your own settings for the oscillators, independently of Cube patches.
 Cube's oscillators generate noise by modulating the partials used in the sound. This can then be introduced into the oscillator's output by drawing a noise transfer function across the frequency spectrum.The editing screen for each oscillator boasts six pages, the most fundamental allowing you to define an overall level for each partial or group of partials (for the higher frequencies, where they are closer together) in the sound. Editing is easy: you simply click and drag, and the vertical lines representing the level of each partial change height. The same editing approach is applied on the other five pages. Attack and Decay are used to define simple two-stage envelopes for each partial, while Pan allows you to place them within the stereo field. These are all simple to use and valuable in practice. If you're trying to recreate a realistic plucked-string sound, for example, you'll want the high-frequency components of the sound to decay faster than the lower ones, and having individual control over the decay time of each partial makes this easy to achieve. The AD envelopes for all the partials of all the oscillators are triggered at the same time when you play a note, even when the oscillator is not brought into the sound until later in the morphing phase.
The ability to pan the partials individually allows you to use the stereo field in much more creative and subtle ways than in almost any other synth. For instance, if you set up oscillator A so that alternate partials are panned hard left and hard right, and oscillator B with all partials panned centrally, morphing from A to B dramatically alters the stereo presentation of the sound without changing its overall pan position.
One of the limitations of the implementation of additive synthesis in the Kawai K5000 was that you could introduce unpitched or inharmonic elements into the sound only by adding a PCM component to it. There are no sample-based oscillators in Cube, however, and it tackles the problem in two ways. One is the Spread control mentioned earlier, which pushes the oscillator's upper partials into increasing degrees of inharmonicity. The other is accessed via the Noise editing panel. As well as generating individual sine waves for each partial, a Cube oscillator also generates noise in proportion to each partial's level. You can then add elements of this noise to your sound by drawing them in on a separate frequency plot. The effect is much more subtle than the noise generators you'll find in any conventional synth, and you need to introduce quite a lot of noise if you want it to be heard above the pitched partials, but it's a very useful resource. Quite a lot of real pitched instruments, for instance, include a component that's unpitched (like the attack of a guitar pick or the 'chiff' of a flute), and morphing quickly between a noisy and a pitched oscillator can be an effective way of reproducing this. Because the noise shape is derived from the partials, moreover, the noise generated tends to follow the pitch of each note, in a way that's a lot more musical than the noise generators found in most synths.
Filter Fun
Among the staple elements of subtractive synthesis that are missing from Cube is a conventional resonant filter. Instead, each oscillator boasts a Filter panel where you can draw in your own filter shape, which can be as simple or as complicated as you like. Drawing with the Shift or Option keys held down provides a simple way of creating comb filter patterns, while Control-clicking allows you to copy and paste filter shapes. What you can do with this filter is create complex structures that mimic the formant peaks in the human voice, or the resonant characteristics of a violin body. What you can't do is create a screaming resonant low-pass Moog diode ladder with enough self-oscillation to kill a cow at 20 paces.
It's in the filter panel that the heart of Cube's morphing ability lies. For each oscillator, you can specify up to eight morph points at particularly significant places along the filter curve, and when Cube morphs between two oscillators, it will use these significant points as the basis for a smooth change in filter response. For instance, if you want to morph between two human vowel sounds, you can define morph points at the formant peaks in each, and Cube will smoothly slide the formants up or down as appropriate. The update to version 1.01 adds a neat animation feature to the filter editing window, so when you press a key, you can see the filter shape changing.
Filter morphing is a hugely powerful tool, and I'm not aware of any other synth that offers a comparable feature, but I sometimes missed the ability to apply dynamic changes to the filter response in other ways. The Kawai K5000 provided a rather similar formant filter, which couldn't be morphed, but did allow you to introduce an offset in its transfer function — what would appear in Cube as shifting the filter curve to the left or right without changing its shape — and assign this to a modulation source. This meant that LFOs, envelopes and so on could be brought to bear on the filter. It is possible to achieve most of the same results (and a whole lot more) with Cube's filter morphing, but not in quite such an immediate way.
Processor Power & Partials
As you might expect, Cube is a fairly processor-intensive plug-in, but the relationship between CPU load and polyphony is not as straightforward as it is in other soft synths. CPU load is dependent not on the total number of notes being played, but on the total number of partials that are sounding, so patches with a rich high-frequency content are more processor-intensive than those that use only a few partials. Each patch provides a global Partials control, which can be used to limit the number of partials sounding and hence the CPU load. A small display at the top right of the screen shows the number of partials sounding at the current time, and the percentage of the computer's CPU power being consumed. With no notes sounding, the CPU meter settled at 6 percent on my 700MHz G4 iMac, while a note that used 56 partials doubled this load.
Effects & Arpeggiator
Cube's signal path is topped off with a two-band EQ and a basic effects section. Each of Cube's eight multitimbral parts can access its own distortion, delay and modulation effects, and there's also a global reverb, to which each part can send in different amounts. Most of the effects are usable, but I think it's fair to say that anyone using Cube within a MIDI + Audio sequencer will prefer to apply separate effects to the clean output.
Finally, mention should be made of the basic arpeggiator, which features the usual Up, Down, Alternate and Random modes. It works, but again, most MIDI + Audio sequencers will have more flexible features for generating MIDI notes from a chord.
On Balance
Although it's only Virsyn's second product, and it's brand new, Cube is full of thoughtful design touches that make it seem very finished. In almost every area, the interface has been created in such a way as to combine swift editing with detailed control. There's a lot of power at your fingertips here, but it's managed in such a way that it seldom becomes overwhelming. Clever use of context-sensitive menus and modifier keys means that you're always encountering new possibilities and rarely running into frustration. It's interesting, and refreshing, to encounter a synth front end that really makes use of the mouse as an editing tool: this is one soft synth that wouldn't be more satisfying to use in hardware form. My only serious quibble about the interface concerns the 2D envelope editor, which really needs additional graphic touches to make the direction of the morphing path clear.
 There are individual distortion, modulation and delay effects for each Cube part, and a global reverb.So what of the sound? Well, given that Virsyn have chosen not to include basic subtractive synthesis elements like a resonant filter or a modulation matrix, it's surprisingly versatile, and can reproduce a fair range of more or less 'analogue' sounds. Nevertheless, Cube's real strengths lie elsewhere. Perhaps its two greatest features are its morphing capabilities and its ability to accurately reproduce filter shapes modelled on real-world systems like the formants of the human voice. Combining the two can produce sounds that really demand the listener's attention, morphing seamlessly from a startlingly realistic vocal sound to something completely different. With up to 64 stages available in the morphing envelope, plus the ability to sync these to the host sequencer's tempo, you can create lengthy evolving sounds with dramatic or subtle changes in timbre. Cube's noise components and Spread controls provide effective ways of introducing the grit and dissonance that pure additive synthesis lacks, while the ability to assign a pan position to individual partials also allows you to do things with the stereo presentation of a sound that I've not heard from other synths.
Since Cube has the power to reproduce complex sounds, it's perhaps a shame there's no way to use it for true resynthesis. The supplied oscillator presets have been carefully modelled on human vowel sounds, bowed strings and the like, but there's no system for importing and analysing your own sources. If Virsyn could have found a way to do this without making Cube impossibly complicated to use, it would have been a real achievement — but since no-one else really seems to have cracked the problem of resynthesis yet, this is more of a wish than a whinge.
Cube takes the additive component that lifted Virsyn's first synth, Tera, out of the ordinary, and develops it into a comprehensive sound-generating system. The result is a synth that is capable of unique results, and which should be on every sound designer's kit list. Unlike Tera, you probably wouldn't want to use Cube for every element in a mix — you won't find the same excellent 909-style drums here, for instance — but if you're looking for that one sound to make your tune stand out from the rest, a demo of Cube would be a very good place to start.
Pros
- Proves that additive synthesis and fast, intuitive editing are not incompatible.
- Powerful morphing facilities can generate many unique sounds.
- Offers flexible ways of introducing noise and inharmonic elements into additive textures.
Cons
- 2D envelope editor can be confusing.
- Effects are a bit weak.
- Some features are not properly explained in the manual.
Summary
With Virsyn Cube, additive synthesis has finally become a force to be reckoned with.
information
£169.95 including VAT.
Dark Horse Distribution +44 (0)208 204 4943.
+44 (0)208 204 4943.