 Pro Tools will warn you if you try to import audio that’s at the wrong sample rate, but the warning is easy to overlook...
Keep these five commandments in mind, and avert Pro Tools disasters!
Whether you’re a beginner or a professional, recording or mixing, in music or post-production, there are some things that we all need to be reminded of regularly. Forget about the fundamentals and you could end up with a minor disaster on your hands. So, in this month’s Pro Tools workshop we are going to look at five Pro Tools essentials you cannot afford to ignore.
Session Sample Rates
The choice of sample rate for audio recording can be the result of personal preference, or the client’s wants. If you’re working as part of a large studio or post-production facility, sample rates will be determined either by company policy or set by the delivery specifications from the broadcaster, record company or film studio. But whatever the context, failing to check what sample rate your session is set to before recording is likely to land you in hot water, especially if you’re collaborating with other Pro Tools users. Avid have eliminated some of the potential problems with the Cloud Collaboration features in Pro Tools 12.5, but it’s possible you may be working with people using earlier versions of Pro Tools, or choosing not to use the Avid Collaboration features.
Whatever the situation, the simple rule is to try not to mix sample rates. So when you get elements in for a project the first thing to do is to check sample rates before using the supplied content. There are plenty of applications out there that can convert the sample rate of an audio file, and Pro Tools can also convert sample rates on import, but on the whole, the best thing is to make sure you know what sample rate you are working at and stick to it. Otherwise you can get into situations where the client complains that your piano recording is out of tune when it was actually the client not checking the sample rate of the recording before adding it to their project.
Pro Tools should warn you of any mismatch, but there will always be users who fail to understand the significance of the warning and wonder why they run into timing or tuning issues. Another example I have had is a client complaining the programme was too long. It turned out the programme was played out at 44.1kHz when it had been recorded at 48kHz. Sometimes this can be due to clocking issues, which leads us onto...
Clock Checking
As soon as you have more than one digital device in a studio, clocking becomes an issue. Every device needs to be kept in sync by working from one clock source. Not getting this right can result in all sorts of problems including silence, clicks on recordings, distortion, audio mismatches, timing and pitch issues.
When using an external clock source with Pro Tools, it’s sometimes possible to accidentally set the clock to a different sample rate from that of the session. For example, consider a situation where you have a Pro Tools system working in conjunction with a digital mixer. In this example, one of the two devices needs to be the clock master. If, for instance, the output of the mixer is connected to Pro Tools using an ADAT optical connection, you need to go into the Pro Tools Session Setup window and set the Clock Source to the ADAT input the mixer is using. Now the mixer is the master and Pro Tools is the slave. Alternatively, if you’re running a digital output from Pro Tools back into the mixer, you could set the mixer’s clock source to be the digital input and have Pro Tools set to Internal. Then Pro Tools will be the clock master and the mixer is the slave.  It’s vital that all digital devices in your studio are running from the same clock source, be it the one in your audio interface or an external device.
This type of arrangement is OK when you have just two digital devices, but when you have three or more it is best practice to have a dedicated master clock source. There are a number of specialised devices on the market that will take care of this. In larger facilities this may be a centralised clock source and distributed around the facility so that not only are individual studios all running off one clock source, but all the studios are running off the same clock source. This makes cross-connecting different studios easier.
Setting Frame Rates In Pro Tools
Frame rates matter if you are working to picture with a video file either in audio post-production or as a composer creating music to picture. When working to picture, it is critical that the settings in the session match the video file you are importing. The best thing to do is to check the video file you have been sent before importing it into Pro Tools. I usually open it in QuickTime and use the Movie Inspector, or you can open it in a utility like MPEG Streamclip, which is available for both Mac and Windows.
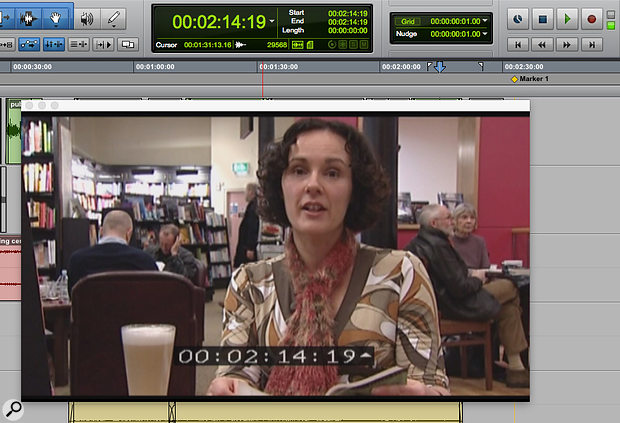
 A simple way to confirm that timecode and frame-rate settings are correct is to jump to the end of the video file and check that Pro Tools’ timecode readout matches the burnt-in timecode.
Once you have checked this and created a new session, go into the Session Setup window before importing the video and set the frame rate and timecode to match the video frame rate and timecode. Otherwise, things are likely to go out of sync. As a rule, film is set to 24 frames per second and PAL video to 25 frames per second, but things get a little more tricky with NTSC for the US and Canada, especially if the video editor has used drop frame, in which case, instead of the usual 30 frames per second you will need to use 29.97 frames per second. One trick to be aware of is that if you are sent HD video files at a higher frame rate than 30fps, you can set Pro Tools to half that frame rate — so if the video is 59.94fps, for example, you can set Pro Tools to 29.97fps.
I always ask for burnt-in timecode, which means the video file has the timecode displayed on the video. Once I have imported the video I place the cursor very close to the end and make sure that the burnt-in timecode matches the cursor position on the appropriate timecode ruler. This is a useful safety check — video editors tend to resist creating a reference video file with burnt-in timecode as it takes extra time to render it out, but it does give another level of security.
Pro Tools Session Locations
If you don’t take care of where you store your Pro Tools session data, you can find yourself losing some or all of your hard work, either temporarily or — worse still — permanently. It is best to use at least one separate hard drive dedicated to storing your Pro Tools sessions; with storage cheaper than ever, you can get a suitable drive for less than £100 that will store a lot of data. I often get calls from users who run into problems because they keep their sessions in a folder on the desktop. It is very easy when cleaning up your desktop to drop such a folder into the trash and delete it, and in most circumstances, it is virtually impossible to retrieve a deleted Pro Tools project with all its media files intact.
The other issue to consider with regard to storage locations becomes important when sharing projects with other users. Maybe you have tracked a session and now you are going to ask someone else to mix the session. You need to be very careful to make sure you give them everything they will need. The normal way Pro Tools works is to put all the audio relating to a session in the Audio Files folder inside the session folder. However, let’s suppose you import some audio into the same session from elsewhere on your system. If you do not pay close attention to the Import Session Window and you choose to Add the audio rather than Copy it, Pro Tools will work with that audio in its original location. This means that when you copy the session folder with the audio files, to give to the mix engineer, the audio that was imported won’t be in the session’s Audio Files folder, and when the mix engineer opens the session, he or she will get the dreaded Cannot Locate Audio window.  The most robust way to hand over a session to someone else is to use the Save Session Copy command.
There are two ways of avoiding this. Either make sure you choose Copy and not Add whenever you import audio, or use the Save Session Copy option in Pro Tools when you come to create a copy of the session. This way, as long as you tick Audio Files in the Items To Copy section of the Save Session Copy window, Pro Tools will collate all the media files used in the session, irrespective of where they are on your system, and save them all together in the Audio Files folder of the Copy Session.
Backing Up Your Pro Tools Data
Your Pro Tools sessions and associated data are among the most precious things in your studio, and some have learned the hard way what happens if you don’t back them up. There are several ways to back up your Pro Tools sessions, but as a rule of thumb, you should have at least one local copy and one off-site copy. Why an off-site copy? Simple: fire, flood or theft are always ways to lose your data — and if you think it won’t happen to you, you are not being smart. Both cloud storage and hard drives are cheaper than ever, so if you care about your Pro Tools sessions, make sure you keep them backed up.


