 for the chosen parts. All these tracks are then routed to an Aux track (bottom) with the necessary compression, EQ and so on.") One approach to vocal comping is to have each take on a separate track, with an extra track (top) for the chosen parts. All these tracks are then routed to an Aux track (bottom) with the necessary compression, EQ and so on.
One approach to vocal comping is to have each take on a separate track, with an extra track (top) for the chosen parts. All these tracks are then routed to an Aux track (bottom) with the necessary compression, EQ and so on.
We look at a range of techniques you can try to help you produce a better vocal sound for your project.
In a vocal session you would normally record a number of takes and/or do drop-ins to patch up an otherwise good take. In this month's Pro Tools Notes we are going to look at how we deal with these raw takes to turn them into a polished vocal line.
Vocal compositing or 'comping' for short is usually the first stage in producing a good vocal line. To comp a performance, we take the best elements from the various raw takes and edit them into a master vocal track. There are two basic ways of achieving this.
The first is to use multiple Pro Tools tracks with the same processing applied to each. For this approach, the various takes are laid out in the Edit window with each take on its own track, and an additional track serving as a destination for our chosen parts. All the 'take tracks' and the 'comp track' are then routed via busses to a common Aux track, on which the necessary processing is applied using insert plug-ins. You then listen to each track, one phrase at a time, and compare the various takes. Once you have identified the best take of a phrase, edit and drag it onto your comp track. When you take out these sections, it is best to leave the gaps in the take tracks intact, as they give you a visual indication of which phrase the take came from. There are a number of variations of this technique; some people edit all the tracks into separate phrases and make their selections by muting and unmuting regions.
The other approach is to use Pro Tools 's Playlists feature. This allows you to have multiple takes on a single track, with each take having its own Playlist within the track, and has the advantage that you can do comping without continually having to add new tracks and fill up your Edit window. Before the singer sings the first take, name the track something like 'Vox T1'. When they finish, create a new Playlist on the same track and call it 'Vox T2'. Carry on doing this until you feel everything is covered in there somewhere. Next, create a new Playlist (again on the same track) called 'Vox Comp' and listen to each take, copy the best element from the source Playlist, switch to the Vox Comp Playlist and paste it in. If the Playlists are named sequentially, the region name created in Pro Tools will show you which take it came from.
If you go for the second approach, it is usually easier to create a new Playlist as you record each new take, but it is possible to create a set of Playlists afterwards by spotting each take from the region list into a new Playlist on a Vox Comp track.
Fattening Your Vocal Sound
Once you have comped your master vocal track, there are other tricks you can apply to improve the vocal sound further. Most of these techniques depend on creating multiple layers and making each of them different from the original. The trick is to make sure the difference is very subtle, or it becomes too obvious that you are listening to multiple versions of the same thing. Here are some ideas to set you going: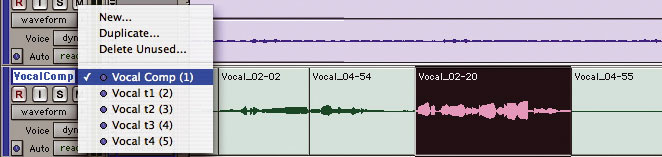

 and pasted into the Vocal Comp Playlist (bottom).") An alternative approach is to use multiple Playlists within a single track, which takes up less space in the Edit window and means your processing can be kept on the track itself, rather than an Aux. Pro Tools automatically names the regions to show which take they have come from — in this case, the selected region has been copied from take two (centre) and pasted into the Vocal Comp Playlist (bottom).
An alternative approach is to use multiple Playlists within a single track, which takes up less space in the Edit window and means your processing can be kept on the track itself, rather than an Aux. Pro Tools automatically names the regions to show which take they have come from — in this case, the selected region has been copied from take two (centre) and pasted into the Vocal Comp Playlist (bottom).
- Try small amounts of 'good' distortion by using a valve sound plug-in or a tape-simulation plug-in. You could even use a real tape machine to run the vocal sound through and then slip the resulting track back to compensate for the tape delay.
- Send to a subtle chorus from the main vocal track and pan the return to the left. Then repeat it and pan that to the right, but invert the phase of the second one. This gives the vocal a nice wide effect in stereo, but the effect completely disappears in mono. Watch you don't use too much of this effect, though, as the vocal might be too low when the mix is collapsed to mono.
- Use small amounts of doubling via a very tight delay. Try using a stereo delay with left and right settings somewhere around 35ms, but slightly different from each other, and bring it up just enough until you hear the vocal spread. Alternatively, try using a stereo delay plug-in and starting with 15ms delay on the left side and 30ms on the right. You get a nice wide vocal that doesn't cancel out in mono. Mix in the original and the delayed track to taste but not too wide, or too close to the centre either.
- Doubling the vocal by recording it a second time usually sounds like... doubling the vocal by recording it a second time. However, if you keep the double low enough in the mix, it can sound a little bigger without the double becoming too obvious. If you plan to use this technique then whilst you are comping, make a 'double' track using the 'second best' elements. Note that for this double track, timing accuracy with the master vocal track is more important than tuning.
- An alternative doubling technique is to get the vocalist to sing the 'double' differently. If the main voice is sung with some smile and energy, try to do the double with almost no projection, adding a lot of whisper and breath. Alternatively you can also try to do a 'double' track with more energy, but be aware that this does not always fit every style of music. If that doesn't work, try getting the vocalist to record an extra 'accent' track by hitting the on-the-beat phrases very hard and singing the rest very quietly. Then combine this track with the main vocal track to give it more energy. You can also try using this 'accent' track instead of the main vocal track to drive your vocal reverb.
- You could try the so-called 'Ricky Martin' technique. You leave the main vocal track panned centre, and you take two copies. Pan one hard left and pitch-shift by minus four cents, pan the other hard right and pitch-shift by plus four cents. Try different amounts of pitch adjustment — you can usually use larger amounts of pitch adjustment on backing vocals.
The next two tricks are a bit too severe for an exposed lead vocal, but great for fattening out backing vocals...
- Route to a Waves PS22 stereo width expander plug-in via an Aux, spread the stereo image to taste and mix it back into the backing vocal subgroup. It can make them sound nice, big and wide.
- Try using a real-time pitch-shifter such as Digidesign's DPP1 set to slightly flatten and sharpen — say by around minus four and plus three cents — and have it return on a stereo Aux input. The important part of this trick is to have the dry, un-pitch-shifted version panned slightly to one side and the pitched version panned fully over to the opposite side (ie. pan the Aux send to the opposite direction compared to its source, and wider). Do this with every vocal in the backing vocal group individually, taking whatever panning you have on each element and making it opposite and more for the pitched version. It's like adding more performances on the other side of the stereo sound field.
With all these vocal fattening tricks, make sure you check how it sounds in mono, especially when using an effect which involves time delay, as the mono could sound muddy or phasey. Waves' C1 side-chain compressor, with the appropriate settings for the final vocal brightening trick described in the main text.
Other Vocal Tips
- If you find sibilance from the vocal track is hitting the reverb and making it splash, rather than 'pre-EQing' the feed to the reverb to roll off the high frequencies, try using a de-esser in the send path to the reverb. This will give you a 'splash-free' reverb sound while maintaining the clarity of the vocal line.
- Another reverb-related trick is to insert a compressor on your send track before the reverb. Set the compressor to compress the loud vocals but to leave the quieter, more intimate sections uncompressed. The loud sections will then be dryer and the soft sections wetter — tweak the compressor setting to taste.
- Finally, here's a trick that can brighten a vocal without resorting to conventional EQ. Make a duplicate of the main vocal track, route both vocal tracks through an Aux track, and move any plug-ins that were on the main vocal track to the Aux track. Then remove the plug-ins on the duplicate track and replace them by a compressor with a built-in side-chain such as Waves' C1. Set it to run as a side-chain compressor, and to listen to only the side-chain. Set the side-chain frequency around 8 to 12 kHz, and compress it very hard. Gently mix the duplicate track in with the original vocal, and tune the frequency to suit the vocalist's sound (see screenshot below).
I hope these tips will get the creative juices flowing and help you to develop tricks and techniques that are unique to you.


