Pro Tools doesn't officially support macros or assignable keyboard shortcuts, but with a little know–how and a copy of QuicKeys, you can use custom key commands to bring up anything from simple menu items to complex chains of commands.
Over the years, Digidesign have added more and more keyboard shortcuts to Pro Tools, but there is still no option to have different profiles for different users. Nor is it possible to reassign shortcuts within Pro Tools, or create macros to implement complex operations with one keyboard shortcut. This approach has its advantages — you'll never find yourself at a loss as to how to use someone else's Pro Tools system — but some users find its inflexibility frustrating. Fortunately, there are 'unofficial' ways around these restrictions, and in this month's Pro Tools workshop we're going to explore the options that are available if you want to add your own keyboard shortcuts or macro functionality to Pro Tools.
Panther Tracks
Since OS 10.3 'Panther', Mac OS X has included what some would describe as a hidden feature which makes it possible to add your own keyboard shortcuts to menu items, either globally or on an application–specific basis. One advantage of this approach is that it requires no extra software, and is free!
 System Preferences in Mac OS 10.3 and above has the ability to assign key commands to menu items. To set up your own keyboard shortcuts, you need to run System Preferences either from the dock or from the Apple menu. Select Keyboard & Mouse from the Hardware section of the System Preferences window, then choose the Keyboard Shortcuts tab, and you will get to the window from which you can add, edit and delete keyboard shortcuts. Click on the '+' icon near the bottom left–hand corner and a small window will pop up.
To create a Pro Tools–specific shortcut, click on the Application drop–down menu, go straight to the bottom and select Other (it would appear that the OS can only see applications that are not nested in sub–folders for the drop–down menu). This will bring up a standard navigation window, within which you should navigate your way to the Pro Tools application, and click the Add button.
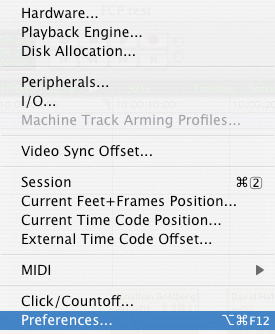
 Here I've added new shortcuts to the Preferences menu item and the No Scrolling sub–menu item using System Preferences.Next you need to type the exact menu option you want to create a shortcut for. In the example screenshots I am going to create a shortcut to display the Pro Tools Preferences window. You have to remember to type the name of the menu item exactly as it appears in Pro Tools, including the ellipsis (...) at the end of the word 'Preferences...' Finally, select a keyboard shortcut that hasn't already been assigned. You have to quit Pro Tools and reboot it for the new shortcut to become active. If all has been successful, your new shortcut will be in the menu, just like all the rest.
You can use this method to create shortcuts for items in submenus as well as the main menus. For example, I created a shortcut to turn on No Scrolling from the Scroll Options menu, by typing in 'No Scrolling'. Be aware, though, that there are some menu items within Pro Tools that use the same text. For example, 'Preferences' appears in both the Pro Tools menu and the Setup menu, and so both get assigned the same shortcut. In this case, there's no problem because both entries relate to the same thing. However, in HD systems 'Delay Compensation' also appears twice, but for different functions. It appears in View / Mix Window / Delay Compensation, which toggles the Delay Compensation section of the Mix window, and also in the Options menu, where it enables you to turn on the Delay Compensation feature. System Preferences is unable to differentiate between the two, and so allocates the chosen shortcut to both, even though they control different features. It would appear to work from left to right, as the View menu item wins every time!
It is actually getting more and more difficult to find unused key combinations, and I have taken to first trying a possible shortcut in Pro Tools before assigning it, then confirming that it isn't used by running a search though the Pro Tools Keyboard Shortcuts PDF (accessible from the Help menu in Pro Tools). There are still relatively few Pro Tools shortcuts that use Ctrl on the Mac or Start on the PC as the sole modifier key, and it is also worth thinking about which shortcuts will be easy to learn, so to start with, you might want to look at combining Ctrl or Start with the letters A to Z and consider what shortcuts you might find useful that don't already exist. (See the table overleaf for some ideas.)
Macro Economics
There are limits to what System Preferences can control. It can't add shortcuts for menus that appear anywhere else other than the application menu bar, or string together more than one operation to create macros. To do this, you'll need a third–party application. There are a number available, but it seems that the two most commonly used are the Mac–only iKey from Script Software (www.scriptsoftware.com/ikey/) and the cross–platform QuicKeys from Startly Technologies (formerly CE Software: www.cesoft.com/company/index.html).
QuicKeys has been around in the Mac world for around 20 years, and I remember using it in conjunction with Pro Tools in pre–OS X times. Startly Technologies offer a 30–day fully functioning demo, so you can try it out without shelling out any cash. To set up new shortcuts or macros, QuicKeys should be running and so should any application you want to create shortcuts or macros for.
Obviously, QuicKeys can handle the basic menu commands just as Keyboard Shortcuts in System Preferences can, so to help you get to grips with QuicKeys, let's see how you would use it to create a shortcut to access the Preferences window in Pro Tools.
 To create an application–specific shortcut in QuicKeys, you need to set the Scope to the application in question.
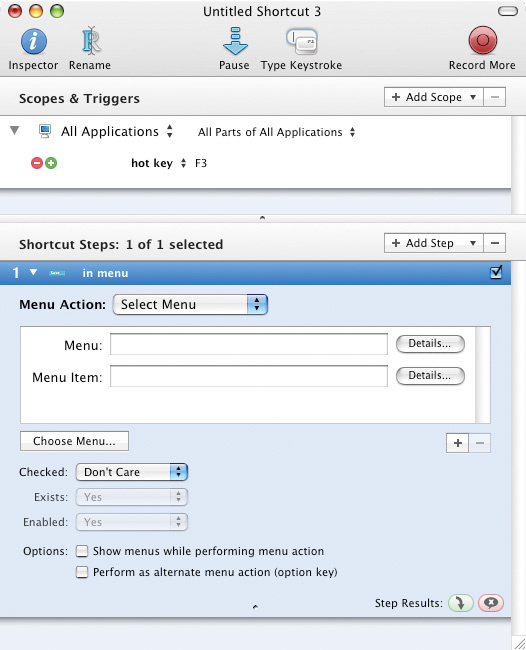
 The next step is to choose an unused key combination.Click on the New Shortcut icon in the toolbar at the top of the QuicKeys Editor window and a drop–down menu will appear. Select User Actions / Menus / Menu Selection and QuicKeys will open an Untitled Shortcut window with a blank Menu option section. If this is your first Pro Tools shortcut, you will need to specify to QuicKeys that this shortcut should only work in Pro Tools (QuicKeys describes this as setting the Scope of the shortcut). Open the drop–down menu called All Applications, below Scopes & Triggers, and select Pro Tools from the list. Now you will see that Pro Tools has been added to the list of 'scopes' in the main QuicKeys Editor window. Next, click on the Hot Key allocation and select your desired shortcut combination (in this example I've used Command + Option + F12).

 You can browse the Pro Tools menu structure from within QuicKeys and choose the item to assign to your key command.Now we can select the menu item we want to activate with this shortcut. You can type in the Menu names, as we did in System Preferences, but QuicKeys also has a clever system where you can show it which menu items you want. Click the Choose Menu button and a Select Menu window will appear, which directs you to select the desired Menu Items from the application menu bar. QuicKeys also resolves the 'two different options with the same name' problem, as you are actually specifying which menu you are calling it from.
 Finally, you give your shortcut a name.The final task is to name the new shortcut so that is no longer an untitled shortcut. Click on the Rename icon in the QuicKeys Editor window toolbar and give the shortcut a relevant name, such as Pro Tools Preferences. You need to remember to Save the shortcut and close the Shortcut editor window before trying to use it in Pro tools. However, you don't need to close the main QuicKeys window or quit QuicKeys to check the shortcut.
Multi–step Example
The real power of applications such as QuicKeys lies in the ability to record macros. These are sequences of actions that you want to be able to trigger from a single key command. As a single example, suppose you find you often want to select the AudioSuite Gain plug–in and get Pro Tools to add 6dB of gain. Doing this the conventional way requires you to select your audio Region, open the plug–in from the AudioSuite menu, input the required amount of gain and click Process. Setting up a macro to do the same saves lots of time if you need to do this often.
In practice, creating such a macro can be a little difficult because the plug–in windows in Pro Tools are not at all compliant and have been left unnamed, making it very difficult for QuicKeys to work with them. However, Pro Tools is obviously not the only uncooperative application in the world, and fortunately QuicKeys has a Record option to cover these sorts of situations.
Once I had created a basic shortcut, which opens the AudioSuite Gain plug–in, I then used the Record More option from the QuicKeys Editor tool bar to 'record' my actions and turn them into QuicKeys instructions. In this case I double–clicked on the Gain dB field to highlight the data and typed 6.0, then Enter and finally clicked the Process button before stopping QuicKeys from recording. After some tidying up this gave me a shortcut (I used Ctrl + G) which not only opens the AudioSuite Gain plug–in window but processes the selected region with 6dB of gain. It would even be possible to add a QuicKeys User Dialog Box to enable you to enter the amount of gain you wanted in dB and then the Shortcut would process the selected Region with that amount, rather than a fixed 6dB, as in this example.
When 'recording' your macro actions you need to be slow and positive and wait for each element to go green; this shows that QuicKeys has acknowledged where you are and what you plan to do.
What about being able to go one stage further and process a selected Region with a preset? With QuicKeys, it is possible to configure a macro to open the correct plug–in (in this example I'm using Waves Renaissance EQ 6) and apply a preset, but it's much harder than you might expect! This all comes back to the fact that neither the plug–in windows nor the drop–down menus within them have names, so the only way left is to 'record' mouse clicks. The problem here is that plug–in windows can open anywhere on the screen, so it is important to make sure that QuicKeys works with positions relative to the plug–in window.
 Some lateral thinking is required when setting up complex macros. For instance, patch selection via the usual drop–down menus doesn't work in QuicKeys, but you can choose presets from the pop–up window.I tried to get QuicKeys to record me selecting the Plug–in menu and the position on the preset drop–down menu, but as the menu was long enough that it had to scroll, there was no way to record how I got to the required preset. However, using a bit of lateral thinking I then tried opening the plug–in patch window and using that to select the correct preset. This was more successful, and Digidesign have given this window a name, which meant that QuicKeys could check for the existence of this window and then log which preset I wanted, albeit by the relative position that I clicked on. Then I could click the Enter key, as this patch window has a normal Close button, and finally QuicKeys was able to log me clicking on the Process button on the plug–in.
Lateral thinking is definitely required when using macro applications such as QuicKeys for anything but the simplest shortcuts, in order to find ways around the limitations imposed by the designers of the application you are trying to control.
You can use macro applications to handle multi–step macros, which will make a single complex task easier, but they are often most useful for creating relatively simple macros that make repetitive tasks much, much quicker. You could, for instance, create a vocal comping macro that takes a highlighted section from a vocal track, cuts it, moves the cursor up a track and pastes the selection onto your 'comp' track. Or say you have a kick-drum track you want to reinforce using samples. First, use Beat Detective to cut up the kick-drum track so there are Region boundaries before each kick. Next, put your replacement kick sample in the clipboard, by copying it. Now create a macro that tabs to the next Region boundary on the original track, moves the cursor up a track (to the track you're using for the replacement sound), pastes the sample, and finally moves the cursor back down to the original track ready for the next sample. By making this series of operations one macro, you can very quickly work through an entire song. Most macro applications will repeat the macro for as long as you hold down the keyboard shortcut, so you could run through a complete song sample replacing in a matter of a few seconds. Now that is useful!
iKey In Brief
Script Software's iKey is similar in concept to QuicKeys, but works differently. I was very quickly able to use it to create menu–based shortcuts, but I got into trouble when trying to implement the 'add 6dBs of gain to Region' macro that I had successfully created with QuicKeys. I could not persuade iKey to see the plug–in window as a separate window in order to give co–ordinates relative to the plug–in window rather than absolute ones (as the plug–in window could be anywhere on the screen). I expected the Focused Window option to refer to the plug–in window, but it didn't: it kept referring to the main Edit window, which was fine as long as nothing moved but things don't work like that. There doesn't seem to be a direct recording option, but there is a comprehensive Simulate Mouse section that you can use to program each step with. The iKey software also works with a range of hardware keypads where you can set up dedicated buttons to do a specific task, so creating a kind of dedicated hardware controller for Pro Tools that is customised to your way of working, like the X–Keys from PI Engineering (www.piengineering.com/xkeys.php).
Shuttle Pro v2
Another possibility is a hardware and software combination from Contour Design. They make a range of devices, but there is one created with audio and video editors in mind that has a jog/shuttle wheel and 13 buttons, called Shuttle Pro (www.contourdesign.com/shuttlepro/). With the included application you can assign the dedicated buttons to handle specific tasks. You could also use it in conjunction with a macro application, so that one of the buttons on the Shuttle Pro runs a macro. It is possible to download a wide variety of profiles for the Shuttle Pro from the Contour web site, including a Pro Tools profile!
In researching for this article I was surprised to find very little guidance on detailed programming of macros, either on the Digidesign User Conference or either of the macro application forums. It is a shame that there isn't an opportunity to share macros, to save folk having to reinvent the wheel many times over. The manufacturers Startly Technologies, Script Software and others cannot be expected to understand how Pro tools responds — or not — and so help from them will always be limited by the lack of knowledge of the particular software users want to control with macros. I searched back over five years on the Digidesign User Conference and I only found one user who had shared his macros — back in 2004!
So in an attempt to rectify this and get the ball rolling, I've exported my Pro Tools QuicKeys shortcuts for everyone to download. These include a number of simple shortcuts and macros that I find useful, as detailed in the 'Keyboard Shortcuts: Some Suggestions' box, and can be downloaded from the SOS web site at www.soundonsound.com/resources/Shortcuts.qkexport. You may have to tweak them for your settings, depending on what version of Pro Tools you are using, as they were created on Pro Tools HD v7.4.
Keyboard Shortcuts: Some Suggestions
| Function | Letter | Possible with System Preferences | Comments |
| New Mono Audio Track | Shift+A | No | |
| New Stereo Audio Track | Shift+Ctrl+A | No | |
| Activate/deactivate track | Shift+Command+Option+A | No | |
| Open Beat Detective | Shift+B | Yes | |
| Colour Palette | Shift+C | Yes | |
| Duplicate AS plug–in | Shift+D | Yes | |
| Delete track | Shift+Ctrl+D | Yes | |
| Delete Fades | Shift+Command+Option+D | Yes | |
| Zoom Toggle | E | N/A | Already a Pro Tools shortcut |
| F | |||
| Gain (AS plug–in) | Shift+G | Yes | |
| Gain (AS plug–in) +6dB | Shift+Ctrl+G | No | |
| Hardware setup window | Shift+H | ||
| Hide Pro Tools | Shift+Ctrl+H | Yes | Normal Mac OS shortcut for Hide is Command + H, which in Pro Tools is already taken for Heal Separation |
| New Mono Instrument Track | Shift+I | No | |
| New Stereo Instrument Track | Shift+Ctrl+I | No | |
| Toggle I/O view in Edit window | Shift+Command+Option+I | Yes | |
| J | |||
| K | |||
| L | |||
| New MIDI track | Shift+M | No | |
| Normalise (AS plug–in) | Shift+N | Yes | |
| Normalise (AS plug–in) –0.1dB | Shift+Ctrl+N | No | |
| Toggle Names in Regions | Shift+Command+Option+N | Yes | |
| Open I/O Setup window | Shift+Ctrl+O | Yes | |
| Toggle Sends A to E view in Edit window | Shift+Command+Option+O | Yes | |
| Pitch (AS plug–in) | Shift+P | Use your preferred pitch correction plug–in | |
| Open Pro Tools Preferences | Shift+Ctrl+P | Yes | |
| Open Macro program from within Pro Tools | Shift+Q | No | Q is for QuicKeys, but you could have one set up for your preferred macro application. Also set the same shortcut in QuicKeys to switch back to Pro Tools |
| Reverse (AS plug–in) | Shift+R | Yes/No | This QuicKeys macro will also process and close the window, which cannot be done with System Preferences |
| Save Session As | Shift+S | Yes | |
| Time Compression & Expansion (AS plug-in) | Shift+T | Yes | |
| Show System Usage | Shift+Command+Option+U | Yes | |
| Vari–Fi (AS plug–in) Down | Shift+V | No | |
| Vari–Fi (AS plug–in) Up | Shift+Ctrl+V | No | |
| Open Workspace Browser | Shift+W | Yes | |
| New Mono Aux Track | Shift+X | No | X for Aux! |
| New Stereo Aux Track | Shift+Ctrl+X | No | X for Aux! |
| Y | |||
| Z | |||
| Switch to Send A in Mix Window | Command+F1 | No | |
| Switch to Send B in Mix Window | Command+F2 | No | |
| Switch to Send C in Mix Window | Command+F3 | No | |
| Switch to Send D in Mix Window | Command+F4 | No | |
| Auto Scroll Off | Shift+F9 | Yes | |
| Auto Scroll On | Shift+F10 | Yes | |
| Continuous Scroll | Shift+F11 | Yes | |
| Scroll past Centre playback head | Shift+F12 | Yes | |
| REQ 6 Mono (PTC Patch) | F13 | No | This QuicKeys macro will need editing to suit whatever patch you want but shows it can be done |


