 Selecting a kick drum track from which to derive a tempo map.
Last month we looked at using Pro Tools' Beat Detective tool for chopping up and quantising drum recordings. Now it's time to look at the other side of the coin: extracting and using the tempo and timing of a recording.
In common with most music recording and sequencing packages, a Pro Tools song contains a tempo map, or bars-and-beats scale that measures musical time from left to right across your display. When you create a new song, the tempo map starts off as a steady 120bpm 4/4 grid. Typically, when starting a song from scratch, you'll manually set these values to what you want, then start recording MIDI and audio. When quantising MIDI, the notes are moved closer to the Bars/Beats grid, and last month we saw how the TDM/HD-only Beat Detective tool is used to quantise audio by moving individual drum hits with respect to the grid. However, Beat Detective can also be used the other way around: for taking existing audio and conforming a song's tempo map to the recorded performance.
There are a number of reasons why you might want to do this. For a start, you might have a multitrack song that's been recorded as audio without any absolute timing reference (maybe from tape), and you want to bring it into Pro Tools. Constructing a Bars/Beats grid around the audio will make it possible to add extra MIDI tracks, and speed up editing and arranging. More subtly, you might wish to take the 'feel' of a good performance, and imprint the timing variations into the tempo map so that other tracks can be quantised with a similar groove. Beat Detective can also achieve this latter result by storing tempo-map snapshots as Groove Templates for later use, leaving the song's grid alone.
Pro Tools' tempo map consists of anchor points marked out along the tempo and meter rulers in Edit Window signifying changes in these parameters. A simple way of creating anchor points (and the only way in non-TDM systems) is to use the Edit Menu's Identify Beat command. This lets you specify the bar number at the current cursor position. Alternatively, you can drag out a selection in the Edit Window, and tell Identify Beat which bars lie at the start and end of this selection. Additionally, you can create a tempo change at the cursor position by clicking the small note icon next to the name of the tempo ruler, and Pro Tools will automatically shift the time scale accordingly. In these ways a tempo map can manually be built up against audio in a track, becoming more accurate as more bar markers are identified. Beat Detective can be used to automate this process, using its transient detection facility to quickly identify where Bar, Beat, and even 'Sub Beat' points lie. And because anchor points can be laid for all of these events throughout a selection, the tempo map is very detailed and accurate, representing even the most subtle timing variations.
Quick Tips
- You can quickly change a track's automation graph view by Control+Command (Mac)/Control+Start (Windows)-clicking on any parameter control.
- It can be pretty tedious having to 'bounce' to free up the DSP/CPU power used by a plug-in on the track, but often you can save the time it takes bussing and re-recording by using Audiosuite. Most plug-ins have an Audiosuite version, and any settings you save in the real-time version can be used in that. So save the settings in the real-time plug-in and open them up in Audiosuite. You can now process much faster than in real time, and without messing about with recording to a track.
Mapping Audio
Last month we used Beat Detective to detect transients in an audio track, and cut the recording into individual chunks. This time we'll be using the same first step, but instead of making cuts at the detected beats, Beat Detective will write anchor markers into the tempo track. The first screen (above) shows some drum tracks that have been imported into a fresh Pro Tools Session. The Bars and Beats ruler bears no relation to the actual music at this point. I've decided to use the second track (the kick) with Beat Detective to align the time scale. I've made a selection that starts exactly where I want a bar to start (in this case bar one), and encompasses a known number of bars of the recording. This contrasts with last month, where the selection was made in Grid mode and was made using the existing bar scale in the session. Next I've opened Beat Detective and selected Bar/Beat Marker Generation mode. I've told Beat Detective how many bars my selection represents by manually entering the start and end bar numbers in the central Selection area of the Beat Detective window. This is crucial, as it gives Pro Tools the ability to work out which beat (or sub-beat) each waveform transient falls on. Finally, I've used the Detection section to analyse the waveform and display the transients and the beats they represent. I've not chosen to detect sub-beats as I'm not that concerned with subtle timing in this case — I just want to get a working grid.
The last step will be to hit Generate, which will re-scale the Bars and Beats ruler, and leave tempo change markers at each 'hit point' calculated from the distance between the beats. In my example I've used an eight-bar section, but I probably want to line up the whole song. If there's a clear rhythmic track like in my example, and a pretty steady tempo, you could analyse much larger selections (you'd have to count the bars, of course). However, in reality you'd probably have to take the song in several sections, using different analysis settings, to get the right results. Sections with definite intentional tempo changes should also be treated separately.
Rewire In Pro Tools 6.1
Digidesign have announced the release of Pro Tools version 6.1, and I'm hoping to get my hands on an update CD to check it out for next month's Notes. This version is a particularly big deal for those using the Windows platform, as you now get all the features that came to OS X with v6.0, including the Groove Template stuff we're looking at this month. The other big story is the inclusion of Rewire — the Propellerhead Software technology that integrates different music applications. Rewire is built into Pro Tools 6.1, and will mean that you can route audio from other Rewire programs (like Reason, and the new beta version of Live) straight into the PT mixer. Rewire also provides MIDI communication, and automatically takes care of sync and bi-directional transport linking between your programs. In terms of Pro Tools keeping up with the competition, this is easily the most important thing that's happened in ages.
Groove Templates
The beat-detection method described above imprints the timing of your recording into the song's time scale. This means that when you quantise MIDI or audio tracks, they will pick up the 'feel' of the track(s) you initially 'Beat Detected'. While this is an effective and practical way of groove quantising, it lacks flexibility. This is where Groove Template Extraction mode comes into play. Just like before, this detects the transients in the waveform and figures out which beats they fall on — but instead of writing markers into the Bars/Beats ruler and warping the song's time scale, this mode simply makes note of how the recording varies from a straight 'no-feel' performance and saves the information as a template. This template can be used as a quantisation map at any other point in the song, regardless of the master tempo map at that point.
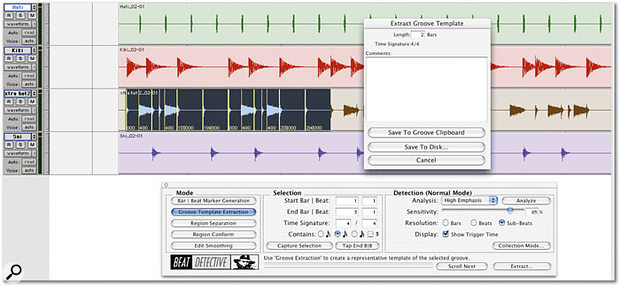
 Extracting a Groove Template from a two-bar piece of recorded audio.
 Applying the extracted groove to a MIDI part.
The second and third screens (above) show an example of extracting and using a Groove Template. Firstly I've selected two bars of a hi-hat track that's been played with some swing that I want to capture. As before, the start and end bars of the selection are entered into the Selection area of Beat Detective. I've increased the Detection settings to include Sub-Beats (essential when extracting a groove) and set the sensitivity to pick up all the hits. At this point Extract brings up the options to save this template to disk (where it can be used later in any song), or just store it temporarily for immediate use. In the last screen there's now a MIDI track with a looping two-bar phrase. I've opened up the Groove Quantise page from the MIDI menu, selected my new template from the pop-up and applied it at 100 percent strength to the MIDI selection. The template is 'looped' throughout the selection, so even though I only extracted two bars of performance data, the whole track is being quantised with the desired feel.
I've used a MIDI example here, but it's also possible to use the new groove template on other audio. The process is the same as that described last month: use Beat Detective to Separate all the individual components of the recording, then Conform the individual regions. The only difference is that instead of using a flat quantise for the Conform you choose your newly created Groove Template.
Next month, we'll look at some examples of tempo changing and loop matching, and check out the Rewire functionality in Pro Tools 6.1.


