Our short series on getting started with Pro Tools continues with some advice on configuring the software and your first Sessions.
Last month, we looked at the hardware choices that are available when buying a Pro Tools system. Having guided you through that particular maze, this month we offer advice on getting the software side of the system up and running smoothly.
Configuring Your Computer
Digidesign make some fairly detailed recommendations about how to set up your Mac or PC to work well with Pro Tools: the Troubleshooting guides on the Digidesign User Conference (http://duc.digidesign.com/showthread.php?t=240754) give detailed guidance about what doesn't play well with Pro Tools on both platforms.
A few of the more obvious recommendations include turning off automatic OS updates. This is because Pro Tools isn't immediately compatible with the latest version of the Mac OS, so don't upgrade your operating system until Digidesign have approved it, if you want a quiet life! On Mac OS X, the default keyboard shortcuts conflict with Pro Tools shortcuts, so go to System Preferences and turn off all the shortcuts in both Dashboard and Exposé. Likewise, in Spotlight you need to turn off the two shortcuts at the bottom of the window, as they conflict with the Record shortcuts in Pro Tools. While in System Preferences, turn off Energy Saver too — Pro Tools really doesn't like the hard drive to spin down whilst it's running!
Authorising Pro Tools
The first time you run Pro Tools LE, you will asked to enter your serial number. You will find this on a piece of Digidesign paperwork, usually inside the front cover of the 'What's new…' documentation, and it will start with 'DIGI0800 xxxxxxx xxxxxxx' where the x's are a series of numbers and lower-case letters.
The Pro Tools LE software won't run without a Digidesign interface plugged into your computer, making the interface effectively a dongle. Pro Tools M‑Powered and HD systems, by contrast, are authorised using an iLok key. Pro Tools M‑Powered and HD systems require an iLok key, as do most third‑party Pro Tools plug‑ins. This is a USB device that holds licences for some Pro Tools software and plug‑ins. It is a multi‑platform device and can hold up to 100 licences. You can have software installed on a number of machines but it will only run on the system you have the iLok plugged into.
Most plug‑in manufacturers use iLok to protect their software from piracy, so although you might not need an iLok to start with, it won't be very long before you do. Once you have any software that uses iLok, you will need to register and open an account with iLok.com. This account keeps track of your licences ('assets'); when you buy plug‑ins on‑line, the suppliers will often deposit your assets into your iLok account and then you transfer them onto your iLok.
Two final tips on iLoks: if you own any Waves plug‑ins, it is best to keep their iLok licences on a separate iLok from other manufacturers, as they work differently when it comes to resolving problems with a broken or lost iLok. Second, make sure your iLok is covered by your insurance, as if it is lost or stolen, you will need to claim on your insurance to replace the lost software. For more details on iLoks and their use, and what to do when things go wrong, take a look at the Pro Tools workshops in the August 2008 (/sos/aug08/articles/pt_0808.htm) and November 2005 (/sos/nov05/articles/ptworkshop.htm) issues of Sound On Sound.
Creating A New Session
Before you can make any music in Pro Tools, you'll need to create a project — or a Session, as they're known. Pro Tools 8 gives you the option to do this at start‑up, or you can choose New Session from the File menu.
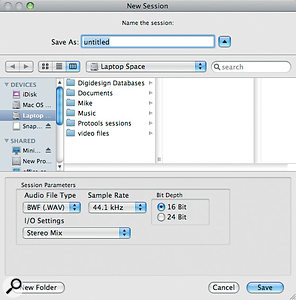
When creating a new Session, especially in version 7 and earlier, it is easy to just give it a name and click the Save button without filling in the Session Parameters. Since these include the location of the Session on disk, this often leads to the cry "I can't find my Session!” If these settings aren't correct, you won't notice until much further down the road, when fixing it could take quite a while, so take my advice and spend a little time here. Happily, in Pro Tools 8 the Session Parameters are harder to miss, as once you have selected New Session from the File menu you are presented with this window. Let's take a look at the various options that are available here.  If you don't pay attention to your Session Parameters, you could be storing up trouble.
- The Audio File Type determines the file type for all audio files created by Pro Tools for this Session. These days I can see little if any justification for using any file type other than BWF (Wave files).
- Moving on to the Sample Rate drop‑down menu, the hardware you have will determine what options you are offered here. The screen shows what you get on an HD rig with a 192 I/O attached. Some LE systems will offer a range of sample rates from 44.1 to 96 kHz, while others are limited to 44.1 or 48 kHz. Don't automatically choose the highest number here! Depending on the rest of your signal chain, you may get higher quality at higher sample rates, but you will produce larger audio files and put more load on the computer. It's also worth bearing in mind the final format you're working towards: for music or radio project, 44.1kHz or one of its multiples is usually best, but if you are working on a TV project, choose 48kHz or one of its multiples.
- Bit Depth, like sample rate is a quality versus performance trade‑off; 24‑bit files can represent a greater dynamic range, but will be 50 percent larger than their 16‑bit counterparts. Again, you pays your money and takes your choice.
- Pro Tools will offer a range of default I/O settings, and you can create your own from the I/O Setup window by selecting 'I/O...' from the Setup menu. For much more detail on configuring your own I/O setups, see the Pro Tools workshop article in the August 2007 issue of SOS (/sos/aug07/articles/ptworkshop_0807.htm).
Once you have made your choices, in Pro Tools 8 you can click OK and the system will offer you the usual navigation box to select where on your system you want to save your project. Remember that although you can save Pro Tools Sessions on your 'C' drive or Macintosh HD drive, it isn't recommended: an external audio drive is the best location for your Session.
The Edit & Mix Windows
Now you have created a new Session, you will get two mostly blank panes, which are the Edit and Mix windows.  An Edit window with two newly created audio tracks. Above these is the Toolbar.These are the two main windows in Pro Tools, but before you can do anything with them, you need to create at least one track; hit Shift+Command+N (Windows: Shift+Ctrl+N) or select New from the Track menu. From the window that appears, you can choose your track types and how many of each you want. This isn't a 'once in a lifetime' choice; you can go back into this option at any point and add more tracks as you need them. Now you will see that the Edit and Mix windows look a little more populated. There are many options as to what is displayed or hidden in each of these windows — visit the View menu to explore the possibilities.
  The same two tracks as they appear in the Pro Tools 8 Mix window.
Across the top of the Edit window is the main toolbar. From left, this contains the Shuffle, Slip, Spot and Grid buttons, which determine how you can move material ('Regions') around in the Edit window. Next are the Zoom settings, then the main Tool selection — more on what each of these does in a minute. After this is the Counter section, which also will display the start, end and duration of any selected Region(s). Then come the Grid and Nudge settings. When Grid edit mode is selected, regions will 'snap' to grid lines, and the grid itself can be set up so that the lines fall on the beat for music, or on the frame boundaries for video post production. The Nudge setting enables you to move Regions forward or back by the set amount displayed in one of the full variety of timeline (ruler) options. Finally comes the Transport section, with the usual transport function buttons, most of which duplicate what's available in the separate Transport window.
Before you actually record anything, you'll need to select the correct input for your track, and click the 'R' button to record‑enable it. It's important to name the tracks (double‑click on the track name to do so), as Pro Tools derives its default file names from the track name, so if you don't name them, you'll end up with hundreds of files called things like 'Audio 1_01‑152'. By default, files that you record are named after the track they're recorded on to.
 Fail to name your tracks, and your Region List could look like this! If you do want to rename a file, select the Grabber tool and double‑click the Region either in the track or in the Region List (the fold‑out panel at the right of the Edit window). Always choose to rename both the region and disk file, so that the file in the Audio Files folder gets renamed as well. This will help you when you want to borrow files from another Session.
Be Smart
I promised to talk more about the Tools pane. You can find details of what each tool does in the Pro Tools documentation, and I recommend that you start to use the Smart Tool straight away. You will find routine editing and manipulating in Pro Tools much easier and quicker.
The Smart Tool is a composite tool that changes its function depending on whereabouts you hover the mouse. To activate the Smart Tool, click on the linking bar above the three main tool buttons in the toolbar, or hit F6 and F7 simultaneously. The Smart Tool becomes the Selector (I‑beam) tool when you hover it above the centre line of the track you are working on. When the cursor is below the centre line of your track, you will see it change to a 'hand' — the Grabber tool. Place the cursor near a Region boundary near the middle of the track and you will see that it changes to the 'sideways staple' Trim tool, allowing you to drag the Region to make it longer or shorter.  The Smart Tool morphs between several different functions depending on where the mouse is in relation to your target Region.


However, we are not done with the Smart Tool yet! If you place the cursor near the beginning or end of a Region and near the top of the track, you will see that it changes to a little box with a diagonal line. Click, hold and drag the mouse, and you will create a fade on the Region. And there is still more: if you place the cursor near a Region boundary between two Regions near the bottom of the track, Pro Tools will offer you the option to create a crossfade: again, click, hold and drag the mouse out to create a crossfade of the desired duration. The shape of all the fades is set by the default fades settings in the Editing tab of the Preferences, which you can get to from either the Setup or the Pro Tools menus in Pro Tools. (In general, the default Preferences settings will enable you to get going with Pro Tools, but sooner or later you'll want to take a detailed look at your Preferences settings, as described in our March 2007 Pro Tools workshop: /sos/mar07/articles/ptworkshop_0307.htm).
Conclusion
Next month, we will continue this series with some more detailed trips into different parts of Pro Tools that you will need to come to terms with as you use Pro Tools more and more. In the meantime, there is loads of advice and a huge amount of support from Digidesign and users like you and me on the Digidesign User Conference (DUC) at http://duc.digidesign.com. There are 'Stickies' at the top of each section of the DUC, which are a mine of information. If you want a quiet, no‑hassle life with Pro Tools, I recommend you read and follow the advice.
Get Your Levels Right
When recording audio into Pro Tools, it is worth taking a little time to make sure you are recording at the optimum level. With digital recording, you need to make sure you leave enough headroom to cover the unexpected peaks, without the overall level being too low. After all, you don't want to be in the horrible position of telling your client that the superb take they have done is in the bin because it is distorted!
This is something that needs to be set on the recording hardware, as Pro Tools software doesn't have any record level controls — the fader only acts as a monitor level control, even though it turns red in record mode. On an HD rig, you will need to adjust the level coming from your mixer or mic preamps, while most LE hardware has record level controls on the interface that you can adjust. You are, ideally, looking to have the Pro Tools meters in the lower part of the yellow section but leaving some headroom, so that the occasional unforeseen peak does not light the Peak lights and distort.


