It's a bumper crop of short tips in this month's guide to all that's good in Pro Tools...
If you're new to Pro Tools, you might be aware that there are tons of little hints and shortcuts that can help you work faster. This month, Pro Tools Notes compiles the most important tips from every area of the program.
Tracks
 Given that a new Pro Tools Session contains absolutely no tracks or mixer channels, it's essential to set up a template project with a ready-made I/O Setup and mixer. There are tips for speeding up the process of building your mixer below. You can turn a saved Pro Tools Session file into a template on the Mac by Ctrl-clicking on the file, choosing Get Info, then ticking the Stationery Pad option. On Windows, right-click the Session file, choose Properties, then click in the Read Only box.
Here are the essential key modifiers for quickly setting up I/O routings across multiple tracks: Holding Alt (Mac and Windows) applies a change to all tracks, whilst holding Alt and Shift applies a change to all selected tracks. Hold Command and Alt (Ctrl+Alt on Windows) to cascade inputs, outputs or send routings. This means that each subsequent track will get an incremental assignment, saving you from setting each track by hand. Finally, adding Shift to this combination will cascade only selected tracks' routing.
Plug-ins can be picked up and moved between insert points and tracks. Holding Alt while doing this copies the plug-in. Copied plug-ins take all their settings with them, potentially saving lots of time when setting up your template mixer. Another way to save time when setting up a mixer is to just set up one track exactly as required and then use the Duplicate Tracks command from the File menu.
Quick Tips
- In Pro Tools 6.4, support for several MIDI control surfaces has temporarily been removed, as they were not tested in time for the release. However, the 'personality' files needed to re-enable them are available to download from www.digidesign.com/download/ controllers/, along with instructions for where to place the files.
- For the first time, a multi-client hardware driver is available for Pro Tools systems on the Mac (OS X). Digidesign Core Audio driver 6.5.1 allows multiple audio applications to use your Digidesign hardware simultaneously. Unfortunately, Pro Tools still hogs the hardware when it's open, so you need to use Rewire to route third-party applications when running Pro Tools.
- If you use the 'R' and 'T' keys for zooming the Edit Window display, you've probably already noticed that holding either key produces a continuous zoom until you let go. Less obvious is that the behaviour of this function is determined by your computer's keyboard settings. The Key Repeat Rate and Repeat Delay settings found in your computer's keyboard control panel directly affect the speed and responsiveness of zooming in Pro Tools.
- Clicking and dragging to the left or right on either of the zoom buttons in the Edit Window smoothly expands and contracts the display width.
- Pro Tools 6+ has a 'wide meters view' where the meters in both the Mix and Edit windows are displayed, well, wider. Hold down all three key modifiers on Mac or Windows keyboards and click the meters to toggle the view mode.
Editing
Everyone uses Pro Tools ' editing functions a bit differently, mainly because there are so many alternative routes to the same ends. However, if you stick to the following method you should achieve fast results. Forget about the Smart Tool (multi-tool), and forget about clicking the on-screen tool icons. Use the function keys F6 to F8 to choose the active tool. Using this method you'll only need the Selector tool ('I' beam) and the Grabber (hand): all other edits can be achieved using a combination of one of these tools and keyboard shortcuts.
The Grabber is used for moving audio and MIDI regions around. Stick to the 'Object' variant of the Grabber, as the 'Time' Grabber is more limited. The Selector can be used for everything else. Trimming is achieved by dropping the cursor at the desired in or out point and using 'A' or 'S' on the keyboard to trim from or to this point. If you need to audition the region before trimming, you don't need the Scrub-trimmer tool. Instead, you can hold down the Ctrl key, which turns the Selector into the Scrub tool, enabling you to find the right spot to drop the cursor.
Adding fades is similar: place the cursor at the point you want the fade to start or end, then use the 'D' key to create a fade-in, or the 'G' key for a fade-out. Crossfades are created by selecting across a region boundary and pressing the 'F' key. The fade will start and end at the extremities of your selection. You won't need the Zoomer tool very often, because you can use the 'R' and 'T' keys for zooming the display in and out horizontally. Zooming centres the screen on the current cursor position. If there is a selection on screen the zoom will centre on the start point of this selection. Use the left and right cursor keys to switch the display between the start and end of the selection.
The number one key command in Pro Tools is Command+'=' (Start+'=') which toggles between the Mixer and the Edit Windows. Even if you have two screens this can be useful, because all the single-key edit commands are suspended if the Edit Window is not the active window.
Recording
Often, it makes sense to stay in Quick Punch mode so that you can drop into Record at any time. An extra bonus is that when in this mode Pro Tools records audio for all record-enabled tracks from the moment you start playback. This means that you can't miss anything, and can trim back the start of any recorded regions.
Loop recording mode (where Pro Tools keeps recording over the area selected in the Edit Window) is particularly useful for recording vocals. Make sure you select a decent amount of time before and/or after the time you want to record, so that the vocalist can get his or her breath between takes. Each take is kept, and appears in the Region List. A fairly well known Pro Tools feature is the Multiple Takes pop-up selector, which allows you quickly to switch between takes recorded in Loop mode. This is accessed by selecting the recorded region, then Command (Ctrl)-clicking it with the Selector tool.
The simplest, but most useful recording practice is to be careful to always name your tracks before recording on them. The name of the track determines the name of any audio recorded on it, which makes other tasks (like finding different takes) much easier.
MIDI/Sequencing
A key difference between Pro Tools and many other sequencer packages is the system for determining the playback area. By default, when you hit Play, Pro Tools will start playing whatever audio or MIDI regions are selected in the tracks in the Edit Windows. Users of MIDI sequencers are more used to setting a loop duration in the time ruler, which is unaffected by what you select in the tracks. You do have the option to work this way too, and you'll probably want to take this when writing tunes in Pro Tools. What you need to do is deselect the Link Edit/Play Selection button that is just below the five small zoom preset buttons in the Edit Window. You can now set your playback loop by dragging out a selection in the time ruler.
 With Link Edit/Play Selection deselected, you can click and drag in the time ruler to select a section of the song to hear.
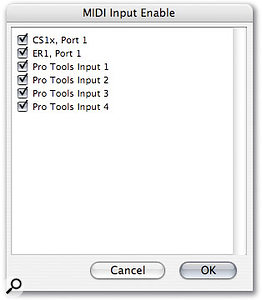
The seemingly innocuous MIDI Input Devices option in the MIDI menu is actually essential. All sources of MIDI must be ticked in the Input Devices box or Pro Tools will ignore MIDI coming from them.
 MIDI input must be enabled for any device you want to use to record MIDI data.When arranging, one of the most useful commands is Command+D (Duplicate), which loops the current selection one time. This command works on time selections, rather than just MIDI or audio objects in the tracks, so when in Grid edit mode, you can easily repeat large sections containing multiple regions.
Large-scale song arrangement can be performed quickly by selecting across all tracks, and making changes while in Shuffle Edit mode. When you cut or paste sections in Shuffle mode, all surrounding regions in the timeline move to make room (for pastes) or fill the gap (for cuts).
Mixing And Automation
If you're not sure what the Edit menu's 'Write Automation to all Enabled Parameters' command does, then you're missing out on some key Pro Tools functionality. This command is used to fix particular mixer setups (often called Snapshots) across areas of your song. If there is a selection in the Edit Window, choosing this command will print your mixer settings on the selected tracks. Different groups of parameters (such as pans, or plug-ins) can be excluded from the snapshot by deselecting them in the Automation Enable window.
Holding Ctrl (Start) while copying or pasting automation will take all automation for all parameters, instead of just the parameter that is being displayed. Command (Start) +Alt+Ctrl-clicking on a plug-in parameter immediately enables it for automation, without having to go through the rigmarole of enabling it in the Auto window. Alt-clicking resets faders, pans and send controls, whilst holding Command (Start) allows for fine adjustments.
Plug-ins are always pre-fader in the signal chain. Be careful not to let the audio clip when going through a plug-in, because you won't be able to stop it with the fader afterwards. If you want a particular plug-in to be active post-fader, you'll need to output your track to an aux track via an internal buss, and put the plug-in on this aux channel.
Files
Double-clicking an audio file from the desktop will automatically import it into the current Pro Tools Session. And when Pro Tools can't find Fade Files while opening a Session, it's perfectly OK to just choose the 'Skip all Fades' option. This doesn't mean that you are losing all your fades in the timeline, it just means that Pro Tools has to recreate the small bits of media it uses to play your fades back.
Maintenance
 The Playback Engine page allows you to specify the hardware buffer size, for optimal latency.If you've had a crash, and Pro Tools repeatedly quits on launch even after a restart, you need to delete Pro Tools ' settings files for a clean start. On the Mac navigate to Users/[your directory]/Library/Preferences and trash DigiSetup, DAE Preferences, and Pro Tools Preferences, then restart. On Windows the Pro Tools preferences are at C:\Documents and Settings\[your directory]\Application Data\Digidesign. The DAE Preferences can be found at C:\Program Files\Digidesign\ DAE\DAE Prefs.
Pro Tools ' performance optimisation settings are found in the Playback Engine page, accessed from the Setups menu. The Hardware Buffer setting offsets audio throughput latency against plug-in processing power. CPU Processing Limit lets you set the maximum amount of resources allocated to audio playback and plug-ins, so that you can hold some in reserve for things like screen redraws. The DAE Buffer is Pro Tools ' disk reading buffer, so a higher setting allows for increased track count, at the expense of reduced playback responsiveness.


