Sonar 4 has excellent loop editing facilities, and here we're going to show you how to use them.
When Sonar first appeared, one of its strengths was the ability to create, edit and save WAV files that could stretch automatically with the project tempo and pitch. Previously, this type of convenience was pretty much the domain of Sony's Acid software (originally introduced by Sonic Foundry). Although DJs and groove-orientated musicians took to this concept initially, over time loops have worked their way into a variety of musical genres, including rock and soundtracks, and while many musicians are content to get their loops from sample libraries, quite a few are creating loops from their own recorded material. For example, if a guitarist plays a great lick, sometimes it's worth repeating as a motif in different parts of the song. Even if you only ever use commercial loops, it's important to know how to edit them because, sadly, a lot of sample CDs are carelessly 'prepped' and do not stretch well over a range of tempos.
Sonar 's Loop Construction window is the centre of activity for editing, creating and saving stretchable loops, which Cakewalk call 'groove clips'. We've covered some aspects of looping before in Sonar Notes, but Sonar 4 added several new capabilities (facilitating some rather nice special effects) to the Loop Construction window, so there's still plenty left to talk about.
To make this article as hands-on as possible, I'd recommend that you download my example loop from the SOS web site (![]() sonarloop.wav). This is a file from my AdrenaLinn Guitars sample CD (but with the groove clip characteristics removed). We'll use it to illustrate the various points in this article.
sonarloop.wav). This is a file from my AdrenaLinn Guitars sample CD (but with the groove clip characteristics removed). We'll use it to illustrate the various points in this article.
Establishing Root Pitch
 Here's the way to make a loop follow any key changes in the Project, as set by the Project pitch value.For melodic loops, enter the original key (the one the loop was recorded at) in the Root Note field. If you want the loop to follow the Project pitch, click on the 'Follow Project Pitch' button. In the case of an unpitched sound (such as a drum loop), you probably want the pitch to stay constant regardless of what's happening in the song, so make sure this option is not enabled.
Groove Clip Background
A Sonar groove clip embeds pitch and tempo information into a standard WAV file's header. This information instructs a compatible host how to play back the file in the face of varying tempo or pitch changes. The more accurate and detailed the pitch/tempo information embedded in the file, the better the stretching quality during playback. Sonar 's groove clips are compatible with the ' Acid ised' file format that was introduced in the Acid loop-based composition program; in fact, you can load ' Acid ised' files into Sonar and Sonar groove clips into Acid. Clicking on Enable Looping turns the clip from a standard WAV file into a Groove Clip.
The underlying technology that allows such advanced loop manipulation is DSP-based. The basic idea is to create 'slices' of audio at transients, add or remove samples to lengthen or shorten the loop respectively, then crossfade these segments to smooth any transitions within the loop. Some wonder how this differs from REX files. Well, in the case of the latter, minimal DSP is applied to the slices, so audio quality is virtually unaltered. However, REX files are best suited to percussive material, as putting slices in the middle of a sustained tone produces an audible discontinuity. With DSP, crossfading within a sustained tone hides these kinds of problems.
There are limits to the stretching abilities of groove clips. If you slow down the loop too much, you'll hear artifacts as the algorithms struggle to insert samples that extend the material. Speeding up is less problematic, as it's easier to remove existing material than create new material that never existed previously. This is why pro loop-library designers often record their loops at slower tempos, if possible.
OK: enough theory. Download the file, and let's create the perfect loop.
Bringing Loops Into Sonar
 A loop has been selected for auditioning. Double-clicking on the loop inserts it into the Clips pane.There are several ways to bring a file or loop into Sonar:
- Drag and drop from the desktop into an audio track. The file starts at the point where you release the mouse button, consistent with any Snap value you've set.
- Drag and drop from the desktop into a blank space in the Tracks pane (Track View). This automatically creates a track, with the file starting at the beginning of the sequence.
- Go File / Import / Audio, then navigate to where the file resides. Double-click on the file and it will be placed in the active track, starting at the Now time.
- Use the Loop Explorer. This is such a useful option that we'll cover it in detail.
The Loop Explorer
The Loop Explorer (View / Loop Explorer, or type Alt+1) provides a way to locate and audition loops, as well as see their properties. If the loop is a groove clip or Acid ised file, it will play back at the Project tempo as you audition it (see screen below).
The Loop Explorer is laid out like Windows Explorer, with a tree structure to the left for navigation. Files are displayed in the right pane, and when you click on a file its properties (sample rate, bit resolution, number of samples, length in samples, original tempo and original key) appear in a line at the bottom of the window. Click this button at any time to hear the loop play.
The toolbar in the upper left has two distinct sections. The three buttons to the left relate to navigation. From left to right, these are:
- Go up one level in the tree.
- Refresh.
- Call up Windows Explorer.
The next three buttons to the right control auditioning. Again from left to right, we have:
- Play: click this to play the selected file.
- Stop: click to stop the selected file from playing.
- Auto: when this is enabled, clicking on a file will cause it to play automatically.
Once playing starts, unless Auto is enabled a file will continue to loop until you select another file or click on Stop. Either of these actions stops the file from playing. If Auto is enabled, the only way to get the Loop Explorer to shut up is to click on Stop. If you double-click on a file in the Loop Explorer, the file will be inserted into the active track, starting at the Now time.
The rightmost toolbar button has a drop-down menu that chooses the display mode for the right pane: you can choose a list format, details, small icons or large icons. Another item, Folders, shows or hides the left pane. To the right of this button is the Preview Buss drop-down menu, which provides a list of available outputs over which you can monitor the loops. Finally, note that there's a splitter bar between the left and right panes, so that you can change the proportion of the window taken up by each pane.
Loop Construction Preparation
Bring the example file W_FUNK04_Bb.WAV into Sonar, and we'll turn it into a groove clip. There are several semi-automatic options for placing slices within a file, but we'll do some of it by hand.
- Double-click on the clip and the Loop Construction window opens up.
- We need to tell Sonar how long the clip is. Click on the Enable Looping button (see screen above), and two main things happen: the number of beats is displayed in the 'Beats In Clip' field (eight, in this case), and a set of markers appears that represents Sonar 's guess as to where the transients should fall. Usually Sonar gets the number of beats right, but you can enter a number in the 'Beats In Clip' field if you need to change the default.
- Set the Project tempo in the main program to 100bpm (the same as the original loop tempo) and click on the Preview Loop button to hear what we have so far. As with the Loop Explorer, there's a drop-down menu for choosing the Preview Buss.
- While you're at it, click on the button to the immediate right of the Preview Loop button to enable Slice Auto-Preview. This is a new feature in Sonar 4 that lets you hear a slice if you click on it in the main waveform view. The next button to the right, if enabled, causes the selected slice to loop; leave it off for now.
Tweaking The Slices
When you play the clip, you'll hear that it contains several guitar chords. What we'll do is put a slice at the start of each chord's attack, so each chord lives in its own slice. Sonar detects more transients when you increase the Transient Detection sensitivity.
A drop-down 'Slices' menu puts slice markers at specific intervals. This can save time if you're slicing something like a drum-machine pattern with a regular 16th-note hi-hat pattern; set the slices to 16th notes and you're probably done. In fact, if you set the Trans Detect percentage value to '0', slices show up only at the interval you specified. I'm not going to make things that simple, because this is a guitar part played by a human! So we're going to add slices manually.
- Select 'No Slicing' from the drop-down menu (see screen above). Note that Sonar has detected three transients — the most obvious transients in the file. These are at beats three, four and five.
- Highlight the Trans Detect (%) parameter, enter 100, then hit Return. This makes Sonar more sensitive to transients, and several more slice markers show up at these transients (see top-right screen).
- Now click in each slice in the waveform. Sonar has done a pretty good job of isolating the chords, except for the slice that falls around beat six. We need to add more markers for these chords.
 Double-click in the markers row to add another slice marker.
 - Use the horizontal zoom-in button (+) so that this slice fills most of the Loop Construction window. Look closely at the waveform. You can pick out what appears to be a fairly significant 'blob' of audio just before beat six. To add a slice at this transient, double-click in the row that has the other marker triangles, right above where you want the slice. A blue triangle appears (blue indicates a marker that's manually created, as opposed to the red, automatically-generated markers — see middle screen above).
- Play the slice to the right of the marker you just added. We still need two more markers to mark the two chords that occur in this slice. Another slice is needed almost exactly on beat two; zooming right in often makes it easier to see the blob of audio where a transient occurs. To fine-tune a marker's placement, click on its triangle and drag to the desired position.
 The transient at beat two is difficult to see unless you zoom right in. When you locate it, add another slice marker.
 - Continue listening to slices and tweaking markers until each chord has its own slice. Set each marker as close as possible to any attack transient. For example, if you zoom right in on the marker that was generated around beat three, it hits a bit early. Drag this marker to the right so that it sits right at the beginning of the transient that hits on beat three. The triangle turns blue to show that it has been manually adjusted.
- Now you should have something that looks like the screen above. Change the Project tempo to 150bpm and preview the loop. It should have the same rhythm as the original, only faster. Now change the Project tempo to 70bpm, then preview the loop. This makes the DSP work a lot harder, and also reveals a problem: The little decays at the ends of the chords that start at beats two, three and four are being stretched so that they last longer, and they therefore sound unnatural. To solve this problem, add another slice marker just before each of the little decays (see screen below). Now play the file at 70bpm. It should sound much better.


Another problem with slowing down tempo is that sustained sections can sound uneven, because a fairly long section is being stretched. We can remedy this problem by adding another slice marker in the middle of long sections. For example, when you preview the file at 70bpm, note that the first slice suffers from a little 'wavering' Add a marker in the middle of this slice and the wavering goes away. Try the same technique with the slice that begins at beat five as well. Note the three slice markers added just before each chord's final decay. These help create a more realistic sound when you slow down the tempo.You can tweak groove clips forever, but this one works pretty well from about 80bpm to 180bpm. More tweaking won't improve it that much.
Let's Go Nuts
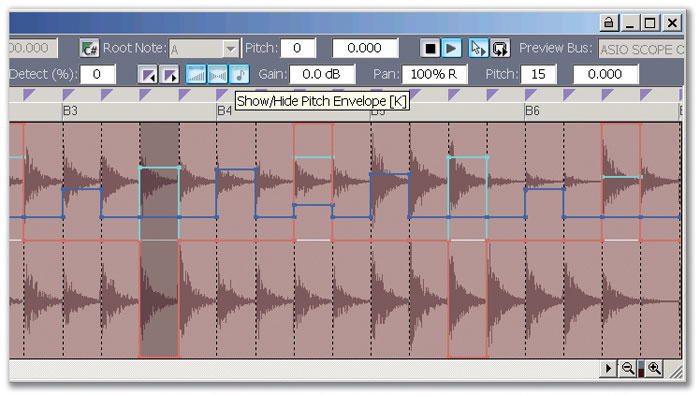
Sonar 4 added the option to change pitch, pan and gain for each slice. This works in a very similay way to standard envelopes, although changes are quantised to each slice, and you can't change values within a slice. In other words, an individual slice can't fade out or pan from left to right — it will be set at a constant level or constant pan position.
Edits can be done graphically or by entering numbers in fields. For graphic editing there are three toolbar buttons, each of which shows/hides an envelope (orange for pan, light blue for pitch and dark blue for gain). Drag the envelope within the slice to edit it (see the screen on the first page of this article). The only significant difference between graphic and numerical editing is that when you're working graphically you can change pitch only in semitone steps. When you're doing so numerically there's a field for semitones and another field for fine-tuning. There are some limitations — gain changes might produce pops if there are significant level shifts, for example — but being able to change these parameters offers tremendous creative latitude.
Save It!
I'm sure you don't want to do all this tweaking again, so now you should save the file. Either of these options will save it as an Acid ised WAV file: either drag the loop from the Clips pane to your desktop (or to a folder on your desktop), or click on the floppy disk ('Save Loop to WAV File') button. Happy looping!

