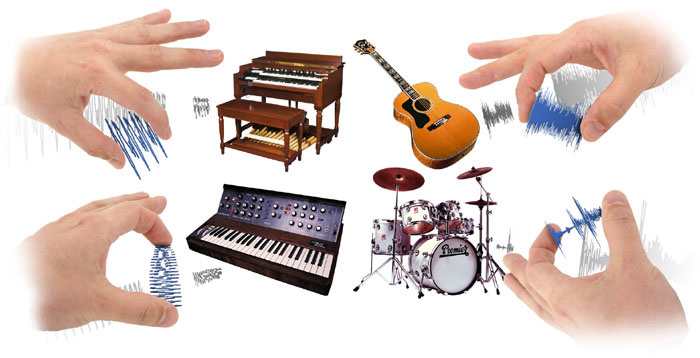
Nearly all modern samplers have powerful synth engines concealed inside them — and sometimes they're so well hidden that their users are unaware of their existence. But then why would you want a synth in your sampler? Let's find out...
Last month, we concluded by looking at the process of keygrouping and saw how easy it is to assign pitched instrument samples across a range of notes in a modern sampler, so that they can be correctly played by a MIDI controller sending the right trigger notes. Once you've got the hang of that, it's the same procedure, whether you have two samples or 20, whether you're mapping one sample across several notes or mapping one sample to each key.
However, mapping drum and percussion samples is slightly different. As mentioned last month, you're unlikely to want to pitch, say, a cabasa sound over the whole range of a keyboard to the exclusion of anything else. It's much more likely that you'll want different drum and percussion sounds on each key, so that you can play in rhythm parts comprising multiple drum sounds in one pass.
It's easy to achieve this kind of mapping, especially on modern samplers which allow you to drag and drop samples onto representations of a keyboard to assign them — you simply drag (say) your bass-drum sample onto C1, your snare onto D1, rimshot onto E1, floor tom onto F1, low tom onto G1, and so on. However, depending on how your drum map is set up, you may find that some of your drum sounds play back very slowly after you've assigned your sounds in this way, while others sound about right and still others seem ridiculously sped up. This can happen because drum sounds are often nominally assigned a root-note 'pitch' of C3 (Middle 'C') when they are sampled. If you place, for example, a crash cymbal on C1 which has nominally been assigned a pitch of C3, and if your sampler still thinks it's dealing with pitched instrument samples, it will slow down the playback of the cymbal sample in an effort to create a low 'C' note from what it thinks is a sample played at middle 'C'. Result — a seriously slow-sounding cymbal!
Fortunately, there's a way around this. Most samplers have a function called something like 'Keyboard Tracking' in their sample-mapping screens (as always, the exact name varies from sampler to sampler), and deactivating this in mappings designed to deal with multiple drum samples should fix the problem. Samples are then played back at the same speed irrespective of where they are placed on the keyboard, which is perfect for drum and percussion mapping. Some samplers even have dedicated drum-mapping options which don't even offer the option of pitching the samples across the keyboard.
 The author's own drum map, showing the different drum samples assigned to different MIDI notes across part of a keyboard.
You are of course free to assign different drums to any key of your choice, but you may find it helps you to standardise, so that bass drums, for example, are always found on the same key (or set of keys), snares on another, and so on. This way, you're not always trying to remember what you've assigned where! Taking this idea a stage further, you can assign your drums according to the General MIDI drum map convention, which rigidly ties certain sounds to certain keys. This could be useful if you're in the habit of sharing sampled drum kits with other players. Having said that, you may prefer to 'roll your own' — not all drum kits fall comfortably within the GM specification, which requires six toms and seven cymbals, not to mention shedloads of esoteric percussion!
Lastly, it might be worth your while to make yourself a 'template' Keymap for drums that you can use over and over again, especially if you tend to make up a lot of drum kits. On my Akai S5000, I simply load a drum Program without the samples and I can then replace those empty Keygroups with my new samples. If your sampler also allows this, it can save an enormous amount of time. My own drum-mapping template is shown on the right, by way of example.
A Little History: Samplers Or Synths?
Samplers didn't always contain comprehensive synth engines for sound processing, as they do today — but then when the Fairlight was launched in the late 1970s, there was no such thing as a sample-and-synthesis synth engine! The original Fairlight had no synthesis facilities to speak of for processing samples (although it was a fairly powerul digital synth in its own right) and it had no filters.
The first company to truly blur the distinction between synth and sampler was Emu, who rapidly pulled ahead of the competition in terms of the sample-processing facilities their products offered. The first Emu sampler, 1980's Emulator, was fairly basic, but more adventurous players, such as Michael Boddicker (session keyboard player and programmer for Michael Jackson, amongst others) had their Emulators retrofitted with analogue filters so that samples could be used like oscillator waveforms in a synth. Emu were quick to pick up on this, and their next model, the Emulator 2 (or EII) came with a fairly comprehensive array of synth functions built in, including filters, envelopes and LFOs. It wasn't sophisticated compared to today's offerings (and you certainly paid for it too... the EII cost around £5000 when it was released), but it was quite something in the early 1980s. Uniquely amongst samplers, the EII's synth-like features were all analogue, reflecting Emu's history up to that point — until 1980 they had been predominantly a manufacturer of modular and semi-modular analogue synths.

 featured a comprehensive sample-processing engine like that used in their sample-based synths. Later, Emu added even more comprehensive filtering to their range of samplers from the Emulator IV (top) onwards, based on the Z-plane filters introduced in their 1993 Morpheus synth. These days, though, such extensive facilities are commonplace on software samplers like Native Instruments' Kontakt 2.") Roland's S-series samplers (of which the S760 is shown above) featured a comprehensive sample-processing engine like that used in their sample-based synths. Later, Emu added even more comprehensive filtering to their range of samplers from the Emulator IV (top) onwards, based on the Z-plane filters introduced in their 1993 Morpheus synth. These days, though, such extensive facilities are commonplace on software samplers like Native Instruments' Kontakt 2.By 1986, Roland had entered the sampler market, and their samplers rapidly began to offer a full range of synth-like editing facilities. After the release of their D50 sample-based synth workstation in 1987, the distinction between synth and sampler became very hazy — on the one hand, you had Roland's D-series workstation synths, based around samples held in ROM which could be put through a complete synth engine, and on the other, you had Roland's S-series samplers, which allowed you to put samples of your choice held in RAM through a complete synth engine! The Roland S-series offered low-pass, band-pass and high-pass filters. Roland weren't alone — at around the same time, other manufacturers, such as Ensoniq and Yamaha, were making similarly well-equipped samplers. Ensoniq, for example, included a flexible (though non-resonant) filter section in their Mirage (1985).
Roland's S-series samplers (of which the S760 is shown above) featured a comprehensive sample-processing engine like that used in their sample-based synths. Later, Emu added even more comprehensive filtering to their range of samplers from the Emulator IV (top) onwards, based on the Z-plane filters introduced in their 1993 Morpheus synth. These days, though, such extensive facilities are commonplace on software samplers like Native Instruments' Kontakt 2.By 1986, Roland had entered the sampler market, and their samplers rapidly began to offer a full range of synth-like editing facilities. After the release of their D50 sample-based synth workstation in 1987, the distinction between synth and sampler became very hazy — on the one hand, you had Roland's D-series workstation synths, based around samples held in ROM which could be put through a complete synth engine, and on the other, you had Roland's S-series samplers, which allowed you to put samples of your choice held in RAM through a complete synth engine! The Roland S-series offered low-pass, band-pass and high-pass filters. Roland weren't alone — at around the same time, other manufacturers, such as Ensoniq and Yamaha, were making similarly well-equipped samplers. Ensoniq, for example, included a flexible (though non-resonant) filter section in their Mirage (1985).Curiously, given their later dominance of the hardware sampler market, Akai's offerings during this period were crude in comparison. Their first sampler, 1985's S612, didn't have any filters, and their later S900 (1986) was also somewhat lacking in that department. Whilst the S900 did have filters, they were simply static affairs used as noise-reduction devices. Towards the end of the '80s, as sampling became widely affordable, Akai finally began to offer dynamic (sweepable) filters in their S1000 (1988), but these too were limited; they had no resonance and they were only controllable from an ADSR (you couldn't even assign LFOs to them). It wasn't until Akai released the S3000 in 1993 that we saw resonance on an Akai sampler's low-pass filter. But a significant addition on the S3000 was APM or 'Assignable Program Modulation' where any controller could be assigned to (almost) any destination, allowing LFOs and envelopes to sweep filters and modulate pan positions. LFOs could control other LFOs (as could envelopes)... and so on. This brought many concepts hitherto only seen on modular synthesizers to the digital sampler and so allowed you to gain a lot more mileage out of a simple sample than ever before. In fact, by just using the stock sine, square, pulse and sawtooth waveform samples that were permanantly held in in the S3000's memory, you could coax some decent analogue-style synth sounds out of an Akai S3000 without ever going near its sampling facilities!
As explained in the first part of this series, by the early 1990s, most other players had dropped out of the hardware sampler market, leaving Akai and Emu to battle it out with each other. By 1994 Emu brought their offerings up to snuff by incorporating the many different digital 'Z-plane' filter types (introduced in their 1993 Morpheus synth) into the Emulator series, starting with the Emulator IV and its many derivatives. Akai responded by introducing a second multi-mode filter board for the S3000 (and derivatives) and then their S5000 and S6000, released in 1999, offered true multi-mode filters.
The arrival of software samplers has taken sample post-processing to another level, affording samplists access to even more filter types, multi-stage envelopes (with as many as 32 stages in some cases!), advanced LFO options, insert effects, global effects, and so on. These features are far in excess of those offered by most hardware synths, let alone hardware samplers. It's another case of technological developments abolishing the former distinctions between different types of equipment. Just as a modern telephone is no longer just a telephone, but can also increasingly be regarded as a personal music player, a personal organiser, or a camera, so it's pointless in many ways to talk of distinctions between software synths and samplers in an age when modern so-called software 'samplers' are, if anything, more synth-like than many hardware synths of former times!
Hidden Synths
I've hinted several times during this series at the creative potential for sample manipulation that's offered as standard in all modern samplers, hardware or software. It's often forgotten that modern samplers are nearly always also powerful synths, perhaps because the earliest samplers didn't offer these kinds of facilities (see the box overleaf). Too often, the synth engine in samplers is neglected by users, or only made use of by factory patches or commercial sample libraries. This month, I hope to get you all using it more often. In the third instalment of this series, and last month, I gave a few examples of how you could save on sample memory by taking fewer (or shorter) instrument samples and making up the rest of the notes or note set by employing your sampler's onboard envelopes, modulation routings, and filters. It's now time to look at these features in more detail.
When synthesizers were first invented, they existed in the form of a series of modules that were interconnected in different ways (usually by patch cords) to create different sounds — hence the term 'modular synth'. Typically, there were sound sources, sound processors and controllers. The sound sources were typically oscillators — devices that produce a periodic (and hence pitched) waveform (sound). The sound processors were typically filters (devices for removing or enhancing part of the sound source and hence adjusting its basic tone) and amplifiers (devices that regulated or set the amplitude or level of either the oscillators and/or filter, or both). The controllers were just that: devices that could control the sound source(s), the filter(s) and/or the amplifier(s). Typically, these would be things like the keyboard (for controlling the pitch of the sound source), envelopes (for 'opening' and 'closing' the filter and amplifier in a repeatable, controllable way) and Low Frequency Oscillators (or LFOs — for altering pitch, tone, and/or amplitude in a repeatable way).
A modern sampler is very similar in structure, although of course the 'modules' are now pieces of software in an operating system, and the patch cords are modulation routings. The only major difference is that in a sampler, there are no oscillators — instead, the sound sources are your samples, which can be of any sound you like, synthetic or otherwise. I would argue that a sampler is the ultimate synthesizer for this very reason, because instead of relying on a restricted set of predefined oscillator waveforms determined by the manufacturer, you can take and process any sound to use as the basis of your sonic creation! This would have been the stuff of dreams, fantasies and science fiction when the early sonic pioneers embarked upon their quest for new musical forms, sounds and textures. Today, of course, we all take it for granted!
As we have seen, the synth facilities in modern samplers can be used to save sample RAM, and they can also be used creatively. At its simplest level, you might do this by mapping the velocity with which the sample is triggered to control the playback level or amplitude of the sample, rather than taking many RAM-hungry samples at different loudnesses. But as we saw in the third instalment of this series (see SOS October 2005) acoustic sounds can exhibit many other characteristics, and these can be recreated in a fairly natural-sounding way using your sampler's filters and envelopes, rather than by taking lots of memory-hungry samples.
It's outside the scope of this series to explain the component parts of a synth in great detail — SOS has done it many times, perhaps most comprehensively in our long-running series Synth Secrets, which appeared for over five years (links to all the instalments can be found on-line at www.soundonsound.com/sos/allsynthsecrets.htm). Nevertheless, it's worth briefly recapping a couple of bits of synth architecture that are particularly relevant to manipulating samples.
Envelopes
Every sound has an 'envelope', or a way of representing what happens to it over time. A piano starts instantly and dies away slowly over time (as do many other acoustic instruments). A violin starts sounding slowly but sustains at a (relatively) constant level as the intrument is bowed, and then the sound dies away quite quickly after the bowing stops. A woodwind instrument will typically have an initial burst of sound, but will sustain at a relatively constant level for as long as the player can blow and, once the player has run out of puff, will stop quite quickly. Brass instruments follow a similar pattern. These characteristics are known as the sound's 'envelope' and every sampler offers some form of envelope shaper to reproduce these characteristics electronically. Nearly all synths and samplers offer envelopes of the simple ADSR type (Attack, Decay, Sustain, Release), which was created as a simple way to mimic the many real-life sounds which start quietly and build to a crescendo (the Attack phase of the sound), then Decay to a constant level (the Sustain portion), before dying away gradually when they stop sounding (the Release phase). However, more modern synths and software samplers sometimes offer more complex enveloping facilities, usually based on multiple levels, with different rate parameters governing the speed at which the sound passes from level to level.
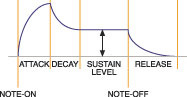
, and (below) an example of a more modern multi-stage envelope based on rates and levels (here, four rates and four levels). The second of these is more useful, for example, when trying to emulate the complex envelope characteristics of instruments that cannot be replicated with the simple ADSR (like sforzando brass), but they can be trickier to set up.") A traditional standard Attack/Decay/Sustain/Release envelope (left), and (below) an example of a more modern multi-stage envelope based on rates and levels (here, four rates and four levels). The second of these is more useful, for example, when trying to emulate the complex envelope characteristics of instruments that cannot be replicated with the simple ADSR (like sforzando brass), but they can be trickier to set up.
A traditional standard Attack/Decay/Sustain/Release envelope (left), and (below) an example of a more modern multi-stage envelope based on rates and levels (here, four rates and four levels). The second of these is more useful, for example, when trying to emulate the complex envelope characteristics of instruments that cannot be replicated with the simple ADSR (like sforzando brass), but they can be trickier to set up.Envelopes are extremely flexible tools for sound-shaping, as they can not only be applied to loudness or level, but to pretty much any synth engine parameter. For example, when applied to pitch, they can create regular, controllable rises and falls in pitch, and when applied to pan parameters, they can move sounds around the stereo spectrum. They can also cause the brightness of the sound to grow or diminish if they are applied to the synth engine's filters. Which brings me neatly to...
Filters
As their name suggests, filters remove certain components in the source sound whilst allowing others to pass through unaffected. Low-pass filters remove high-frequency content whilst allowing lower-frequency components to pass through unaffected. High-pass filters do the opposite. Band-pass filters, logically enough, allow a band of frequencies to pass through unaffected whilst removing frequency components either side of that band, and the opposite of this is the band-reject filter, also known as a notch filter.
Filters can also be severe or more forgiving in what they remove from a sound. This is determined by the steepness of the filter's 'roll-off', which is measured by the amount of sound attenuated by the filter over the course of an octave's worth of change in frequencies. The steeper the roll-off, the more sound is attenuated in the course of one octave, and the more severe the effect of the filter. You often encounter six dB-per-octave, 12dB-per-octave, 18dB-per-octave, 24dB-per-octave, and even 36dB-per-octave types. For ease of writing, these types are often known as one-, two-, three-, four- and six-pole filters respectively.
Many, if not most, samplers (hard or soft) now feature these different filter types as standard, allowing a great deal of tonal variation and sonic mangling to occur. Most also offer resonance on their filters, and as on synths with these filters, these enable you to emphasise certain frequencies while filtering others, albeit often at the expense of making the sound somewhat synthetic after it has passed through the filter.
 Different filter roll-off characteristics.
When processing samples of 'real' instruments, the low-pass filter is usually the most useful, as it mimics what happens in nature. High-frequency content tends to decay as a sound gets quieter, and soft sounds tend to have less high-frequency content. Low-pass filters are therefore ideal to replicate the natural effects of decay over time, or of playing an instrument softly.
Amplifiers
These are relatively innocuous little devices whose sole job is to regulate the level of the sound that plays back. They are usually associated with an envelope that allows you to control how the amplifier opens and closes over the course of a note and again, this can be very useful for artifically restoring the natural 'shape' of an instrument (especially if it has been looped, as discussed last month). However, by controlling an amplifier with trigger velocity, you can simulate the natural response of most instruments that are quieter when played softly, and louder when played hard.
LFOs
LFO stands for Low-frequency Oscillator, and, as their name suggests, these generate low-frequency, periodic waveforms. These waveforms can then be used to control such parameters as pitch, tone, level and panning. Like envelopes, LFOs can usually be assigned to most synth parameters, and are very flexible tools for altering samples. When assigned to pitch, they cause repeated rises and falls in pitch, or vibrato, and when applied to level, they allow you to create tremolo effects. You can also use them to make sounds gradually brighter and duller by applying them to the filter. Many LFOs offer the facility to be synchronised to incoming MIDI clock, so that their effects run in time with the tempo of your track.
Putting It All Together
You may well be thinking that you don't need these synth-like facilities, because you bought your sampler to play 'acoustic' sounds such as piano, strings, guitar, and so on. But think again. Even with such sounds, you can creatively exploit these parts of your sampler's sound engine to bring life to your samples. Here are a few examples...
You sample a piano at full whack at every minor third across its range, and map the samples out accordingly. If you apply trigger velocity to amplitude, you afford yourself some degree of control over dynamics, but you will only be hearing a bright sample of a piano played at full tilt at different loudnesses. By backing off the low-pass filter cutoff a little and assigning trigger velocity to control tone as well, you can create softer-sounding versions when playing more softly — and all from the same sample. This trick could be applied to all manner of sounds, including guitar, basses, or drums.
If a decaying sound you've sampled descends into noise, try applying an envelope (either to sample level and/or the filter) to remove this, setting decay and release times to match the sound's natural decay/release.
If you're sampling a violin or string section, you could try recording them completely without vibrato and with the player(s) bowing at full tilt. You then have samples that can be used to generate string sounds with and without vibrato; you can add the vibrato yourself artificially, using an LFO assigned to modulate pitch. Purists will argue that this doesn't create quite the same effect as 'real' vibrato, but applied carefully it can be convincing enough. Recording without vibrato will also make the samples easier to loop.
As I mentioned in the third part of this series, when discussing synth sampling, the trick here is to try to take samples of real instruments with as few 'performance characteristics' as possible. The effect of the latter can often be added to a 'vanilla' sample of the instrument later, by using the sampler's synth engine. Not only will sampling a violin with real vibrato be harder to loop, it will also require many more samples to be taken, because if you repitch a sample with vibrato, the vibrato rate will increase as you play further up the keyboard, and decrease as you play further down. If, on the other hand, you add the vibrato in your sampler, you can use the same basic sample for many pitches, and determine the vibrato rate yourself completely independently of the sample's pitch. Instead of 10 long multisamples, you might be able to get away with just four or five (or fewer) shorter samples, thus saving memory, enabling faster load/save times, economising on storage and/or potentially reducing CPU strain — and that has to be worth thinking about.
Next Month
In Part 6, we will look at some of the more subtle details of your sampler's synth engine, and how you can make use of it to achieve subtler effects, such as minimising abrupt tonal changes between different Keygroups. Until then...