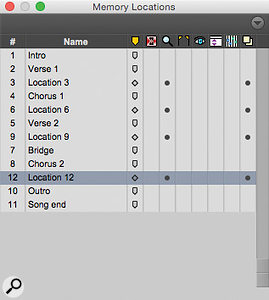
Memory Locations in Pro Tools don’t have to be tied to the timeline — they can also store and recall a host of session parameters.
In last month’s Pro Tools workshop we started to look at Markers, the Marker Ruler and Memory Locations. As we saw, these are tools which can help you set up an order or structure to your project, and to this end, we explained how to name, number and use Memory Locations, and how to colour–code the Marker Ruler. This month we look at some more advanced applications for Memory Locations, including a trick that lets us renumber them so they are consecutively numbered, and how to use them to access and recall features that are not time–specific.
Renumbering Memory Locations
While working on a song or project, you tend to add Markers as you need them, and if you’re moving back and forth between different sections, you can easily end up in a situation where the order of the Markers along the timeline is not the same as their numeric order. By the time you are ready to mix, the start of the song could be Marker 13, the first chorus Marker 3, the kazoo solo is Marker 25, and so on. Pro Tools doesn’t offer an easy way of renumbering them, but fortunately, there is a neat trick you can use:
- For safety’s sake, save your song before you start.
- If your session doesn’t contain at least one MIDI track, create one; it need not contain any data.
- Select File / Export / MIDI, make sure MIDI file format is set to ‘0 (Single Track)’, name the file ‘Markers’ and save.
- Make sure the Markers are visible on the ruler, select all of them by double–clicking on the Marker Ruler, and hit the Delete key to wipe them. (This will delete only the Song Position Markers, leaving any non–time–specific Memory Locations intact.)
- Select File / Import / MIDI and choose the MIDI file you saved earlier.
- Make sure that the destination in the MIDI Import options dialogue is set to ‘Clip List’, otherwise you will reimport all of your MIDI info into new tracks in the session. Hey presto: all of your markers will be imported back into the session and sequentially renumbered!
One limitation with this approach is that the reimported Markers will all be set to Bar|Beat even if they were originally Absolute, so you will need to double–click each one and reset it back to Absolute, but this still takes less time than renumbering all Markers by hand.
Memory Without Location
As we saw last month, there are three types of Memory Location: Marker, Selection and None. They can store and recall any combination of the parameters listed in the Edit Memory Locations dialogue under General Properties, and with up to 999 Memory Locations available, they can be used for saving settings for all sorts of things including track heights, track show/hide combinations and zoom settings.
 Before and after: by saving a Type 0 MIDI file, wiping the Markers from your session and then re–loading the MIDI file, your Markers are magically reordered!
From this Location dialogue, you can change the type of a Memory Location to None, and you can change its number, either to reorder Memory Locations manually or to overwrite another Memory Location. You can also enter a descriptive name for each Memory Location. Naming Memory Locations is just as important as naming tracks and clips: it makes it so much easier to find things quickly.
Ticking the Zoom Settings box means that selecting that Memory Location will recall the current horizontal, audio and MIDI zoom values for audio, MIDI and instrument tracks. This is something you’d normally achieve using the five dedicated zoom settings buttons on the Edit window and their associated shortcuts, but if you want to set the zoom settings in conjunction with other parameters, this is the way to do it. You can use this option along with the Track Heights setting to store and recall Edit window configurations that are suited for particular tasks, such as editing down to the sample level or trimming MIDI notes.
The Pre/Post Roll Times tickbox lets Memory Locations recall pre– and post–roll times, but not whether they are enabled. Note that when you use this option with a Selection Memory Location you can store and recall record and play ranges along with pre– and post–roll times. For example, most of the time I want a two–bar pre–roll for a drop–in, but on occasions this isn’t long enough, so having a Memory Location that stores a four–bar pre–roll makes it quick and easy to change. Alternatively, when working in post–production, a three–second pre–roll is often sufficient to judge if an edit will work, but sometimes you need a longer run–up. Having a ‘timeless’ Memory Location that stores a 10–second pre–roll makes this painless.
Show & Tell
The Track Show/Hide option is really useful when editing for displaying different groups of tracks. For instance, you could create ‘timeless’ Memory Locations for different parts of the band, so you can have one that shows only the drums, another the guitars, another the vocals and so on. In a post–production project, likewise, you could separately recall settings that show only dialogue, Foley, atmos tracks, spot effects and music. Then it is very easy to focus on the appropriate tracks for the editing job you’re currently working on.
With Group Enables ticked, a Memory Location will recall the current enable/disable status of each Edit and Mix Group. This option is helpful in recalling groups for particular edit and mixing operations, such as muting all drum tracks or fading a stereo pair. If you use this a lot, it’s worth settling on a series of standard Memory Location numbers for specific functions, such as ‘123’ to select the All group.
Finally, it’s possible for a Memory Location to recall a specific Window Configuration. This option is helpful in recalling specific Window Configurations alongside other settings to facilitate editing or mixing tasks. For instance, using this in conjunction with Track Show/Hide settings will help you manage complex sessions much more easily — when you are working on the drums, a single Memory Location can recall a Show/Hide setting to display just the drums and a Window Configuration that displays just the plug–ins that relate to the drums, laid out on your screen in a consistent manner. To learn more about Window Configurations, check out the Pro Tools workshop in the December 2008 issue of Sound On Sound.
Memory Location 999
I sometimes need to temporarily mark a certain location on my timeline and be able to jump back to it very quickly, to spot a sound for example. Recently I picked up a tip that is brilliant for this and that is to use Memory Location 999, which is actually very quick to set and recall. Just three adjacent keys on the numeric keypad do the trick and make it very easy : zero, dot and enter.
- Set Location 999 with the following sequence : dot, zero and enter twice.
- Recall Location 999 with the following sequence : dot, zero, dot.
This cleverly exploits the fact that Memory Location zero is the same as Memory Location 999.
Memory Locations & Global Edits
 When setting up a complex global edit, one handy approach is to identify the in and out points using Markers. By selecting the first, then holding down Shift and recalling the second, you can then select all the material to be cut. Quite often I find myself wanting to make edits that cut out a lot of material across the entire project, yet need to be fine–tuned very accurately.
To do this, I use Memory Location 1 to mark the ‘in’ point and Location 2 for the ‘out’. Once I have positioned these Markers, I’ll recall the first, then hold down the Shift key and recall the second. Pro Tools will highlight everything between the two Markers. Engage Shuffle edit mode, hit the backspace key, and the edit is made.


