, all the vocals were recorded in an adjacent DIY vocal booth (above). As a result, no ambient sound from the singer spilled onto any of the other mics in the setup, so the voice, therefore, didn’t blend naturally with the rest of the band in the mix.") Although the band normally played together in the main recording room (below), all the vocals were recorded in an adjacent DIY vocal booth (above). As a result, no ambient sound from the singer spilled onto any of the other mics in the setup, so the voice, therefore, didn’t blend naturally with the rest of the band in the mix.Photo: Daniel Plappert
Although the band normally played together in the main recording room (below), all the vocals were recorded in an adjacent DIY vocal booth (above). As a result, no ambient sound from the singer spilled onto any of the other mics in the setup, so the voice, therefore, didn’t blend naturally with the rest of the band in the mix.Photo: Daniel Plappert
Spektakulatius: Our engineer picks up where last month’s Session Notes recording feature left off, with details of how he approached the mixing side of things on this ambitious project...
Last month, I explained how I managed a high–speed on–location tracking session for the band Spektakulatius (www.spektakulatius.de), recording 28 songs spanning various musical styles in less than five days. My brief had been to record multitracks that would require as little mixing as possible, the plan being that the band would tackle the post–production. So, I recorded the musicians as an ensemble where possible, made assertive sonic commitments while recording, rather than leave such decisions to the mixing stage, and used spill between mics to reduce the amount of sonic enhancement and blending work required at mixdown. (For full details of the recording setup, see the SOS June 2015 ‘Session Notes’ column at http://sosm.ag/jun15-session-notes and its associated resources page at www.cambridge-mt.com/rs-ch10-case1.htm.) In the event, though, the band liked the session rough mixes enough that they asked me to mix both records too — and that gave me a golden opportunity to find out just how effective our tracking approach had been in lightening the mixing workload!
Panning & Blend
Well, the main good news was that the fundamental sound of each song was already in place the moment I pulled the faders up. I made a point of rechecking the phase–relationships between the channels, though, which occasionally yielded slightly more appealing results than before. There are no ‘right’ or ‘wrong’ settings when there’s so much spill flying around, so all I did was check which combination of polarity switches I liked the sound of most. On some mixes I also take the extra time to experiment with more refined phase–manipulation tools such as sample–delays and phase–rotators, but normally this is more time–consuming than it’s worth, to be honest, unless I’m clearly not getting results I’m happy with from the polarity switches alone.
I also spent a little more care with stereo panning than I had while tracking. For example, I sometimes narrowed the panning of the stereo tom close mics to match the tom positioning in the overhead mics, and usually tried to pan any solo instrument’s close mic(s) to the same side as its respective spill (as heard though all the other mics in the recording room). However, there was an aesthetic element to the panning too, because many stereo decisions are largely a question of individual taste for most engineers — me included! I prefer, for instance, to keep kick, bass and snare fairly central at all times, even though the snare here was clearly off–centre in the spill image. There were also occasions when I set the image width of rhythm instruments I’d recorded in stereo (such as the piano and acoustic guitar) to avoid a lop–sided stereo image, which is something I’m not crazy about.
 That done, there remained three essential mixdown jobs. Firstly, any parts that had been acoustically isolated or DI’d during the ensemble takes, or had been overdubbed separately, needed room ambience added to them to blend them with the main ensemble backing tracks (which blended naturally by virtue of the spill between all the different mics in the room). For a few overdubs I was able to plan for this by recording the drum overhead mics as ambience mics alongside whatever close mics I was using, but for the most part I had to rely on artificial reverb I designed to roughly emulate the character of the recording room itself.
I’m no ‘tweakhead’ when it comes to reverb parameters, though, so the thought of designing such a patch algorithmically from first principles thrilled me about as much as the prospect of mediaeval dentistry! Instead, I just surfed through a few dozen reverb impulse responses in search of something promising, but with the convolution engine’s envelope parameters set to isolate just the reverb onset — you don’t need any real decay ‘tail’ for blending dry sounds into a small–room recording. Once I’d found a shortlist of three impulse responses I liked, I sculpted each tonally using EQ and fine pre–delay settings, before deciding on a favourite within the context of my first full mix. I was then able to reuse this setting across all the mixes, although of course the send levels to the effect had to be adjusted to suit each specific arrangement.
Overall Balance & Mix Tonality
The second essential task was to finalise every musician’s balance thoughout the course of each song’s arrangement. The fact that the ensemble takes included lots of musical interaction made life a lot easier in this respect, but there was still plenty I could do to enhance their natural performance dynamics. For example, I made the balance of some instruments more consistent using compression. The bass was typically compressed 2–6dB with Fabfilter’s Pro–C, using a soft–knee 2:1 ratio and fairly long 400ms release, and similar settings were used for solo woodwind parts too — clarinet, in particular, can have a very wide dynamic range. Similarly, in some of the pop– and rock–flavoured numbers, I applied higher–ratio look-ahead compression to maintain more dependable kick and snare levels hit–to–hit, carefully adjusting the release time setting in each scenario to avoid tampering unduly with the respective instrument’s decay contour.
 Here you can see the ambience reverb Mike applied to the vocals to make them sit better with the naturally cohesive live–room band sound. Notice how the amplitude-envelope controls within the convolution processor have been used to dramatically shorten the selected impulse response’s decay tail.However, the bulk of the balancing was actually carried out with level automation, because anything more than comparatively polite compression usually sounds odd within primarily acoustic instrument textures like these. The vocals and instrument solos understandably received the lion’s share of the attention here, in order to maximise the intelligibility of the lyrics and the audibility of expressive performance nuances, but fader rides also played a role in drawing out entertaining background details in other parts, as well as in solidifying the bass instrument’s levels to form a firm foundation for the rest of the ensemble.
The final fundamental mixing task was to reference the balance against some other commercial productions and massage the overall mix tonality as necessary. I always try to check this to some extent while tracking, but I knew I couldn’t realistically expect myself to nail it down completely when working on location with unfamiliar monitors, unfamiliar acoustics, and scant session time. In retrospect, I reckon the monitoring in our location ‘control room’ (an unfurnished 4 x 5 metre spare room) was bass–light, because both the kick drum and bass were distinctly porky at the low end — although nothing that some low–frequency EQ cuts couldn’t easily rectify.
Additional EQ & Filtering
Rarely did it take any more work than that to achieve a reasonable illusion of the whole band playing in a room together, so our recording strategy had clearly paid off. Mind you, nobody wants just ‘reasonable’ at mixdown, and mixing is also just as much about presenting musical events in the most flattering light. As such, I made some gentle EQ refinements on all the songs now that I could hear everything within a more controlled listening environment. Mostly, this amounted to the usual cuts to combat frequency masking, for example shaving a touch of upper mid-range from drums or piano to maintain vocal presence, or rolling off some low end from the piano and guitars to clarify the bass tone. I also did a little work to bring the kick drum and upright bass through more clearly on smaller speaker systems, usually by boosting the 700Hz–1.4kHz octave to some extent — especially for the band’s more pop/rock–oriented arrangements.
Equalisation did play an important role in adapting the vocal recordings for each song, though, particularly in those numbers where some voices were alternating between lead and backing roles. A vocal tone that sounds great when a singer is performing on their own will usually be too full–sounding as part of three– or four–part vocal harmonies, for instance. Sometimes I multed the vocal parts to make it simpler to set up separate frequency contours for different song sections, sometimes I just automated the EQ on a single track, but the thinking behind each approach was identical. By the same token, there were some situations where I automated a band instrument’s EQ as well, most commonly to add a little more presence to solo sections.
 Although some compression was used on individual channels, particularly on the bass and woodwind parts, the majority of the detailed balancing work for these mixes was carried out using level automation, as you can see in this screenshot, for instance.I also used filtering to tackle some sonic niggles that we’d been unable to address within our super–tight tracking schedule. On the one hand, these filters tackled spill–related issues. For example, high–pass filtering often tightened up the kick–drum sound by reducing its low–frequency spill on the piano, drum–overhead and snare mics; whereas low–pass filtering occasionally helped smooth cymbal spill coming through the saxophone microphone. On the other hand, though, filters also compensated for two side–effects of close–miking: low cuts counteracted proximity effect bass–boost (especially on the acoustic guitar and vocal mics), while high cuts took the edge off things like stick noises, guitar picking and woodwind key clicks, all of which are typically over–emphasised by miking close up — particularly when you’re using condenser mics, which normally exhibit a sizable on–axis high-frequency boost.
 The ‘control room’ on the tracking session, which was an unfurnished spare room without any acoustic treatment, led to some low–end misjudgments that had to be addressed when mixing.The thing with filters, though, is that they’re not choosy: they cut out everything, whether you want them to or not. As a result, there were occasions on which I had to turn to more sophisticated processing instead. For example, the pad switches I’d engaged on the drum overhead and tom mics during tracking resulted in recordings that were a little noisy on the quietest songs, but you can’t just filter out this hiss while cymbals are playing. This is where specialist noise–reduction software really comes into its own, and iZotope’s RX2 Denoiser plug–in made short work of the problem, even in its low–CPU real–time mode. Similarly, I sometimes also used multi–band limiting or dedicated transient processing in place of low–pass filtering to tame ride–cymbal stick noise, guitar picking spikes, and even hard vocal consonants, again to avoid a general loss of high–frequency detail on those sources.
Dynamics Spot–fixes
In addition to the basic compression mentioned above, more specialised dynamics techniques were used for a few other spot–fixes. For example, I mentioned in the ‘Session Notes’ column that I made the mistake of over-compressing the vocals while recording, so that left me with a certain amount of rueful de–essing work to do. I often use Tonebooster’s TB_Deesser plug–in for this these days, because it’s got a nicely controllable split–band mode that helps minimise lisping. It worked well here, not only processing the dry vocal, but also ironing esses out of the vocal effect sends. With heavier sibilance processing, though, you can’t afford to ‘set and forget’, and I had to automate of the de–essing Amount parameter in some instances to ensure consistent results.
There was a sporadic instrument resonance around 80Hz on the upright bass (by which I mean, it was something that manifested itself in both the mic and DI signals, so it wasn’t just the result of a room–mode effect at the miking position), so I trained a single band of dynamic EQ on that to make its musical lines a little more even for a few of the songs. A couple of the singers also moved around quite a lot while singing, which made the degree of proximity effect rather variable, and I occasionally used the low–frequency band of a multi-band compressor to address this — although most of the time I just automated a low–frequency EQ shelf in tandem with my general vocal–channel fader rides.
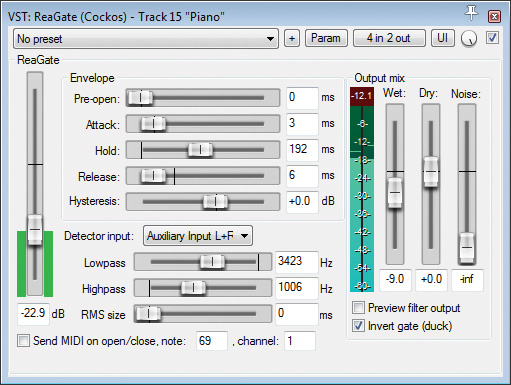
 Not only were the lead-vocal levels automated in detail for every mix, but the vocal de–esser’s Amount control was often also automated to avoid lisping artifacts on certain specific sibilants.A handful of the ensemble line–ups required some extra work to fine–tune the mix’s front–back perspective. The main offender here, as I already mentioned last month, was the saxophone, which generated a lot of spill on our snare–drum and upright bass mics. While this caused no problems when the instrument was playing an accompanying role, the room sound prevented my pulling the player’s solo parts sufficiently upfront. A solution was to use my DAW’s automation system to tweak the mix just for those solo sections, bringing in a limited–range gate on the snare track and rebalancing the bass sound more in favour of its DI.
Likewise, a few numbers featured louder snare hitting, which gave quite a roomy snare sound in the mix (on account of spill through the piano and bass mics). Because the tone of the snare ambience was actually pretty nice, this didn’t worry me in most cases, but on a few occasions I chose to dry things up a little with a limited–range ducker on the piano channels, triggered from the snare mics. About 3–4dB of gain–reduction was all it ever needed. A sporadic resonance of the upright bass instrument required some more specialised mix processing, namely a band of dynamic EQ from Melda’s MDynamicEQ plug-in operating at 78Hz.
Mix Flattery: Effects & Master–bus Processing
I’d used a single ambience reverb for basic blending purposes, so there was plenty of scope to polish the mixes with send effects. My first move was to expand the perceived space beyond the inevitable small–room acoustic signature of the raw recordings by using an additional short early-reflections patch. I selected this in much the same way as I had the vocal blending reverb, but here I deliberately sought out impulse responses which suggested slightly larger rooms. A little of that reverb across the board opened out the sound significantly.
Another family of reverbs I found useful were longer–tail patches with less obvious early reflections (often based around plate–reverb impulse responses), which I sometimes used to enhance the sustain of the piano, acoustic–guitar and vocal parts, especially for the more downtempo arrangements. (This wasn’t the only way I increased sustain, however, because both tempo–sync’ed delays and parallel compression occasionally played a role as well, wherever I felt that too much reverb was unduly clouding the mix.) Given the genre–hopping that the band were doing between songs, some of my send effects were also inevitably more style–specific. So, for instance, the poppier arrangements tended to feature more audible vocal echoes; the ’80s–influenced tracks brought in a bit of audible chorusing; and slapback delay effects cropped up more frequently on retro rock/blues tunes.
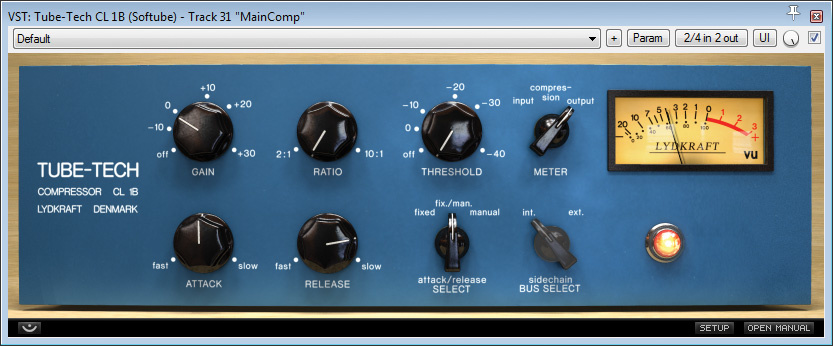
 Finally, there was always some element of master–bus processing involved. Given the entirely solid–state, digital recording setup we’d used, I decided to run all the mixes through some modelled analogue processing to thicken them up a touch. Mostly I used Softube’s Tube–Tech CL1B emulation for this, but occasionally switched to their modelled Summit TLA100 instead if the Tube–Tech’s flavour didn’t seem to suit any specific song. In neither case did I use their compression, though — just the modelled valve saturation. Tonebooster’s TB_Ferox tape–emulation plug–in also came in handy on a few occasions to smooth the overall high end.
Some gentle master–bus compression from Cytomic’s The Glue helped the mixes cohere slightly better too: I typically used a slow–attack, fast release setting with 2–3dB gain reduction to steer clear of obvious gain–pumping side–effects. I usually dialled in a few decibels of ‘air’ boost as well, using the 18kHz shelf of Variety Of Sound’s excellent BaxterEQ freeware plug–in, simply because most commercial productions these days are a little brighter than reality, and I prefer to make final mix decisions with that in mind.
A Stitch In Time
Many of the band recordings featured in this column take days of painstaking mix work to transform into a creditable end product. But this month’s session demonstrates that it really doesn’t have to be that way — despite budget gear, domestic acoustics, and general time pressure while tracking Spektakulatius, the mixdown stage still averaged out at only three to four hours per song. So next time you’re recording a band, try to front–load the production process as much as you can by making sonic decisions early on, because that makes it much more likely your mix will look after itself.
Mix Rescue: Audio Files
The audio files available on this page accompany my Mix Rescue article in SOS July 2015 about mixing two albums I recorded for the band Spektakulatius. The filenames are fairly self–explanatory, but here are some additional notes to describe exactly what you’re hearing in each case. For complete details about the setup of the ‘Wayfaring Stranger’ recording mentioned below, see www.cambridge–mt.com/rs–ch10–case1.htm, and there are also a selection of full multitracks from this session available for download at www.cambridge–mt.com/ms–mtk.htm#Spektakulatius if you fancy having a go at mixing them yourself. A three–part video series showing all the basic processing I used for many of the Spektakulatius mixes can be found at www.cambridge–mt.com/rs–ch10–case1.htm#Mix.
BassResonance01
One bit of necessary mix troubleshooting resulted from a sporadic low–frequency resonance within the upright bass instrument itself, which you can hear in this audio example. It’s most noticeable in terms of the unmusical emphasis it gives to the fundamental frequency of the ‘E’ note at 0:04 and 0:06, but it also affects the fundamentals of adjacent pitches a little too.
BassResonance02_DynEQ
To tame the sporadic resonance in the bass part, I trained a single band of dynamic EQ on it using Melda Productions’ MDynamicEQ plug–in. The band was set to a frequency of 78Hz, with a moderately narrow Q value of 2, and it attenuated up to about 5dB at its maximum gain reduction, using an attack time of 37ms and a release time of 432ms. The effect is still quite subtle, though, if you compare this example with the BassResonance01 file directly.
 The proximity of the piano to the drums meant that some of the songs which had louder snare hits on them generated a lot of spill on the piano mics. Although this often enhanced the snare sound in the mix, there were a few occasions where Mike side-chain–ducked the piano channels to reduce the apparent spill levels and bring the drum more forward in the mix.Enhance01_DryMix
The following eight examples demonstrate how I used effects and bus compression to enhance many of the Spektakulatius recordings at mixdown. This first audio file comes from a song called ‘Wayfaring Stranger’ and so far I’ve just put together a dry balance of it in the Cockos Reaper DAW. The only processing I’ve used so far is six high–pass filters, four bands of EQ, two compressors, a single transient processor, and some level automation. Although the balance is now fairly creditable, the vocal part sounds a little dislocated from the mix. This is because the singer recorded her part in a DIY isolation booth, so she generates no ambient spill on the rest of the band’s mics.
Enhance02_BlendVerbSolo
To draw the singer back into the mix and blend her with the rest of the band, I’m going to add a short ambience reverb, roughly designed to emulate the early reflections of the room the band recorded in. You can hear this effect in isolation in this audio example. To hear it in the mix, listen to the Enhance03_BlendVerbMix file.
Enhance03_BlendVerbMix
 If you compare this audio example with Enhance01_DryMix, you’ll hear how the singer now sits more comfortably as part of the band, on account of the added reverb showcased in the Enhance02_BlendVerbSolo file. Notice, though, that the effect is deliberately quite subtle, to avoid it sounding like an obviously artificial addition. (To hear the differences more clearly, import the audio files into your DAW so you can switch instantaneously between them on the fly.
Enhance04_SpaceVerbSolo
The effect that I’ve soloed in this file is designed to expand the perceived dimensions of the recording room slightly, so that the small–room signature of the raw recordings themselves is less apparent. The reverb is still fairly short, but in this case it’s added to all the instruments in the ensemble, not just the vocal. To hear this reverb in context, check out the Enhance05_SpaceVerbMix file.
Enhance05_SpaceVerbMix
Mixing in the reverb you heard in the Enhance04_SpaceVerbSolo audio file subtly expands the apparent acoustic space. Again, though, it’s not designed to be a massive change, because the aim is to enhance the natural musical event, rather than making it sound like we’ve added something artificial.
Enhance06_SustainVerbSolo
Another reverb effect that can flatter acoustic music is a longer–decay patch without appreciable early reflections, of the type you can hear in this audio example. This kind of reverb helps add warmth and sustain without supplying too much conflicting spatial information. Notice that I’ve deliberately biased the effects send levels to emphasise the piano in the reverb sound, because I feel that this instrument will benefit most from the enhancement. Listen to the Enhance07_SustainVerbMix file to hear how this reverb sounds within the full mix.
Enhance07_SustainVerbMix
 compression; Variety Of Sound’s Baxter EQ for upper–spectrum ‘air’ EQ boost; Softube’s Tube–Tech CL1B and Summit TLA100A hardware emulations for valve ‘thickening’; and Tonebooster’s TB_Ferox tape emulator for high–frequency smoothing.") A selection of different master–bus processors was used for the different Spektakulatius mixes, including: Cytomic’s The Glue for (typically quite gentle) compression; Variety Of Sound’s Baxter EQ for upper–spectrum ‘air’ EQ boost; Softube’s Tube–Tech CL1B and Summit TLA100A hardware emulations for valve ‘thickening’; and Tonebooster’s TB_Ferox tape emulator for high–frequency smoothing.Now you can hear the mix with the sustain–enhancement reverb (isolated in the Enhance06_SustainVerbSolo audio file) added to it. Although this reverb is slightly more audible in its own right, it’s still subtle enough not to distract from the nuances of the musical performance, especially given that the end listener won’t be comparing this mix with the dry version as we can here.
A selection of different master–bus processors was used for the different Spektakulatius mixes, including: Cytomic’s The Glue for (typically quite gentle) compression; Variety Of Sound’s Baxter EQ for upper–spectrum ‘air’ EQ boost; Softube’s Tube–Tech CL1B and Summit TLA100A hardware emulations for valve ‘thickening’; and Tonebooster’s TB_Ferox tape emulator for high–frequency smoothing.Now you can hear the mix with the sustain–enhancement reverb (isolated in the Enhance06_SustainVerbSolo audio file) added to it. Although this reverb is slightly more audible in its own right, it’s still subtle enough not to distract from the nuances of the musical performance, especially given that the end listener won’t be comparing this mix with the dry version as we can here.
Enhance08_BussComp
Some master–bus compression from Cytomic’s The Glue plug–in provides a further gentle cohesion, using a slow–attack (30ms), fast–release (100ms) setting to trigger 2–3dB of gain reduction at a 4:1 ratio. A 75Hz high–pass filter was engaged in the compressor’s side–chain to make it less sensitive to low–frequency information from the upright bass and kick drum.
Sustain01_AllOut
Although the Enhance07_SustainVerbMix file has already demonstrated the kind of subtle reverb processing I used to enhance warmth and sustain on many of the Spektakulatius mixes, some of the songs demanded more assistance of this kind. The following audio examples demonstrate some of the other strategies I used for this, in order to avoid washing the mix out with too much reverb. This audio example contains a section of the song ‘Forever Young’ without any artificial sustain enhancements — just a subtle Hammond organ pad I suggested the band’s keyboard player add during the tracking session.
 Sustain02_ParaComp
For this example I’ve added in a pair of parallel compression channels fed from the acoustic guitar and piano parts respectively. Both of these channels use Stillwell Audio’s fast–acting The Rocket compressor plug–in to duck attack transients, but the two are then EQ’ed differently: the guitar has a high–pass filter rolling off the low end below 300Hz, and a further shelving cut focusing the remaining energy into the sub–3kHz band; whereas the piano is high–pass filtered below about 200Hz to emphasise the sustain of upper–spectrum frequencies. Compare this example to the Sustain01_AllOut file to more clearly hear how this affected the mix as a whole.
Sustain03_ParaCompDelays
 For this audio example, I’ve added in tempo–sync’ed feedback delay effects on the lead vocal, backing vocals, and acoustic guitar. To prevent the echoes drawing too much attention to themselves I’ve reduced the HF levels of all three effects, as well as de–essing the send to the vocal delay and transient–processing the send to the guitar delay to duck the instrument’s picking noises. Line this file up against the Sustain02_ParaComp file to hear a before/after comparison.
Sustain04_ParaCompDelaysReverbs
Now I’ve added in my sustain–enhancing reverb, although in this case it’s a combination of two patches: a long plate emulation on the lead vocal, and a slightly shorter hall reverb primarily for the vocals, piano and guitar.
 TrackingRoughs_Overview
This audio file contains a selection of the rough balances I put together during the Spektakulatius tracking sessions. Not only does this indicate the wide variety of instrument line–ups and musical styles the band covered, but also demonstrates how much of the sound was already in place before any real mixing occurred — these balances were put together with negligible processing within the Roland VS2480 multitracker we used for recording purposes. Compare this file with the FinalMixes_Overview audio example, where you can hear my final mixes of all these song sections.
FinalMixes_Overview
Here’s a some snippets of my final mixes from the Spektakulatius session, all mixed within the Cockos Reaper DAW. On average, each of the 28 songs we did on this session took about three to five hours to record and edit, and a further three to five hours to mix.
Mixing A Whole Album
When you’re mixing a whole album, it’s human nature to look for some ‘economies of scale’ by copying settings from one song to the next. This tends to work best with plug-ins aimed squarely at technical troubleshooting tasks such as reducing pick–noise, hiss, sibilance, or undesirable spill. It can also make a lot of sense to duplicate generic reverbs/delays (like the vocal–blending, room–enlargement and sustain–enhancement reverbs mentioned above) and master–bus processing across all the songs on an album, as this can help give the different songs something of a ‘family sound’.
But the copying approach can also be taken too far, in my opinion. Things like channel polarity, compression and EQ settings tend to be very arrangement–dependent, for instance, so I definitely wouldn’t copy, say, my kick–drum chain from one song to another without carefully reevaluating the appropriateness of every plug–in within its new context. Another big reason why I don’t like copying too many settings between songs is that rebuilding my processing from scratch encourages me to experiment with new approaches to similar problems, and frequently yields better solutions — and even if it doesn’t the exercise will still improve your mixing chops for your future work.
Finally, it’s important to realise that mixing an album is usually something of an iterative process, if only because some late–in–the–day mix decisions are better made by comparing all the different mixes. This is why I always set up a separate DAW project containing all my mix–in–progress bounce–downs, so I can switch between them to check for balance and overall–tonality inconsistencies that would be extremely tough to spot in any other way. In this specific project, lead–vocal and solo levels were tweaked a fair bit at the final moment, as were the relative levels of the kick drum and bass. Some might say that this kind of work is best left to the mastering engineer but I disagree, for two reasons. Firstly, you’ve got more scope to fix problems at the mixing stage than at the mastering stage. And, secondly, I think the aim (however unattainable) of any mix engineer should be to create sonics that require as little mastering work as possible. Besides, the less remedial work you leave for mastering, the more time the engineer can spend concentrating on niceties.
Editing Recordings With Spill
I think a lot of people worry too much about recorded spill limiting their post–tracking editing capabilities. In reality, there’s still plenty you can do at the editing stage to improve the end result. The most obvious thing, of course, is to do several takes and then stitch the best ones together, as we did for several of the Spektakulatius songs. But that same kind of editing approach also gives you masses of scope to repair smaller performance blunders. There was one occasion here, for instance, where the bass–player played the wrong part for three beats of the master full–band take! It was no problem to patch that up by extracting those beats from an alternate take. Similarly, I could usually replace the odd mis–hit snare drum or sloppily timed ensemble stab with a snippet copied from a similar musical section elsewhere in the same take.
The main thing you have to bear in mind is that it’s always best to edit across the whole multitrack, rather than on individual tracks: that way, the phase–relationships between direct sound and spill remain consistent. And, of course, that does mean you have to keep your ears open while tracking to be sure that you have enough material to edit from — if some important fill is fluffed on all your takes, then you won’t have anything suitable to patch it with.
Video: Watch Mike Build A Mix
In this article, I’ve given an overview of the range of techniques I used to mix all 28 songs I recorded for Spektakulatius. To provide a more concrete example of my workflow, however, I’ve put together a short video series in which I take a section of one of the songs and demonstrate how little processing is actually required to build up a polished–sounding mix. You can find these videos on my web site, accompanied by download links for both my Cockos Reaper mix project and the raw multitrack recordings.
Listen For Yourself!
A variety of supporting audio examples are available on this article’s associated media page, including snippets of a dozen of the songs (in both ‘tracking rough mix’ and ‘final mixdown’ versions) and demonstrations of several of the mix–polishing effects Mike used. http://www.soundonsound.com/sos/jul15/articles/mix-rescue-media-0715.htm