This month we explore a mix in which distortion, reverb and modulation effects provide powerful alternatives to EQ.
Steven Separovich records under the artist name column:inches, and sent in his track 'Aftershow' because he felt that it was too one-dimensional and wanted to see if we could achieve more space and depth within the mix. Many aspects of his original mix were already pretty good, with a sensible arrangement and most of the tracks balanced well, but I agreed with his concerns and felt that the sounds seemed to be coming across as a bit anaemic and lacking in character. On a more practical note, the lead vocal line (provided by Tina Norden) was vocoded in such a way that the lyrics were getting lost, and this also needed attention.
Attacking The Kick
 Here you can see the original waveforms of the two different kick-drum samples. It's clear that they are drifting in and out of phase with each other. The resulting phase cancellation made it impossible to arrive at a consistent sound, so Mike had to edit them back into phase before processing.
 The low-end punch of one of the two kick-drum samples was improved with a low-pass-filtered Digital Fishphones Dominion send effect.
 EQ and a very short SIR reverb were used to adjust the hi-hat sample's tonality, while two send effects widened the stereo picture, the first a chain of MDA's Detune and Cubase's internal Double Delay, and the second a chain of Cubase's Mod Delay and GVST's GStereo.
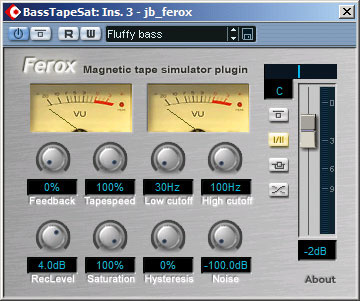
 A combination of two send effects was used to process the main bass-guitar sound: an instance of Jeroen Breebaart's Ferox tape-emulation plug-in, saturating only low frequencies below 100Hz, and an MDA Combo amp-simulation plug-in, set to its Radio mode to add upper-mids.The most important element of the track seemed to me to be the drums, and the kick in particular. The drum tracks comprised two kick-drum samples (which played the same part most of the time, giving a layered sound), snare and clap samples (again playing the same parts), and a hi-hat sample. Listening to the two kick-drums playing on their own, it was apparent that they weren't always playing at the same time, but were drifting in and out of phase. I had this problem with Richard Campbell's mix back in SOS September 2007, and the result is that the tonality of the composite sound shifts in a complex way from beat to beat. There was the additional problem here that the gap between the two samples was occasionally wide enough to give a kind of flamming sound, which made the mixes sound less punchy and also affected the rhythmic feel of the track. Being reluctant to embark on the rather tedious task of lining up all the kick-drum hits, I initially tried to make the best of things with processing, but the sound simply wouldn't shift into focus and in the end I was forced to admit that phase-matching the hits manually would be the only remedy.
The mix of the two sounds didn't seem to have quite enough low-end attack, so I turned to a technique of Jack Joseph Puig's that I'd read about in SOS's November 2007 feature on Fergie's 'Big Girls Don't Cry'. He split a track to two channels and used the Waves TransX Wide plug-in to isolate specific frequencies of the attack portion on one of them, mixing it with the unprocessed track. I used to do a similar parallel-processing trick in the analogue domain with SPL's Transient Designer, but hadn't yet got round to implementing the idea in my sequencer, so I was keen to see if it might help.
Of course, not everyone has the Waves plug-ins, and I turned instead to Digital Fishphones' freeware Dominion plug-in to provide the Transient Designer-style processing — so if you like the way it sounds in the audio files, you can easily try out the technique. One thing to bear in mind, though, is the issue of latency compensation. Some sequencers, such as Pro Tools LE, don't automatically compensate for plug-in latency. Most others now do, but even then you can face problems with some plug-ins; your sequencer may not be able to compensate for the latency of Digital Fishphones' freeware plug-ins, for example, as they don't seem to declare their latency to the host application, and this can result in phasing problems. Cubase SX2 has automatic delay compensation but wasn't able to solve this issue — although, fortunately, I was able to find a workaround.
One of the two kicks (I called it Kick 1) seemed to have a more solid attack than the other, so I set up the parallel Dominion processing on that one, boosting the attack level and cutting the release level to make a punchier sound. Because I was after more low-frequency punch, I set the attack length to its 100ms maximum (shorter lengths don't let as much of the low end through) and then low-pass-filtered the track, nominally at 7kHz, but with such a gentle slope that it was already rolling off at 500Hz. Mixing the processed and unprocessed tracks together, I cut another 3dB on the processed track using a narrow peaking filter at 125Hz, just to match the tonality of the attack sound a little more to what I wanted.
I turned to the other kick sound (Kick 2) to add weight overall, boosting over a one-octave range with a peak of 6dB at 30Hz, but combined with a high-pass filter at 20Hz to avoid any useless subsonic peaks. The combination of the two kick drums now worked better for me, but I still felt that Kick 2 didn't sound quite powerful enough: it sounded a bit too 'digital', with too much click and not enough body. Some soft clipping from GVST's GClip plug-in improved this, though, after which I moved on to the rest of the drum parts.
Snare, Claps & Hi-hat
The snare benefited from the same parallel processing technique, although I also hard-clipped the output of the Dominion track in this case (as I used to with the SPL Transient Designer — and as it appeared Jack Joseph Puig was also doing on the Fergie track) to contain the scope and adjust the tonality of the added attack spike. No EQ was then required for the snare, so I faded up the claps. These lacked edge, and were also very narrow-sounding, so I applied a very small amount of heavily-driven Storm Studio Exciter to give them a bit more attitude and then applied my usual stereo-widening send effect — 12ms and 15ms delays in the left and right channels respectively, combined with opposite five-cent pitch-shifts.
The hi-hat track needed a little more work, because the raw track sounded very hollow and hissy, which meant that it didn't really help fill out the track very well. This was partly an EQ problem, but partly that the whole character of the sound needed more complexity, so I decided to bring in a technique I'd recently read about in Alex Case's Sound FX book: applying a very short reverb effect without pre-delay, not to add ambience but to change the tone colour of the sound.
I opened the SIR convolution plug-in and, as I was after something with raw personality and lots of presence, headed straight for my collection of spring reverb impulse responses. A little searching turned up one which filled things out really well, particularly in the mid-range, even though I'd reduced the impulse file's length from its original 3s to 0.22s in order to avoid any hint of a reverb-like effect. Some careful EQ was still needed to de-emphasise the hissiness from 2.7kHz upwards, but a few decibels of cut with two fairly narrow peaks and a high shelf made a fair job of it. Some of the previous stereo widener and an additional quarter-note stereo delay completed the picture, the latter widened a little using GVST's GStereo multi-band MS matrix plug-in.
Layered Basses
The main bass guitar part comprised two layers, both overdriven versions of the same performance, and this part underpinned the mix during the majority of the song. The less overdriven of the two sounds didn't really sound meaty enough to me, and neither did it have enough bite, despite having been passed through a Tech21 Sansamp distortion. My solution to the first problem was to set up a send to Jeroen Breebaart's Ferox tape-emulation plug-in, turning the high cutoff control down to 100Hz to isolate only the low end and then pushing the Saturation up to 100 percent. The extra hardness in the sound came courtesy of another send, this time to MDA's little Combo distortion plug-in, operating in its Radio mode: the small-speaker simulation added in just the kind of high-mid emphasis I wanted.
The other layer was completely mashed with a hard fuzz effect, and as such was very harsh-sounding. While I figured that Steven wanted a fuzz-style sound, it also needed to be kept under control, to avoid it trampling over the other parts to come, so I bracketed the track using high-pass and low-pass filters to leave a region centred on 2kHz, adding it in judiciously with the other bass sound, which was now providing the guts of the combined sound.
The main bass guitar sound is replaced by a different mixed bass sound, made up of three separate synth layers, for a short section in the middle of the song, but this needed very little work. I compressed two of the layers to try to keep the mix of the sound consistent in the face of filter modulation on these parts, and also high-pass filtered two of them to keep the low-end region solid and free of phase cancellations. Feeling that the combined sound lacked a little warmth compared with the main bass part, I also set up a send to the bass-guitar's Ferox plug-in from one of the parts and low-pass-filtered another at 2kHz. All very simple stuff, really, but you often don't need much processing when you have control over the balance of the different layers of a sound like this: it is when several layers are already mixed to a single track that you tend to encounter more problems.
I chose to go slightly easier on the high-pass filtering with the bass sound that opens the track (and recurs for various drops in the arrangement later, too) than Steven had chosen to do, putting the cut-off of Cubase SX2's Tonic plug-in at 460Hz, albeit with fairly high resonance and drive settings. I figured, however, that it made sense to narrow what was originally a stereo track into mono to enhance the arrangement contrast.
Fattening Up The Synths
With the drums and bass now working together, I began adding in the rest of the arrangement parts. There were four synth parts to mix in, and these all seemed a little lifeless to me, so more processing was required to resuscitate them. The rhythmic synth that you can hear most clearly at 0:53-1:07 probably took the most work, because I wanted to give it much more sustain — it was pretty much inaudible in the original mix because of masking by the kick drum. Limiting it helped a little, but a good dose of distortion from Craig Anderton's Quadrafuzz and from GVST's GClip were still needed to give more thickness to the sound. Being able to adjust the drive in different frequency bands, as you can in Quadrafuzz, is really useful for concentrating added harmonics into those parts of a sound where you need them most. That said, I did need to slice out a good chunk at 220Hz with EQ to get the tonality right in the mix. Another trick I used to make this part more audible was panning the track to the right and then using a quarter-note delay panned to the left, doubling the note rate and thereby getting at least every second note out of the way of the kick-drum hits.


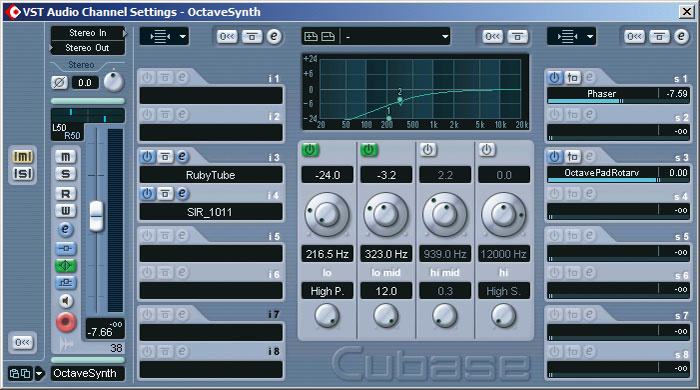

 Silverspike's Ruby Tube and Christian Knufinke's SIR added complexity to the main lead synth part's frequency spectrum, while Kjaerhus Audio's Classic Phaser and Cubase SX's in-built Rotary plug-in provided extra stereo interest.My first step with the lead synth that arrives at 0:37 was immediately to high-pass filter at 215Hz, getting rid of a lot of redundant low end that was simply clouding the mix. An instance of Silverspike's Ruby Tube put some hairs on the sound, and another short reverb impulse response (only 0.05s) added complexity, giving a much more satisfying result. To enhance the stereo movement inherent in the sound, I sent to two further effects: a Kjaerhus Audio Classic Phaser plug-in and an instance of Cubase SX's rotary-speaker simulator, the latter set up via its virtual Leslie miking positions to maximise the width of the stereo image.
The rhythmic synth at 1:25 sounded a bit lazy to me, so I made it spikier with another instance of Dominion, feeding it on to GVST's GClip to keep the peaks under control. Another MDA distortion send, again on the Radio setting, improved the presence and bulked out the sound's spectrum in a pleasing manner, after which the existing phaser and a further Kjaerhus Classic Flanger pulled the sound more towards the edges of the stereo spread and complemented the metallic timbre.
Synth hits like the pitch-dive that first appears at 1:47 can be difficult to mix — even when they're balanced correctly they will often sound rather small and unimpressive. The way around this is to give them a sense of real space, which I did in this case using Silverspike's room-ambience simulator Room Machine, mixing in just enough to do the job without giving an obvious 'effect'. The Kjaerhus phaser and flanger also came in handy here, to widen things a little.
Guitars & Vocals
 Vocalist, and one half of column:inches, Tina Norden during a recording session.
 Tina Norden's original vocal recordings were mixed in with the vocoder parts to improve intelligibility, but not before they were high-pass filtered and limited to emphasise the vowel formant and consonant details. Cubase's Metalizer matched the timbre of these vocals better with the vocoded tracks, while some extreme pitch-correction from GVST's GSnap made some of the pitched elements more in tune with the track, thereby pulling them more into the background.The guitar tracks provided two processed layers based on the same performance, but no matter how I combined them they sounded rather uninspiring. So I threw caution to the wind, bussed them to a single channel and selected something mad-looking from my plug-in collection: Betabugs Flo Fi. Who knows what it really does (it sounds like a cross between a ring modulator and The Wicked Witch Of The West), but within a few minutes of twisting controls I had something more engaging that also sounded more synthetic, in line with Steven's artistic vision for the track. Another curtailed reverb impulse from SIR (the inside of a coffin this time, apparently), in tandem with some tape saturation effect from Ferox, smoothed a few of the rougher edges left by Flo Fi. The overall sound now had real character, but it was also way too bassy for its place in the mix, which meant that I had to high-pass-filter at 400Hz and cut a further 6dB at 500Hz with a peaking filter before it fit around everything else going on, particularly when the texture reached its fullest at 2:08.
Bar a few little reverse cymbals and a similar white-noise-based sound, which I just widened with some sprinkles of flanger, phaser and reverb, that left just the vocals to attend to. I'd normally attend to the vocals earlier than this in the mix process, but I left them until the end on this occasion. I didn't feel that the part was musically more important than any of the other synth or guitar parts, so didn't need any more space left for it, whereas I knew that making the lyrics intelligible was going to be the real challenge and it would only be possible to judge this with the whole arrangement to compete against.
As I'd suspected the first time I heard Steven's original mix, there simply wasn't enough information in the vocoder tracks to allow the words to cut through — the high frequencies in the vocoder's carrier signal couldn't sufficiently support the vocal formants and enunciation. Anticipating this, I'd asked Steven to include the original unprocessed vocal that he'd used to drive the vocoder, and resolved to mix this in with the vocoded signal, to get the lyrics coming through more clearly. In this context, all the vocoder tracks needed was some level control (courtesy of MDA's little Limiter plug-in) and a send to another tiny reverb impulse response to give them more of a stereo feel — and I also took some high end out of the reverb return to darken the tonality a touch.
The dry vocal parts were high-pass filtered to isolate the region from about 1kHz upwards — where the formants really start to get going — and then heavily limited to bring up all the details in the performance. Because the vocals sounded a bit 'stuck on' to start with, I also treated them to some of Cubase's Metalizer process, as well as a shovelful of stereo widener, and this lent them a diffuse, synthetic flavour, which blended better with the sound of the vocoded tracks. Another thing that was making the dry vocal difficult to blend was that, although the part was basically spoken, it still had enough pitch in it to clash with the track's key at a number of points. Setting about the vocals with some ridiculously fast and abusive pitch-correction, courtesy of GVST's GSnap, I managed to nail it to a consonant pitch most of the time, dragging the body of the vocal sound further back into the mix compared to the elements responsible for intelligibility. Result: I could fade the intelligibility up higher without the other aspects of the vocal performance taking up too much space in the track.
Once the vocals were in place, I bounced down the mix as a 24-bit WAV and re-imported it into a new Cubase Project, so that I could bring up the detail a little more using a bit of multi-band compression from Cubase's internal Multiband Compressor plug-in. I set up the plug-in as a parallel process, a configuration which lets you add a lot more background detail without reducing the punch of the drums. A few decibels of extra loudness were gleaned from Buzzroom's Buzz Maxi, without too many side-effects, and I also let the tops of the drums clip a little, as (judging by his original mix) Steven wasn't averse to this tactic. Referencing the mix against a few well-known tracks made me pine for more low end, so I also added in a couple of decibels of shelving boost at 50Hz for this, before sending off a draft to Steven to get his views. Although he was pleased with the new sound, he had some concerns about the timing of the vocal parts, now that the dry vocals were more prominent, so I went back into the original mix project and spent a while editing syllables around to tighten that up for him before creating a final version.
When EQ Isn't The Answer
One of the things that Steven professed himself most keen to learn more about was EQ, but it was pretty clear to me from the outset that EQ wasn't really the key to improving on Steven's original mix, because EQ mainly just adjusts the frequency balance of a sound — if the character you want from a sound isn't there in the first place, no amount of cutting or boosting frequencies can reveal it! In an arrangement that's quite sparse like this, each sound needs to have a lot of body to fill out the overall production, and I hope I've been able to demonstrate how distortion, modulation, and super-short reverb effects can be more effective alternatives; they meant that I used comparatively little EQ for this mix, in fact. I was also pleased to rediscover the usefulness of Transient Designer-style parallel processing, and will certainly be returning to that in future...
Rescued This Month...
 Steven Separovich. Steven Separovich and Tina Norden make up column:inches. Their track was put together using Apple Logic Pro 7.2.3 and Native Instruments' Vokator, layering EVOC20 and Vokator together to achieve a layered vocoder sound. Although Steven used live vocals and instruments as well as synths, he deliberately tried to blur the boundaries between them on 'Aftershow' by making the guitars and vocals sound more like synths, and synths sound more like guitars. You can contact the band at houseofsandn@btinternet.com.
Hear The Differences For Yourself!
Find out exactly what difference Mike made to Steven's mix by listening to the before and after audio files, available for download as WAV or MP3 from the SOS web site, at www.soundonsound.com/sos/mar08/articles/mixrescueaudio.htm. As well as the full mix, there are files that show the changes made to the individual sounds within the mix.
Remix Reactions
Steven: "One of the key things I'd like to have achieved with my mix is more 'three-dimensionality'. Partly, I feel that my current studio setup didn't help the mix. I'm limited to Logic's plug-ins at the moment, and would have ideally liked to mix my track on a range of high-end hardware and software instruments. I also have very small monitors, which don't really provide the best picture of the track. I do, however, realise that equipment is not necessarily the key to a good mix, and that an understanding of the mixing process is important.
"On the whole, I was blown away by Mike's mix — his interpretation of the track was spot on, and he definitely headed in the right direction. Initially, I was most impressed by the 'bigness' of the sound Mike created. The track has more width and depth, and the individual sounds appear richer, fuller and more clearly defined and separated in the mix. I was also impressed that Mike managed to make the vocals more intelligible (through a careful mix of wet and dry sounds) and also address the timing issues associated with the vocals. I can't wait to read how he achieved his results!"