Following last month's introduction to the Thor synthesizer, we embark on a patch-building project and explore several of the key features of Reason 4's god-like new synth...
 Last month we looked at the basic structure, routing controls, and modulation matrix in Reason's new Thor synthesizer. This time we're going to investigate the Wavetable Oscillator, Step Sequencer and Virtual Controls by following a series of steps towards a finished patch.
Getting Started
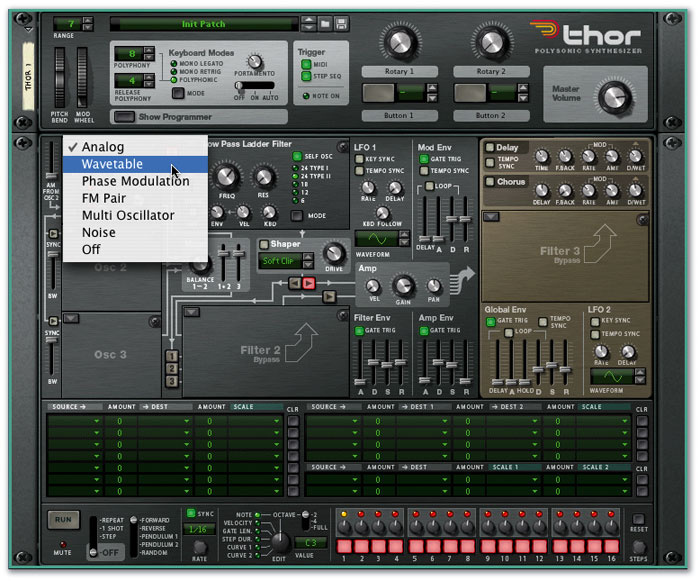
Begin by creating an instance of Thor in your Reason rack, then right-click on it and choose Initialize Patch; this will give you a simple starting point with a sawtooth oscillator, a filter, and no modulation assignments. Now click the Show Programmer buttons to see all of Thor's controls. Change Osc 1 to a Wavetable, by clicking on Osc 1's pop-up selector, as shown in the screen above. (For more information on Wavetable synthesis, see the 'What's A Wavetable?' box.)
The Wavetable Oscillator has a central display showing the current wavetable. Click on the display to bring up a pop-up menu, or use the up and down buttons to step through the available wavetables. For this patch we're going to use the 'Logic Or' wavetable.
Play some notes and slowly turn the Position knob to hear the sounds generated at different points in the table. Try experimenting with different settings for Filter Frequency, Resonance and Envelope, and the Decay stage of the Filter Envelope. As you'll hear, a wide range of timbres are available, even from this simple patch.
A Simple Step Sequence
Thor's step sequencer is located at the bottom of the panel, beneath the Modulation Bus Routing Matrix. No assignments are needed to play notes with the sequencer, so we can get stuck straight in. At the left of the sequencer panel you'll find the Run Mode controls. The first slide switch is set to off; change this to Repeat, press the Run button, and the sequencer will begin to play the default sequence of 16 middle Cs at a rate of 16 per bar.
 The basic settings for our patch. The rest of the sound will be programmed in the Modulation Matrix and Step Sequencer.The playback speed of the sequence is controlled by the Rate knob, just to the right of the Run Mode controls. By default, this is sync'ed to the song's tempo.
The rest of the panel is dedicated to the actual sequence, represented by a series of 16 knobs and buttons. A six-way selector knob (labelled Edit) reveals six separate step sequences. The first four sequences have pre-determined functions: Note, Velocity, Gate Length and Step Duration. The final two — Curve 1 and Curve 2 — are left unassigned, ready for you to use as you wish. Regardless of the pre-assignments, you can send any of the six sequences to any destination (including the external CV outputs) using the Modulation Matrix.
With the Edit knob set to Note, use the sequence knobs to create a simple melody. You can disable individual notes using the buttons beneath the knobs.
If you switch to the Velocity sequence, different settings here will change the brightness of the notes, because Velocity is mapped to Filter Envelope by default in the Filter modules.
Virtual Control Key Assignments
Each of the Virtual Control buttons on Thor's main Controller Panel has a small display to the right of it. Clicking and dragging upwards on these displays reveals that you can set a MIDI note value for each button. This is an unusual feature that allows you to momentarily (in the British sense of the word) activate a button (if it is off) by holding down the assigned MIDI note. Typically, you would assign a note to this that you won't need to play otherwise. You can then alter the sound mid-performance simply by holding down the assigned note.
Custom Sequencer Assignments
Our patch could use something to make it more interesting, so the next step is to give the sound some movement by assigning one of the Curve Sequences to Oscillator 1's wavetable position.
 Assigning the Curve 1 sequence in the Modulation Matrix.In the first slot in the Modulation Matrix, set the Source field to Step Sequencer / Curve 1 (as shown in the screen below); for the Destination choose Osc 1 Pos and set the Amount to 100. Now we need to create a sequence for Curve 1: start by using the Edit knob to display the Curve 1 sequence, then right-click anywhere on the Thor panel (or go to the Edit menu) and choose Random Sequencer Pattern. Now click Run to hear the results.
Set Osc 1's Position knob fully to the left: the sequencer's modulation acts positively on the current position of the parameter. This setting of Position is where the sequencer modulation will have the greatest effect on the sound.
As with step sequences created using Reason's Matrix device, our Thor patch is currently limited to playing the specific notes set in the note sequence. Also, the sequence is triggered whenever you press Play on Reason's transport. It would be better if the sequence only played when you held down a MIDI note, and was also transposed depending on what note you played — so here's how to achieve that. Using the Modulation Matrix, assign MIDI Key / Gate to Step Sequencer / Trigger (as shown in the screen above). The sequence will now be triggered whenever Thor receives a MIDI note. Making this assignment also stops the sequence from being triggered by Reason's main transport.
Assign MIDI Key / Note to Step Sequencer / Transpose (also in the screen above). Now the sequence will play at different pitches depending on which key you play. If you play middle C (C3), the sequence will play back at its original pitch. Play any other note and the sequence will be transposed up or down by the number of semitones between C3 and the note you played. Finally, set the Keyboard Mode (on the main Thor panel) to Mono Retrig.
Thor Sequencer Tips
- You can use Thor's step sequencer to modulate played (and sustained) sounds, rather than just triggering notes. Begin by switching off all the sequencer notes from the step buttons and then assign any of the sequence layers to modulate the desired synth parameters. Finally, you can use the assignment in step 15 of the sequence to trigger sequencer playback whenever you play a MIDI note.
- When triggering and transposing sequences from the keyboard, switch off MIDI in the Trigger section of the Controller Panel to prevent double notes when you play keys.
- The way you play affects how sequences are re-triggered. Playing legato will transpose the sequence without resetting the step position. Releasing MIDI keys between the notes will re-trigger the sequence from step 1.
Virtual Controls
It's time to turn our attention to the Virtual Controls, the two rotary knobs and two buttons on Thor's main Controller Panel. These are used in a similar way to the assignable knobs (or 'macros') on many workstation synths, and also in Combinator. They allow patches to be set up so that choice aspects of the sound can be varied from a simple control panel, without needing to delve into the more complicated guts of the synth.
 The core assignments for our patch: Wavetable Position is modulated by the sequencer, and the sequencer is triggered and transposed by MIDI notes.There is a significant difference between the assignable controls on Thor and those on Combinator. Combinator's knobs and buttons are absolute controls, effectively replacing the control which they are assigned to. Thor's rotaries and buttons are relative (or delta) controls, adjusting a value up or down from a base value. For this reason, the Virtual Controls are called Modifiers.
There are also two different ways in which they can be used. You can use a Virtual Control to adjust a particular parameter directly — a typical example would be to use a rotary to adjust filter frequency. Alternatively, you can use a Virtual Control to scale another modulation or routing assignment (as, in fact, we did in last month's column).
Let's create one of each of these types of assignment. To start with, we'll set Rotary 1 to act as a filter frequency control. In the next spare modulation slot, choose the first knob (Modifiers / Rotary 1) as the source and Filter 1 / Frequency as the destination and set an Amount value of 100. Now set the Filter 1 Frequency control fully anti-clockwise. By setting the original Filter Freq control to zero and using a 100 percent control assignment, you've made Rotary 1 act as a direct replacement for the filter control. This is as it would be if you'd assigned a Combinator knob to the filter with full range. If you set the original control to somewhere other than zero and limited the Amount value, the Virtual Control would adjust the filter frequency over a limited range. You can also set negative values to reverse the polarity of the control.
 The final patch, complete with Virtual Control assignments for easy tweaking.An interesting aspect of Thor's design is that many parameters can extend beyond the range of their panel controls. This means that modulation sources, including the Virtual Controls, can take a parameter to values that would not be possible otherwise.
Next, we'll use the second assignable knob to scale an existing modulation source. In the first modulation slot (S.Curve 1 assigned to Osc 1 Pos), click the Scale field and choose Modifiers / Rotary 2 (as shown at the bottom of the screen above) and set the Amount to 100 percent. Rotary 2 will now act as a depth control for the wavetable modulation by Sequencer Curve 1. By setting the two Amount fields carefully in an assignment like this, you can finely tune how a control will affect the sound. If the first Amount was 50 percent and the Scale Amount was 100 percent, Rotary 2 would adjust modulation between zero and 50. You could use a number below 100 for the Scale Amount, and this case the rotary would have less effect, so there would still be some modulation at the minimum position.
The two assignable buttons work in exactly the same way as the rotaries, except that they can only toggle between two values. Let's look at a typical way of using a button to switch an effect on or off.
Switch on the Shaper, choose the Soft Clip mode and set Drive to zero. Then, in the Modulation Matrix, assign Modifier / Button 1 to Shaper Drive and set the Amount to about 80. Button 1 will now switch the Shaper Drive between off and nearly maximum. By adjusting the Shaper Drive's panel value and the button control Amount, you can define the two values of Drive for when the button is in or out.
Signal Routing With The Virtual Controls
For the finishing touch, we'll look at an advanced use of the Virtual Controls. As we mentioned last time, Thor's Matrix can be used to route audio signals, as well as modulation sources. By scaling this type of assignment with the virtual knobs or buttons, you can adjust or switch signal routings from the Controller Panel. We'll use our final available button to illustrate an example of this. In the Matrix, assign Osc 1 to Filter 2 / Audio Input and set the Amount to 75. In the Scale field, choose Modifiers / Button 2, and set an Amount of 100. Insert a Formant Filter into the Filter 2 module and press the red arrow button above Filter 2 to route its output into the Amp.
Now, when you press Button 2, audio will be routed from Oscillator 1 to Filter 2, mixing in a differently processed version of the sound. Alternatively, you could leave Filter 2 blank, which would blend in some of the clean signal from Osc 1. Another option is to use one of the rotaries instead of a button to scale the routing, as this would allow you to control the level of signal being routed to Filter 2. Given the range of possible routings, and the fact that you can scale multiple assignments from each Virtual Control, it's possible to create patches whose sounds can be radically altered using just the four panel controls.
Of course, there's a good deal more to explore and understand in Thor, but hopefully this example will give you some insight into some of the many possibilities available to you.
What's A Wavetable?
Each of the wavetables in Thor's wavetable oscillator consists of a series of single-cycle waveshapes. At any instant in time, the oscillator is 'looking' at one point in the table (the Position), and playing the waveform at that point. If the Position is between two of the waveshapes and the X-fade button is active, the oscillator will play a blend of the two waves. This gives you a vast range of waveshapes to use as the basis of a sound. If you then modulate Position, with an LFO, envelope, performance controller or similar, the sound will shift over time between the different waveshapes in the table. In most cases, the series of waves in the table change slowly from one wave to the next, resulting in a smooth, natural evolution of the sound when Position is swept.


