Pro Tools doesn't support RAID arrays, but does have its own disk management features that allow you to 'stripe' audio files across multiple disks, or record additional safety copies of everything.
The Disk Allocation window is one of those parts of Pro Tools that most people rarely visit unless they are having problems, but it can be put to other uses too. By default, Pro Tools puts the audio files it creates inside the Session folder, in a folder called Audio Files, which I suspect isn't too much of a surprise to most of you. The primary role of the Disk Allocation window is to enable you to change where Pro Tools puts the audio files on a 'track by track' basis. You access the Disk Allocation Window from the Setups menu .
One of the ways in which the Disk Allocation window can help increase the performance of your system is by allocating some tracks in your Session to another drive attached to your computer, so reducing the amount of data that has to be recorded to and played back from each drive. The window (above) is basically a table, with a column for the track names and a column for the location of the folder Pro Tools is using to store the audio recorded on each track. If you click on a folder location, a pop-up menu offers you a list of available drives on your system. You can use the usual multiple select options within the Disk Allocation window, such as Alt+A to select all tracks, or Shift+ Click to select a group of tracks, or Control+Click (Windows) or Command+Click (Mac) to make a non-contiguous selection. Only drives designated as Play & Record (R), as set in the Workspace Browser (below), are offered in the Disk Allocation window.
 Only drives designated 'R' in the Workspace Browser appear in the Disk Allocation window.
Note that if you change the Disk Allocation for a track, Pro Tools doesn't move any existing files that have already been recorded. It is only new files created on that track after the change that will be stored in the new location.
 The Custom Allocation Options tick box allows you to decide whether new sub-folders will be created within the folder you select.
When you allocate a track to a different drive, a folder is created with the Session name and the usual Audio and Fade Files sub-folders. However, you can also choose to set Pro Tools to save files into existing folders. To do this, choose Select Folder from the pop-up menu, navigate to an existing folder and select it. You can specify what happens by ticking Custom Allocation Options (above), which is normally greyed out. Now you can click on the Change button and select a current folder you want to use. You can also set Pro Tools to automatically create the usual sub-folders as well. Now when you choose Select Folder from the pop-up menu, Pro Tools offers you that location straight away.
Round Robin
The 'Use Round Robin allocation for new tracks' option means that Pro Tools will automatically distribute any newly created tracks around all of the drives connected to your system that are set to Play & Record (R) in the Workspace Browser. If you want to exclude any drives from the Round Robin mode, set them to either Transfer (T) or Play (P), and Pro Tools will ignore those drives. Note that by default Pro Tools does not include the system drive (that is, the drive with the computer's operating system and applications) in any Round Robin allocation. This is because Digidesign advise not to record to this drive as a general guideline. You can do so if you don't have another choice, but it is not recommended and you will suffer a performance hit if you do.
Safer Recording
Although Disk Allocation is usually used to spread the load of tracks across a number of drives, there is another application you can use it for. Imagine you are recording a 'once only' event. You can use Disk Allocation to create a backup 'on the fly' as you are recording, by tracking the same content to two drives simultaneously. Here's how:

 and Duplicate them (left and below), then change the Disk Allocation of the duplicate tracks to point to a different drive (below left).") The Disk Allocation system and the Duplicate Tracks command make it straightforward to record important sessions to multiple destinations. Simply select all the tracks you're recording to (far left) and Duplicate them (left and below), then change the Disk Allocation of the duplicate tracks to point to a different drive (below left).
The Disk Allocation system and the Duplicate Tracks command make it straightforward to record important sessions to multiple destinations. Simply select all the tracks you're recording to (far left) and Duplicate them (left and below), then change the Disk Allocation of the duplicate tracks to point to a different drive (below left).
- Create a Session with the appropriate tracks as normal.
- Select all those tracks and duplicate them. Note that the duplicate tracks will have the same input routing, and so will record duplicate audio.
- Go into Disk Allocation and change the Disk Allocations of all the duplicate tracks to another drive.
- Change the output routing of the duplicate tracks to a set of unused outputs so you don't hear the audio through the Pro Tools mixer twice.
- You are then ready to record, knowing that you will end up with the files in two places straight away (see screen overleaf).
Using this method is like having the benefits of a RAID array within Pro Tools, which is great news, because Digidesign do not support the use of RAID arrays as media drives for Pro Tools Sessions.
Duplicating Tracks
Talking of duplicating tracks, this feature has recently had a make-over, so here is a look at what we can do with the Duplicate Tracks command, which is now found in the Tracks menu. The Duplicate Track command lets you duplicate one or more tracks, including their audio or MIDI data, Playlists, automation and other attributes. When duplicating multiple tracks, you can also choose to have the new tracks follow the last selected track or have each new track follow its source track.
To duplicate one or more tracks, select the tracks you want to duplicate by highlighting the track names in the Edit or Mix window. The usual conventions for multiple selections apply, such as using Shift+Click to select a contiguous group of tracks, Command+Click (Mac) or Crtl+Click (Windows) to pick up non-contiguous tracks, and Alt+Click to select all the tracks in your Session.
Then choose Duplicate from the Track menu, or the keyboard shortcut Alt+Shift+D (Windows) or Option+Shift+D (Mac). In the latest versions of Pro Tools you can also right-click the name of the track in the Track List, Mix or Edit window, and select Duplicate from the pop-up menu.
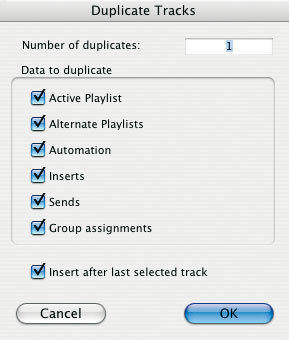
The Duplicate Tracks dialogue allows you to choose a range of options. You can: Recordings made with the duplicate track arrangement described on page 203 are made to two drives simultaneously.
- Enter how many copies you want to create by typing into the Number of Duplicates field.
- Copy only the currently active (visible) Edit Playlist from the source track, by enabling the Active Playlist tick box.
- Copy all Edit Playlists on the source track by enabling the Alternate Playlists tick box.
- Copy all automation data from the source track by enabling the Automation tick box.
- Copy all plug-in and insert assignments by enabling the Inserts tick box.
- Copy all sends and send assignments by enabling the Sends tick box.
- Maintain all Mix and Edit Group assignments by enabling the Group Assignments tick box.
If you are duplicating multiple tracks, and you want all the newly created tracks to be added after the last selected source track (to the far right of the Mix window, and at the bottom of the Edit window), enable the Insert After Last Selected Track option. Otherwise, each newly created track will be inserted directly after its source track. Once you are happy with the settings, click OK to have Pro Tools duplicate the selected tracks, or Cancel to bottle out.
The new dialogue really helps to make the most of the Duplicate Tracks command, by making sure the duplicate tracks only have the data and settings on them that you need. Remember that if your source tracks already have Regions on them but you don't want the duplicates to have them, you should uncheck the two Playlist tick boxes. This feature makes the Speedy Overdub Track Management tip we outlined in the July 2005 issue (www.soundonsound.com/sos/jul05/articles/protoolsworkshop.htm) even quicker.
Deleting Preferences & Digidesign Databases
In the same July 2005 workshop article I mentioned in the main text, we looked at how trashing Pro Tools Preferences can sometimes help get your system back on an even keel. Jean-Charles Deshaies has written a clever little Mac OS X application to delete all the necessary files, most of which are in the Preferences folder in the Library folder inside your 'User' folder: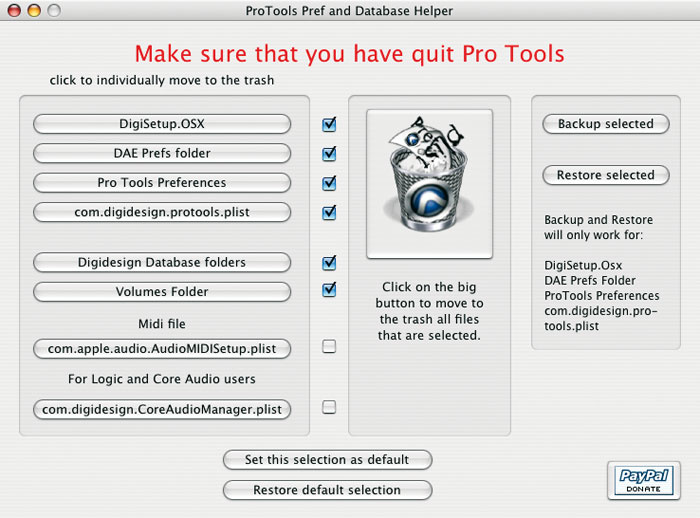
- com.digidesign.Pro Tools.plist
- DAE prefs (folder)
- DigiSetup.OSX
- Pro Tools x.x preferences
In addition, there are Digidesign Databases on every drive or partition attached to the computer, as well as in the Volumes folder, located in the Databases folder inside the Digidesign folder, which is found in Application Support in the Library folder on your startup drive. However make sure you don't delete the Catalogs folder, as this contains your carefully arranged catalogue files of samples and sound effects.
As you can see from the screenshot, you may choose which files will be trashed, and there's an option to back up and restore the various preferences files as well. Once you've selected files for trashing, hit the Trash icon in the application's window and off to the trash-can they go. You will still need to empty the Trash and restart the computer yourself, which I suspect Jean-Charles did for 'safety' reasons, but this is an excellent little time-saver which should be on every Mac running Pro Tools. You can download it for free, but if you do end up using it, hit the Donate button and pay the man — he deserves it!
http://web.mac.com/jcdeshaies/iWeb/DeleteProToolsPrefs/Bienvenue.html


