Studio One offers multiple methods of synthesizing splendid stereo from mediocre mono.
Synthesizing stereo from mono signals is a task that has been around since, well, the advent of stereo. It can be very surprising how much richer a mono sound feels when it is spread into stereo, even when this is done in a relatively subtle way: lead vocals can stay front and centre in the mix, yet still benefit from widening. Many techniques have been created to do the job, most of which have been discussed in SOS several times over the years, and Studio One offers ways to apply most of the established approaches. I have yet to hear a method that works great on every source, so it’s worth knowing a range of these tricks.
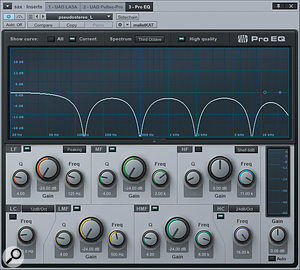
 Screen 1: complementary EQ settings in two hard-panned instances of Pro EQ send different frequency bands to each side of the mix.
Most schemes for creating pseudo–stereo assume the image must remain fixed, but personally, I like small amounts of animation in mono sources I convert to stereo; a little movement helps emphasise the fact that you’re not simply listening to a panned mono signal. Either way, be aware that some common pseudo–stereo schemes do introduce subtle motion into the sound, which might not always be what you’re after. I am not going to discuss third–party plug–ins for generating pseudo–stereo in this column, but if you can afford a few plug–ins, there are nice ones out there, like the Stereo Imager section of iZotope’s Ozone, and Waves’ PS22.
Combover
Maybe the first mono–to–stereo scheme to come into broad use was spectral spreading. A mono signal is split to a stereo output with different filtering on each channel, so that left and right carry different parts of that signal’s frequency spectrum. The most rudimentary method of accomplishing this is to apply a high–pass filter to one channel and a low–pass filter to the other, and this actually works OK in some cases.
A more sophisticated approach is comb splitting, in which the spectrum is divided into a number of bands (octave bands being common), which are alternately panned to the two channels. This way, 80Hz and down goes to the left channel, 80–160 Hz to the right, 160–320 Hz to the left, and so forth. This obviously requires applying different EQ settings to each channel of a stereo signal, which many, but by no means all, stereo EQ plug–ins will allow. I make here one exception to my rule about discussing third–party plug–ins to point out that back in 1992, Waves’ Q10 came with a preset called ‘10X PseudoStereo’. When I want to use the comb–filtering approach to creating stereo, I usually just call up this preset and move on, because it works so well it really has never even needed tweaking. Worse, I don’t even feel guilty about it.
Studio One’s Pro EQ does not allow the channels of a stereo signal to be equalised independently, so this approach can only be realised with Pro EQ by duplicating resources. The simplest method is the most obvious: duplicate the track, events and all, pan the original and the copy to opposite sides, and apply complementary comb EQs to each. Screen 1 shows suitable EQ settings, or you could build your own comb–splitting EQ. If you do, remember that low frequencies are much less significant for stereo imaging than mid and high frequencies — you won’t often needto worry about having bands below 100Hz — but the notches you create must be quite narrow (a Q setting of 15 has worked well for me). You are not looking for the kind of band overlap you get in a graphic EQ, for example.
 Screen 2: Studio One’s Beat Delay plug–in can provide simple (though not always mono–compatible) stereoising effects.
The comb-splitting approach sometimes produces undesirable artifacts, including some loss of low frequencies and image movement when a sound ripples up or down the spectrum. However, done correctly the method is completely mono–compatible (when that matters), and the image is pretty stable on more sources than not. I have often used comb–splitting on vocals, and have liked what it does on tenor sax, as well.
A Little Delay (Goes A Long Way)
Time and level are the two biggest cues we use to localise sounds, and delay can be useful in synthesizing stereo from a mono source. The range of delays your brain uses to localise goes down into the microseconds. You will not usually be creating pseudo–stereo using plug–ins set this short, though: psychoacoustic cues of that order get swamped by room acoustics when played over speakers in just about any room. (That does not mean that the resulting effect will not be interesting and useful, only that it will not be what psychoacoustic theory tells you to expect.)
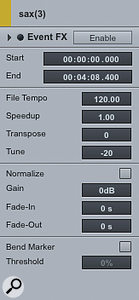
Again, the cheap and cheerful technique is to replicate the track — I would have three copies, total — then apply delay. The Delay field in the track inspector is quick if you want all events on a track delayed the same amount. If not, simply slip the events you want delayed. Give both copies of the original track different, but somewhat Screen 3: The Event inspector allows detuning of selected events. close, delay times. I have used anywhere from 1 to 40 ms of delay to create stereo. Theoretically, a source delayed by 40ms should be perceived as a source separate from the original, but I find delays on that order to be an in–between zone which, mixed in judiciously with the original, can widen the right kind of source, especially sources with a medium to long attack.
There’s another delay method in Studio One I like better, though, which is simply to use the Beat Delay plug–in, set close to its shortest setting. Beat Delay is designed to provide rhythmic, tempo–sync’ed delays, but we’re using it differently. You can see the setup in screen 2, but the key point is to set Beats (the delay time) to its shortest 1/64T setting. Cross delay is likewise set, not to its central Off setting, but to a low value for the L or R delay, just to the left or right of the Off position. Feedback would simply introduce ringing with such short delay settings, so this is switched off, and the width is not set fully to Stereo. That setting produces a blatant widening effect, which can be cool, but sounds very obviously processed. In this case I’ve set the Mix to fully wet; introducing some of the undelayed source by backing off the Mix control likewise creates a more plainly processed sound. Again, if that’s what you want
Mirror Images
When Eventide pitch–shifters first hit the studios in the ’70s, a stereoising technique was invented in which a source was split, with one copy shifted up in pitch a few cents and panned to one side, and the other copy shifted the same amount down in pitch and panned to the other side. People have their variations on this method, but here’s the basic technique Screen 4: Used with care, the Doubler mode in Studios One’s Chorus plug–in can introduce subtle stereo width to a mono signal. in Studio One. First, duplicate the source track. Now select all of the events on one of the tracks and set the Tune parameter in the Event inspector to +20 cents. Do the same on the other track, but set Tune to –20. This amounts to a few Hertz in the mid–range octaves that matter for this effect. Finally, pan the tracks to opposite sides and mix to taste.
Chorus effects can also generate stereo from mono, though it’s easy to go too far and end up changing the source sound. In Studio One, try inserting the Chorus plug–in across your mono source and set it for its most subtle effect. The ‘Backing Vocals’ factory preset provides a great jumping–off point. The key points are to set the Mode to Doubler, the LFO Speed and LFO Width very low, and Stereo Width to Full Pan. I then find the most effective Spacing and Depth settings to be 20–40 ms and 20–50 percent, respectively.
Double Mojito
Finally, Studio One’s Mojito software instrument is a virtual analogue synth designed mainly to produce bass and lead sounds. Its synthesis section is fundamentally mono, but the synthesized sound passes through an effects section which can do a nice job of stereoising it. You won’t need the Drive control for this. Set the Color high and Depth to a middling value for straightforward stereo synthesis; as you lower Color or raise Depth you’ll start to hear more animation in the sound.
Audio Examples
To hear the stereo effects described in this article in action, surf to www.soundonsound.com/sos/mar14/articles/s1media.htm.


