Pitch-correction plug-ins are the key to the current trend for weird vocal effects. Here's how to achieve them in Pro Tools.
This month, we're going to look at different ways of using pitch-correction techniques to create vocal effects in Pro Tools. Normally, you want to keep side-effects to a minimum when tuning vocals, so that you can save your vocalist's blushes, and most pitch-correction tools are designed to assist you in achieving this end. Take a look at image 1: 1: Sound Toys' Pitch Doctor is great for transparent pitch fixes.
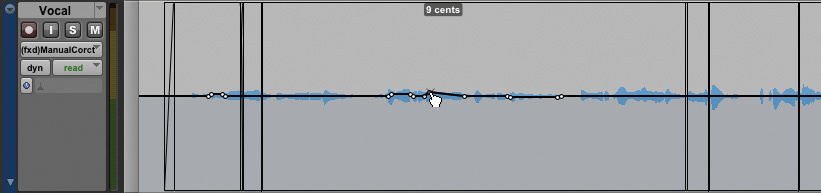 this is my reference point for Sound Toys' Pitch Doctor plug-in. It is set to Auto-Correct but I don't have it working too hard, so the Smoothing control is well down. I find that this setting fixes most of the tuning errors from an average to good singer, but for the odd notes it doesn't quite pull in, I prefer to use the Manual Correction to help it pull in the final few errant notes. You can see that I have automated the Manual Correct, making very small changes of usually no more than 10 cents or so — unless the singer completely missed the note, in which case I prefer to comp that note in from another take rather than get a pitch-correction plug-in to pull it in.
Tune Me Up
In this workshop, however, we're not looking for invisible pitch correction but noticeable vocal effects, so let's start with the daddy (or should that be mummy) of them all, the 'Cher effect' that we first heard on her single 'Believe'. The basic principle of the effect is to get the pitch correction plug-in to work immediately on a note and to pull it hard onto the note's pitch. The 'retune' speed has to be set to zero, as it is the crucial part of creating the 'robotic' sound. This is because when a human sings, there is a degree of natural modulation of the pitch as they hit the note, but with the retune speed right down, the pitch-correction software pulls the note in right from the start.
I've found that I can't get the full 'Cher effect' with Pitch Doctor: even with the scale set correctly and the Smoothing as low as it goes, the effect is still relatively mild. Sound Toys seem to have designed Pitch Doctor to be as transparent as possible, so it isn't really possible to push it far enough. The effect was originally created with Antares' Auto-Tune, which is still probably the most commonly used tool for the job. 2: Auto-Tune 7, the classic tool for the 'Cher effect'. If you have Auto-Tune, insert it onto your vocal track and turn the Retune speed down to zero. The other vital part of the effect is choosing the appropriate musical scale to correct to — you might want to disable some notes in the scale to stop Auto-Tune pulling the vocal onto those notes. In Auto-Tune 7, this is achieved by highlighting the appropriate Remove buttons in the centre of the window; by contrast, if you select a Chromatic scale, you should find the effect isn't nearly as noticeable. Finally, try setting the Retune speed to 1 or 2, as it may suit your vocal more to relax it slightly.
You can also use Auto-Tune's Graphical mode to create the same effect. Select Graphical, using the Auto/Graph button in the top right-hand corner of the plug-in's window, and then click on the Options button next to it. In the Options window, set the Default Notes Retune Speed to 0. Back in the main Graphical window, select the Show Lanes button to make lining up the notes easier. Now hit the Track Pitch button and play the section of audio you want to process. Click the Make Notes button. Try adjusting the Number of Note Objects control to see now that changes the effect. Make sure that all of the Note objects butt up against each other, as this will ensure that all of the note changes are instantaneous. If they don't, either use the Arrow tool to extend existing Note boundaries so that they do, or use the Note tool to draw new notes to fill in any gaps. If you're not happy with the result, simply experiment with changing the pitch or length of individual Notes. The beauty of Note objects is that you can literally sculpt any melodic contour to get exactly the effect you desire. Once you get the effect exactly as you like it, Auto-Tune 7's graphical Paste function will allow you to copy all of the Note objects and paste them in subsequent verses or choruses, or wherever else in your track you'd like the same effect. 3: Auto-Tune's Graphical mode gives you even more control.
For those who can't afford the full Auto-Tune 7, Antares have produced a simplified version, called Auto-Tune EFX: with a UK street price of around £90, it is really designed with this vocal effect sound in mind. The plug-in is simple and effective: drop it on a track, select the appropriate key and away it goes. It has three basic settings: Hard EFX is the 'Cher effect', Soft EFX is a less processed version, and then the third is a more traditional pitch-correction mode. I would suspect that the switch is controlling the retune speed. The conventional Pitch Correction is remarkably good, although there aren't any options to soften any side-effects or to add manual tuning options, as on its bigger brother.
Even if your singer is bang-on with his or her pitch accuracy, try using Auto-Tune on a duplicate track set to a Chromatic scale, with a slow retune speed, and mix it in with the original. Once you have slipped the Auto-Tune track back to compensate for the plug-in's delay, you will find you have a nice chorus/flanging effect that is becoming very popular with female vocalists like Christina Aguilera and on a lot of really soulful R&B vocals. It's not there to fix the vocal: it's there to be part of the vocal sound. Once you get really at home with Auto-Tune 7 and its Graphical mode, you can also create some really nice portamento effects, such as enhancing or smoothing a slur on a vocal or an R&B slide.
Out Of The Box
Even if you don't have any third-party plug-ins to work with, there's plenty you can do with the plug-ins that come with Pro Tools as standard. One such is Pitch, which used to be a separate plug-in called DPP1; eventually it was rolled into the bundled plug-in collection, and has largely been forgotten about since being eclipsed by Avid's later and posher pitch-based plug-ins. However, unlike its later cousin, it can be automated, and is available as a real-time or as an AudioSuite plug-in, meaning that it can be used as a way of achieving the 'Cher effect'. Drop a real-time instance on the track you want to process, and then activate automation for the Coarse Pitch control. 4: By automating the built-in Pitch plug-in, the 'Cher effect' is easily achievable. Select this control to be displayed in the track's automation lane, and draw in a pitch change on every note. Because the Coarse Pitch control works in semitone steps, the automation will only go up and down in fixed steps — so by adjusting the pitch up and down by fixed amounts, you get a stepped pitch-change effect. What's more, Pitch is available as a mono-to-stereo plug-in, so you could get two for one by pitch-shifting the left and right channels separately and deriving two harmonies from the one line. How's that for value for money!
An alternative is to use Elastic Pitch, the less well known brother of Elastic Audio. Unlike conventional plug-ins, Elastic Pitch is a region-specific effect that can't be automated; nor can it do automatic pitch-correction, but it does have some useful tricks up its sleeve. To get started, engage Elastic Audio on the track you want to work with, select Elastic Properties, then Polyphonic.
Elastic Pitch is perfect for the well-known Eventide Harmonizer widening effect, where slightly pitch-shifted duplicate parts are added to thicken out a vocal. Duplicate the track a couple of times, then right-click regions on the duplicates. From the Elastic Properties window that appears, tweak the pitch up a couple of cents on one duplicate and down a couple of cents on a second duplicate. This can really fatten out a sound. For a more 'flangey' effect try increasing the detuning up to five, 10 or even 20 cents. Also, reduce the level of the detuned parts so that they sit under the original line, which you can do from either the Elastic Properties window or by using the fader automation, as normal.
Elastic Pitch can also help you rewrite your harmonies. Because it is region-specific, you will need to cut up the vocal parts into individual notes where you need to change the pitch. This is most easily done using the Tab to Transient feature to help you find the start of each note. Once you have cut your vocal lines up, select Elastic Properties from the Regions menu and move offending notes up or down by the necessary number of semitones. If the tuning of an individual note isn't perfect, you can use the cents value to fine-tune it too. Very quickly you can create a completely new vocal harmony arrangement from your original vocal part without having to get the singer back in to re-record it.
I hope this workshop has stimulated the creative juices. Now take your pitch-correction plug-ins and push them into creating some new vocal effects!


