
More hands-on tips for harnessing the power of Roland's monster multitracker.
Last month's VS2480 masterclass concentrated on mixing and automation advice, as well as discussing some issues of audio quality and the usefulness of the VGA output. Now I'm going to spend a little time exploring some of the useful things you can do with the mixer's routing matrix, before passing on a few of my favourite VS8F2 effects tricks.
Gain Extra Aux Outputs!
Because of its eight auxiliary busses and eight direct outputs, there are many more potential sends from the VS2480's internal digital mixer than there are built-in analogue outputs. This may not be a concern for you if you have invested in additional R-Bus interfacing, but there is a workaround to get a couple of extra send outputs at mixdown if you're just running the multitracker on its own.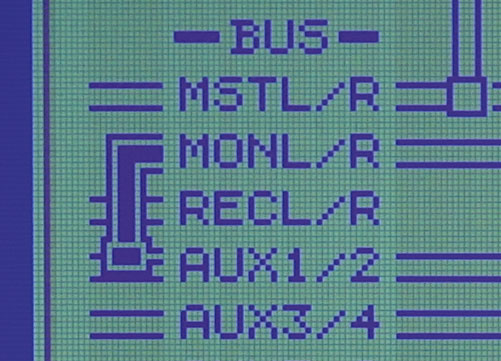
These two extra send outputs are the Monitor outputs. In order to free these up while mixing, you have to do your monitoring via the main Master outputs, if you're using speakers, just re-plug them to the Master outputs if they're not already there. If you're wanting to mix on headphones, then you'll need to press the EZ Routing button and then select the Output tab to get to the Output Assign screen. Once there, you can select the headphone output you're after (with the cursor keys or mouse) and select the MSTL/R buss as its source.
. If the aux busses aren't linked, then a single aux buss will be fed to both outputs (left).") Linking two aux busses into a single stereo buss lets you send separate signals to each of the two Monitor jack outputs (right). If the aux busses aren't linked, then a single aux buss will be fed to both outputs (left).You can now access the two Monitor outputs using a stereo aux buss. If you don't have one yet, then link a pair of adjacent mono aux busses from any Ch Edit View screen by selecting one of the aux pre/post switches and then pressing Enter — the pop-up window which follows offers a linking switch. Now if you head over to the EZ Routing Output Assign screen as before, and then cursor all the way to the left, you can connect the aux-buss stereo pair to the Monitor outputs.
Linking two aux busses into a single stereo buss lets you send separate signals to each of the two Monitor jack outputs (right). If the aux busses aren't linked, then a single aux buss will be fed to both outputs (left).You can now access the two Monitor outputs using a stereo aux buss. If you don't have one yet, then link a pair of adjacent mono aux busses from any Ch Edit View screen by selecting one of the aux pre/post switches and then pressing Enter — the pop-up window which follows offers a linking switch. Now if you head over to the EZ Routing Output Assign screen as before, and then cursor all the way to the left, you can connect the aux-buss stereo pair to the Monitor outputs.
Some of you may want to get two separate mono sends to come out of the two Monitor output jacks, but unfortunately this is not possible in any straightforward way. An unpaired aux buss will hog both Monitor outputs if you try to select it in the EZ Routing Output Assign page, which is fine if you only need one extra mono send, but a bummer if you want to hear another aux buss on one of the outputs. You can work around this a little by linking the two separate sends together and, although not ideal, it does in practice provide two fairly independent sends if you're willing to spend time juggling aux level and pan controls.
Using The Assignable Controls
 If you assign the EQ bypass function to the channel faders, you can keep flipping the EQ in and out of the signal path while you're using the PRM Edit knobs to set it up.One of the most useful control facilities offered by the VS2480 is the User Knob/Fader Assign mode, enabled by pressing the front-panel Knob/Fader Assign button and then the '9' numeric key. This lets you control pretty much any mixing parameter (hold Shift and press the '9' numeric key while in User Knob/Fader Assign mode for the list) from either the channel faders or the row of rotary encoders, as specified using the Knob/Fader Assign Sw parameter in the Global pages of the Utility menu.
If you want to be able to see the setting of the adjusted parameter instantly, then fader control is the best option. However, the rotary encoders respond more smoothly to rapid control movements (the faders end up stepping), and also offer greater accuracy. In cases where one 'click' of the rotary encoder doesn't give the finest increment of a given parameter (in other words, for any parameter calibrated in decibels), holding down Shift allows finer adjustment. I find that I usually have the User Knob/Fader Assign mode set up to control the EQ bypass switch from the fader, so that I can adjust the EQ from the rotary controls as normal while working the bypass switch from the fader, all without touching the cursor buttons or data dial.
Using The Oscillator For Drum Mixing
 The D-Time parameter in the Mastering Toolkit effect algorithm's Input block is set to 10ms by default, which means the effect adds a delay of 10ms to the signal. When you're using it as a channel insert effect, it's therefore usually better to reduce this delay to zero.Although the main purpose of the oscillator in the VS2480 is technical, there is also the odd creative application for it when you're mixing drum sounds. One of the things you can do is add extra low-end welly to your kick-drum tracks. Select the Utility menu's Osc/Anlyz option to get to the oscillator settings screen, and then set it up to output a sine wave at 40Hz. Make sure it's switched on, but turn off its Mix Sw and assign it instead to a spare Dir buss. Now make sure that the Record Monitor parameter in the Utility menu's PlayRec pages is set to Source and arm a spare track for recording. From the EZ Routing View screen, patch the Dir buss carrying the oscillator sine wave to the record-enabled track, and then go to that track's Ch Edit View screen. Switch on the dynamics processor, selecting the Expander option and making sure that the KeyIn parameter is set to feed the side-chain from the kick-drum track.
Finally, press Play and adjust the dynamics parameters: go for the more extreme Ratio settings in order to pretty much silence the sine wave between beats, set the Threshold for reliable triggering, and use the Attack and Release controls to tweak the sine wave's level envelope. Note that there isn't any point trying to EQ the oscillator channel — a sine wave only has energy at one frequency, so EQ will only change its level! If you find you need more level, head back to the oscillator settings and raise its Att control, and while you're there you might want to experiment with different oscillator frequencies as well.
If you need to reclaim the record-enabled track, bounce the two tracks down to another one and use the result in place of your original kick-drum track — remember that you can always keep the original recording tucked away in your virtual tracks in case you want to redo things.
Another variation on this theme is to use the oscillator's White Noise or Pink Noise settings to support snare drums in the same way. Here, though, you can afford to use drastic EQ to isolate just those frequency ranges of the noise signal that you want to add to your snare — perhaps it just needs more weight, or a little more buzz.
Waiting For VS8F3...
Roland's new VS8F3 effects card , which offers the capability of running third-party plug-ins, has just arrived here at the SOS office, and it's presence already has an impact on what I've been writing in this masterclass. The first thing to mention is that the new card works at 56-bit resolution, which means that you're not losing resolution from the VS2480's internal 56-bit mixer when inserting effects processing into any channel, or indeed the mix buss.
The second thing to say is that it looks as if some of the third-party effect algorithms may not be usable without the external VGA display. Although the five Roland plug-ins bundled as standard with the VS8F3 card all work on both LCD and VGA, when you load up any of these plug-ins, there is a line in the Plug-in Information page that reads 'Available On VS2480: LCD & VGA'. Call me suspicious, but this kind of hints to me that 'Available On VS2480: VGA Only' is a possible option here, so my advice last month to spend the money you would have used for a VGA display to buy extra effects cards could end up being a bit self-defeating... Rest assured that any of the third-party plug-ins I get hold of will be reviewed with this in mind!
One final thing. Although the heritage of some of the VS8F2 algorithms lives on in the VS8F3, the more recent card doesn't include most of the earlier card's algorithms. So, in practice, you'll probably want to think of the VS8F3 as a complement, rather than a replacement, for the VS8F2.
VS8F2 Effects Tricks
Even without the VS8F3, the effects processing is one of the VS2480's real highlights, in my opinion. If you install the full complement of VS8F2 effects boards, you get up to eight stereo processors, which means that you can really go to town with spot effects in your mix. However, there are a couple of bits of general advice which I'd like to offer for getting the best out of them.
 Screen 1.
 Screen 2.
 Screen 3.
 and route this buss to a spare record-enabled track (Screen 2). Then go to the Utility menu and switch the Record Monitor mode to Source (Screen 3) so that you can hear the oscillator through the spare track. Finally, enable the track's channel expander and key it from your choice of drum track, adjusting the controls for reliable triggering (this Screen 4).") You can mix the oscillator in with drum sounds only when they're playing. First you need to set up the oscillator to feed one of the Dir busses (Screen 1) and route this buss to a spare record-enabled track (Screen 2). Then go to the Utility menu and switch the Record Monitor mode to Source (Screen 3) so that you can hear the oscillator through the spare track. Finally, enable the track's channel expander and key it from your choice of drum track, adjusting the controls for reliable triggering (this Screen 4).Firstly, I'd recommend complementing the internal effects with a dedicated hardware reverb unit — you'll probably want something at least as good as the TC Electronic M•One XL or Lexicon MPX550. Not only does this throw more processing power at an important effect which really benefits from it, but it also frees up your internal effects to do all the mad things they do best! The second thing I'd suggest is to avoid inserting effects on your mix buss if you're working at 24-bit resolution. The reason for this is that the VS8F2 only processes at 24-bit resolution (compared to the much more suitable 56-bit resolution of the VS2480's own internal mixer), and it can therefore potentially degrade the sound of your whole mix. If you are a fan of processing the main stereo buss at the mixdown stage, then I'd suggest mixing down to an external digital recorder via a rackmount digital processor — one of the all-in-one mastering boxes would be a good bet for this, but be careful with any multi-band dynamics.
You can mix the oscillator in with drum sounds only when they're playing. First you need to set up the oscillator to feed one of the Dir busses (Screen 1) and route this buss to a spare record-enabled track (Screen 2). Then go to the Utility menu and switch the Record Monitor mode to Source (Screen 3) so that you can hear the oscillator through the spare track. Finally, enable the track's channel expander and key it from your choice of drum track, adjusting the controls for reliable triggering (this Screen 4).Firstly, I'd recommend complementing the internal effects with a dedicated hardware reverb unit — you'll probably want something at least as good as the TC Electronic M•One XL or Lexicon MPX550. Not only does this throw more processing power at an important effect which really benefits from it, but it also frees up your internal effects to do all the mad things they do best! The second thing I'd suggest is to avoid inserting effects on your mix buss if you're working at 24-bit resolution. The reason for this is that the VS8F2 only processes at 24-bit resolution (compared to the much more suitable 56-bit resolution of the VS2480's own internal mixer), and it can therefore potentially degrade the sound of your whole mix. If you are a fan of processing the main stereo buss at the mixdown stage, then I'd suggest mixing down to an external digital recorder via a rackmount digital processor — one of the all-in-one mastering boxes would be a good bet for this, but be careful with any multi-band dynamics.
Just because you might not want to use the Mastering Toolkit over your whole mix, it doesn't mean that it's redundant, because it can prove very useful on individual channels — just set the D-Time parameter in the algorithm's Input block to zero in this case, so that your track isn't delayed any more than necessary. For example, I recently used it to tighten up the low end of a flabby kick drum: with the Low Split Point parameter in the Input block at about 80Hz, I set up the multi-band expander to operate only in that band, and then used a low ratio (1:1.6) and high threshold to tighten up the low-end envelope of each kick drum, redressing the tonal balance using the Low Level parameter in the Mixer block.
The VS8F2 algorithms were developed for the VS1680, so some of the algorithms seem a little irrelevant given the enhanced channel EQ and dynamics facilities in the VS2480. However, the effects-board EQ patches can still be handy in chains of effects, and they can be combined with the dynamics in the DualComp/Lim and MicModeling algorithms to allow equalisation to follow dynamics — something that isn't possible just using the mixer channel. Furthermore, it's possible to automate dynamics parameter changes by changing effect algorithms, and you can't do this with the channel dynamics processor.
Audio Editing
 can be useful occasionally for checking editing settings, you'll find that it gets in the way if you do a lot of editing using the front-panel buttons.") Although the Edit Message confirmation (above) can be useful occasionally for checking editing settings, you'll find that it gets in the way if you do a lot of editing using the front-panel buttons.The audio editing on the VS2480 is another of its strengths, despite the inability to edit down to sample level, a restriction shared by the whole VS clan. However, there are some things that it's good to know if you end up editing a lot.
Although the Edit Message confirmation (above) can be useful occasionally for checking editing settings, you'll find that it gets in the way if you do a lot of editing using the front-panel buttons.The audio editing on the VS2480 is another of its strengths, despite the inability to edit down to sample level, a restriction shared by the whole VS clan. However, there are some things that it's good to know if you end up editing a lot.
First of all, you should prepare the ground a little by setting things up so that you can work as fast as possible. For a start, this means switching off the confirmation messages which accompany every editing procedure and Locator-point change — they just add unnecessary key presses. Head for the Utility menu's Global pages, and make sure Locator/Scene Type is set to Quick and Edit Message is set to Off. Also change Edit Point Sw Type to Overwrite, so that you can set the In, Out, From, and To points with single key presses. (Incidentally, if you actually want to locate to any of these edit points, rather than overwriting them, hold down Shift.) Setting these three parameters correctly dramatically increases the speed at which you can carry out editing operations. There may be the odd occasion where you wish to see the Edit Message to confirm the exact timing of your editing points, in which case it's easiest to toggle the Edit Message parameter directly by holding Shift and pressing the Phrase/Region/Automix button.
Unlike with the previous VS machines, you have a mouse at your disposal on the VS2480. This is especially useful for moving audio between tracks, and it's also great for quickly adjusting Phrase boundaries from the Waveform Display screen. However, I still find that I don't use the mouse for most of my edits, because using the buttons and data wheel is so much more reliable and repeatable. If, like me, you don't use the mouse for many of the editing operations, it's worth making full use of the dedicated Track Edit buttons under the LCD display. Not only do they bypass the Track menu, but they also provide a quick method of confirming your edits — for Phrase and Region Copy/Move commands (as well as for Phrase Trim/Split) you can click the same Track Edit button again to confirm, rather than having to move your hand down to the Enter/Yes key every time. One thing to remember about the Track Edit buttons, though, is that you can only use them when they're lit up, and they only do that when a Region or Phrase is selected and the required editing points are set.
Using Stereo Delay

 and Stereo Delay Chorus (bottom).") There are only two true stereo-in/stereo-out delays in the VS8F2 algorithm set: Stereo Pitch Shift Delay (top) and Stereo Delay Chorus (bottom).There's a lot to be said for using delays at the mixing stage nowadays rather than reverbs, because delay can give you a sense of fullness and space without clouding the mix.
There are only two true stereo-in/stereo-out delays in the VS8F2 algorithm set: Stereo Pitch Shift Delay (top) and Stereo Delay Chorus (bottom).There's a lot to be said for using delays at the mixing stage nowadays rather than reverbs, because delay can give you a sense of fullness and space without clouding the mix.
One of the great things about the effects implementation in the VS2480 is that you can set up a true stereo delay — in other words a stereo aux buss feeding a stereo-in/stereo-out delay effect. The advantages of stereo delay are that any mono track can have its delay sound panned independently, and the delay sound for stereo tracks will share the same stereo spread as the dry signal.
Here's how you set up this effect. First of all you need to link an odd/even pair of aux sends, as described above. Head to a spare effects-return channel and set its Assign parameter to the newly linked pair of aux sends before selecting Stereo Pitch Shifter Delay (one of only two true-stereo delays in the VS8F2 set) as its effects algorithm. Go into the editing pages for this algorithm and zero the Pitch, CrossFeedbackLvl, and DirLvl parameters, before setting up the remaining values to taste — just make sure that you set associated Lch and Rch parameters the same. When I'm using this patch as an alternative to reverb, I tend to zero the PreDly, set the FBDly according to the song's tempo, and then roll off high and low end using the effect algorithm's EQ block.
Quick Tips
 On the VS880, the Previous/Next buttons could be used to jump between Marker points, but on the VS2480 the default is that they jump between Phrase boundaries. If you want to change this back to the VS880 method, then go to the Global Utility pages and set the Previous/Next Sw parameter to Marker.
If you link two mono mixer channels into a single stereo channel, their individual pan controls disappear and are replaced by a single communal control. Similarly, their individual fader levels are replaced by a communal stereo fader level. However, if you want to adjust the individual pan controls (say, to narrow the stereo image) or fader levels (to adjust a recorded level imbalance) you have to go to the Ch Edit View screen, select the pan or fader icon, and then press Enter. A small pop-up window will then offer up the separate controls for tweaking.
As a related point, if you're automating a pair of mixer channels which have been linked for stereo, you need to put the automation data on the odd-numbered channel, otherwise it won't have any effect.
Effect Chains & Effects-return Aux Sends
 A couple of useful effects setups. The upper screen here shows how you use the Stereo Pitch Shift Delay algorithm to imitate the traditional Harmonizer vocal chorus effect.The only drawback of this technique for creating a stereo delay is that the Stereo Pitch Shifter Delay algorithm only offers a maximum 500ms delay time. However, you can work around this problem by chaining two effects returns together, and this is quite straightforward to do using the Dir busses.
Go to the first effects-return channel and set it up with a stereo delay as already described above, but leave the algorithm's EQ switched off and all FeedbackLvl parameters at zero. Switch off this channel's connection to the mix, assigning it instead to a pair of Dir busses. Now go to a second effects-return channel, select the appropriate Dir busses as its input, and duplicate the same effects patch as on the first channel.
 This screen shows the speaker simulator block of the Guitar Amp Simulator algorithm — if used on its own with a Mic Setting value of three, it creates a nice stereo ambience.You'll now get a single delay through the two effects of up to 1000ms, to which you can add feedback by simply fading up whichever aux send on the second effects-return channel feeds the first effects-return channel. This technique for chaining effects can of course be put to use with any effects algorithms in much the same way, which can be handy for things like de-essing reverb sends and ducking delays.
The effects-return aux sends are handy in other situations as well. An obvious use for them is to add a little reverb to delays, helping to recess them behind the dry sound. Also, if you're unable to run a dedicated external reverb, you can increase the smoothness of the internal reverb sounds in the same way people often used to in the '80s: by layering different delay and reverb patches, and by feeding small amounts of signal between the different effects-return channels as well.
The Quickest Way To De-ess Using Automix
Although de-essing a complete lead vocal using an automated channel EQ takes a fair bit of time to do, I consider it worth the effort nonetheless. I hope that the de-essers which will become available on the VS8F3 card will render such an activity unnecessary, but at the moment none of the de-essers in the VS2480 do the job well enough, to my ears. If you have come to the same conclusion, then here's a way to make generating automated de-essing as painless as possible., you can switch on the Waveform Display and the Scrub function during Automix recording, isolating and ducking rogue patches of sibilance comparatively quickly using the data wheel and the PRM Edit Hi-Mid Gain encoder.") De-essing with a channel equaliser under Automix control: Once you've set up the Hi-Mid EQ band's frequency to something sensible for de-essing (inset), you can switch on the Waveform Display and the Scrub function during Automix recording, isolating and ducking rogue patches of sibilance comparatively quickly using the data wheel and the PRM Edit Hi-Mid Gain encoder.
De-essing with a channel equaliser under Automix control: Once you've set up the Hi-Mid EQ band's frequency to something sensible for de-essing (inset), you can switch on the Waveform Display and the Scrub function during Automix recording, isolating and ducking rogue patches of sibilance comparatively quickly using the data wheel and the PRM Edit Hi-Mid Gain encoder.
First you have to make sure that you've got the lead-vocal channel selected, and that the assignable rotary controls are in the PRM Edit mode, so that you can access the EQ controls. In addition, set the frequency of the Hi-Mid EQ band to a useful value — maybe 6kHz to start with. Now set the lead-vocal channel to Automix write mode (hold the Automix button and press the Ch Edit button until the button goes red) and enter Automix recording mode (hold Automix and press Record).
Return to the Home display and the press Scrub and then Wave Disp. You can now scroll through the vocal track using the data dial and shuttle wheel until you find the first case of excessive sibilance. Locate the transport to the beginning of the 's', turn the Hi-Mid EQ control a few clicks anticlockwise (each click will be a decibel of EQ cut), and then hold the Automix button and press Tap to save a snapshot. Move to the end of the 's', turn the Hi-Mid control the same number of clicks clockwise, and store another snapshot. You've now ducked the EQ band just for the patch of sibilance. You can proceed through the whole track in this way, and because you never have to stop the Automix recording mode, it's comparatively quick.
If each time that you adjust the rotary control the display shifts to the Ch Edit View screen, you can get back to the waveform display by pressing the Ch Edit button — oddly, pressing the Wave Disp button won't work here. However, I prefer to switch off the automatic display switching before I start. The parameter you need is called PRM Knob Auto Disp, and you can find it in the second of the two Global Utility pages.
Another thing to say is that you might decide after you've finished the de-essing automation that you want to try a different EQ frequency or bandwidth. My advice in this case is first to wipe all the frequency and bandwidth automation information for that EQ band for the entire track. You can do this by going into the Automix Edit screen, selecting EQ Hi-Mid Freq or EQ Hi-Mid Q as the Target information, and then using the Erase editing function. Once this is done, you can adjust the EQ frequency and bandwidth by ear while the track is playing, without automation data fighting you for the control of those parameters.
Handy Effects Setups
The Stereo Pitch Shifter Delay algorithm is also the place to look if you're after the classic stereo thickening effect which many engineers used to achieve using the old AMS sampling delay or the Eventide Harmonizer. You only need a mono send for this patch, although the effects-return channel still wants to have a stereo output, so leave the Mono Sw off. Zero all the effect algorithm's delay and feedback parameters, and check that the DirLvl is also at zero. Enter PreDly values of 11ms and 13ms for the left and right channels respectively, and then use the pitch-shifting to shift the left and right channels a few cents flat and sharp respectively. How far you shift depends on the exact effect you like, but I usually stay within the ±5 cents range. The EQ can again be used for tonal fine-tuning. This patch is useful to subtly widen the stereo image of almost anything, and it's especially effective on vocals — just be careful not to overdo the levels unless you're covering 'Hard Habit To Break'...

If you've got any single mono track which sounds a bit thin and uninspiring in your mix, a good way to beef it up is to put it through the GuitarAmpMdl algorithm — even a very clean patch can add a nice degree of extra body and resonance. Although you can insert this effect into the channel directly, this doesn't actually make the best of the processing, because the output of the effect is actually stereo. Instead, switch off the channel's assignment to the mix and send it to a spare Dir buss, which can then be selected as the input for an effects-return channel containing the amp-modelling processing. Because the output of the return channel is stereo by default, you'll now also get the rather nice stereo ambience that is added as part of the speaker-modelling block — for the most pronounced result, choose the highest (most distant) value for the Mic Setting parameter.
Virtual Veteran
In this short series I've demonstrated how careful consideration of your working methods is the key to getting the best from Roland's flagship recording workstation in your studio. I've also shown that many of the VS2480's functions (and quirks!) can be used creatively, and there's little doubt that such possibilities will multiply as Roland continue to expand the capabilities of this powerful machine.
VS2480 Web Resources
This sample-library manufacturer offers multi-track drum libraries directly in VS2480 format. The libraries provide ready-to-go song sections which can be mixed and matched to create a suitable performance for your particular track. Because these are multi-track recordings, rather than just stereo loops, you can, of course, remix the drum balance as appropriate to your style of music, and they would also make great practice material for the novice at mixing drums. The library includes an audio CD in addition to the data CD-ROM, so that you can preview and select the sections you want to use before importing them into the VS2480.
This is the location of Roland's new on-line manual library. There have been a number of manuals for the VS2480, and some are definitely better than others. When we first received the VS2480 for review here at SOS, the manuals seemed barely translated out of Japanese, but the manuals which were released with the VS2480 by Roland US were much better, and it's these which you can download.
So if your manual contains gems such as "the parameter that set up ti with the AUX mixer because the surround function has materialized by using the bus changes writing for the use of surround," do yourself a favour and download the other version! If you're after a DVD manual, there's currently only a VS2400 title available through Roland in the UK — apparently there's been too little demand for them to ship them over from Roland US, who make them. However, some retailers in the US appear to stock the VS2480 DVD manual, so if you're desperate to get hold of it then you could probably get a copy shipped from there, although you may fall foul of customs charges.
The VS Planet site seems to be going from strength to strength, even though it inevitably suffers from the problem of all large forums, namely that the useful information is spread very thinly over a lot of chat. However, given how complex the VS2480 is, this is probably still the best place to look if you're after the answer to a specific VS-related query.
This support site is officially linked with VS Planet, but makes it slightly easier to get to the useful stuff. There's also a great downloads section which includes track sheets, software update downloads, and a variety of miscellaneous utilities.
Here you can read the previous VS880/VS1680 tips article, from SOS March 2002. Although much has changed in the VS2480, there are still sections of this article which apply to it.
A few early Roland VS2480 users encountered problems with their machine's preamps, and wrote in to SOS as a result. The following Q&A response clears things up.