We show you how to edit and save your synth's Patches, and help you maximise the effects potential of your multitimbral setups. Plus there's advice on troubleshooting thorny panning problems, and tips on automating levels without changing your individual sounds.
The first two parts of this series have focused on the XV5080, but this month we turn our attention to those classic workhorses, the JV1080 and JV2080. The points covered can also be applied generally to the JV range, the XP range, the Fantoms, and in most cases the XV models as well.
Tweak With Confidence
Let's begin by taking a look at one of the most user-friendly features which, since the arrival of the JV80, has been one of the strongest aspects of Roland synths. This is the ability to edit and otherwise fine-tune every parameter of each individual Patch, whilst it is resident within a multitimbral Performance. When you create or call up a Performance, all the data required is loaded from memory into a temporary buffer. This includes the Performance parameters themselves, the Patches for all 16 Parts (including the Rhythm Part) and the effect settings for that Performance. As is standard on pretty much any modern device, any editing you do is applied only to the temporary buffer — the original Patch data is safe in the unit's memory and won't be changed unless you overwrite it.
 Simultaneously press the Perform and Patch buttons to edit Patches from within a Performance. Note that when the Rhythm Part is selected, pressing Perform/Rhythm enables fully detailed editing of the Performance's Rhythm Part in the same way.In order to gain editing access to each Patch in a Performance, you must enter the Perform/Patch edit mode. Press and hold the Perform button whilst simultaneously pressing the neighbouring Patch button — both buttons will light up. Using the left and right cursor buttons, you can now scroll through the 16 Parts. The name of each Part's Patch is shown large and clear in the display, and you can select and edit the Patches just as if you were in the normal Patch mode. In addition, any edits you perform on a Patch are retained in the temporary buffer — you don't have to store the changes before you move on to editing any of the other Parts. You could edit the Patches of all 16 Parts in this way, and all in context while you're playing back a sequence.
This may not sound like such a big deal, but not all synths are this flexible. The Yamaha Motifs, for instance, allow only basic Part editing when in Multi (Performance) mode. To edit a Motif patch in detail, you must leave Multi mode, edit the patch in Voice mode, store it, and return to Multi mode, therefore rendering detailed patch tweaking impossible in a multitimbral context. The Korg Wavestation (although admittedly not a contemporary synth) was particularly notorious for its inflexible editing methods — any edited Part had to be stored before you could even select a different Part. And because those Parts were also shared by other Wavestation Patches, this could lead to the unintentional ruination of a significant percentage of your sound set!
Saving Edited Performances
Naturally, you will need to preserve your edited Performance (along with any edited Patches) before disaster strikes, and there are two approaches to this. The first of these involves writing to internal memory, which, depending on the model of synth you are using, has certain considerations to take into account if you have edited any Patches within the Performance.
 Figure 1. When saving a JV2080 Performance, a prompt box warns you of any edited Patches, which show up as asterisks in the line of dashes. Select the Patch tab to save these Patches — selecting OK will write only the Performance. In the lower screenshot you can see the first of the six edited Patches waiting to be written before saving the Performance.
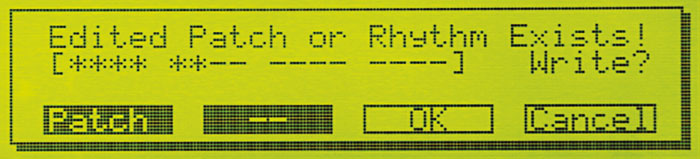 On the JV2080, if you attempt to write a Performance that contains any edited Patch or Rhythm data, a box appears that prompts you to take appropriate action. If you ignore this prompt and press the OK tab to write the Performance anyway, a warning message appears: Edited Patch Or Rhythm Will Be Discarded. Pressing the OK tab a second time will write the Performance parameters, but all your Patch and Rhythm edits will be lost forever. Therefore, the edited Patches need to be saved one by one — happily, the JV2080 makes this an easy task. In that initial prompt box, you will see a line of sixteen dashes and/or asterisks. These represent the sixteen Parts — a dash means the Part's Patch has not been edited, an asterisk means that it has, thus you can see at a glance which Patches need saving.
Select the Patch tab, which takes you to the Patch Write page. The same line of sixteen dashes and asterisks is shown, below which are the source (the edited Patch) and destination (where it is to be written). A small black arrow points to the leftmost asterisk — this is the first edited Patch to be saved. If you wish to change the destination from that shown, move the cursor down to the destination field and scroll the dial until you find a suitable memory location — the Comp tab enables you to compare the Patch to be saved with the Patch to be overwritten. When you are happy, press the Execute tab. The Patch will be written, and the small black arrow will move on to the next asterisked Part. If you do not want to save any particular Patch, just place the cursor in the source field and scroll the dial to move the arrow to the next asterisk. When all the Patches are written, the Performance Write page returns (or click Exit once if you have skipped any Patches) and the OK tab completes the job.
On the JV1080 things work a little differently, though. Unlike the JV2080, it doesn't warn you of any edited Patches when you go to save a Performance, nor does it offer you a direct option to save those Patches. ![]() Figure 2. When selecting JV1080 Parts in Performance mode, an asterisk to the left of the Patch name shows that the Patch has been edited.Writing a Performance will always clear the temporary buffer and reload the original Patches from memory — so any edited Patches must be saved manually before saving the Performance. You can check which Patches have been edited by returning to Perform/Patch mode and scrolling through the Parts; any edited Patches will have an asterisk to the left of the Patch name.
Figure 2. When selecting JV1080 Parts in Performance mode, an asterisk to the left of the Patch name shows that the Patch has been edited.Writing a Performance will always clear the temporary buffer and reload the original Patches from memory — so any edited Patches must be saved manually before saving the Performance. You can check which Patches have been edited by returning to Perform/Patch mode and scrolling through the Parts; any edited Patches will have an asterisk to the left of the Patch name.
The edited Patches can only be saved from within Perform/Patch mode (not Patch mode), and the procedure is as follows. Enter Perform/Patch mode and select a Part that contains an edited Patch. Press Utility, select the Write option, and press Enter. Choose a location in which to save the Patch, and save it in the usual way. The JV1080 then returns to Perform/Patch mode, and you can select the next Part containing an edited Patch. Continue until all Patches have been saved, then save the Performance.
Temporary Performance Dump
Writing Performances as outlined above does have drawbacks if you find yourself frequently doing Patch tweaks in Perform/Patch mode. Before very long, you will find you have run out of locations in which to store the edited Patches! In any case, the editing you do may be quite subtle, such as changing the filter cutoff of a bass sound so that it sits better in the mix, and it may not merit permanently saving the slightly altered Patch versions.
The good news is that you don't actually have to write anything to the JV's memory at all. There is an extremely convenient way to save the Performance — together with all those subtle Patch edits that are probably specific only to one particular song — so that it can be reloaded at a later date exactly as you left it. This is where the Temporary Performance Dump comes into its own, and is yet another great feature that makes the XV/JV synths a joy to use. This is similar to executing a normal System Exclusive dump, only instead of dumping the entire memory, the JV transmits the current Performance parameters, together with all sixteen Patch edit buffers — including any edits you have done. Make sure the JV's MIDI out is routed to the MIDI input of your computer, sequencer or MIDI storage device, and that the sequencer's software MIDI Thru is turned off. The JV must be in Performance mode to do the dump. If you're in Perform/Patch mode, just click the Perform button, but, whatever you do, don't then select another Performance or you'll lose all your edits!
 Figure 3. On the JV2080, setting up the SysEx data transfer options as shown will enable you to back up a complete Performance, including all Patch edits currently in the temporary buffer.On the JV2080, press Utility, then the Xfer tab to get to the data transfer page. We want to transmit the temporary buffer Performance data and its Patches, so set up the options as shown in Figure 3, making sure the rightmost source field shows '+Patch', and not '-Patch'. Start your sequencer recording, and press the Execute tab on the JV2080. Ten seconds and 14,785 bytes later, the Performance and all your Patch edits will have been transmitted, and can be saved to disk for a later session. The procedure is much the same for the JV1080, but with fewer options and different button presses. Hit the Utility button, followed by tabs for Menu 2 and Bulk, and then the Enter button. Select Temp as the source, and Performance as the type, and press Enter to begin data transfer.
Next time you power up the JV, it is a simple matter to restore the Performance. Just send that SysEx data back to the JV, and everything is as you last left it, with none of the synth's internal memory having been disturbed in any way. It is good practice to regularly update the JV's SysEx data while you work on a song, especially just prior to some wild Patch editing. That way, you can easily return the JV to its last 'good' state if you go a bit too mad.
Performance Effects
One of the most frequently voiced complaints concerning the JV synths is that some Patches don't sound the way they should when placed in a Performance. This is because those Patches rely on effects to sound the way they do — in particular many of the factory presets. Whereas each Patch, when played in Patch mode, can have a dedicated insert effect (EFX) as well as unique reverb and chorus settings, compromises have to be made in Performance mode, especially on the JV1080.
Like all JV synths, a JV1080 Performance has two global effects — a reverb and a chorus. Each Part has its own send level to each of these, but nevertheless there is only one of each, so a compromise is necessary. In other words, a suitable reverb and chorus must be chosen that will 'do' for any Parts that require them. In addition (and this is usually the main cause for disappointment) the JV1080 has only one EFX insert effect available for the entire Performance. Therefore, if you want a Performance to include a guitar Patch that relies on the distortion EFX, an organ that relies on the rotary speaker EFX and a pad sound that relies on the phaser EFX, you're effectively stuffed, as far as running them all 'live' is concerned. Here are three solutions to this scenario:
- Avoid using more than one Patch that requires an EFX. OK, this solution sucks, but it is an option...
- Route Patches that would otherwise use an EFX to the JV's auxiliary outputs and use outboard effects instead. This may actually be an opportunity to improve on the effects that the JV has to offer, and you will be able to play all the Parts 'live' from your sequencer with suitable effects applied. To make full use of the JV1080's four auxiliary outputs, you may want to consider reducing the relevant Patches to mono so that four such Parts can be treated with individual outboard effects — see 'The Wonderful World Of Panning' later in this article.
- Render each Part that needs an EFX insert effect to audio, one at a time. This is most easily done by selecting each Patch in turn whilst in Patch mode, where it is guaranteed to sound exactly as it was programmed. It may be advisable to remove any reverb and apply it later using a software plug-in or outboard effect — again, an opportunity to improve on the JV's reverb. Alternatively, do an audio render of each Part with no effects at all, and apply suitable alternatives using software plug-ins.
The JV2080, on the other hand, being the most sophisticated of the JV series, can more readily cope with the above 'triple EFX' scenario, as it has three EFX insert effects (as do all the XV synths.) But as we know, even three EFXs are sometimes not enough!
Getting The Most Out Of Your JV1080 At Mixdown

 The JV's Direct Outputs allow you to work around only having one internal insert effect.Here's an illustration of how you can still get a great deal of mixing and effects flexibility when using the JV1080, despite its single EFX block. The key is to use all six outputs, render some Parts to audio, and make use of hardware and software effects. Part 1 uses some internal chorus, and appears at the Mix output, while Part 2 emerges dry from the Mix output. Part 3 uses some internal reverb, and Part 4 uses both chorus and reverb, and both parts emerge from the Mix output. Part 5 is routed through the EFX, emerging at the Mix output, and Part 6 is reduced to mono, panned fully left and routed to the first Direct Output. On the mixing desk, it is also sent to an outboard effects unit.
Part 7 has been rendered to audio (in mono), and the corresponding MIDI sequencer track muted. On the mixing desk, the audio track is sent to another outboard effects unit. Part 8 has also been rendered to audio (in stereo), again with the corresponding MIDI track muted, and is processed with a software plug-in. Part 9 is forced to be mono, panned fully right, and routed to the first Direct Output. On the mixing desk, it is also sent to a third outboard effects unit. Part 16 is a stereo Patch, routed to the JV's second Direct Output and left dry — you could of course add outboard effects via any of your mixer's aux sends.
Recreating A Patch's Effects In A Performance
Supposing we do want to use an EFX-reliant Patch in a JV1080 Performance, how is it made to sound identical to the way it does in Patch mode? There are two approaches to doing this. The first is where you want to recreate only the EFX of the source Patch, and are happy to make do with slightly different reverb and chorus effects. For this example, let's assume that you want to use the JV1080 preset PR-B:002 Dist Gtr 2 in Part one of our Performance. This Patch uses the Distortion EFX, as well as some ping-pong delay (from the reverb processor) and a small amount of chorus. We're not bothered in this case about the delay and chorus, because we only want the distortion EFX.
So, in Performance mode, select Part one using the left/right cursor buttons, and assign to it Patch PR-B:002 — press Parameter, then Part to do this. Now, with the Parameter button still lit, press Effects. In the Part Output field, spin the value dial fully clockwise to select 'Patch' (more on why shortly). Set the reverb and chorus levels to zero for now — you can set them as required later. Click the down cursor button once to go to the EFX Type page. The EFX Type will probably show as 01:Stereo-EQ, or possibly something else — but pay it no heed, as this is merely telling you which EFX is currently assigned to the overall Performance. But surely you need the Distortion EFX? Well yes, you do, but you don't actually select it here. Instead, note the Source field at the right of the display — it most likely says Perform, which means that the EFX type currently shown is indeed the one that is active. Change this Source value from Perform to '1'.
Now play the Patch and, as if by magic, you hear the guitar Patch playing through the Distortion EFX — even though the displayed EFX Type shows something completely different. This is initially confusing, and at first sight it appears that two EFXs are available — the one displayed, and the one you're hearing. However, this is a complete red herring. So what is happening here? The Source value defines whether the EFX used is the one displayed (in other words, one specifically chosen for the Performance, hence the Source value Perform) or an EFX derived from one of the sixteen Parts. If you select a Part number in the Source field — in this case Part one — the EFX that was originally programmed for the distorted guitar Patch assigned to Part one is automatically copied into the EFX buffer — and that is the effect you'll hear — even though the EFX Type display will probably indicate otherwise.
Earlier, we set the output assignment for Part one as Patch. The reason we didn't set it to EFX is that the entire Patch (in other words all the Tones that it's made from) would be sent through the EFX to an equal degree — which is fine if all the Tones in the original Patch have been routed through the EFX. However, the JV Patch structure enables individual Tones to have independent output routings, and if perhaps only one Tone in the original Patch was routed through the EFX, then that Patch would play incorrectly in Performance mode if the output routing were set to EFX. Setting it to Patch ensures that only the Tones that were originally routed through the EFX are treated.
 through the EFX effect according to the Patch's original programming.") Figure 4. Setting a Part's Output Assign parameter to Patch ensures that the individual Tones within the Patch are routed (or not) through the EFX effect according to the Patch's original programming.
Figure 4. Setting a Part's Output Assign parameter to Patch ensures that the individual Tones within the Patch are routed (or not) through the EFX effect according to the Patch's original programming.
In the second scenario, you might want the distorted guitar Patch in Part one to sound exactly the same as the original, including the delay and chorus components. This requires copying all of the guitar Patch's effects to the Performance effects buffer. In doing so, it means that the entire Performance will have to share the same delay/reverb and chorus settings as the Patch — which we'll assume is not a problem! Starting again in Performance mode, press Utility. On the Menu 1 page, cursor across to Copy and press Enter. Cursor down to Perform FX Copy. In the left field, select Patch — in the right field, select the target Patch whose effects you wish to copy. As in our previous example, we'll select PR-B:002. Press Enter again, and then press Performance to return to that mode. Select Part one, press Parameter then Effects. This time, the EFX Type displays 03:Distortion — the same effect as used by our source Patch. Cursor up to Part Output, set to Patch as before, only this time set both the reverb and chorus send levels to 127. The Patch will now play exactly as it does in Patch mode, with precisely the same EFX, reverb and chorus.
There is, however, a limitation to this second effects copying method: you can only copy effects from the Patch User, Card and Preset banks. Expansion-board Patches cannot be accessed by the FX Copy function. The only available option here is to use the EFX Source method outlined in the first scenario, then make reverb and chorus settings manually.
The Wonderful World Of Panning
Panning parameters crop up in numerous places on JV and XV synths, so given the preponderance of panning possibilities, it's no surprise that issues related to panning rate amongst the most frequently asked JV questions. Top of the list of FAQs is 'I've panned this Patch all the way to the left, so how come I can still hear part of it in the right speaker?' OK, let's start by examining aspects of JV panning from the ground up. At the lowest level, a Patch is made of up to four Tones, each of which has its own pan setting. This is found on the TVA editing page for each Tone. If two or more different Tones are used in a Patch, and each Tone is panned to dramatically different positions, the final composite sound will occupy a big, panoramic sound stage — a sort of 'pseudo-stereo'. At this level, each Tone's pan is operating just like the pan knob on a mixing desk channel.
![]() Figure 5. The JV1080 TVA page showing all Tones panned to centre, making the Patch mono. By hard panning this Patch (or its Part), it can be routed exclusively to a single auxiliary output.At the next level up, there is the overall Patch pan parameter, which operates on the total stereo Patch. This is where the analogy to a mixing desk ceases, because the pan knob on a stereo channel of a mixing desk is not really a pan knob — it is a balance control. In reality, it alters the relative level of the left and right sides of the signal, so that if you pan hard left, only the left side of the signal remains — the right side is completely attenuated.
Figure 5. The JV1080 TVA page showing all Tones panned to centre, making the Patch mono. By hard panning this Patch (or its Part), it can be routed exclusively to a single auxiliary output.At the next level up, there is the overall Patch pan parameter, which operates on the total stereo Patch. This is where the analogy to a mixing desk ceases, because the pan knob on a stereo channel of a mixing desk is not really a pan knob — it is a balance control. In reality, it alters the relative level of the left and right sides of the signal, so that if you pan hard left, only the left side of the signal remains — the right side is completely attenuated.
The JV's Patch pan is entirely different — panning to left or right biases the panning of each Tone in that direction, but maintains the relative mix of the Tones, regardless of their original pan position. It also retains a degree of stereo spread between the Tones, so if your Patch has a naturally wide stereo spread, part of it will always be present in the right speaker, even if you have panned the Patch hard left.
At the Performance level, each Part also has its own pan control, which works in exactly the same way as the Patch pan — it biases the overall Part to the left or right, while still retaining the Patch's stereo image. All of these panning possibilities also act cumulatively on each other — so if a Patch within a Performance has one Tone that is panned hard left, and the Patch itself is panned hard right, the Tone will end up in the centre. If the Part is then panned hard left, the Tone will end up on the left again.
Returning to the question of how to pan an entire stereo Patch hard left or right within the JV, there are two ways to approach this. The first method is to force the stereo Patch to be mono. This is simply done by setting each Tone's pan value to centre (the zero value). Having done this, panning the Patch or the Part left or right will have the desired effect. The second method makes use of the cumulative panning effect described above, whereby the stereo Patch is panned fully to one side using the Patch pan parameter, followed by fully panning the Part in the same direction. This double-panning technique 'squashes' the Patch entirely to one side, effectively reducing it to mono. This is OK when hard panning is desired, but if you wish to localise a Patch more precisely (in other words not hard left or right) the 'forced mono' technique above is much more flexible.
 Figure 6. Panning a stereo Patch will reduce its inherent stereo width and bias the image in the desired direction, but further steps need to be taken to pan it hard over to one side.An alternative approach to precise panning is to route the Patch to a spare output pair, then pan the channel pair appropriately on your mixing desk. This is obviously less practical if you're already using those outputs for other things, or if you have several Patches you wish to pan specifically in this way.
Panning With Effects
In some circumstances, when using EFX, this panning problem is sorted for you, because a number of the EFX effects are mono — for example the phaser, overdrive, and distortion. Any stereo Patch routed through these EFX effects is summed to mono by default, and can be panned with impunity. However, attempting to pan mono EFX sounds using the Tone, Patch or Part panning controls has no audible effect at all! In this situation, the only way to apply panning is using the mono EFX's own pan control.
Another point worth mentioning is that the global reverb and chorus effects cannot be panned or forced into mono within the JV. So if you are using these effects on a panned mono Patch, the effects remain irrevocably stuck in wide stereo, regardless of where you pan the actual Patch. The same is true for many of the stereo EFX insert effects.
Another favourite question is 'How do I get rid of that infernal random panning?' People have been known to abandon using an otherwise suitable Patch because it has this disconcerting effect (I quite like it, actually, but there's no accounting for taste...) Getting shot of it is a cinch. Just navigate to the Patch's Pan Modulate page in the TVA menu (or the TVA Prm page on the JV2080). Look for the parameter named Random and set it to zero for all four Tones.
On a more subjective note, whilst it is tempting to have everything running in glorious panoramic stereo (indeed, many of the JV's presets are programmed to occupy a wide stereo image) this can lead to a generally cluttered sound, with parts competing for the same space. It is arguably better practice to reduce individual Parts to mono (or significantly reduce their stereo width) and pan the results judiciously. Does that trombone ensemble really need to be in wide stereo? It would be much more localised in reality, and sitting slightly to the right. How about the violin section? In a real orchestra, they would be panned to the left, with minimal stereo spread. If you reduce or remove the stereo spread of individual parts in this way, the entire performance becomes significantly more transparent, and the details of the arrangement will be much easier to hear.
EFX/MFX & Part Levels
 Figure 7. Most of the overdrive and distortion MFX insert effects on the XV provide no output level control. However, the COSM amp modelling algorithm does, which makes it a good choice in multitimbral setups.On the JV1080 and JV2080, the Part levels are used to adjust the mix of a Performance. Additionally, MIDI Continuous Controller number seven (Volume) or 11 (Expression) messages can be used for dynamic Part level changes within a sequence. However, a different approach is needed for Parts that use certain EFX effects. Specifically, the compressor, limiter, and any effects that make use of distortion or overdrive, because they are highly dependent on their input level. These insert effects are the last step in the signal processing chain, and as such are affected by every other level setting preceding them, from the individual Tone levels to the Patch level and, ultimately, the Part level. The upshot of this is that if you have, say, a steaming lead guitar Patch that is a bit too loud, simply turning down the Part or Patch level will cause the Patch to lose some of its steam — because the distortion EFX is no longer being driven at the same level. In order to alter the balance of any Part using these effects, you must use the level parameter of the EFX in question, rather than the Part level. In this way, the effect itself responds consistently, because this EFX level operates after the effect, not before it.
The JV synths also enable you to assign various EFX parameters to MIDI controllers — a maximum of two such controllers are available for this. The MIDI assignable EFX parameters vary according to the specific EFX you are using, and in the case of the compressor and limiter, their post-effect level is one of those parameters. Thus you can 'ride' the level of a compressed or limited Part using a MIDI controller as a means of automation. However, neither the overdrive nor the distortion offer this crucial facility — the only MIDI controllable parameters for these EFX are Drive and Pan. Automating the level of a distorted or overdriven sound (without changing its character) is therefore not possible within the JV synths. My best alternative suggestion is to render such Parts to audio, and subsequently to automate the level from within your audio sequencer program.
 Figure 8. In order to automate the MFX output levels, you can route MIDI Continuous Controller messages to the appropriate MFX parameters, as shown here.The MFX of the XV synths share many of the same effects as the JV's EFX, including the overdrive and distortion. Whilst the MIDI control of MFX parameters is improved by the provision of four assignable MIDI controllers per MFX (instead of the JVs' two), the distortion and overdrive effects still do not allow MIDI control of their output level. Even the multi-effect algorithms that include overdrive or distortion are denied this luxury. All is not doom and gloom, however, for amongst the various COSM effects to be found in the XVs' MFX armoury is the Guitar Amp Simulator (effect number 78). This offers arguably better distortion effects than the basic JV distortion types, and with considerably more detailed tonal control. Not only that, but the post-effect level can be controlled via MIDI — which means that level automation becomes possible within the XV without ruining the character of the sound.
Sens Unique: XV/JV Patch Compatibility
One final point before wrapping up — in the first installment of this series, I mentioned that JV-type Patches were forward compatible with the XV range of synths. The reverse is not the case, however, as the XV synths have a considerable number of features and parameters not found within the JVs. Patch compatibility is therefore a one-way trip — a JV Patch can be 'upgraded' to work in an XV, but 'downgrading' from XV to JV is not an option. In Part 4 we'll discuss further ways to warp and mangle waveforms, examine techniques to get more from the filters, and discover how the JV2080 can make an excellent cup of tea. Well, maybe not that last one...
Roland XV & JV Masterclass: Part 1 of 4
Roland XV & JV Masterclass: Part 2 of 4