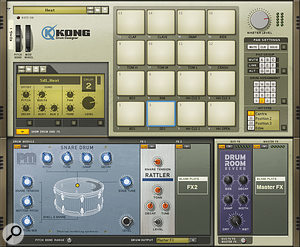
 Kong in all its folded‑out glory. Notice the Pad Settings area in the upper-right quarter, which includes the Pad Group, Drum Assignment and Hit Type controls.
Last month's column offered an introductory guide to Kong, Reason 5's new dedicated drum instrument. This time we're going to dig deeper into its complexities and possibilities, and hopefully give you an idea of just how much more there is to Propellerhead's giant primate‑themed percussion player.
Channels, Pads & Hits
The first thing would‑be Kong power users need to know is that while there are 16 pads on offer, and Kong can play 16 different sounds at once (if you really go for it!), the relationship between pads and sounds is more flexible than you might imagine.
It works like this. Kong loads its sounds into up to 16 drum 'channels'. To see what I mean, create a Kong and click the 'Show Drum and FX' button underneath the Control Panel to reveal its Drum Module and FX slots. (You could be experiencing an 'ooh!' moment right now if you've never done that before.) Then have a click about in the little 4x4 keypad in the Pad Settings area on the right of the main interface. Each of the 16 buttons calls up its own Drum Module and FX.
The crucial thing here is that these 16 drum channels, slots, or whatever you like to call them are not hardwired to a corresponding pad. You could, for example, have pads 2 and 3 triggering exactly the same snare-drum sound, loaded into channel 2. This might, perhaps, make it easier to play rolls and flams from a small keyboard controller. Setting it up is totally intuitive: just click pad 2, then Drum Assignment 2. Then click pad 3 and Drum Assignment 2 once more. Working like this, you're always in total control of which pad (or pads) are triggering the 16 drum channels available.
But there's more to it. Some types of drum sound — those that use the NN‑Nano, Physical Snare Drum and Synth Hi‑Hat modules — offer up to four sound-type variations, which in Kong are called Hit Types. To see this in action, try loading up a Synth Hi‑Hat module (via the pop‑up menu button next to the 'on' indicator at the top‑left of the Drum Module area). Then, at the bottom of the Pad Settings panel in Kong's upper half, you'll see four Hit Types, relating to the various ways in which a hi‑hat can be played: Closed, Semi‑closed, Semi‑open and Open. Accessing all (or some) of them simultaneously is just a question of making the right assignments.
 With its two inserts per drum channel, plus 'global' Bus and Master FX slots, Kong is well equipped for both subtle and drastic effects treatments.Let's say you'd clicked Drum Assignment button 5, to load to load that channel with the Synth Hi‑Hat module we've just been discussing, and you want access to all four of its Hit Types on pads 5, 6, 7 and 8. Easy. First click through the pads in turn and set the Drum Assignment of each to channel 5 by clicking the keypad '5' button. But now click through again, and for each assign an individual Hit Type: I, II, III or IV. You're sharing one drum module amongst four pads, yes, but there are advantages. First, the sounds become mutually exclusive, so triggering the closed hi‑hat automatically mutes the open hi‑hat sound, if it happened to be ringing on. And also, because just the one drum module is responsible for all four sounds, tweaking its parameters will cause corresponding character changes across all Hit Types, keeping everything nicely harmonised.
Groups
We've delved into the complexities of Drum Assignment and Hit Type, but what happens when you just want to layer some drum sounds, especially those that are being produced with several different kinds of drum module? It could hardly be easier. Kong provides what are called Pad Groups, and there are three dedicated to linking pads so that when one is triggered, they all trigger.
Let's say you've got three snare sounds loaded and you want to layer them. Select the first pad and click one of the Link group buttons (D, E or F) to put that pad in a group. Then click the other snare pads followed by the same group button. As the name suggests, you're 'linking' the pads.
Other Pad Group possibilities include three Mute groups. Pads assigned to the same mute group become mutually exclusive, so this is a great solution for that classic open hi‑hat 'choke' when a closed hi‑hat is played immediately following. Yes, it can be achieved with Hit Types and Drum Assignments, as we've seen, but mute groups give you more flexibility.
Finally, there's Alt groups. This is all to do with 'cycling' drum sounds so that the same one never plays twice in succession. Perhaps you have a bunch of similar but not identical ride-cymbal samples assigned to three pads. Placing all those pads in the same Alt group would cause the pads to take it in turns to trigger when you played only one of them.
Effects
 Each pad has a Bus FX send control in its Send section.
One of Kong's strengths is its remarkably simple but very powerful effects architecture. Have a look at the lower part of the interface and you'll see the FX slots to the right of the Drum Module area. These are the FX1 and FX2 'insert'-type effects slots, connected in series, and dedicated purely to the drum module they're next to. Further right are dedicated Bus and Master FX slots. The first allows the effect processor loaded there to be shared flexibly amongst all your loaded drum sounds via their Bus FX send parameter. The second is also available to all drum models, but acts like an insert on Kong's master output. In each case, you load effects into these slots by clicking on their little pop‑up menu buttons and choosing an effect from the list that appears.
 A common requirement in drum mixing is to put a reverb on the snare or other individual drum. Kong makes this easy: just select your snare pad (or its corresponding Drum Assignment button) and call up a Room Reverb module in the FX1 or FX2 slot. But what if you wanted to apply the same reverb to three different pads? In that case it might be better to go down the Bus FX route. You'd start by loading Room Reverb into the Bus FX slot. Then, for each pad that you want to treat with the reverb, click it and raise its Bus FX send level in the control panel.
An effect module loaded into the Master FX slot can treat an entire Kong mix. Consequently, it's great for some overall compression (via the Compressor), a specific EQ boost or scoop (Parametric EQ) or a bit of Overdrive/Resonator dirt. Helpfully, individual drums can be excluded from passing through any Master FX by selecting them and changing their default Drum Output setting, which is found beneath the FX1 and FX2 slots. Choosing 'Main Output L/R' there bypasses Master FX, and you'll see other options too, to route drums via the seven additional individual audio output pairs on Kong's rear channel. That allows you to send drums through more complex effects chains constructed from Reason's main effects devices, should you so wish.
Hit Parade
Kong's Physical Snare Drum module offers its own four hit types, relating to the drum being struck in the centre, on the edge, and in two other positions presumably somewhere in between. Making some pad assignments so that all of these are available is really worth doing, to allow some variation and additional interest in acoustic drum programming.
NN‑Nano's Hit Type implementation is more complex. This miniature sample-player has four dedicated Hit slots for loading associated samples. While it's perfectly legitimate to use just one of them, additional hits give you more options. Try clicking a Hit slot, in the 'Hit' or 'Sample' columns, to select it. To load in a sample, use the familiar Browse Sample or Live Sampling buttons above the LCD. Interestingly, you can have more than one sample loaded into each slot — that's what the Add and Remove Layer buttons are for. Then, with multiple layers in place for an individual Hit Type, you can just enjoy the additional sonic complexity, or drag the handles in the Velocity column to create velocity switches between layers. That's what's being shown for Hit 1 in the screen shot above. Also, if you click the 'Alt' tick-box at the bottom right of the display, the layers within a Hit Type will trigger one at a time, cyclically. This is excellent for creating more natural-sounding drum parts if you've got 'alternative' samples you can load up.
One last thing: NN‑Nano's Polyphony setting can have an important impact on its playback behaviour. When Polyphony is set to Full, the different Hit Types do not mute each other, so that's not a good setting for when you need a closed hi‑hat sound to mute or 'choke' an open hi‑hat sound, to resurrect an obvious example once more. The correct setting would be Exclusive Hits, which causes any hit type to silence any other, but not itself. For really brutal treatments, and to force NN‑Nano to truly only produce one sound at any one time, choose Monophonic.
Noise & Tone
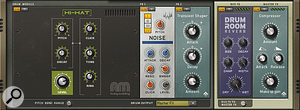
Two effects modules available in Kong's FX1 and FX2 slots are Noise and Tone, both very powerful tools for tweaking your sounds. There's one thing to watch out for, though: the four buttons near the topmost knob enable and disable these effects for individual Hit Types. So if the effect doesn't seem to be working, or you just need to turn it off for a specific Hit Type, this is the place to look.


