 Photo: Daniel Plappert
Recording a choir: it sometimes makes economic sense to use a commercial studio, and you’ll often learn a thing or two while you’re there as well.
I was recently approached by a leading amateur pop/jazz choir to record a unique children’s project: an audiobook story interspersed with songs and sound effects, all performed by unaccompanied voices. I detailed the voiceover recording for this CD back in December 2016’s column, but this month I’d like to focus on how I captured the choir’s musical contributions, because those presented plenty of challenges of their own.
The first constraint was simply time, because the scheduling window between the musical arrangements being completed and the CD needing to be pressed realistically allowed only one weekend of recording time for 11 songs (many with lead vocals and human percussion) and dozens of full-choir sound effects. In addition, I felt the choir needed an unusually dry, close capture for their recordings, for several reasons. Firstly, the song arrangements hopped between a wide range of styles (calypso, classical, pop, blues, country, swing... even yodelling!), so I needed a good deal of mixing flexibility to cater for that. There was also a preference amongst the musicians for the upfront presentation typical of contemporary one-voice-per-part a capella productions and, besides, I felt that a traditional choral presentation would have sounded undesirably distant from the upfront voiceovers, given that narrators and singers frequently interacted during the story.
 All lead vocals on the session were recorded in the studio’s isolation booth to allow more flexible editing between takes.Photo: Daniel PlappertWith all this in mind, I planned to record the choir as a full ensemble, but with any lead vocalist acoustically isolated, the idea being to save time by building up independently editable choir and lead-vocal takes in tandem. In addition, I decided to add the human percussion elements as overdubs, so that we could retain full control over percussion levels, something that can be tremendously difficult when they’re printed into your main choral tracks. That said, I was determined to record those percussion parts via the choir’s microphone rig so that they would naturally cohere with the sung choral sound. As when working with any other amateur group, I was also keen to avoid messing too much with the singers’ natural performance setup and wanted to minimise the use of headphone monitoring, in order to preserve as much of the ensemble’s well-drilled internal balance and musicality as possible.
The Economic Argument For A Commercial Studio
 In addition to the controlled acoustics and top-notch mic collection, working in a commercial facility had a number of other perks, such as the availability of custom-made acoustic reflectors and a grand piano for rehearsal purposes.Photo: Daniel PlappertMy second suggestion was that we book a purpose-designed studio space for the session. Now, regular readers will know that I spend a lot of time recording on location in more-or-less domestic environments, largely in response to artist budget constraints. In this scenario, though, my main argument against doing that was the difficulty of finding a suitable non-studio environment large enough for a whole choir. In domestic rooms, even if you’re lucky enough to find something without too many uncontrolled room resonances (a frequent source of unwanted timbral coloration), the acoustic will usually be either too reverberant (distancing the choir) or too dead-sounding (impoverishing the sound by lack of upper-spectrum early reflections). Moreover, trying to adjust either of those things by DIY means will usually end up being overly time-consuming and/or expensive, given the relatively large room dimensions. What I felt we needed was an acoustically well-controlled, live-sounding room without any substantial reverb tail, and the only reasonable local venue I knew with those characteristics was Munich’s Mastermix Studio (www.mastermixstudio.de).
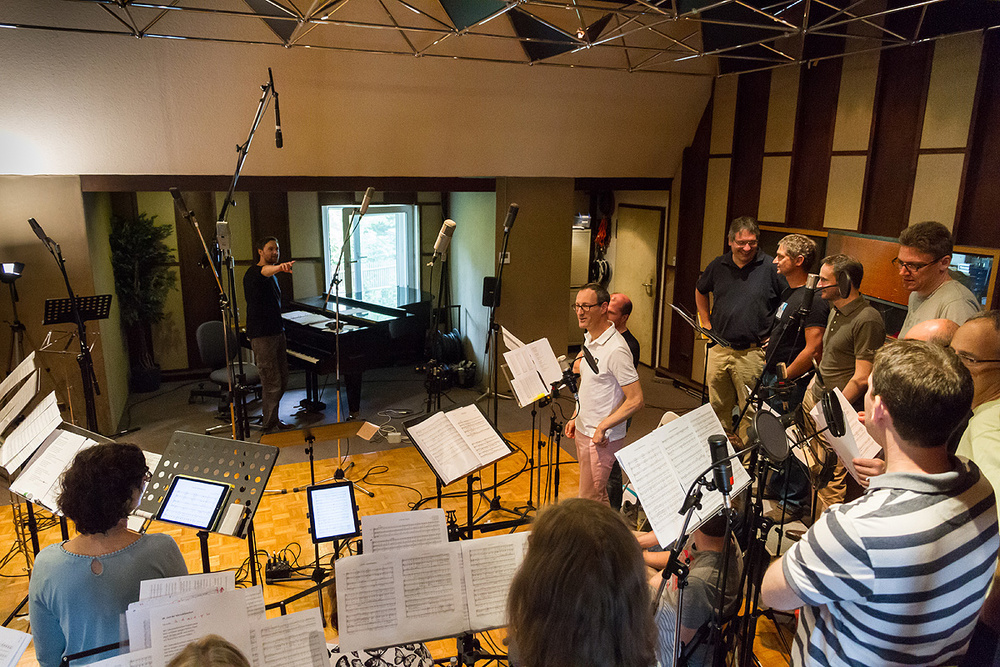 Photo: Daniel PlappertBut quite apart from the main acoustics consideration, the studio’s microphone collection (which easily eclipsed my own location equipment in the quality stakes) was an important factor in the decision. You see, I think few things place greater technical demands on microphones than multi-miking an unaccompanied choir, and not just because we humans are instinctively so attuned to unnatural recording colorations on voices. Another difficulty is that the physical size of a choir means that each mic captures relatively little of its audio signal on-axis, and more budget-conscious mics rarely capture off-axis sounds very faithfully. Indeed, when working with more affordable mics, I’d normally gravitate towards small-diaphragm models because they’re typically better behaved in their off-axis response, but the downside is that those designs also tend to sound a bit hard and cold by comparison with large-diaphragm models. By taking advantage of Mastermix’s excellent large-diaphragm condenser mics, I’d be able to get a more appealing sound directly from the mics themselves, thereby saving considerably on mixdown time.
Fortunately, the choir agreed with me that booking Mastermix was a no-brainer from a budget perspective. Bear in mind that the weekend ‘self-drive’ session rate was less than it would have cost just to rent its mic collection for two days, and the studio offered numerous other valuable perks besides: 16 channels of Millennia HV3D mic preamps; a fully isolated monitoring environment; a dedicated vocal booth with sight-lines into the main live room; air-conditioning (we were recording in high summer); five movable live-room gobos; a grand piano for rehearsal purposes; and, of course, free coffee!
Piggy-back Planning
The secret to beating the clock on any recording date is careful planning, and in this instance that preparation probably took me as much time as the session itself. In addition to my usual location-recording preparations (sketching out the mic setup, cabling runs and recording-system configuration) I made a point of visiting the studio in advance to double-check the facilities on offer. Not only did I want to confirm that my desired mics were available and in working order, but I was also eager to confirm the number of popshields, gobos, chairs and music stands. Moreover, there’s nothing like actually being in a recording room and visualising your mic setup in situ to highlight potential problems with things like mic-stand positions, cable runs, or sightlines.
It always pays to ask the studio owner for their advice too. Sure enough, Mastermix’s owner Stefan Gienger provided me with several useful tips from his own long experience, recommending some revisions to my ensemble positioning and divulging which of his microphones he prefers for the different voice sections. Being able to piggy-back on insider expertise is another of the great advantages of using a commercial studio, so you should take full advantage whenever you get the chance!
My preparation was by no means solely technical in nature, though. One of the most crucial pre-session jobs, for instance, was designing an effective recording schedule. In this respect, my own bottom line was that the only truly essential task during the weekend session was nailing the 11 core full-choir songs. Lead vocals and human percussion could be overdubbed in my home studio if necessary, and sound effects could also be faked (albeit rather laboriously!) using multiple layered overdubs. On this basis, I proposed to the choir director that we schedule the recording of all the core songs for the first day of the session, so I could edit together master takes of all the songs on the Saturday evening and bring those to a pre-session playback meeting with the choir director early on Sunday morning. That way, it would be self-evident whether each song was indeed mix-ready, giving us the opportunity to do any necessary fixes on day two.
Motivational Mind Games
An equally important function of this scheme, however, was more psychological. I’d noticed that whenever the choir had a new set of music to learn, the performance quality increased dramatically in the final week before the first concert. Unfortunately, the studio session in this case preceded that first concert, so I used the recording schedule to encourage a little of the same ‘motivational panic’ instead. I was also conscious that the choir, as a commendably democratic institution, were prone to rather time-consuming creative discussions, and I was keen to encourage them to hammer those out before we arrived in the studio so that we could make the most effective use of our recording time.
So, with the blessing of the choir director, I emailed all the singers with a fully itemised timetable for the Saturday session, specifying timed slots for warm-up, initial rehearsal, four blocks of recording time, and all breaks. I then laid it on with a trowel, stressing that we’d be fighting the clock (“only 30 minutes per song...!”) and that if we didn’t finish recording all the percussion and sound effects on the Sunday then the project would miss its completion deadline and the earth would be hit by a colossal asteroid. (OK, maybe not that last bit.) While I was at it, I also reminded everyone about a few specific technical issues, in order to make the impending session feel more real — such as suggesting preparations each of them might make to banish page-turn and movement noises from our recordings, as these can be a real scourge when you’re close-miking.
Let me sound a note of caution, though: mind games like these can easily backfire, because there’s a fine line between motivating musicians and simply freaking them out, especially if you’re dealing with less-experienced ensembles who may already find studio environments pretty unnerving. In this case, though, I was ready to take the gamble, because I was well acquainted with the musicians and knew they’d recorded a number of previous CDs. And, thankfully, in practice it worked like a charm! Not only did the performance quality peak for the session as I’d hoped, but the sense of time urgency seemed to focus everyone’s concentration on getting the job done efficiently, so we got through all the songs exactly on schedule, ending the first day’s session on a high. From that point we were on the home straight, as far as I was concerned, with plenty of time and goodwill available on the Sunday to retrack a couple of the songs we felt could be improved and then to deal with all the remaining overdubs and sound effects.
The Main Stereo Rig
Let’s now look at the mechanics of the recording setup in more detail. My first priority was simply to encourage maximum visual and acoustic communication between the singers, so I set them up on a circular arc with risers lifting the second row of singers out of the acoustic shadow of the first, and then placed the studio’s reflective gobos behind the whole group. In this context, a stereo mic rig at the focus of the arc made sense to me, and Stefan had already recommended a Neumann SM69 from his collection for the purpose, so I configured that as a crossed cardioid pair, using an angle of 110 degrees between the capsules to catch a fairly wide recording angle, without compromising the ensemble’s natural level balance across the soundstage.
I’ve recorded the choir’s concerts from time to time, where the singers generally gravitate towards a less steeply curved stage layout, and hence I usually find it necessary to bolster any centrally placed main stereo rig with wider-spaced outriggers, to avoid the outer voice sections becoming recessed relative to the inner ones. Anticipating this eventuality in the studio, I’d already plugged up a pair of cardioid Neumann U87s, but fortunately the live-room layout rendered these extra mics redundant on balance grounds, because the SM69 captured the group’s inherent balance very nicely on its own.
That said, my concern with most X-Y stereo rigs is their lack of time-based stereo decorrelation, which makes them subjectively a bit sterile-sounding, in my opinion. Granted, the SM69 rendered the choir with a precisely defined and full-width stereo image, but I missed that sense of blend and spaciousness I associate with spaced-pair microphone rigs. This spurred me on to try moving the U87s inwards from their wide-spaced outrigger positions, in a bid to supplement what I was already catching through the X-Y rig. After a certain amount of experimentation, I found a worthwhile position for them either side of the SM69, using a fairly wide spacing to emphasise their width-enhancement of the main pair, and they also improved the tonal warmth of the combined timbre too, as a welcome side-effect! Again, I deliberately sought out Stefan and asked him to cast his ear over the resultant balance, as I was in no doubt he’d heard many more choral recordings through his monitors than I had! His advice proved sage too, because adjusting the angle of the outriggers on his suggestion delivered an appreciably better-defined high end.
Spots & Bass Mics
 All of the voice-section spot microphones were moved closer in during the initial choir rehearsal to improve separation for balance-control purposes. Here you can see me adjusting the cardioid C414EB covering the sopranos, for instance.Photo: Daniel Plappert
Frankly, I’d already pulled my main microphone rigs closer than I normally would for this session, but I still felt I wanted the facility to dry things up even further at mixdown with closer per-section spot microphones. In particular, I was keen to have the ‘nuclear option’ of turfing out the main mics completely, should the choir feel that a super-dry sound worked better with the voiceover narrations within the context of the final mix. But even without going to this extremity, I knew that spot mics would also be useful for balance control in general.
Following Stefan’s recommendations once more, I gave the tenors and basses a Neumann U47 FET each, and the sopranos and altos classic AKG C414EBs. I put these all too far away to start with, but once I’d moved them closer and lower to get better separation between the sections for balance-control purposes, I was surprised how smoothly they captured the full-ensemble sound on their own. Indeed, this is exactly the kind of situation where I think high-end mics really come into their own, as I’d never have expected to get a workable close-miked sound so quickly with my own motley collection of mid-price location-recording mics — I’d normally calculate to spend at least another half hour swapping out mics and trying different miking positions.
 Here you can see some of the additional close mics that were set up for the lowest bass singers to help achieve a more commercial a capella sound.Photo: Daniel Plappert
In addition to these spot mics, I put up another group of close mics to capture the five deepest bass voices individually. This is another measure I would not typically take with choirs, but I reasoned that unless I actively enhanced the natural low frequencies of the unaccompanied choir’s spectrum, the basses in the final mix might not feel sufficiently powerful to do justice to the range of musical styles being covered — or indeed to compete with the LF-enhanced sound typical of many modern a capella productions.
I put these mics a little below lip level to avoid their interfering with the bass projection into the room, and chose the mics based on my impressions of how they might suit each individual singer. For example a multi-pattern AKG C414 B-XLII allowed some spill control on one of the quieter voices, while a Shure SM7 helped blend a voice with strong presence frequencies. Although these decisions were mostly educated guesswork, they worked out pretty well in the event — only a Heilsound PR40 unexpectedly sounded rather harsh on the voice I’d paired it with, and was quickly swapped out for a smoother-sounding Groove Tubes GT55 large-diaphragm FET condenser.
Express Soundcheck
 A good deal of preparatory work went on in the studio to allow a speedy soundcheck once the choir arrived. This included scratch-testing and quality-checking all the mic signals... Photo: Daniel PlappertAs I’ve already mentioned, time was an ever-present issue on this session, and not just from the perspective of how many hours we’d booked the studio. Singers aren’t machines (with the arguable exception of T-Pain...), so there’s a limit to how long they can sing before fatigue takes over. In light of this, I suggested that the choir do their pre-session warm-up/rehearsal in the studio, allowing me some time to get my mic signals sorted out ‘in the background’. In theory, this meant that I’d have roughly 90 minutes to audition and refine the sound of my 13 mics, although in practice I knew that half of that time would likely be taken up with discussion rather than singing, so I’d only get finished in time if I’d done plenty of groundwork before the choir arrived.
Part of this was the normal routine of making sure all the mics are plugged up and line-checked in advance, although I went the extra mile here by setting up several ‘contingency mics’ (such as the aforementioned outriggers) that could be swung into action at a moment’s notice if required. I also quality-checked all the mic signals by singing into them myself, which also made it possible to set the close-mic preamp gain controls to sensible starting positions. Once the vocal warm-ups started, I could set the rest of the preamps, as well as auditioning the individual bass close-mics for basic timbre, all before the choir started singing any of the repertoire to be recorded.
 ...as well as predetermining and labelling seating positions for the performers.Photo: Daniel PlappertAnother key time-saver was positioning the choir and mic stands as much as possible before the choir arrived. Chairs proved very handy for this, allowing us to effectively predefine the positions of all the performers while the studio was still empty. Some bits of masking tape with names scribbled on indicated the edges of voice sections, so the process of getting everyone into position was mercifully swift, and I still had enough time before the warm-ups kicked off to talk to each of the close-miked basses about trying to maintain a consistent position relative to their respective mic.
Despite all the forethought, though, I anticipated that the soundcheck would nonetheless be pretty fraught — even factoring in my own predilection for no-frills ‘laugh in the face of processing’ tracking! To ameliorate this, I arranged the session running order to shunt several tasks later in the day. For example, by recording the last few sections of the rehearsal, I was able to use the short break before the first set of takes to work up a usable rough mix (with some reverb) for the approval of the choir director. And by shifting all the songs with lead vocals later in the day, I was able to postpone all the shenanigans of setting up the booth microphone and headphone mix until subsequent breaks.
Money For Value
It never ceases to surprise me what you can achieve using your own affordable recording rig without ever setting foot in a commercial studio. With this month’s featured session, however, I hope I’ve been able to demonstrate that there are situations where decamping to a professional recording facility can make sound sense on grounds of both quality and economics. If you do choose this route, though, you’ll usually get best value for money if you meticulously prepare the technical setup, schedule the session time as tightly as you can, and draw on assistance from willing friends and colleagues.
Audio Examples
We’ve placed a Zip file of some audio examples from this session in the sidebar of this article.
Download | 159 MB
Featured This Month
 The Don Camillo Chor are an award-winning mixed-voice pop/jazz choir from Bavaria. Their latest recording project, as featured in this month’s column, is called Kasimirs Abenteuer, and can be ordered direct through their web site
Acoustic Balancing
Creating a balance between the different voice sections on this session was made trickier by the fact that the sopranos and altos outnumbered the tenors and basses, so I attempted to address this with my live-room setup.
If you look carefully at the pictures in this article, you’ll notice that there are more reflective gobos behind the male singers, and their second row is also standing on higher risers, helping them project better into the microphones.
Many Hands Make Light Work
 Simon-Claudius Wystrach and Benedikt Ruf at work in the control room, evaluating the technical and musical quality of each take as it went down.Photo: Daniel Plappert
Most of the sessions I do involve just me and the musicians, and therefore tend to be totally ‘self-op’. In other words, I’m doing the location studio-build and all the engineering, as well as stepping in to cover whatever other production tasks are left unaccounted for by the artists in question. But even though I’m quite accustomed to multitasking during tracking sessions, it was clear from the outset that I’d need to get some extra help for this project, for the simple reason that I was also meant to be singing! Fortunately fellow engineer Simon-Claudius Wystrach (www.simonclaudius.com) kindly agreed to come along and help out, and once we’d talked over the action plan on the Friday night he was able to hit the ground running on the session — especially impressive given that my customised Reaper DAW system and control surface were both unfamiliar to him.
I also insisted that someone else be in the control room with the sheet music, listening carefully for musical mistakes and timing/tuning vagaries, and generally ensuring there was enough clean recorded material for an acceptable master edit. Here it was Benedikt Ruf (a colleague of the choir director) who took the reins, freeing up the occupants of the live room to evaluate the more subjective merits of different takes. It was this division of labour that allowed us to record multiple takes in quick succession without the need for constant quality-control playbacks, and was thus crucial in achieving such a fast work rate. Furthermore, there would have been no chance of my editing all the songs on the Saturday evening had Simon and Benedikt between them not created such a clear and detailed ‘paper trail’ of take notes and score markings, so two heads definitely proved better than one there too.
Moments Of Muppetry
 A duvet can work great for improvised acoustic absorption, but on this session it was as a draught excluder that it really saved the day!Photo: Daniel PlappertAs usual, not everything went to plan, so I learnt a few new lessons the hard way. For example, on the next studio session I do, I’ll be sure to check the position of the air-conditioning vents before designing the live-room floor plan! We were recording in high summer, so the air-con was justifiably active, to keep the singers from roasting. Imagine my surprise, then, when I suddenly noticed during the initial rehearsal that several altos were sporting sweaters, scarves, and (in one case) a woolly hat! It turned out that the air-con outlet vent was directly over them, putting them directly in an icy draught. Turning it off really wasn’t an option for the rest of the musicians, but moving the entire recording setup would also have been an utter nightmare, so initially it seemed we might truly be caught between a rock and a hard place. As usual on my sessions, though, it was one of my trusty duvets that came to the rescue, jury-rigged from the studio’s ceiling diffusers to divert the worst of the draught. It was far from a perfect solution, but at least it meant the show could go on!
In addition, something went amiss with the headphone monitoring for the lead singers in the isolation booth. As usual with singers, I’d done my best to set up zero-latency analogue monitoring, because it tends to help less experienced singers in particular feel more comfortable while performing. However, after I’d personally set up and tested the headphone mix, the software vocal monitoring somehow re-engaged, resulting in nasty-sounding comb-filtering between the zero-latency and latency-delayed vocal signals — and, unfortunately, the singers were all too polite to point it out! I’d like to think I might, as a singer myself, have spotted their unspoken signs of distress had I been sat in the control room during the takes, but as things were the overdubbing experience can’t have been very pleasant for them. Plus it came back to haunt me too, because the comb-filtering significantly destabilised their pitching, leaving me with a certain amount of rueful Melodyne-ing to do...