 were cardioid mics, and supplemented with per-section close mics for soprano, alto, tenor, and bass sections.") Recording a mixed-voice choir in a rehearsal room. To allow scope for adding in a more suitable church-style ambience at mixdown, the main stereo pair (above the conductor’s head) were cardioid mics, and supplemented with per-section close mics for soprano, alto, tenor, and bass sections.
Recording a mixed-voice choir in a rehearsal room. To allow scope for adding in a more suitable church-style ambience at mixdown, the main stereo pair (above the conductor’s head) were cardioid mics, and supplemented with per-section close mics for soprano, alto, tenor, and bass sections.
The Don Camillo Chor: Our engineer records a choir singing in their practice room, and tries to make it sound like it was captured in a church!
I was recently approached by an amateur choir who had decided to enter a competition set up by their local radio station, for which they needed to record an original arrangement of Handel’s ‘Hallelujah’ chorus in short order — by the time they’d learnt of the competition, the entry deadline was fast approaching! Given the time constraints, it wasn’t feasible to arrange an appropriately ecclesiastical recording venue, so my challenge was to capture the ensemble in their normal practice room, but in a way that would allow us to fake something akin to a church environment at mixdown. And did I mention we only had a 2.5-hour rehearsal slot to work with? Just another day in project-studio land...
Rehearsal Room Recording
In our favour was that the choir’s practice room was a reasonable size (8x17 metres, with a 3m ceiling height), so although its reverberation character implied smaller dimensions than we wanted, we didn’t have to deal with serious resonance-mode colorations in the mid range, which are a real problem when more than one room dimension gets below about 4m. Because I wasn’t at all sure how much natural acoustic reflection we’d be able to get away with in the final mix, I decided to give each of the 20-strong group’s four main sections (from left to right: tenor, bass, soprano, alto) its own directional close mic, reasoning that in the worst case I could rely exclusively on these close mics should the room ambience present insurmountable mixdown problems.
The problem with close-miking a choir is that you sacrifice a good deal of the tonal complexity and natural blend that are essential to convincing choral textures. In other words, your recording starts sounding too much like a collection of disconnected soloists, rather than a coherent group performance. That’s why the most fool-proof method of recording a choir usually involves setting up a stereo mic rig to capture the whole group, and then balancing the voice sections as necessary by rejigging the ensemble layout or adjusting performance dynamics. So although I wanted to have the ‘nuclear option’ of an all-close-miked sound, I also set up a stereo rig for overall pickup, with the intention of sneaking as much of its more realistic perspective into the mix as I could get away with.
 Each of the sections were close-miked with both a small-diaphragm condenser and a ribbon mic -- you can see two of those mic pairings here, covering the soprano and alto sections respectively.
In most project-studio ensemble-recording situations, I instinctively avoid using directional mics for overall pickup, partly because omnis inherently provide truer low-end presentation, but also because the off-axis frequency response of affordable cardioid-family mics can sometimes be truly dire. In this scenario, though, my desire to keep room ambience to a minimum overrode my usual preferences, not least because (a) I knew from the sheet music that the bass part’s lowest fundamentals wouldn’t trespass below 70Hz; and (b) the choir director had lent me his own nice pair of Neumann KM184s for the occasion! I chose a near-coincident setup for these Neumanns, so as to include some time-difference cues in the stereo picture, but using a 90-degree mutual angle and five-inch spacing to get a wide enough acceptance angle.
My final quandary was what close mics to choose. Although small-diaphragm condensers tend to be my knee-jerk choice for acoustic ensembles (on account of their high-frequency sensitivity and more predictable off-axis response), my own affordable selection of such mics usually leaves me underwhelmed when working up close with choirs. They just sound thin and unforgiving, and their inherent on-axis high-frequency boost frequently overemphasises sibilance into the bargain. The idea of tackling this problem by trying out ribbon mics in this role had been at the back of my mind for a while, so I decided to give that tactic a shot, albeit with the condensers alongside as a fallback option in case my experiment backfired! The ribbons I used were three bargain-basement Superlux R102s and a slightly more expensive Beyerdynamic M130, while the condensers were three Shure KSM-series pencil mics and an Avantone CK1, all four using cardioid polar patterns.
 Although the close mics were all three to four feet from the singers, and well above mouth level, the sound from the condensers was thin and brittle-sounding on account of the small-diaphragm mics’ inherent on-axis high-frequency emphasis.
Session Struggles
Without the liberty to faff around with mic positions for ages, my priority with the close mics was to make sure each was picking up its own section strongly enough (ie. affording a respectable degree of balance control) and didn’t sound obviously horrid. Once those were in the bag, I spent the remaining setup time tweaking the stereo pair, trying to decide on a miking distance with a decent trade-off between dry/wet balance, ensemble timbre/blend, and stereo spread. We soon had to dive into takes, though, because I wanted to amass enough raw material so I could edit around any unwanted background noises — for example the occasional sound of a lorry zipping down the road outside the rehearsal room, the local church bell chiming the quarters of the hour, or random people slamming doors in other parts of the building!
And yet, despite my contingency planning, we were still pitched a curve-ball on the day, because an outside dance-party suddenly kicked off a block away, underpinning our recording with the muffled four-to-the-floor of its PA system! My first thought (well, the first printable one...) was to check if my ‘nuclear option’ might allow us to salvage something usable. On first listen, the kick was still clearly audible, but with some careful high-pass filtering I was just able to snatch usability from the jaws of defeat, even with the main stereo pair judiciously mixed in. Yes, if you listen carefully to the final mix on studio monitors, you’ll still hear an occasional ghostly kick-drum pulse, but in most normal listening situations it’s effectively inaudible.
Close-mic Shootout: Condensers Versus Ribbons
Following the session, I loaded the files into my Cockos Reaper-based mix system to see how they’d come out — although I had a reasonable idea of what to expect, I was monitoring on headphones while recording, which I always find to be a bit of a guessing game! Fortunately, the time I’d spent dickering with the overall-pickup stereo pair appeared to have paid off, because those mics had captured a pretty respectable timbre and balance of the ensemble. The room ambience was also quite well contained, and my only real concern was that voices at the centre of the soundstage seemed a touch recessed in the balance compared with those at the edges.
Turning to the close mics, the condensers were as brittle-sounding as I’d expected, while the normal high-end roll-off of the ribbons gave them a much duller sound by comparison. Neither set of mics felt absolutely on the money in terms of high-frequency balance, so I first experimented with EQ (the Sonimus SonEQ plug-in’s beautifully smooth high shelf) to roughly match their subjective brightness, before mixing each group with the signal from the overall pickup — there’s no sense in choosing between close mics out of context, because their suitability depends upon their interaction with every other mic in the mix. After careful auditioning, I did eventually prefer the ribbons to the condensers, particularly with regard to the soprano tone, which had been given a rather unflattering edginess by the cardioid Avantone CK1 condenser covering that voice group.
 Here you can see the Sonimus SonEQ Pro settings Mike used to prepare the ribbon close-mics bus for mixdown: a combination of super-smooth high-frequency boost, to compensate for the mics’ innate high-frequency roll-off, and high-pass filtering, to remove unwanted spill from the PA system of a dance party that unexpectedly kicked off in the neighbourhood just as takes were beginning!
Achieving a final dry balance involved very little extra work, the only remaining processing being high-pass filters at 85Hz (for the spot mics) and 110Hz (for the main pair) to rein in the PA kick-drum spill. Although you’d normally aim to pan your close mics to match the imaging of the overall pickup, I decided to compensate for my centre-recessed stereo-pair capture by panning the close mics slightly narrower. On the most basic level, I didn’t expect this to cause imaging confusion, because the spot mics were closer to the singers than the overall pair, so I was confident the Precedence Effect (see box) would keep each section’s stereo positioning stable enough. Admittedly, the risk with this scheme is that if you ride the spot-mic levels for ensemble-rebalancing purposes, this can cause unwanted image drift, but I kept my ears open for this while automating and didn’t encounter any audible problems for the range of fader adjustments I ended up using.
Take Me To Church
I now had a decent balance, so all that remained was to try transporting that sound into a fictitious church, which turned out to be a two-step process. First of all, I used a convolution reverb to disguise the early reflections character of the room we’d recorded in — the early reflections provide a good deal of our perception of a room’s character and dimensions. To do this, I applied a neat little trick Richard King mentioned to me when I interviewed him back in SOS September 2015: I created a zero-pre-delay reverb with the character of a larger room, the idea being that this pre-empts, and therefore dominates over, the captured early reflections in the listener’s perception.
 In order to disguise the recorded small-room acoustic signature, a short early-reflections patch with zero pre-delay was created in Christian Knufinke’s SIR2 plug-in.
I use convolution processing for most of my reverb processing these days, so I rifled through my collection of impulse responses until I found one that seemed to suggest an appropriate acoustic character — the Large Wooden Room from Samplicity’s freeware Bricasti M7 collection, to be specific. I then removed the reverb tail using the envelope controls in my convolution engine (Christian Knufinke’s SIR2 plug-in) to isolate the early-reflections component. This was partly to allow me independent control over the early reflections level in my mix, but also so that I could work around one of the weaknesses of convolution processing, namely that convolved reverb tails have no time-varying properties, and therefore seem to develop slightly unnatural-sounding sustained resonances when applied to complex acoustic sources. This is a side-effect of convolution processing that rarely causes problems in mainstream pop/rock mixes where multiple effects are being layered anyway, but in natural acoustic styles, where the qualities of a single reverb tail come under much greater scrutiny, I prefer instead to use a high-quality algorithmic reverb which incorporates specialised modulation processing to mitigate any unnatural resonance build-up.
 The reverb was then EQ’d with Cockos ReaEQ to avoid undesirable tonal coloration.
Whenever you mix in a reverb, you not only have to ask yourself whether it’s doing the job you want it to do, but also whether it’s incurring any unwanted side-effects. In this case, by the time I had the reverb high enough in the mix to sufficiently obscure the recorded room ambience, it seemed to be clouding the overall mix tone and introducing some boxiness, so I tackled this by EQ’ing the effect return channel, high-pass filtering with a very gentle slope at 130Hz and cutting a further 3dB with an octave-wide peaking band at 610Hz. In addition, the combination of the synthesized and recorded early reflections seemed to concentrate too much ambience into the centre of the stereo picture, so I also adjusted SIR2’s M-S-based stereo-width controls to emphasise the Sides component of its artificial reverb, giving a more even spread of reflections in the mix as a whole.
 In addition to the early reflections patch, a long church-style effect tail was synthesized using Lexicon’s LXP Native Hall plug-in.
Once I was happy with the way the early reflections were functioning, I reached for Lexicon’s LXP Hall plug-in to generate a luxuriant church-like sustain tail. After a bit of preset-surfing, I settled on the Large Vocal Hall setting, tweaking it to taste by reducing the level of early-reflections (to avoid conflicting unduly with the work I’d already done in SIR2) and slightly increasing the reverb time. Finally, I revisited the overall balance between spot mics and the overall-pickup pair, and discovered that the added effects were disguising the recorded ambience well enough that I was able to use less of the spot mics than I’d anticipated, which was all to the good!
Choral Moral
Even if you’re recording top professional musicians in a world-class venue with high-end gear, capturing decent results isn’t necessarily a walk in the park. But when you’re faced with amateur ensembles, unflattering acoustics and budget gear, the difficulties can sometimes feel insurmountable. In this month’s article, though, I hope that I’ve been able to demonstrate how you can still achieve a respectable outcome when the odds are stacked against you, as long as you play to the strengths of your available equipment and regulate the room-ambience pickup so you have enough scope for mixdown effects fakery.
The Precedence Effect
One of the ways we humans work out the location of a sound source within a reverberant environment is by detecting the direction of the first wavefront which reaches us from it — the underlying assumption being that this has had to travel the least distance, and therefore comes directly from the sound source.
When you record with a combination of overall-pickup mics and closer spot mics, you have the ability to manipulate this effect to your advantage. This is because the first wavefront of any spot-miked instrument will always arrive at the closer spot mic before it arrives at the overall-pickup rig, so wherever you pan the spot-mic signal in your mix, the perceived stereo positioning of that instrument will tend to follow it, even if the spot mic is quite low in level.
That said, the Precedence Effect isn’t the only thing that influences stereo perception, so you do still have to be a bit careful that you don’t end up with instruments drifting around the stereo panorama or seeming to emanate from two different locations at once.
The School Of Facepalm
One of the things I like most about going back over my recording sessions in this column is that it flags up mistakes I’ve made. It’s not that I take some masochistic pleasure in repeatedly facepalming myself, but I’ve come to the conclusion that it’s my errors, more than anything else, that have taught me how to engineer.
This is also why I like stepping outside my comfort zone with sessions like the one this month, because it increases the likelihood I’ll cock up, and that I’ll then learn something that will improve my future work. Clearly you want to minimise the impact of any mistakes you make by building redundancy into your setup or reverting to more tried and trusted approaches when the stakes are highest, but if you always play things too safe, I think you end up stunting your professional growth. On this session, for instance, I realised afterwards that I’d missed a trick: I should have tried bringing the singers closer together. In that way I could have set up the main stereo rig with a narrower acceptance angle, which would probably have given me a more even centre-versus-edge balance, as well as drier capture overall. What makes this realisation particularly galling is that the choir actually had risers I could have used to put the singers in two (or even three) rows without them shadowing each other. I normally consider this kind of thing as a matter of course whenever I design an ensemble’s recording layout from scratch (as in my January or June 2015 columns, for instance), so I was surprised that I’d managed to develop a blindspot to it in this case. As such, even though the end results turned out to be perfectly respectable, I was nonetheless keen to reverse-engineer my decision-making process to iron out the kinks.
With hindsight, I think the main thing that distracted me was that I’d already recorded a number of concerts for this choir, under which circumstances there’s no real option to change the stage layout, since that’s created with the live audience in mind, not for my benefit. On a subconscious level, I reckon I carried that mindset over to our rehearsal-room recording session, where it simply wasn’t as appropriate. (I’ll now go and write out 10 times on the blackboard, “I must not unthinkingly transfer on-stage miking techniques into the studio.”)
Featured This Month
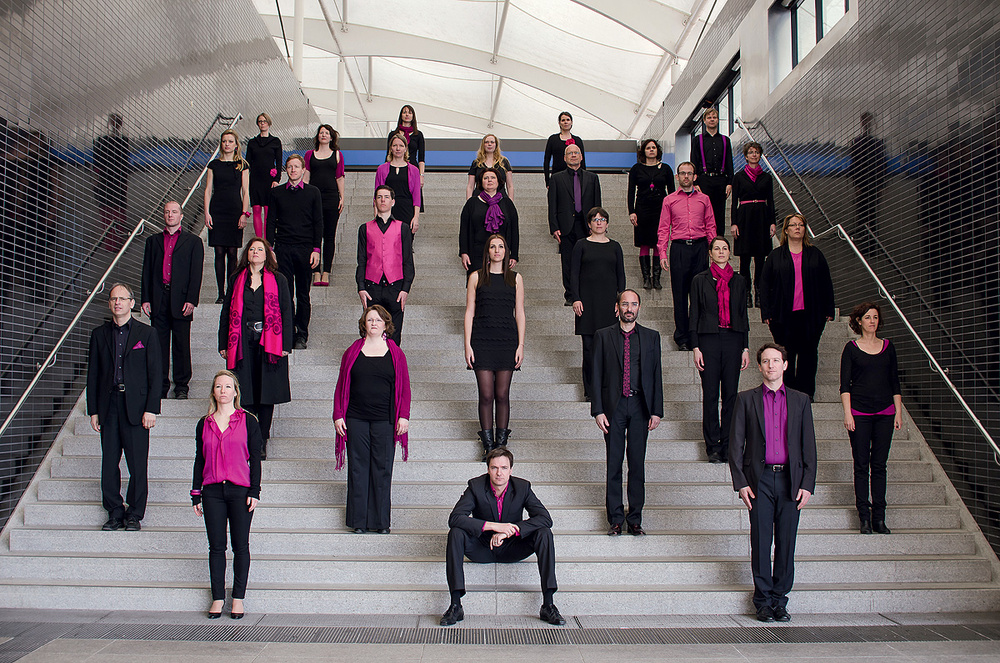
The Don Camillo Chor are a 35-strong mixed-voice choir from Bavaria who specialise in jazz, pop, and rock arrangements, but with a sprinkling of classical-style repertoire — as showcased in this month’s column. As well as performing all around Europe, they have also released 10 CDs in their 20-year history, and took first place in both of the last two Bavarian Choir Competitions.
Audio Examples Online!
Download this ZIP file which features a selection of fully captioned recording and mixing demonstrations relating to this month’s article.
Download | 62 MB
Media Files
The ZIP audio files available on this page accompany my Session Notes article in SOS August 2016 about simulating a church-choir sound when recording the Don Camillo Chor singers (www.doncamillo-chor.de/en) under less-than-ideal circumstances in a rehearsal room. The filenames are fairly self-explanatory, but here are some additional notes to describe exactly what you’re hearing in each case.
RawMics01_CloseRibbons
Here’s a panned mix of all four ribbon close-mics, comprising a Beyerdynamic M130 on the bass section and Superlux R102s for the tenors, altos, and sopranos. Notice the warm tonality, on account of the rolled-off high frequencies typical of ribbon-mic designs — and also the significant kick-drum spill from the PA of an open-air dance party which started up nearby soon after we started takes!
RawMics02_CloseRibbons
The small-diaphragm cardioid condensers I used for close-miking were as follows: Shure KSM141s for bass and tenor sections, a Shure KSM137 for the altos, and an Avantone CK1 for the sopranos. Even though the mics were all three or four feet away from their respective voice group, and off-axis to the singers’ mouths (roughly a foot above head height), the sound is nonetheless thin and brittle on account of the microphones’ inherent on-axis high-frequency boost. The kick-drum spill is also coming through more strongly on these mics than on the ribbons, if you compare this sound with the RawMics01_CloseRibbons audio file.
RawMics03_OverallPickup
A pair of Neumann KM184 small-diaphragm cardioid condenser mics were used to pick up an overall impression of the ensemble. As you can hear if you compare this audio example with the RawMics01_CloseRibbons and RawMics02_CloseCondensers audio files, the more distant perspective gives a much more natural and convincing choir sound with better blend between the voices, but at the expense of picking up a larger amount of small-room ambience.
CloseMicsInContext01_Ribbons
In order to decide which of the two sets of close microphones I preferred within a mix context, I first roughly matched the high-frequency tonality of each set using the high-frequency shelf of Sonimus’s excellent SonEQ Pro plug-in (boosting the highs for the ribbon mics and cutting the highs for the condenser mics) and then balanced each set of close mics in turn with the overall-pickup mics heard in the RawMics03_OverallPickup audio file. Here’s what the mix with ribbon close mics sounded like. (I’ve also high-pass filtered all the mics to remove the worst of the kick-drum spill from the outside PA. For the overall-pickup mics I used a 110Hz 12dB/octave filter from Cockos Reaper’s bundled ReaEQ, whereas for the spot mics I used the 12dB/octave high-pass filter built into the SonEQ Pro.)
CloseMicsInContext02_Condensers
And here’s a mix of the four condenser spot mics together with the overall-pickup stereo pair. Compare this with the CloseMicsInContext01_Ribbons audio file — import both files into your DAW and instantaneously switch between them (as I did when choosing) to highlight the audible differences most clearly. Note that, in both cases, I’ve also used a little automation of the close mics (exactly the same in both examples, mind) to refine the musical balance — subtly boosting the tenor-section ‘Hallelujah’ at 0:03, for instance.
EarlyReflections01_DryMix
Here’s a dry mix of the overall-pickup stereo mic pair with the ribbon close mics (which I preferred to the condensers). Although this dry mix is pretty respectable already, there’s a definite small-room character to the recorded reverberation that I wanted to disguise.
EarlyReflections02_WetMix
In this example I’ve used the envelope controls of Christian Knufinke’s SIR2 to isolate the early reflections of a Samplicity freeware Bricasti M7 impulse response, and then mixed that in with the dry microphone signals with zero predelay to perceptually overshadow the (naturally predelayed) recorded small-room ambience. If you compare this directly with the EarlyReflections01_DryMix audio file, you’ll hear that this already provides an improved illusion of room size, but at the expense of a muddied, and slightly boxy, tonal shift.
EarlyReflections03_WetMixEQ
In response to the unwanted tonal changes showcased in the EarlyReflections02_WetMix audio file, I inserted an instance of Cockos Reaper’s bundled ReaEQ equaliser after the SIR2 convolution reverb in the effect return channel, applying a 12dB/octave high-pass filter at 130Hz (Q=0.35) as well as an octave-wide peaking filter cut of 3dB at 610Hz. As a result, switching the artificial early reflections on and off (the equivalent of toggling between this example and the EarlyReflections01_DryMix audio file) made much less difference to the perceived mix tone. However, one thing that still bothered me was that the sense of ambience in the mix as a whole now seemed a bit too concentrated in the centre of the stereo panorama.
EarlyReflections04_WetMixEQWidth
Using the MS-based stereo widening facilities within Christian Knufinke’s SIR2 convolution engine, I was able to increase the Sides level of the added early reflections patch, such that the sense of room ambience in the mix as a whole became more even across the stereo panorama. Compare this with the EarlyReflections03_WetMixEQ audio file to hear this difference most clearly.
FinalMix
Here’s a final mix, complete with a healthy dose of church-style long-tail reverb, courtesy of Lexicon’s LXP Hall plug-in. This particular effect setting is based around the Large Vocal Hall preset (in the Large Halls preset category), with the Reverb Time increased to 2.66s and the Early Reflections Level reduced by about 6dB to reduce conflict with the early reflections demonstrated in the EarlyReflections audio fileset above.