
Mic choice and technique may be important, but the other half of the recording battle is working to make musicians feel relaxed enough to deliver a great performance.
The Travis Waltons are what I'd very loosely describe as an indie rock band. I'm currently recording their second album, having also recorded and co-produced their first album, My Neck is Bleeding, between 2010 and 2011. The band's situation is one that is fairly common these days, with band members spread around the country (Bristol, London and Cambridge, in this case), very little budget, and the recording process spread out over a number of months, whenever people can get out of work and life commitments. They've yet to really establish a proper live line-up, so the recordings are very overdub-heavy — and what you might call 'studio' albums, in that the tracks are very much developed during the recording process itself, rather than being worked out in a rehearsal room beforehand.
Recording Workflow
The process typically starts with home demos provided by the main songwriter and guitarist, Daniel Flay. These are transferred into Ableton Live at my studio, where we'll begin to flesh out the ideas with guide guitars and some basic programming. The recording process then starts in earnest with the drums and is built up from there with live and synth bass, Hammond organs, electric and acoustic guitars, vocals, piano, violin, cello, shakers... and whatever is lying around the studio at the time.
In this month's Session Notes, I'll run through some of my experiences of recording the Travis Waltons' latest album, and focus in more detail on some of the problems I faced when completing the final acoustic and electric guitar overdubs. I work with quite a few guitar bands, but recording guitars with Dan has provided me with some of my most challenging but rewarding experiences as a sound engineer to date. Most of the tracks are in drop tuning of some kind, and a capo is often employed. When combined, these factors can cause tuning problems that can be tricky to pinpoint. Dan would also be the first to admit that he sometimes struggles a little with his timing, and for some of the heavier tracks on the album we couldn't really double-track the guitar too much without it feeling messy, due to the double strumming pattern being too different to the main take.
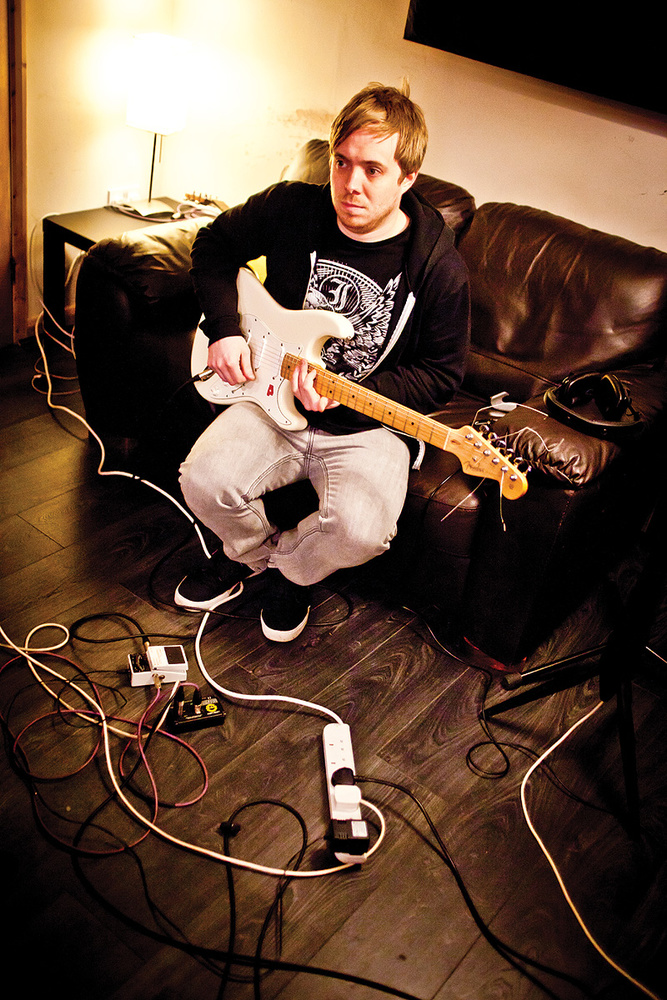
Staying In The Same Room
I can call on a few different live spaces in my studio, but when working with Dan it just seems to come together more quickly and easily if we record in the control room as much as possible. Wearing headphones together makes it easier to get the headphone mix right, and I find that it becomes more of a shared experience, which can make the artist feel more relaxed. This, combined with the ease of communication that such a setup provides, makes it well worth the little extra effort required to deal with cabling, setting up headphones, and so on.

I know that many home recordists and project studio owners find themselves working in a single space out of necessity. Control-room-based setups can be made to work well enough, as long as you don't have too many other band members hanging about making noise or shuffling around — and you remember to turn the speakers down before you hit record! However, I always prefer to keep guitar cabs away from the control room, if possible.
Recording Acoustic Guitar
When contemplating how to record an acoustic guitar — what mics to use, where to position them and so on — my decisions are very influenced by the role of the acoustic in the specific song I'm working on. If it's sitting in a busy mix, I might go for a bright, small-diaphragm condenser mic such as an AKG C451, or even a dynamic mic of some kind, such as a Shure SM57 or a Sennheiser MD421. Recorded like this, the acoustic might not sound great on its own but it will 'cut through' and do its job nicely in the mix.
 After experimentation, both the engineer and the guitarist agreed that the large-diaphragm AKG C414 microphone, pointing roughly towards the 12th fret, gave the best sound for the first track, 'Doom'.
If the acoustic is the main instrument, though, I'll probably want more of a full, accurate representation of what the guitar sounds like in the room. I might want to take advantage of the proximity effect to exaggerate the low end a little, opt for a multi-mic set-up, or maybe do a stereo recording if there's enough space in the track to make that work. The ability of the player, type of acoustic, style of song and the sound of the room are all important considerations when making these choices.
In this session, there were two acoustic guitar parts: one in the upliftingly titled track 'Doom', which required a simple, rhythmical chugging part to sit with an electric guitar playing the same thing, a simple bass drum pattern, some piano and organ parts and vocals; and another for 'Satan', a song that would comprise only the acoustic guitar and a vocal part.
Looking at 'Doom' first, I got Dan comfortable playing his Martin acoustic and, as quickly as I could, began to audition a few mics I had in mind. My intention was to use only one mic, and the options in my mind (and at my disposal!) were an AKG C414 B-ULS, one side of my stereo Royer SF12 ribbon and an AKG C451B. I'm a fan of the 'pointing the mic at the 12th fret' technique, and was deliberately sticking mainly to what I knew for what would be a fairly simple part.
When auditioning mics, it's important to get the sound properly in context, so I got Dan all set up with a headphones mix, and recorded a small sample section of the part with each mic. I then distracted him for a few minutes to allow our ears to clear a little from hearing the instrument in the room (I use this technique quite a lot to get perspective), and then we listened to the three mic options in the context of the song. We agreed that the C414 was the clear winner — as it provided a full but tight and controllable sound, which seemed ideal for the track — and then turned our attention to getting a good take.

Timing Issues
I mentioned earlier that Dan sometimes struggles with his timing. It's a minor but noticeable problem getting a consistent pattern going with his strumming hand, which he gets annoyed about — and that in turn makes it worse! This normally just requires patience on my part to get a few usable takes down, which I can then comp into a single take. For this track, though, we stumbled upon a great technique for squeezing a bit more consistency out of his playing.
First, I took the best take we had and, working quickly, quantised it using Ableton Live's Programmes/Warp function — which makes the job really quick and easy for any audio file with reasonably well-defined transients. With a little tidying and moving of warp markers, we soon had an acoustic track that was almost perfectly in time.
 The arrangement for 'Satan' allowed the acoustic guitar sound much more space, so Neil tried out — and eventually settled on — his Coles stereo ribbon mic.
As is often the case with such processing, there were a number of undesirable artifacts from the warping process, and I could never consider using the resulting part in the final mix. What I could do, though, was to get Dan to re-track the part, but this time playing along to the quantised version. I hard-panned this to one side of his headphone mix, and his 'live' to the other — and it worked really well, the quantised track seemingly pulling his playing into time. I've yet not had another chance to use this technique, but it certainly got us out of a fix in this session, and I'd recommend giving it a try in similar circumstances (just make sure you don't let it disrupt the flow of your session too much).
Thinking On Our Feet
Because the next track, 'Satan', would feature only the acoustic guitar and a vocal, I decided to aim for a more expansive guitar sound, knowing that I could switch back to the very workable sound we'd achieved for the previous track. I'm lucky to have at my disposal a Royer SF12 stereo ribbon mic, which I often use set back a bit from the source, usually in conjunction with other close mics for acoustic guitar. On this occasion, though, I was enjoying the sound of Dan playing in the room and started thinking 'I just want the recording to sound like that'. I used my ears to find what I considered to be a 'sweet spot' in front of the guitar, and positioned the SF12 roughly where my head had been.
As before, we recorded a sample section, cleared our ears for a moment and listened back — and did a bit of a double take, as the recording sounded so much like the guitar in the room that it was quite a surprise! The only difference was a slightly fuller bottom end, which was due to the high proximity-effect bass boost that you always get from figure-of-eight (and almost all other directional) mics. The sound seemed ideal, as there was plenty of space in the mix for a full stereo recording to take centre stage.
We were working in the control room again, and despite the pleasing sound, I became aware that the ever-so-slight hum of my PC was creeping on to the recordings. A stereo ribbon mic inherently employs two figure-of-eight polar patterns in a Blumlein stereo configuration, so it was capturing sound from the back as well as the front of the mic. Although this is part of what makes the mic's sound what it is, it was capturing a little too much of the room sound for my liking, given the stripped-back nature of this track.

Using a few standard squares of acoustic foam that were lying around the studio, I experimented with taping a piece to a mic stand and positioning it a foot or so behind the Royer mic. This had just enough of the desired effect of 'drying out' the sound, and also appeared to screen the mic off a little bit from unwanted sounds (such as me rustling about, and the humming PC). With the sound finally in the bag, the tracking passed off refreshingly quickly and we got two good-quality takes down.
We were working to a click for this track, and it's worth mentioning that when you do this you need to take plenty of care to ensure you're not recording any spill from the headphones! Experience has taught me that using clicks in quiet tracks without due care, can be an easy way to ruin an otherwise great recording!
Electric Guitars
 The Gibson SG used on 'Separation Season' was fitted with heavy-gauge strings, making it ideal for the drop-tuned parts on this track.
The main electric guitars we had to get down in this session were for a track called 'Separation Season' which we were thinking required a combination of cleaner, jangly sounds, with a hint of distortion, along with, perhaps, a heavier guitar to give the track the necessary 'meat' and 'drive'. I really wanted the guitars in this track to have fullness and width but without adding an excessive number of guitar tracks. I'm also very much a firm believer in making decisions at the tracking stage and not recording loads of parts and options to go through at a later date. My plan was to have the main guitar part double tracked, hard-panned left and right, with one side slightly clearer and the other a bit more distorted. We would then add in extra parts where we felt them to be appropriate. I find that it's nice to build up a good texture with guitar tracks by mixing things up a bit on different parts, using different guitars, pick-ups, amps, mics, and so on. With double tracking, in particular, this can work really well and add a great sense of width to a track, compared with similar recordings all using the same instrument and amp.
For this session, we had a couple of nice amps at our disposal, including an Orange Thunderbird 50 Head running into a Zilla Cab and a Fender DeVille combo. Guitar-wise, we had Dan's trusted American Standard Stratocaster fitted with Lace sensors pick-ups, and we have a Gibson SG at the studio fitted with heavy gauge strings, which I find particularly useful for tracks with drop tuning. I like to take a little time setting things up before beginning guitar recording, so I have my options available and can audition sounds and get some momentum going in the tracking process without having to muck about with mics. Like the musicians, I want to be able to stop thinking about anything technical, try to get my head into the song, and help the musicians out if I can. The Gibson SG was recorded via two separate amps, in order to thicken the sound. First, an Orange Thunderverb 50, driving a Zilla cab, was miked with one of Neil's favourite mic pairings for electric guitar, comprising a Shure SM57 and a Beyerdynamic M160 ribbon mic, running through API preamps. The signal was also sent to a Fender DeVille combo, which was miked with a single SM57.
A Tricky Phase
My plan was to use the Orange as the main guitar amp, so I set this up first with my favourite combination of guitar-amp mics, which is a Shure SM57 dynamic mic paired with a Beyerdynamic M160 ribbon. I mainly close-mic guitar cabs, and I like the combination of these mics for a couple of reasons. Firstly, in terms of tone, they combine well, with the SM57 providing the brighter, more aggressive sound and the M160 a more rounded 'fuller in the mids' tonality. I tend to point the SM57 at the centre of the speaker cone, to capture a brighter timbre, with the M160 next to it but pointing slightly off-centre, which I find helps to exaggerate the difference between the two different mics. Balancing the levels of the mics against each other then provides a nice amount of control over the tone, although I generally commit to a decision on the spot, recording into my DAW the two mics summed as a single track.

 I'd really recommend swotting up a little on phase issues, if you're not really familiar with them, as phase is a massive consideration when working with any multi-mic setup. With guitar-heavy tracks, in particular, the sound can become really smeared and weak if even slight phase problems start to build up. In days gone by, I'd often spend ages getting a multi-miked guitar setup in phase. Nowadays, if I'm not really confident that the mics are working together, phase-wise, I'll make the decision to just go with one mic, so I can get on with the recording. But that's the other reason why I like this combination of mics: they're incredibly easy to get into phase with each other. If you visually line up the mics and check the phase, by flipping the polarity on your mixer/interface/DAW, more often than not the mics almost completely cancel each other out, which is a great sign that everything is pulling in the same direction.
With the Orange set up, and with a good basic sound achieved, I moved on to the Deville, achieving a workable sound with it miked up very simply, using an SM57 pointed just off-centre. We then had what we considered two really good amp sounds and two nice but different sounding guitars to choose from in the context of the track. Preamp duties for both mic setups were taken care of by my trusty API 3124+.
 The API mic preamps used on Seperation Season, complete with handy DIY labels!
Keeping The Width
As tracking began, the timing issue reared its head again. Knowing that this might be a problem, we experimented for a while with a few different double-tracking options. Although we liked our individual sounds and the power and width they gave the guitar, the result was just too inconsistent and messy to seriously consider using. After discussing our options, we decided to work on a stereo guitar setup that would involve isolating the two guitar amps, splitting the signal leaving the guitar and sending it to both amps at the same time. This would enable us to use the combination of sounds we liked with a single performance, and would also give us guitars we could pan left and right in the mix to achieve the width we liked. This was a 'eureka' moment for me and Dan, and the pressure noticeably lifted from his shoulders when he knew he wouldn't have to re-create a performance for a double track, so I decided to go with it... despite a few reservations.
I've done multi-amp guitar recording before, and it has its pros and cons. As well as being able to combine the sound of different amps, which can be very desirable, you can get a similar powerful effect to double tracking, but without the sometimes glossy chorus effect and, of course, you don't get timing differences between takes. The major down-side is that the two amps can cancel out very efficiently in mono — and although it's debatable whether mono is relevant any more, I believe it's still good practice to avoid problems if at all possible.
I've found that using 'fake' stereo techniques, such as introducing a very short 12-17ms delay, can put your mind at rest over this issue, and there are also plug-ins, such as Soundradix Auto Align, that can really help. Completely isolating the amps (placing them in separate rooms, if at all possible) can also help a great deal, and with zero spill in this situation you always have the option of just deciding to use one amp if you change your mind.
So, to recap, our setup for the 'Separation Season' main guitar part employed the Orange head in the control room, with a long speaker cable feeding the Zilla cabinet, which was set up in another room and miked with my favourite SM57 and M160 mic combination. The sound we had for this was distorted enough to have a bit of meat but not enough to completely lose the 'jangle'. We then had the Fender Deville set up in another room, miked up using a single SM57. The sound of this amp was a touch cleaner, and although the sounds were unremarkable on their own, together and in the track we really liked what we were hearing. Splitting the signal to the two amps was made possible by my wonderfully titled Little Labs STD which, as well as splitting the signal, is designed to ensure that there's no extra noise or loss of tone when you need to make long jack-cable runs between rooms. There are a number of options out there that help with this application, such as the Radial SGI, and even some standard guitar effects pedals or tuners also offer the option to split the signal. A Little Labs STD cable extender/splitter split the guitar signal between amps and ran the signal from the control room to the live room without significant degradation.
Feeling The Noise
With our multi-amped , multi-miked setup all ready to go, we suddenly became aware of quite a lot of unwanted hum and general noise coming through the amps, and through the Fender in particular. I'm often happy enough put up with a little noise when recording guitars, particularly if the song doesn't have any quiet sections where it will become noticeable — but on this occasion it was really quite apparent.
My Little Labs STD has a ground-lift switch on it which, when engaged, swapped the noise to the other amp, suggesting that the noise was being caused by some kind of grounding problem. Thinking about what might be causing the problem, I realised that the two amps were drawing power from different rooms and, knowing the electrical layout of my studio, from different electrical mains circuits. As an experiment, we ran an extension cable from the room where the Fender was located, so that everything we were using that required mains power (including our pedal tuner) was connected to the same power point. This improved the situation greatly, and although there's still a little noise in places on the recordings — which you can hear if you listen to the audio examples — it wasn't enough to make me hold up the session any longer. With another problem solved, I was keen to begin tracking. It's almost inevitable, when using multi-amp setups, that you'll discover hums from ground loops. Neil tackled the issue by using the Little Labs STD cable extender/splitter's ground-lift switch, and ensuring that everything was coming from the same power socket. This improved matters enough to allow him to get on with the recording.
Tuning Issues
'Separation Season' uses a drop-tuned guitar, tuned down from G-flat to C. I'm not a guitarist myself, so I have to think on my feet a little with guitar issues, and I've had to try to learn a little theory in order to be of any help with problem solving. With the guitar down-tuned, the strings inevitably get a bit flappy, and this usually seems to make them quite unstable in terms of tuning. The heavy-gauge strings of my studio's Gibson SG help in this respect, this but for 'Separation Season' we had to obsessively check the tuning with our Boss pedal tuner, and actually ended up checking the tuning of specific chords! This involved Dan holding down any offending chords and checking that all the notes in it were perfectly in tune.
Guitar tuning, in general, can be a strange and somewhat unpredictable thing, with problems often specific to a particular player's technique (or lack thereof!) and style. It's strange, but sometimes just taking a break and relaxing can sort things out. The other common issue is the intonation of the guitar or, more specifically, the accuracy of the pitch across the whole instrument. If it is a problem, it commonly gets worse and more prominent the higher up the fretboard you go. The intonation is affected by the length of the string between the nut (headstock) and the bridge, and can be altered by adjusting the bridge saddles. If you don't know what you're doing, though, it's probably a very good idea to get your guitar properly set up by a professional.
Tracking The Electric
Refreshingly, once we'd sorted out our technical problems, the recording process went fairly smoothly, with Dan seemingly liberated from his timing straitjacket. We got down our main guitar part in one take, and then went through and overdubbed a few small sections to tidy and tighten where we thought that was necessary. With Dan now 'in the zone', we added another guitar that came in only during the chorus and seemed to really lift things at the right moment. We used the same setup as for the first guitar part, only this time we used the brighter of the pickups on Dan's strat and I changed the balance between the two mics on the Orange amp, making the SM57 more dominant — which allowed the part to cut through a little more. As a final touch, we recorded another rhythm part with the heavy-stringed Gibson SG, for which we turned up the gain quite a bit, for a nice meaty sound. Our thinking was that this part would follow the bass line and would sit just below the other guitar in the mix. This seemed to work really well.
Summing Up
I rarely leave a recording session punching the air and thinking that I've nailed every single aspect of it, but this was a pretty successful and satisfying one. A major reason for my positive feelings was the sheer amount of material we were able to get through together, successfully, in the control room. The pleasing outcome of working in this way will possibly change my approach to forthcoming sessions and has even made me reconsider the current layout of my studio.
One aspect of the session that had slightly annoyed me was the unwanted noise and hum on some of the electric guitar parts for 'Separation Season'. Considering the nature of the track, I decided that it wouldn't be a major problem, and consoled myself by reflecting that these issues arise in recording sessions. We just have to decide at what point the problem, although not completely solved, has reduced enough to allow recording to continue, so that the flow of the recording session isn't interrupted for too long.
I was fortunate enough to have a dedicated recording space for this session, but whatever your situation, it's important to arrange your setup in a way that allows you to at least be able to hear and respond to potential problems like noise or phase issues. It took me a while to figure this out, but the key is getting to the point where you are comfortable enough with your setup to relax, think clearly and make good decisions.
As well as any technical problems you have to deal with in a session, you also need to manage the people you're recording, who might be having issues with their performance, whether for technical reasons, tiredness, or a lack of self-confidence — and this is arguably where the real skill in recording lies. Problem solving, creativity, thinking on your feet, helping the artist feel good and having a few tricks up your sleeve are all essential aspects of the recording process. It's developing a good combination of people skills and troubleshooting, alongside a good grasp of the technical stuff, that enables us to become better recording engineers.
Audio Examples
Neil has prepared a number of audio examples to accompany this article, which you can find on the SOS web site.