Keeping track of your Pro Tools plug-in settings can make your life so much easier.
In this month's column, we're going to look at how Pro Tools handles the storage and recall of plug-in settings. Learning how to manage plug-in presets, and where on your system they live, can save time and frustration, especially when you need to apply the same settings in a different session.
The first thing to remember is that every plug-in's settings, irrespective of whether you create a preset or not, are saved in the session file. This means that when you open a project, even years later, all the plug-in settings come back just as if it was yesterday. But if you want to use those plug-in settings in a different session, you will need to actively save them as plug-in presets.
A lot of plug-ins come with a range of presets included. These are often called factory presets, and can be really useful for helping you to understand how a plug-in works, but it often pays to take care when using them in your own sessions. Whoever created the presets had no idea what your audio would sound like, and presets for EQ and dynamics plug-ins, in particular, should be used with caution. The presets in other types of plug-ins, such as reverbs or virtual instruments, are much more useful 'out of the box', but, again, don't be scared to tweak them to suit your project. Whether you create your own settings from scratch, or modify one of the factory presets, Pro Tools will let you save them without having to overwrite whatever preset was your starting point.
When you modify any plug-in parameter, you will see that the preset name becomes italicised and the Compare button lights up, indicating that the settings have been changed with respect to whatever preset was originally loaded. The Compare button lets you switch between the modified and original settings with one click, which is very useful, especially with EQ, when it is very easy to kid yourself that you're making the sound better when actually you're not!
Once you've adjusted all the controls on the plug-in to your satisfaction, turn your attention to the Presets section at the top of the plug-in window. If you have created a new setting from scratch, you can simply choose Save Settings; however, if you are modifying an existing preset, Save Settings will overwrite the existing preset with the modified settings. The basic 'Save Settings' option will overwrite the source preset: to save the current settings as a new preset, choose 'Save Settings As'. Sometimes this is what you want, but if you are starting from a factory preset, you will lose the original factory setting. If you want to keep the starting preset, choose the Save As option instead, and give the modified setting a new name before saving it. The Presets menu also includes options to lock the current preset to prevent it from being overwritten by the Save command, and to delete the current preset.
Deep Roots
Pro Tools enables you to save presets in one of two locations: either in a special folder called Plug-in Settings, within the session folder, or on your system in the Root settings folder. You can choose which you want from the Presets menu in the plug-in. But what are the benefits of these two options? Settings can be stored in the central Root folder or with the session from which they are saved.
If you're going to be moving the session to another machine, or sharing it with collaborators, it is best to save presets in the session folder. That way, your presets will come along with the session when it's moved, because the presets are copied with everything else in the session folder. The down side is that you will only be able to access these presets from within that session. Open any other session on your system, and they won't appear in the plug-in's preset menu. If you are creating a preset that you would like to be able to access from within other sessions on your system, you should choose Root Settings, and this is Pro Tools' default setting.
Finders Keepers
If you want to track down plug-in settings after the fact, it is possible to use the Mac Finder or Windows Explorer to move and copy the plug-in settings files. The Session Plug-ins Setting folder is easy to track down, as it will be in a folder called Plug-in Settings inside your session folder, along with Audio Files, Session File Backups, and so on. The Root Plug-ins Settings folder is harder to find. On a Mac in Pro Tools 10 and below, it is Macintosh HD/Library/Application Support/Digidesign/Plug-in Settings. Within this folder, each plug-in has its own subfolder. On Windows machines, the location is C:/Program Files/Common Files/Digidesign/DAE/Plug-in Settings, and again, each plug-in has its own folder.
When you have a lot of presets for a particular plug-in, you might want to go further and create separate folders for different types of preset. The factory presets are sometimes managed in this way already, for instance with the Avid EQ III plug-in. You can create a new folder when Saving Presets by using the New Folder button in the Save dialogue box, or, again, you can manage things from the Finder or Windows Explorer. Presets for an individual plug-in can be categorised using folders, which is helpful when you need to store a lot of settings for different purposes.
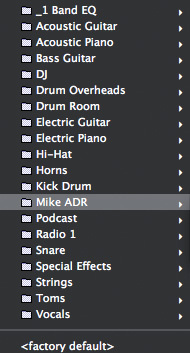
If you end up with plug-in settings in other locations than the Root Setting or Session folder, they can be imported using the Import Settings option in the Presets menu. You can also use the Workspace Browser to search for plug-in settings files on your system. Then, rather than use the Import option, you can drag and drop from the Workspace browser onto an empty insert point, and Pro Tools will insert the correct plug-in and apply the preset.
Alternatively, if you want to import a plug-in setting from another session and you didn't save it as a preset, all is not lost. Select Import Session Data from the File menu and navigate to the session containing the plug-in with the settings you want. Choose the track that has the plug-in on it and match it to the track you want the plug-in to go onto. From the Track Data To Import option, near the bottom of the window, select None so that all the options are deselected, and then check 'Plug-in Assignments' and 'Plug-in Settings and Automation'. When you hit OK, the plug-in and its settings will be inserted on the selected track.
No matter what industry sector you work in, presets and their management can help streamline your working practices. The more organised you are, the more efficient you can be, and when time is money, that matters!
Copying & Pasting
There are times when you need to transfer settings from one instance of a plug-in to another, but you don't especially want to go to the trouble of saving them as a preset. The obvious case is where you want to apply those settings offline in an AudioSuite plug-in. When I'm intending to do offline processing, I'll often make my parameter adjustments using a real-time (native or DSP) version of the plug-in, as this is easier and more responsive than working with the AudioSuite version. Then I'll go into the Presets menu and select Copy Settings, before selecting the relevant clip or combination of clips and choosing the matching AudioSuite plug-in. Within this plug-in's window I'll select Paste Settings, and the parameter adjustments I'd made in the real-time version will be imposed on the AudioSuite one. I can then hit Process to apply these settings to the selected audio, then remove the real-time version and move on. A refinement of this process is to duplicate the playlist of the track the clips are on, and then AudioSuite process the files on the duplicate playlist. That way, if you ever need to go back to the unprocessed version, it is very easy to do so by switching playlists. (It should be pointed out that this approach only works reliably if the real-time plug-in you're using to make your adjustments is the first in the chain, as otherwise you'll be hearing it processing the output of the previous plug-in rather than the raw clip.)
User Default
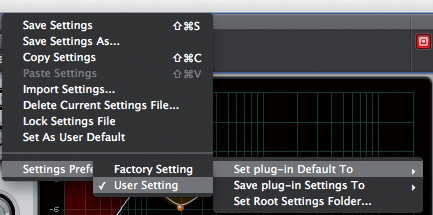
As well as the Factory Default setting, which is the one that will open when you instantiate a plug-in, you can also have a User Default setting. Once you have the correct setting, select Set As User Default from the Plug-in Presets menu, and you will see that you now have a User Default above the Factory Default. It is then possible to make a plug-in open with that User Default applied, rather than the Factory Default set by the plug-in manufacturer. To do this, from the Plug-in Presets menu, select the User setting as the Default from the Setting Preferences. I use this especially for metering plug-ins, where I want the plug-in to open with a specific setting to meet the metering standards needed for that client.


