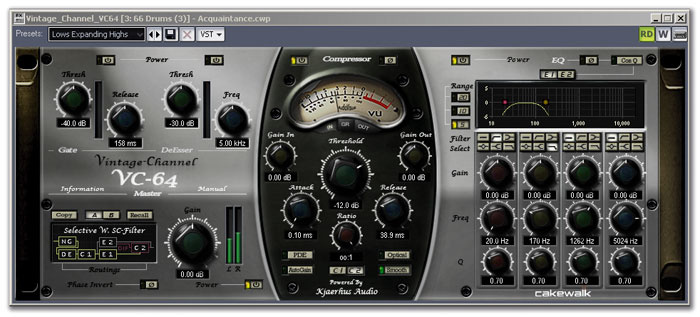
Sonar 6 's new 'channel strip' offers multiple routings that enable techniques such as parallel compression, frequency-conscious dynamics control and side-chaining.
Apparently, Cakewalk like to include some interesting new signal processor with each update of Sonar. With v5 they added the convolution reverb, and prior to that, the Sonitus effects and Lexicon reverb. Now in Sonar 6, VC64 Vintage Channel — basically a re-skinned version of the Kjaerhus Golden Channel plug-in — makes its debut. If you're not familiar with Kjaerhus' effects, they're excellent, and this one is no exception.
First, though, it has to show up in your effects menu before you can use it — and some users reported on the Sonar forum that VC64 simply refused to appear. Fortunately, Cakewalk discovered that the problem affected only those who implemented a registry tweak that disables the generation of MS-DOS-compatible short file names. Although this is claimed to increase performance with partitions that have lots of files with long file names, it will 'break' some functions within programs. In this case, the way in which Sonar reads VST effects was affected. As the tweak can also interfere with programs other than Sonar, if you've done it, it's best to return to the default setting. Do this by opening the Registry Editor, by going Start / Run / Regedit. Then Go HKEY_LOCAL_MACHINE / SYSTEM / CurrentControlSet / Control / FileSystem. Click on the parameter labelled 'NtfsDisable8dot3NameCreation'. Choose Edit / Modify in the Registry Editor and enter '0' for the Value Data parameter.
The Missing Manual?
To call up VC64 's manual, click on the 'Manual' label just above VC64 's Gain control in the lower left. The part called Main Section — which describes how the inter-module routing works, as well as the main controls — is missing from the contents page. To find it, click on the manual's Index tab, then double-click on 'Routings'. Scroll upward to see the rest of the manual's documentation on the Main Section.
 The Noise Gate is very simple, but it is possible to tweak it to obtain some non-traditional effects.
 Like the noise gate, this is a simple processor that has uses other than its intended one.OK, let's cover some basics! VC64 is a multi-function audio processor that's reasonably kind to your CPU. Its roster of effects includes a noise gate, de-esser, two compressors and two equalisers, each of the last having four stages of multi-mode equalisation: parametric, low shelving, high shelving, low pass and high pass.
What makes VC64 really interesting is that it has multiple signal-routing presets. For example, compressors can be 'patched' in series or in parallel, and side-chaining is also possible within the channel strip, to allow for frequency-conscious compression. I'll give a brief rundown of each section, then we'll have a look at the applications made possible by the different routings.
The noise gate is one of the simplest modules, consisting solely of a 'power' button, Threshold control, Decay Time control and meter. You can't set a particular amount of gate attenuation (the only choice is off or on), nor can you set an attack time. However, in addition to gating out noise, the processor does offer one useful effect: tightening up of percussive sounds. Set a relatively high threshold and a short decay and you can reduce leakage in drum parts, as well as cutting down hi-hat, tom and cymbal decays. With full drum or percussion loops, you can sometimes set the threshold high enough to leave the snare and kick sounds intact but remove lower-level percussive sounds.
The de-esser (above) is basically a frequency-conscious compressor. The Frequency control sets the frequency above which compression occurs, while the Threshold control sets the level needed to trigger compression. Aside from de-essing vocals, I've found this useful for taming over-prominent hi-hats in dance music drum loops, as well as reducing the 'buzziness' of distorted signals with lots of highs.
By this stage of your careers you probably know how compressors work, so we'll forgo the standard tour of the compressor features and instead jump into what's different. First of all, there are two compressors, which opens up a range of applications that we'll cover shortly. Each can be bypassed individually. Second, some non-standard controls are provided. One button gives optical or VCA compression characteristics, and a clean/warm switch for different characters. There's also an auto attack/release button; this feature isn't unusual, but it has been given an unusual name ('PDE'), so you may not recognise it. Also note that the compressors can be thrown out of phase if desired.
The dual equalisers take advantage of various routings that put them in series, in parallel, in the path of compressors so that they can perform frequency-conscious compression, and so on. The equalisers work as expected, but do include a few unusual features. For example, there's a Constant-Q button. In a nutshell, a filter with a constant-Q response has sharp notches and broad peaks, whereas one without constant-Q has equally broad (or narrow) notches and peaks. Turn on Constant-Q if you need to make deep, narrow notches to get rid of unwanted frequency anomalies, yet still allow for relatively broad boosts, and turn it off for a more natural sound. There are also Range buttons, which have no effect on the sound but alter the range of the graph by setting the vertical axis to ±5, ±10, or ±20dB. As you generally want to use the minimum amount of EQ possible, I recommend setting this value to '5', as it makes subtle equalisation settings easier to see. Wide ranges (as found on most EQs) can induce people to boost or cut more than they really should, so that they can 'see the curve'.
VC64 Routings
This is where it gets really interesting, as VC64 allows various series, parallel, and side-chaining options. Clicking on the routing window steps you through the various options, but you can also right-click on the window and select one of the 10 choices from a pop-up menu (see the screenshot above right).
 Click in the routings window to cycle through the various options, or right-click to choose the desired routing from a menu.Let's look at the Parallel Compression routing first, which patches all effects in series, except that the output splits through two compressors in parallel. Parallel compression is handy for when you want to do a fair amount of signal squashing but still need a sense of dynamics; here's how to reconcile these two seemingly opposite conditions. Assuming, as an example, that you're doing some drum compression where you still want to retain percussive attacks, use one of the paralleled compressors for the squashing. Typical settings for drums would be Threshold 20 dB, Attack 0.1ms, Release 100ms and Ratio 10:1. Next, set up the second compressor for very light compression. Try the Threshold at 6 dB, Attack at 10ms, Release at 150ms and Ratio at 1.5:1. Now simply use each compressor's Gain Out control to adjust the blend between the 'super-squashed' and 'lightly squashed' sounds (see screen below).
A variation on this technique is to use the Two Band Compression routing. This is similar to the Parallel Compression routing, except that each compressor is preceded by an EQ. You can thus tailor the frequency response of what is being compressed. For example, with guitar you might want to notch the mid-range on one of the channels and apply significant compression to bring up the pick-noise transients. Or you could compress the mid-range to bring up the notes. Of course, you can also use this routing as a primitive multi-band compressor. However, as Sonar already includes the Sonitus multi-band compressor, which can do real multi-band compression over up to five bands, I find VC64 most useful for creating effects.
 Two compressor setups are shown here side by side. The one on the left provides heavy 'squashing', while the one on the right adds a lightly compressed signal.One of my favourite applications for this routing is to create a nice wah-wah effect by throwing one of the EQs out of phase. I described how to create an effect similar to this in a previous column, but it required duplicating tracks and some other complications; using VC64 makes the process much simpler. Here's how to do it.
1. Bypass all stages on one of the EQs so that its response is flat (the bypass button is the 'straight line' amongst the buttons showing the various possible curves). Also on this EQ, turn the Phase switch on.
2. Use the Two-Band Compression routing, but make sure the compressors are off.
3. On the second EQ, select a band-pass response.
4. Set Gain to about +8dB and Q to about eight.
5. Sweep the second EQ's Frequency control.
The wah effect is much more dramatic because with a standard parametric response, frequencies above and below the peak pass through at their 'flat' amplitude. If you include a second out-of-phase stage, frequencies above and below the peak are cancelled, thus emphasising the peak.
Split Stereo Setup
Have you ever wished you could equalise and compress the two sides of a stereo signal separately in Sonar? Actually, you can, if you separate them into two mono tracks and then process them individually. But VC64 's Split Stereo routing lets you do this with an existing stereo track. With this routing, the noise gate and de-esser affect both sides of the track equally. However, once past these two modules the signal splits to an EQ/compressor pair: the E1 equaliser and C1 compressor affect the left channel, while E2 and C2 process the right channel. This can be extremely handy when you're restoring old stereo tracks, including stereo program material, because you can automate the control settings. For example, if an instrument is too prominent in the left channel and unbalances the stereo mix, you can bring in compression (or EQ, or both, depending on what does the job best) to tame that instrument only while it's playing.
Series Routing
The 'Mix and Master' routing option patches the equalisers and compressors in series. With the equalisers, this means that you essentially have eight stages of EQ. You could therefore, for example, set up eight band-pass/notch filters to deal with weird resonances, but the Sonitus equalisers are excellent for dealing with this type of straightforward EQ, so VC64 once more comes into play for more effects-type settings. My favourite way of using this routing is to put two compressors in series, each one set for extremely light compression.
 Two compressors set in series, with very light amounts of compression, can provide a useful lift to a signal without making it sound compressed.The screen shot at the top of the page shows typical settings. If you used these settings with only one compressor, you wouldn't hear much of a difference at all. But put two in series, and the effect seems to intensify. For example, I used these settings for buss compression on a jazz recording of drums, piano and bass. As in the case of classical music, you really don't want to do a lot of dynamics processing with jazz, but the subtle compression helped make the music sound more lively and 'present'. In this case, I also used the Optical and PDE settings.
Of course, as with other compressors, you can 'trim' the compression by varying the Gain In parameter. Turning it up causes more of the incoming signal to exceed the threshold, which is equivalent to turning down the threshold.
Filtered Compression
 The Parallel Compressors routing offers some pretty wild effects if you throw one of the compressors out of phase.This is another name for side-chain compression, which facilitates frequency-conscious operation. In this routing, equaliser E2 taps the signal after compressor C1 and its output serves as the control for compressor C2. In other words, instead of compressor C2 listening to its own output to determine when to initiate compression, it listens to the filter. Thus, if the filter passes only high frequencies, then only high frequencies will be compressed.
However, remember that, unlike compressor side-chains, which typically include a high-pass filter for de-essing purposes, there are many more filter options in VC64. For example, suppose you're applying side-chain compression to drums. If you set up a high-shelf boost, the high end will be compressed. But if you use another band of VC64 's equaliser to add a low-shelf cut, then the low frequencies will sound expanded in comparison to the rest of the drums.
The Secret Sound Of The Psychedelic Sixties
The Parallel Compressor routing also makes possible a lot of special effects if you set one compressor for an out-of-phase response. The settings are pretty crucial here. For compressor C2, set the following parameter values: Attack, 10ms; Release, 224ms; Threshold, 0dB; Ratio, 1:1; Gain Out, 0dB; Phase, out of phase (lit); Gain In, start at 10dB. For compressor C1, use these values: Attack, 10ms; Release, 224ms; Threshold, -20dB or so; Ratio, 2:1; Gain Out, 0dB; Phase, in phase (not lit); Gain In, 0dB (see the screenshot below).
With the settings above, C1 is quite compressed and C2 is not really compressed at all. Now adjust C2's Gain In control. When it's fully anti-clockwise, you'll hear that super-squashed drum sound used by the Beatles, Traffic and others — the effect that sounds as though the cymbals are being sucked into a vacuum. Turn the Gain In control more clockwise and as it approaches 0dB Gain In, the sound will come closer to resembling expansion. Continuing to turn the control clockwise reduces the special effect element, allowing the track to sound more 'normal'.

