Sonar's AudioSnap function has had a bit of a chequered past. The initial version wasn't, shall we say, fully formed, and when AudioSnap 2.0 was released with Sonar 8.5, while it had ambitious improvements, some functions remained 'iffy'. As a result, much of the reaction to AudioSnap, until now, has been along the lines of "Well, I tried it and couldn't get it to work the way I wanted, so I haven't really pursued it since.” However, Sonar 8.5.3 (a free download) concentrated on AudioSnap enhancements, and it's now a solid, reliable function that deserves another look. This month, we'll cover AudioSnap in the context of quantising audio, either to a standard MIDI‑style quantisation grid or a MIDI clip.
AudioSnap Secrets
The principle behind AudioSnap is very similar the one governing how REX files and Acidized files do their magic and, like these protocols, AudioSnap works best with percussive material. The object is to identify each transient within an audio clip, which sets up a custom 'transient grid' (or 'tempo map', if you prefer) for the clip. These transients can then be snapped to a quantisation grid or rhythm and, when snapped, DSP does whatever is needed, audio‑wise, to maintain a natural sound. For example, if the attack transient for a decaying sound moves forward in time to match a particular beat, the AudioSnap process stretches the decaying sound longer to compensate.
AudioSnap can't be applied to groove clips (ie. Acidized loops or REX files, which are converted into groove clips during the import process), only standard audio clips. Unfortunately, if you import a groove clip and 'de‑groove' it by typing Ctrl‑L, the clip length may no longer fall on measure (or beat) boundaries. In this case, right‑click on the groove clip and choose 'Bounce to Clip(s)'. This converts the groove clip to a standard, AudioSnap‑friendly clip without changing the length.
Setting Up The AudioSnap Transient Grid
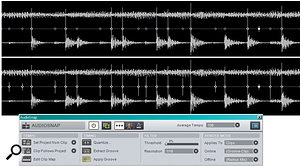
To work with AudioSnap, click on the clip to be quantised and then type Shift‑A to call up the AudioSnap palette (or go Views / AudioSnap Palette). When the palette appears, make sure the Enable/Disable 'power' button is on and click on the Show/Hide Selected Clip(s) Transients button (two buttons to the right of the power button). Transients appear in the clip. Zooming in and enlarging the clip will let you see all transients as clearly as possible.
With simple patterns, Sonar does an excellent job of identifying transients automatically. With more complex patterns, Sonar takes an educated guess, but you'll probably need to do some tweaking to make sure each transient has a corresponding transient marker. The more accurately you identify transients, the more accurate the snapping process and the better the sound quality.
Examine the clip; vertical white lines indicate transients. A small grey diamond means that a transient may exist at that time, but Sonar isn't sure because it doesn't exceed a threshold above which a percussive attack is considered a true transient. You can set that threshold with the Threshold slider; lower percentage values indicate a higher sensitivity to low‑level transients. Also, note the Resolution field below the slider, which lets you restrict Sonar to looking only for transients on, for example, 16th notes.
 The upper clip shows transient markers with AudioSnap's default settings. The lower clip shows the results of setting a much lower threshold (six percent), and restricting resolution to 16th notes. Several transients that are missed in the upper clip are identified correctly in the lower one.Even when you've set the threshold properly, though, there may be extraneous transients that should be disabled and valid low-level transients that may not be identified. Fortunately, there's a useful tool for verifying whether or not a transient is in the right place: Audition Beat. For example, suppose you think that a transient may have been missed (the percussive attack of a note is 'hidden' by a loud decay from a different note, for example). Right‑click on the nearest earlier transient and select 'Audition Beat'. Sonar will play from the transient marker on which you clicked to the next one on the right. If you hear a transient during that beat, Alt‑click where a transient marker should be.
On the other hand, if there's a spurious marker that mistakenly identifies audio as a transient, you can right‑click on the marker and select 'Disable'. Regrettably, when you invoke Audition Beat, Sonar will not play through disabled markers — that function would be very helpful, as you could disable a marker and hear whether there's a transient there — but you can audition the beat on either side of the disabled marker to determine whether the sound is continuous or not. Also, note that markers you add can be deleted, but not the ones Sonar identifies automatically; these can only be disabled.
Let's Quantise!
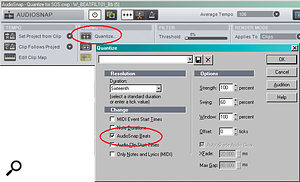
With the transient marker positions squared away, we can now quantise the clip. With the clip still selected, click on the AudioSnap palette's Quantize button. Adjust the quantisation as desired, making sure that 'AudioSnap Beats' is ticked.
 Your audio clip can now be quantised, just like a MIDI clip.However, I usually do a 'test quantise' (remember, you can always undo) with 60 percent swing or so. Then I listen to the quantised file. If there are some rough spots where the sound warbles or doesn't sound right, it may mean that a transient marker is missing or there's a superfluous marker. I then undo the quantisation and examine the file closely, to see if any more tweaks are needed, prior to doing the 'real' quantisation.
Applying A MIDI Groove To Digital Audio
Defining transients allows for far more than quantisation. Suppose you want to apply a MIDI drum track's groove to an audio clip: this is easy with AudioSnap.
- 1. Make sure the audio clip has its transient markers properly defined, via the AudioSnap procedures described above.
- 2. Select the MIDI track.
- 3. Copy the MIDI data (Ctrl‑C).
- 4. Click on the audio track to select it.
- 5. Go Process / Groove Quantise.
- 6. The 'Groove File' field should already be set to Clipboard; that's what we want.
- 7. Make sure 'AudioSnap Beats' is ticked, then click 'OK'.
- 8. The digital audio now has the same groove as the MIDI track.
Isn't science wonderful? We're not quite done yet, however — and we also need to address those who think that "AudioSnap sounds terrible”.
Optimising AudioSnap Sound Quality
When you edit AudioSnap, it uses an algorithm that's optimised for real‑time monitoring, not fidelity, so you can hear changes instantly. However, Sonar also includes high‑quality algorithms that don't work in real time. When you render the AudioSnap clip using one of these algorithms, it turns back into a standard audio clip and incorporates any edits you've made.
To render, click on the audio clip and type Shift‑A to call up the AudioSnap palette. Click on the Offline field and choose the most appropriate rendering algorithm.
 You can choose from five off‑line algorithms optimised for different types of audio, the same algorithm that's used for on‑line monitoring, and the default.It's worth experimenting with the different algorithms to find out which is best suited to your audio; you can always undo and try again. Right‑click on the clip, choose 'Bounce to Clip(s)', and the clip will render in high fidelity. Much better!
If It Ain't Got That Swing...
Swing is one of the most powerful features of any DAW when you want to add a human touch to quantised MIDI or audio data, yet it's often unexploited, for a variety of reasons. One problem is that, while it's easy to add swing to MIDI clips, it's a more complex process with digital audio clips. However, with Sonar, if you can quantise an audio clip, you can add swing via the quantisation dialogue.
If you're not familiar with swing, it's a rhythmic phenomenon that affects the timing of pairs of equal‑value notes. Each note normally defaults to taking up 50 percent of the total duration of both notes. Adding swing lengthens the first note of the pair and, to keep the total duration of both notes the same, starts the second note after the first one finishes, while trimming the second note's duration. Therefore, the two notes added together retain the same length as the 'non‑swung' value. This imparts the kind of feel found in shuffles, some jazz tunes and a lot of hip‑hop. However, it can add a lighter, more danceable feel to just about any kind of pop music.
Swing is expressed by a percentage that indicates how much the first note takes up of the combination of the first and second notes. It's not necessary to add a lot of swing; even a swing of 55 percent makes a significant, audible difference.


