Sonar was one of the first DAWs to take looping seriously - which means that you'll find plenty of tools for making loop-based music easier.
 Red: Opens groove browser. Yellow: Drag to MIDI track to deposit MIDI data to drive REX file. Blue: Loads external REX file.Sonar handles loops extremely well: it can edit the transient markers in Acidised loops to optimise time-stretching, and play back REX loops via the RXP soft synth plug-in. (Given Cakewalk's official support for running Sonar in Windows under Apple's Boot Camp, maybe someday we'll have Apple Loop support as well.) So this month I'm going to take a look at creating a loop-based project in Sonar. I'll be describing a way to put together projects that works well for me, but obviously you should feel free to come up with your own variations.
Collecting & Auditioning Loops
First, collect candidate loops for the composition. The bigger your collection of loop libraries, the better. Having said that, 'construction kit' loop CDs, which consist of a piece of music and its constituent elements, may be all you need for quick projects. Note that even if a loop library claims to have Acidised loops, it seems that few companies take the time to optimise transient markers for stretching over a wide range — and the same goes for REX files. (Just for information, Sony do the best job of editing Acidised loops for optimum stretching. Early M-Audio libraries are very good, and Nine Volt Audio's offerings are also better than average.) As a result, unless you're comfortable editing transient markers yourself, you're probably best off choosing loops that are all in the same general tempo range. Because loops (REX or Acidised) generally have less artifacts when they're sped up rather than slowed down, if your project is at 100bpm and you have a choice between adding a loop whose native tempo is 90bpm or 120bpm, go for the one at 90bpm. Regarding key, the larger the amount of transposition, the more the sound quality deteriorates. If any sample library developers are reading, it would be great if you always remembered to include the native tempo and key in the file title!
Loop Explorer
The easiest way to audition candidate loops is with Sonar's Loop Explorer window. I recommend bouncing CD- or DVD-based loop libraries over to a hard drive or USB memory stick and auditioning from the drive. Auditioning directly from optical media can be slower, and, what's worse, sometimes with my setup Sonar hangs and requires a re-boot. This never happens if I'm using the hard drive or USB stick.
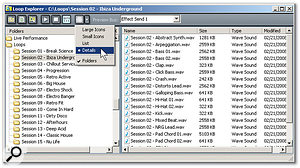
 The Loop Explorer window is your key to auditioning loops.Referring to the screenshot below, going from the toolbar left to right, the first button simply takes you up a level. The next one is a standard refresh button, while the third calls up Windows Explorer so that you can look for files outside of the context of the Loop Explorer. Of the next three buttons, Play and Stop affect whatever loop you selected in the right-hand pane. I always leave the Auto button on, so that a loop starts playing upon being selected. If the loop is Acidised, it will play back at the project tempo. If not, it will play back at its native tempo. This is a good way to determine whether a loop is Acidised, how it will sound when played back at the project tempo, or perhaps how far off it is from the project tempo.
The next button chooses Views. Unless I'm using a laptop with limited screen space, I always tick 'Folders', so that I can see the containing folders in the left-hand pane for the files in the right-hand pane. I also recommend selecting 'Details', so that you can see the file type and size.
The drop-down menu chooses an audio Preview bus. While this can be the Master bus, it's helpful to use a different bus so that you can adjust levels independently of the main mix. This is particularly true if you've trimmed track levels, as the loops might be considerably louder. A dedicated bus is also handy to let you hear how a loop sounds with a specific effect (for example, tempo-sync'ed delay), as you can load the effect into the bus's effects bin while auditioning. If you hear a loop you like, there are two main ways to import it into a project:
- Double-click on a loop in the right-hand pane and it will start at the Now time on whichever track has the focus.
- Drag and drop a loop from the right-hand pane to where you want it in the project. If you drag it into a blank part of the clips pane, Sonar will create a new track and place the loop where you dropped it.
Going Native
Figuring out an Acidised loop's native tempo and key can be useful to make sure you're not straying too far from the loop's original characteristics, which can help you to maintain the best sound quality. Determining the original key is easy: double-click on the loop to open the Loop Construction window and the Root Note field should indicate the original loop pitch. To confirm, turn off the Follow Project Pitch button. Click the Loop Construction window's Play button and the loop will play back at its native pitch. Determining tempo is a little more complex:
 It can be useful to know what an Acidised loop's native tempo and key actually are. Double-clicking on the loop opens the Loop Construction window, where the Root Note field should indicate the original loop pitch. You can then confirm this by disabling Follow Project Pitch, so that the loop can play back at its native pitch. 1. Make a copy of the loop, then click on it and type Ctrl-L to turn off looping. I like to put this loop at the beginning, in an empty track, because that makes the process of detecting tempo easier.
2. Click on the loop to select it, and type F12 to turn it into an Audiosnap clip.
3. Click on the end of the loop (use snap) to set the Now time.
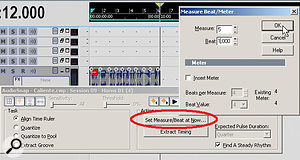
4. In the Audiosnap dialogue box, click on the 'Set Measure Beat at Now...' button. The Measure Beat/Meter dialogue box appears.
5. Enter what you want the Now time measure and beat to be, rather than what they are. For example, if it's a four-bar loop, the Now time would be set to five measures, 1.000 beats.
6. Click on OK. The tempo will change to accommodate the loop length you specified (in this case, four bars).
7. Set the Now point somewhere within the loop (the middle, perhaps), and note the tempo in the tempo field. This is the native tempo (see screen below).
Loop Chopping
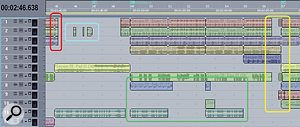
To add variety to repeating loops, why not chop them up into pieces? The screenshot on the right shows several techniques designed to make a loop-based tune more interesting.
Red: The section circled in red shows how three loops have been extended an eighth-note to add an extra downbeat to start off a break.
 This screenshot illustrates several arrangement tricks that add interest to a loop-based composition.Blue: A drum loop has been chopped into individual hits, almost like one-shots, to add accents.
Yellow: Here the loops in tracks 1, 2 and 7 have been pulled back for two beats, giving a 'breakbeat' that's carried by the loops in tracks 3, 4 and 5. The loops starting at measure 57 in tracks 1 and 7 have had the first 16th note cut, copied twice, then placed as two successive 16th notes leading into measure 57. Track 9 is similar, but uses an eighth-note lead-in.
Green: Tracks 8, 10, and 11 (circled in green) use only selected sections of the original loops; in fact in track 8, one of the loops is cut into a section that's only one beat long.
Also note the three pitch transpositions that occur towards the top of the timeline (the original Project Pitch is C). At measure 47, the project modulates up a half-step, from C to C#. Two measures later, the project modulates up to D, and then at measure 57, modulates back down to C#. What you don't see are the subtle tempo changes also occurring in the track.
Auditioning REX Files
If you want to audition REX files for potential use in a project, first insert an RXP REX file player by going Insert / Soft Synths / RXP. Call up files to audition via the Groove Browser (right-click in the field immediately above the waveform view, navigate to a loop, then double-click on it), or click on the Load button and navigate to the file you want to audition.
When the file is loaded, click on the RXP's Loop button, then click on the '0' pad to hear the untransposed loop. Clicking on other pads transposes by the amount shown on the pad (so, for example, +7 transposes the loop up a fifth). To make the amount of transposition 'stick', click and drag upwards on the Transpose field (just below the waveform view) to transpose up and downwards to transpose down. To use the file in your composition, drag the Note symbol to your MIDI track. This inserts the MIDI clip that drives the RXP playback into the RXP instrument's MIDI track (see screenshot at start of article). Note that you can click on this MIDI clip and type Ctrl-L to turn it into a Groove clip that can be 'rolled out', just like an Acidised digital audio clip.
Tempo Changes
 When the loop was a Groove clip, it lasted four measures. Turning off looping causes the file to last over six measures (note the Now time position), meaning that it's slower than the project tempo. Converting it into an Audiosnap clip lets you match the tempo to the file length.Acidised and REX files can both follow tempo changes, which is an exceptional advantage, allowing you to do small tempo tweaks, where speeding up adds tension and slowing down adds release. Go Views / Tempo, and a tempo map opens up. For working with subtle tempo changes, you'll probably need to zoom in vertically for higher resolution.
You have two main choices for altering tempo: draw in a tempo change at a particular point with the Draw (Pencil) tool, or draw a line between two tempos with the Draw Line tool (their keyboard shortcuts are D and L, respectively). In this respect, tempo changes are very much like MIDI controller changes and, like controllers, a value will remain as set until the next value occurs.
If you've never worked with tempo changes you're in for a treat, as these changes can add a huge amount of interest to your music. One of my favourite techniques is to pull back just a little on the tempo before a big chorus. Even if the chorus isn't that big, the slight tempo shift will make it seem bigger because it builds anticipation!
Pitch Changes
 In this example, the tempo changes in tandem with a key modulation, speeding up very slightly (0.20bpm) each time the key modulates upward.Changing keys (modulation) was a technique used in many pop songs of days gone by to make something that repeated sound a bit different, and maybe it's time for a revival. In Sonar, it's easy to experiment with key changes. Songs can have a Project Pitch (key), which is used as a guide by Acidised files. To see the Project Pitch, go Views / Toolbars and select Markers. The Marker Toolbar's rightmost field has a drop-down menu where you can specify a project pitch, or select None.
As an example of how this works, if the Project Pitch is C and the Acidised file has a root note of C, the file won't be transposed. But if it has a root note of D, it will transpose down two steps to match the Project Pitch. Note that for an Acidised loop to follow the project pitch, Follow Project Pitch needs to be enabled in the Loop Construction window (the accompanying Root Note field shows the loop's original key). You can also enable Project Pitch by right-clicking on a loop and choosing Clip Properties, then ticking Follow Project Pitch under the Audio Stretching tab. On this page, the Reference Note field indicates the root note.
You can change the Project Pitch at any point in a project via a Marker. Right-click on the timeline where you want to insert the marker, and select 'Insert Marker' from the context menu. Name the marker, if desired, then enter a new Project Pitch in the Groove Clip Pitch field (see screen, below centre).
 A Groove Clip Pitch marker is being inserted at the beginning of measure 17. The project pitch is C, so specifying a pitch value of C# will modulate Acidised files up a half-step, if they have 'Follow Project Pitch' enabled.A marker affects all loops that occur after the marker. However, it's also possible to transpose individual Acidised loops: double-click on the loop, then edit the Pitch field in the Loop Construction window. This can be edited whether 'Follow Project Pitch' is selected or not.
Final Thoughts
But isn't that a lot of editing, given that loops are supposed to make our lives easier? Well, yes. However, loops aren't designed to be music, they're designed to be components of music. How you put those components together is what creates the actual music — and in that respect, what you get out of it depends on what you put into it.


