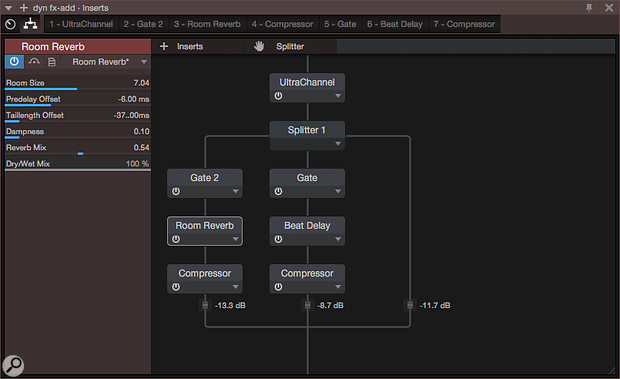
 Screen 1: A loose recreation of Tony Visconti’s famous ‘Heroes’ gated reverb. Set up as a send effect, all signals pass through the small Room Reverb, most signals pass through the gate and into the medium room in the middle leg, and only the loudest sounds go through the large reverb on the right.
Inspired by Tony Visconti’s famous gated room mic technique on 'Heroes', we look at how Studio One’s FX Chains can be used to set up complex dynamic effects.
Many people are familiar with producer Tony Visconti’s famous gated room mic technique, which gave the world the reverb sound heard on David Bowie’s ‘Heroes’ lead vocal. Visconti set up three mics at different distances from Bowie, then gated the two more distant mics such that Bowie’s voice only triggered the distant mics’ gates when he sang louder.
That was then. Now, you can just set up something like that right in Studio One, and that’s exactly what I’m going to do this month. Our virtual ‘Visconti machine’ substitutes digital reverb for the wonderful Hansa Studio acoustic reverb he had available, and involves three signal paths.
All signals go through the Room Reverb on the left, which is set to a tight ambience, basically just adding a bit of body and width. The middle signal path runs through a gate that does not open for soft sounds, and a reverb that is more or less a large room or small chamber size. The signal path on the right is set to only open the gate for loud signals, which then feed into a large cathedral reverb.
This kind of setup works well as a send effect on a vocal or solo that hits only one or two peak notes. If the large reverb in this version (for the loudest notes) were less extreme, one could get closer to Visconti’s ‘Heroes’ sound. (Alternatively, you can get closer still by buying Eventide’s T‑Verb plug‑in, which is designed as a one‑stop recreation of the ‘Heroes’ effect.)
In this example, I built the entire effect in the channel editor of a single FX channel, but it also could be built using three separate mixer channels, for greater control at the expense of more clutter. Studio One ‘hard‑wires’ bus and FX channels to the busses that feed them, so if you take this approach, you’ll need to have three sends on your source channel, rather than just one, as in my example.
There are a few high‑level issues to note at this point. First, I’m not going to lie to you: there are a lot of settings in this effect that need twiddling to get it to work smoothly. Some of that twiddling is for handling chatter right around the threshold. Setting gate thresholds is a sensitive business, and gate attack times may need to be lengthened to soften reverb entrances and exits. Likewise, reverb parameters, including reverb attack times and pre‑delays, must also be set appropriately for smooth entrances and exits.
In Screen 1 (above), two of the reverb outputs are compressed, something that tends to emphasise entrances and exits, but with the parameters set well, the transitions sound clean, resulting in a sound that has impact but nonetheless is smooth. (Of course, if you are actually looking for blatant and exaggerated entrance and exit sounds you should ignore all of these suggestions for smoothness!)
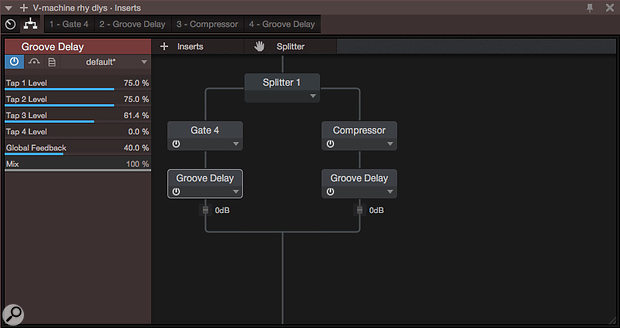
 Screen 2: A similar setup for delay.
More Is More
Once you have the basic structure figured out, it’s easy to think of other applications for this sort of multi‑effect setup. For instance, Studio One has no bundled plug‑in that makes simple, precise, stereo delay easy to accomplish. In fact, while there certainly are plug‑ins well‑suited for this fairly basic application, a surprising number are so oriented towards wilder effects that it takes a few workarounds to set up two simple delays for image widening. Instead, I just reached for the wonderful Eventide UltraChannel, which has not only a stereo delay section that is easy to set to short, sweet delays, but also a micro‑pitch shift section that excellently performs one of the original Harmonizer’s most popular tricks: widening mono signals.
 Screen 3: Eventide’s UltraChannel includes two good tools for widening mono signals. While the order in the signal chain of UltraChannel’s gate, two compressors, and EQ (none of which are shown here) is configurable, the Micro Pitch Shift and Stereo Delays sections always follow the other modules.
All signals pass through this initial stereo‑ising stage (remember that the whole chain is a send effect, to be summed back with the original). Medium to loud signals open the gate on the left leg that flows to a medium room reverb, heavy on the early reflections. Loud signals pass through the right leg as well, where they hit a rhythmic delay set to at least a quarter note of delay.
It only takes a few minutes of playing with either of these ‘Visconti machines’ to appreciate the impact of the signal dynamics on the success of the effect. Visconti’s idea worked so well on ‘Heroes’ because Bowie’s vocal started off pretty restrained and ended up, well, not so restrained. Signals that don’t have a lot of dynamics don’t work these effects in interesting ways, so think about feeding uncompressed signals to them and compressing elsewhere, if desired.
Less Is Less
Taking things a step further, can it work the other way around, so that louder signals end up with less processing than softer ones? Yes, it can. As before, though, you need to spend some time tweaking settings to get this to perform well. What we want to do is decrease effect gain as source signal gain increases. This is a job for ducking, and that is what you see in Screen 4.
 Screen 4: In this example the input signal is routed to the side‑chains of the compressors, so that processing gain decreases as source signal gain increases.
What you can’t see in Screen 4 is that the source signal is routed to the side‑chain inputs of both compressors, so that it triggers gain reduction. Very soft signals get reverb and delay, but the reverb falls off when the level rises above very soft. The delay hangs on until the signal is still louder and then finally gets its gain reduced. In case you’re wondering why the compressor is before the delay and reverb outputs and not after, I tried it both ways, and found that with the compressors after the effects, both effects were being fed by the source all the time, and the compressors were really just reducing the degree of chaos when both effects were going full steam. I was looking for something a bit less jarring than that, and putting the compressors before the effects produced a sound that was less responsive to the source signal, but had more seamless and musical transitions.
More Or Less
You can even take both approaches simultaneously, so that quiet passages trigger one effect and loud signals another. In Screen 5, the signal gets split to two Groove Delays set to different rhythms. One delay has a gate on its input, so its echo rhythm only appears with louder signals, while the other has a ducking compressor on its input, so that its rhythm recedes when the level goes up. This ends up feeling something like velocity switching between the two delay rhythms. Setting gate and compressor thresholds and attack and release times defines the amount and nature of overlap of the two rhythms. Even more interesting phrasing can be added using the filtering available on each of the taps of the Groove Delay to basically make each tap a distinctive tone.
 Screen 5: The two Groove Delays have different, interlocking rhythms. The gate and compressor thresholds are set so that both rhythms are heard most of the time, but one or the other drops out here and there.
Still looking for another option? Rather than setting the delay plug‑ins to complementary rhythms, one delay unit could be set longer and more open for quieter signals, with a tighter room reverb that kicks in on loud signals.
Dynamism
The idea of effects that respond to dynamic changes in the input signal has been around for a while, but few single products have fully exploited it. There are a lot of cool things you can do with these structures, but the down side is that they typically require some fine‑tuning in order to make them pay off. Fortunately, there are two particularly convincing reasons to build dynamic effects in Studio One. First, Studio One bundles some very good effects that provide plenty of interesting creative opportunities when used in this fashion, and second, an entire effects ecosystem can be built in a channel editor and saved as a single FX Chain, to be grabbed and modified the next time you want a dynamic effect. It’s really a pretty cool idea, so the next time you see Tony, don’t forget to thank him.


