With over 50 Studio SOS visits under our belt, we thought it was time to discuss some of the most common studio problems we've tackled.
Having now completed well over 50 Studio SOS visits, I thought this might be a good time to take a step back and consider some of the issues that we've encountered time after time in readers' studios. It really is quite simple to tackle many of the most common issues — or to recognise where there are insurmountable problems, so I really don't think we can ram home these points too much!
Of course, no two studios we've visited are the same, but one thing I have noticed is that the choice of equipment has only very rarely proved to be a major limiting factor when it comes to the quality of readers;' recordings and mixes. Much more often, the issues are about the speaker setup and acoustics, or how hardware and software is being used.
Your Room's Bass Response
 To minimise problems with bass in small and medium-sized rooms, make sure your speakers aim down the length of the room, pointing towards the listener's ears. In this picture, you can also see the 'mirror‑point' acoustic treatment that is used to absorb mid-range and high frequencies, resulting in better stereo imaging.
By far the most common issue we're asked about is how to 'sort out the bass' in a studio — and problems with the bass end often show up in candidates for our Mix Rescue series. So let's start there...
Where a studio is set up in a typical domestic room or converted garage, you'll generally get a much more even bass‑end response if your monitors face down the longest length of a rectangular room rather than across its width.
Small, square rooms (or worse still, cuboid ones) pose the biggest acoustical problems, especially if your listening position is close to the centre of the room: low frequencies tend to null out at that position, so you hear far less low end than your speakers are actually producing. The temptation is to EQ to compensate for the lack of bass and, consequently, you'll tend to produce very bass‑heavy mixes.
The reason why square and cube‑shaped rooms are so problematic is that all the peaks and troughs in the bass response (caused by reflections) occur at the same frequencies for each pair of parallel surfaces. In an ideal room, the lumps and bumps would be more evenly spaced. Proper bass trapping in a small square or cuboid room isn't really possible, as it would require more mass than you could realistically fit into the room!
 For accurate monitoring, the tweeters of your speakers should be pointing towards your ear, forming an equilateral triangle, rather than behind you!
The construction materials used in the room also play a part in its acoustics — solid brick or concrete walls reflect low-frequency energy back into the room, whereas plasterboard walls, lightweight doors and windows allow some low end to pass through, and they also absorb some sound energy through frictional losses. The more low‑frequency energy that's reflected back into the room, the more likely you are to experience problems at the bass end.
To see how your room behaves, try playing back a chromatic scale of sine‑wave bass notes (it's easy enough to create this using your DAW), and then check from your mixing position to see if some notes seem obviously louder or quieter than the notes either side. The more even they sound, the better. Sometimes making small changes to the monitor positions will help smooth out these problems.
Monitor Choice & Location
Something we see time and time again is people concluding that to hear the bass better, they need to use speakers with greater bass extension than a typical small nearfield monitor. Actually, in smaller rooms, where the low end is difficult to control, choosing large monitors with an extended low end — or systems that incorporate a separate subwoofer — will tend to make the problem worse.
It is also important to place the monitors in the correct place relative to the mixing position. Ideally, the speakers should be set up symmetrically to form an equilateral triangle with the listening position, and with the tweeters pointing at or just behind the engineer's head. There should be nothing in front of the monitors that can reflect the sound, including excessively large areas of empty desk, and where the monitors are not mounted on rigid stands, putting them on good isolation pads makes a big difference.
Phase The Music
 A cable tester is a cheap but useful tool that can help you identify phase problems caused by faulty or badly made cables — and can save you a lot more headaches besides!
Inevitably, we come across some systems where the monitor speakers are wired 'out‑of‑phase' — which means that one woofer is moving in while the other is moving out. This results in a loss of bass, a lack of focus in the sound‑stage, and an uncomfortable feeling that I imagine is rather like having your ears sucked out by a sink plunger! The cause is usually crossed‑over positive and negative cables in the case of passive monitors, or an incorrectly wired balanced cable in the case of active speakers.
Acoustics
Thorough acoustic treatment is a complex subject, as the aim (in a mixing and monitoring environment, at least) is to achieve a consistently low reverberation time across the whole audio spectrum, and dealing with the low-end problems described earlier requires bulky bass trapping that may not be practical, or even possible, in a small domestic studio room.
Our usual Studio SOS approach of using relatively thin acoustic foam tiles or mineral‑wool traps is only effective at mid-range and high frequencies, but it can still make a massive difference to a previously untreated room. With suitable treatment, you can expect to hear a generally better‑focused sound, with more pronounced left/right stereo imaging. The thicker the foam or mineral wool, the better it works lower down the audio spectrum, and leaving an air gap behind the absorber also improves its low‑mid performance to some extent. Mineral wool should always be covered with a breathable fabric, such as cotton, to prevent fibres escaping, while allowing sound to pass.
 Although we managed to get a decent result in this studio, our job was made much harder by the fact that it had been entirely carpeted. That's a cardinal sin of acoustics, as all it does is absorb at the high end, without tackling the rest of the frequency spectrum.
Panel absorbers are intended to control reflections — and the usual way to deploy panel absorbers is to use a mirror held against the walls, so that you can see a refection of the monitor speakers when seated in your usual mixing position: where you see a reflection is where you need an absorber.
In larger rooms, further absorbers on the side walls can help dry up the overall sound — but you shouldn't need to cover more than around 20 percent of the total surface area. In a small room, you'll probably end up with one panel just forward of either side of your listening position, maybe one on the ceiling above your knees, and one behind each speaker. If you have space, putting another between the speakers will help as well.
The rear wall, behind the listening position, often works best if used to diffuse (or, in layman's terms, scatter) rather than absorb sound. That's something that can easily be achieved using shelves of books, CDs or unused gear, and a studio couch usually helps too. If there's bare wall left at the back, think about hanging another absorber.
Thin materials, such as carpet, simply soak up all the top end, while leaving all the mid‑range and bass frequencies running riot, and that results in a claustrophobic, boxy sound. If you've committed the ultimate sin and carpeted all your walls (I never cease to be amazed by how many people do!), you can redeem yourself by sticking areas of reflective material on top of around 50 percent of it — any thin wood, MDF or plastic material will work, even old CDs. You can also put your foam or mineral‑wool absorbers on top.
Vocal Recording
 If you want a drier vocal recording, you need to tackle reflections both in front and behind. In this picture, Paul White is setting up a mic with a Reflexion Filter in front, and some acoustic foam behind — although a polyester duvet would serve just as well, if you need something a little more temporary.
Boxy‑sounding vocals are rarely down to having the wrong microphone or mic preamp, or any processing with EQ and compression. In our experience, the more likely cause is your recording environment.
While a good commercial acoustic screen, such as an SE Reflexion Filter, will reduce the amount of sound reaching the rear and sides of the mic, it's equally important to avoid reflections from the wall behind the singer — so a foam sheet, heavy 'moving' blankets or a thick polyester duvet (not a feather one, as all the feathers fall to the bottom!) hung behind the singer will make a huge difference.
A good ploy is to hang a duvet across one corner of the room, and then have the vocalist sing with their back to that corner. Add a Reflexion Filter behind the mic and you should actually get much cleaner results than you would from a small vocal booth, many of which sound boxy and confined.
Too Many Grounds
It's well known that certain wiring configurations can cause ground‑loop hum, but you can minimise the problem by running all your audio gear from a single power point, using a distribution strip to fan out to the various bits of gear in a 'star' configuration.
If you use balanced cables where your gear supports balanced wiring, in the event of a ground-loop hum problem you can disconnect the cable screen at one end to break the loop. Don't try to fix the problem by removing mains grounds, though, as this can be very dangerous in the event of a fault.
Ground loops can also affect the reliability of digital transmissions, even though the hum isn't audible. On one Studio SOS visit, we had a situation where the studio owner was using different power sockets around the room to power his system, and every time the house boiler kicked in, his audio interface dropped out! Moving to a star wiring system fed from one wall socket cured the problem. You may find that those occasional and otherwise inexplicable digital clicks and pops have the same cause.
Too Few Grounds
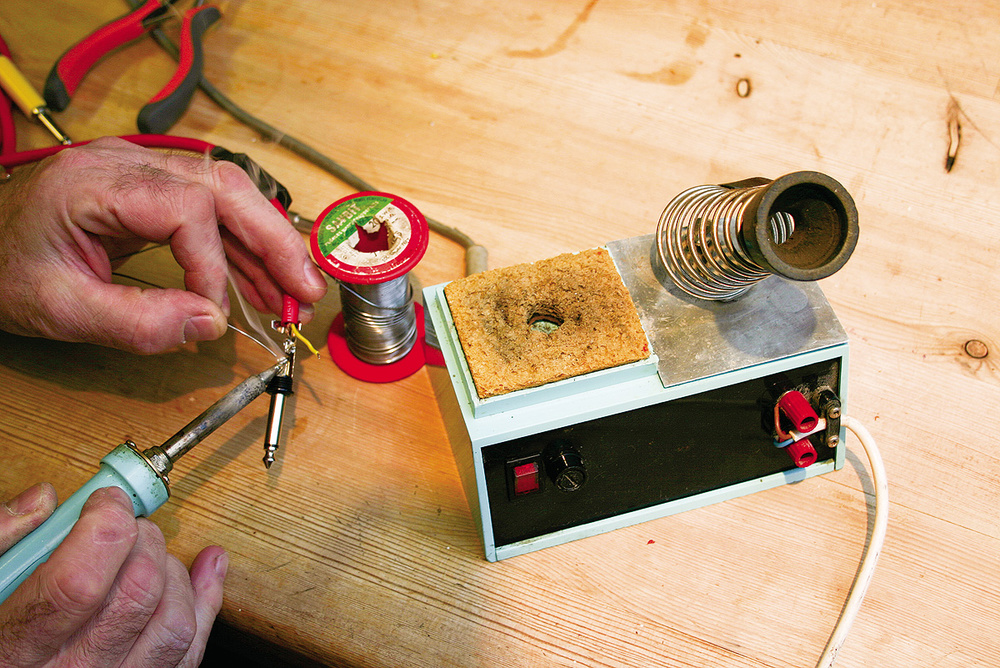
 Learning how to wield a soldering iron can save you time and money.
We've come across a couple of laptop‑based systems with severe hum problems caused by the system not being grounded at all. Electric guitar recording via a POD‑style preamp is likely to really show up this type of problem: if the laptop and its ancillary gear runs from power adaptors, the chances are that these will have no ground connection, so you could end up with a mix of components without a single ground connection between them.
The answer is to ground the metal chassis of one part of the system, such as the audio interface, or the metal case on a jack or XLR plug, to the electrical mains ground. You can do this using a mains plug with just a ground wire connected, but it is advisable to insulate the live and neutral terminals inside the plug so that the ground wire can't come into contact with these by accident, should the cable get pulled from the plug.
Ergonomics
Many Studio SOS visits involve moving gear around to make it easier to use. In today's studio, where you may need to have computer monitors, monitor speakers, hardware controllers and music keyboards close at hand, good planning is essential to avoid frustration.
Having a small music keyboard that slides out from under your desk for general programming makes sense, even if you have a full‑size keyboard off to one side for more serious playing. You might also find that one of the smaller hardware controllers that gives you hands‑on transport controls plus a single motorized fader is adequate for your needs. If you can find a music keyboard with an adequate controller section that works with your DAW, so much the better.
If you're using lots of analogue gear, it's also worth planning which cables you need, and what cable lengths are required. We've seen so many studios that are just swamped by unnecessary metres of cable running all over the floor — and that's not the nicest of environments to work in!
Muddy Mixes
We routinely listen to the readers' mixes when we visit their studio, and more often than not, 'difficult' mixes can be traced back to problems with the source material — often due to recordings made in an acoustically unsympathetic space, or failure to pay attention to mic positioning.
You may also find that some tracks in your mix have excessive low end that needs to be rolled off to keep things sounding clean. Even instruments that produce no deep bass, such as acoustic guitar and voice, can generate low‑frequency artifacts, and in the case of vocals, the lack of a pop shield (or the use of an ineffective one) can lead to air blasts producing very large amounts of low‑frequency energy, even when no audible popping is evident.
A plug‑in with a spectrum analyser display will help reveal this problem and a steep low‑cut filter (10 or 24dB/octave) usually takes care of it. However, if vocal popping is so serious that it becomes audible or causes clipping, it can be very difficult to correct, so re-doing the vocals with a good pop shield might be the easiest option.
Plug‑ins: Insert Or Send?
We've come across mixes with a CPU‑hungry reverb in almost every channel. Even with modern multi‑core machines, this can cause your CPU to trip up as the mix progresses. A more efficient way to work is to set up post‑fade (aux) sends for the reverbs you need. A typical mix may only need two or three different reverb types, and by setting these up on sends rather than channel inserts, you can reduce the number of reverb plug‑ins needed to three, and also blend them in any proportion on any channel.
Presets
 A good frequency analyser plug‑in, such as Schwa's Schope pictured here, can help you tell if there are unwanted frequencies muddying up your mix or recordings.
Nobody can be blamed for trying the presets that come with DAWs and third‑party plug‑ins, but some presets might not do anything without tweaks. We often encounter compressors that have been inserted on tracks but that are actually doing nothing at all — simply because the signal level never exceeds the preset's threshold! Although presets can be a useful way of finding the right type of compression, it's important to adjust the threshold while the track is actually playing, so that the gain‑reduction meter shows the required amount of activity.
Although your ears should always make the final decision, gain reduction of 3‑6dB on louder sections should be OK for most types of vocal and instrument recording. The same is true of limiters, gates, expanders, drum triggers — and any other processors that include a user‑defined threshold setting: the best setting will always depend on the signal level of the audio you're processing.
Soundproofing
 Plug‑in presets can be a great place to start... but if the signal doesn't rise above a compressor's threshold, it won't be doing any compression!
No discussion of our Studio SOS experiences would be complete without a word about soundproofing. People often don't understand the difference between soundproofing and acoustic treatment, so, here it is in short: acoustic treatment makes your room sound better, whereas soundproofing is designed to reduce sound leakage in and out of a space — and there's little or no overlap between the two.
When trying to reduce sound leakage, identify the weakest points first, such as doors and windows, because if they're not airtight, sound will leak through or around them easily. More mass equals more isolation, but you have to double mass to get a 3dB reduction in sound leakage — so a more common ploy is to use two boundaries with an air space between. Windows, for example, can be double‑glazed, doors can be doubled up, so that you have one on the outside of the wall and one on the inside, and walls can have an extra plasterboard 'skin' added, again with an air space between them. The wider the air gap, the better the low‑frequency isolation.
Floors and ceilings are more problematic, and while we've built simple floating floors using board resting on high‑density mineral wool, we've never yet tackled a ceiling. Often, it really is better to find a way of working that makes less noise in the first place — such as using headphones late at night, or either DI'ing guitars or miking low‑wattage amplifiers.
Finally, I'm sure that many of the issues covered here will be the same ones you've faced in your own studios, but there are always new problems to tackle — so do keep those Studio SOS requests coming in, especially if you think you have a problem that may be a little out of the ordinary!